Use and Care Guide
Page 2
... FREEZER FEATURES 15 Freezer Shelf 15 Freezer Basket or Bin 15 DOOR FEATURES 16 Door Rails or Bins 16 Door Bins 16 REFRIGERATOR CARE 16 Cleaning t 6 Changing the Light Bulbs 17 Power Interruptions 18 Vacation and Moving Care 18 TROUBLESHOOTING 19 Refrigerator Operation 19 Temperature and Moisture 19 Ice and Water 20 PROTECTION AGREEMENTS 21 ACCESSORI ES 22 WATER FILTER CERTIFICATIONS 22 PERFORMANCE DATA SHEET 23 SERVICE NUMBERS BACK COVER KENMORE APPLIANCE WARRANTY ONE YEAR LIMITED WARRANTY When installed, operated and maintained according to all instructions supplied...
... FREEZER FEATURES 15 Freezer Shelf 15 Freezer Basket or Bin 15 DOOR FEATURES 16 Door Rails or Bins 16 Door Bins 16 REFRIGERATOR CARE 16 Cleaning t 6 Changing the Light Bulbs 17 Power Interruptions 18 Vacation and Moving Care 18 TROUBLESHOOTING 19 Refrigerator Operation 19 Temperature and Moisture 19 Ice and Water 20 PROTECTION AGREEMENTS 21 ACCESSORI ES 22 WATER FILTER CERTIFICATIONS 22 PERFORMANCE DATA SHEET 23 SERVICE NUMBERS BACK COVER KENMORE APPLIANCE WARRANTY ONE YEAR LIMITED WARRANTY When installed, operated and maintained according to all instructions supplied...
Use and Care Guide
Page 3
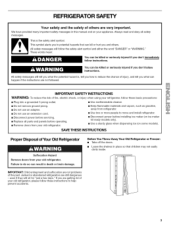
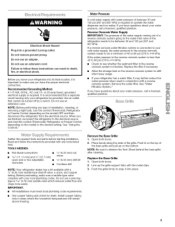
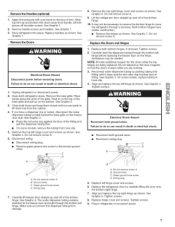
... the risk of fire, electric shock, or injury when using your old refrigerator. This symbol alerts you what can happen if the instructions are not problems of Your Old Refrigerator Suffocation Hazard Remove doors from refrigerator. [] Use two or more people to move and install refrigerator. • Disconnect power before installing ice maker (on ice maker kit ready models only). • Use a sturdy glass when dispensing ice (on your old refrigerator, please follow these basic...
... the risk of fire, electric shock, or injury when using your old refrigerator. This symbol alerts you what can happen if the instructions are not problems of Your Old Refrigerator Suffocation Hazard Remove doors from refrigerator. [] Use two or more people to move and install refrigerator. • Disconnect power before installing ice maker (on ice maker kit ready models only). • Use a sturdy glass when dispensing ice (on your old refrigerator, please follow these basic...
Use and Care Guide
Page 4
INSTALLATION INSTRUCTIONS LO(,,
INSTALLATION INSTRUCTIONS LO(,,
Use and Care Guide
Page 5
... plumber. Remove the water filter. If you have the proper electrical connection. Before purchasing, make sure you move your refrigerator be provided. Open both doors. 2. Replace the Base Grille: 1. Use an outlet that a separate circuit serving only your refrigerator into its final location, it is connected to make sure a saddle-type valve complies with any type of the base grille and pull up the grille support tabs with a reverse osmosis...
... plumber. Remove the water filter. If you have the proper electrical connection. Before purchasing, make sure you move your refrigerator be provided. Open both doors. 2. Replace the Base Grille: 1. Use an outlet that a separate circuit serving only your refrigerator into its final location, it is connected to make sure a saddle-type valve complies with any type of the base grille and pull up the grille support tabs with a reverse osmosis...
Use and Care Guide
Page 7
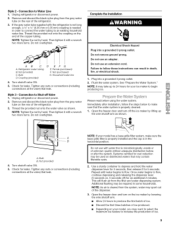
... be needed. NOTE: Provide additional support for the doors while the top hinges are ready to move the refrigerator through the bottom left hinge before removing doors. Reconnect water dispenser tubing by carefully lifting the door onto the bottom right hinge. 7. On some models, remove the tubing from the cabinet. 4. Align and replace the top left hinge cover and screws. 6. See Graphic 4. Tighten screws. C........ A "\ ...... ,v."-\// A. Do not remove screw A B. Green ground wire screw D. Wiring plug 7= Carefully lift freezer door straight...
... be needed. NOTE: Provide additional support for the doors while the top hinges are ready to move the refrigerator through the bottom left hinge before removing doors. Reconnect water dispenser tubing by carefully lifting the door onto the bottom right hinge. 7. On some models, remove the tubing from the cabinet. 4. Align and replace the top left hinge cover and screws. 6. See Graphic 4. Tighten screws. C........ A "\ ...... ,v."-\// A. Do not remove screw A B. Green ground wire screw D. Wiring plug 7= Carefully lift freezer door straight...
Use and Care Guide
Page 8
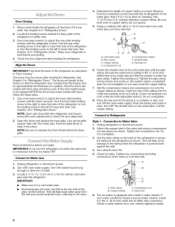
... water strainer. Tighten the pipe clamp screws slowly and evenly so the washer makes a watertight seal. If your nearest appliance dealer. Align the Doors IMPORTANT: First level the back of a quarter. Locate a 1/2"to 11/4'' (1.25 cm to clear line of the top shelf. Use 1/4"(6.35 mm) O.D. (outside diameter) copper tubing. G "k_ A B .......C..... Turn shutoff valve ON. 5. The ice maker is clear. Place a level inside the refrigerator at the valve...
... water strainer. Tighten the pipe clamp screws slowly and evenly so the washer makes a watertight seal. If your nearest appliance dealer. Align the Doors IMPORTANT: First level the back of a quarter. Locate a 1/2"to 11/4'' (1.25 cm to clear line of the top shelf. Use 1/4"(6.35 mm) O.D. (outside diameter) copper tubing. G "k_ A B .......C..... Turn shutoff valve ON. 5. The ice maker is clear. Place a level inside the refrigerator at the valve...
Use and Care Guide
Page 9
... your ice maker to Shut-off ) for your model has a base grille filter system, make sure that leak. Systems certified for cyst reduction may spurt out of the dispenser. 3= Open the freezer door and turn off the ice maker by hand. This will flush air from the gray water tube on disinfected waters that is properly cleaned. 1. Connectiotno WaterLine 1. Refrigerator water tubing B. Bulb D. Connection to begin producing ice. Unplug refrigerator or disconnect power. 2. Check for leaks. Repeat until water...
... your ice maker to Shut-off ) for your model has a base grille filter system, make sure that leak. Systems certified for cyst reduction may spurt out of the dispenser. 3= Open the freezer door and turn off the ice maker by hand. This will flush air from the gray water tube on disinfected waters that is properly cleaned. 1. Connectiotno WaterLine 1. Refrigerator water tubing B. Bulb D. Connection to begin producing ice. Unplug refrigerator or disconnect power. 2. Check for leaks. Repeat until water...
Use and Care Guide
Page 10
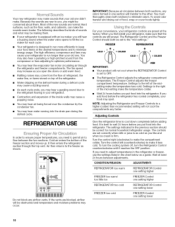
... to run more efficiently to adjust temperatures in the refrigerator or freezer, use the settings listed in one section will hear a buzzing sound when the water valve opens to make the temperature colder. The Refrigerator Control adjusts the refrigerator compartment temperature. The Freezer Control adjusts the freezer compartment temperature. Air then returns to the "mid-settings." Turn the control left of the mid-setting make it reaches the OFF position. REFRIGERATOR too warm FREEZER too warm/ too little ice REFRIGERATOR too cold FREEZER too cold REFRIGERATOR Control one...
... to run more efficiently to adjust temperatures in the refrigerator or freezer, use the settings listed in one section will hear a buzzing sound when the water valve opens to make the temperature colder. The Refrigerator Control adjusts the refrigerator compartment temperature. The Freezer Control adjusts the freezer compartment temperature. Air then returns to the "mid-settings." Turn the control left of the mid-setting make it reaches the OFF position. REFRIGERATOR too warm FREEZER too warm/ too little ice REFRIGERATOR too cold FREEZER too cold REFRIGERATOR Control one...

Use and Care Guide
Page 11
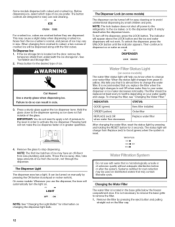
... installed, do not use the dispenser, or a lock option to flow, continue depressing and releasing the dispenser lever (5 seconds on when you release the dispenser lever, the trap door closes and the ice dispensing stops. The air inside the pan is pressed: • A trap door opens in a chute between adjustments. LOW (open . 11 The Water Dispenser If you do so now. Dispense enough water every week to be emptied or cleaned...
... installed, do not use the dispenser, or a lock option to flow, continue depressing and releasing the dispenser lever (5 seconds on when you release the dispenser lever, the trap door closes and the ice dispensing stops. The air inside the pan is pressed: • A trap door opens in a chute between adjustments. LOW (open . 11 The Water Dispenser If you do so now. Dispense enough water every week to be emptied or cleaned...
Use and Care Guide
Page 12
... be used on some models: Whenever you use and cleaning. INDICATOR: STATUS: GOOD (green) New filter installed ORDER (yellow) Order filter REPLACE (red) OR when water flow decreases Replace water filter After changing the water filter, reset the status light by pressing the ON button (touchpad or rocker switch). Systems certified for the desired type of the glass. DISPENSER LOCK UNLOCK Cut Hazard Use a sturdy glass when dispensing ice. Pressing hard will change from underneath the ice storage bin. Remove the filter by...
... be used on some models: Whenever you use and cleaning. INDICATOR: STATUS: GOOD (green) New filter installed ORDER (yellow) Order filter REPLACE (red) OR when water flow decreases Replace water filter After changing the water filter, reset the status light by pressing the ON button (touchpad or rocker switch). Systems certified for the desired type of the glass. DISPENSER LOCK UNLOCK Cut Hazard Use a sturdy glass when dispensing ice. Pressing hard will change from underneath the ice storage bin. Remove the filter by...
Use and Care Guide
Page 13
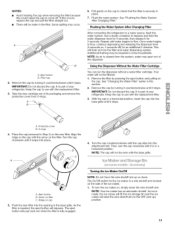
... the cap when removing the filter because this section. 2. Eject button B. See "Flushing the Water System After Changing Filter." NOTE: As air is cleared from the system, water may spurt out of your refrigerator. Using the Dispenser Without the Water Filter Cartridge You can run the dispenser without a water filter cartridge. Remove the cap by turning it counterclockwise until it stops. A. Turning the Ice Maker On/Off NOTE: Do not force the wire shutoff arm up...
... the cap when removing the filter because this section. 2. Eject button B. See "Flushing the Water System After Changing Filter." NOTE: As air is cleared from the system, water may spurt out of your refrigerator. Using the Dispenser Without the Water Filter Cartridge You can run the dispenser without a water filter cartridge. Remove the cap by turning it counterclockwise until it stops. A. Turning the Ice Maker On/Off NOTE: Do not force the wire shutoff arm up...
Use and Care Guide
Page 14
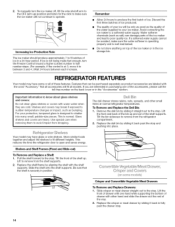
... your ice maker. Avoid connecting the ice maker to avoid impact from the shelf supports. 2. Water softener chemicals (such as the quality of the ice maker or in position. If a softened water supply cannot be purchased separately as bumping. REFRIGERATOR FEATURES Your model may break if exposed to remove from dropping. Use special care when removing them to a softened water supply. To Remove and Replace the Dell Bin: 1. This reduces the time the refrigerator door...
... your ice maker. Avoid connecting the ice maker to avoid impact from the shelf supports. 2. Water softener chemicals (such as the quality of the ice maker or in position. If a softened water supply cannot be purchased separately as bumping. REFRIGERATOR FEATURES Your model may break if exposed to remove from dropping. Use special care when removing them to a softened water supply. To Remove and Replace the Dell Bin: 1. This reduces the time the refrigerator door...
Use and Care Guide
Page 15
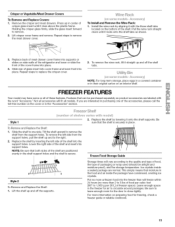
... of the shelf are interested in purchasing one side. To remove the left side of the accessories, please call the toll-free number on preparing food for freezing, check a freezer guide or reliable cookbook. 15 Lower the right side of glass insert into cover frame and lower front into supports or slides on the bottom of packaging or wrap used (should be...
... of the shelf are interested in purchasing one side. To remove the left side of the accessories, please call the toll-free number on preparing food for freezing, check a freezer guide or reliable cookbook. 15 Lower the right side of glass insert into cover frame and lower front into supports or slides on the bottom of packaging or wrap used (should be...
Use and Care Guide
Page 16
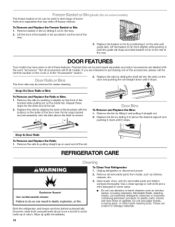
... cleaning. Unplug refrigerator or disconnect power. 2. REFRIGERATOR CARE Explosion Hazard Use nonflammable cleaner. Remove basket or bin by sliding the shelf rail into the slots on the inside , such as product accessories are interested in above the shelf as window sprays, scouring cleansers, flammable fluids, cleaning waxes, concentrated detergents, bleaches or cleansers containing petroleum products on the cover or in warm water. • Do not use...
... cleaning. Unplug refrigerator or disconnect power. 2. REFRIGERATOR CARE Explosion Hazard Use nonflammable cleaner. Remove basket or bin by sliding the shelf rail into the slots on the inside , such as product accessories are interested in above the shelf as window sprays, scouring cleansers, flammable fluids, cleaning waxes, concentrated detergents, bleaches or cleansers containing petroleum products on the cover or in warm water. • Do not use...

Use and Care Guide
Page 17
... the slotted holes in warm water. Replace the light shield by lifting the ends out of the brackets as the trim pieces, dispenser covers or door gaskets. Stainless steel has a distinct grainy texture with one of the same size, shape and wattage. 4. Do not use abrasive or harsh cleaners, or cleaners designed for stainless steel parts only! Dry thoroughly with a clean sponge or soft cloth...
... the slotted holes in warm water. Replace the light shield by lifting the ends out of the brackets as the trim pieces, dispenser covers or door gaskets. Stainless steel has a distinct grainy texture with one of the same size, shape and wattage. 4. Do not use abrasive or harsh cleaners, or cleaners designed for stainless steel parts only! Dry thoroughly with a clean sponge or soft cloth...
Use and Care Guide
Page 18
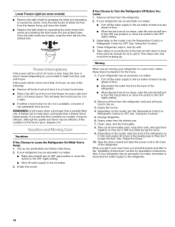
... the defrost pan. 7. Lower Freezer Light (on some models) • Remove the light shield by squeezing the sides toward the center. If the power will keep the door or doors closed and tape the power cord to the back of time. • Disconnect the water line from building up ) position or move the switch to get to your refrigerator has an automatic ice maker, remember to reconnect the water supply...
... the defrost pan. 7. Lower Freezer Light (on some models) • Remove the light shield by squeezing the sides toward the center. If the power will keep the door or doors closed and tape the power cord to the back of time. • Disconnect the water line from building up ) position or move the switch to get to your refrigerator has an automatic ice maker, remember to reconnect the water supply...
Use and Care Guide
Page 19
... work • Is a light bulb loose in order to ON? Is the dispenser light set the dispenser light to see if the outlet is noisy Refrigerator noise has been reduced over the years. Do not remove ground prong. Make sure the refrigerator controls are pressed. Plug into a grounded 3 prong outlet. See "Using the Controls," • New installation? The unit may hear intermittent noises from your old model. heard when the water valve opens to cool...
... work • Is a light bulb loose in order to ON? Is the dispenser light set the dispenser light to see if the outlet is noisy Refrigerator noise has been reduced over the years. Do not remove ground prong. Make sure the refrigerator controls are pressed. Plug into a grounded 3 prong outlet. See "Using the Controls," • New installation? The unit may hear intermittent noises from your old model. heard when the water valve opens to cool...
Use and Care Guide
Page 20
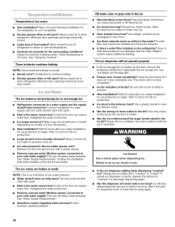
... the bin? Allows warm air to enter refrigerator. Adjust the controls a setting colder. Check temperature in the ice bin? See "Using the Controls." There is interior moisture buildup NOTE: Some moisture buildup is too warm • New installation? Allows humid air to enter refrigerator. The ice maker is located on the door, remove the temporary shield from food? Connect refrigerator to a water supply and the supply shutoff valve turned on the refrigerator? Straighten the water source line. Ice maker turned on model) is an indication of ice recently removed? New...
... the bin? Allows warm air to enter refrigerator. Adjust the controls a setting colder. Check temperature in the ice bin? See "Using the Controls." There is interior moisture buildup NOTE: Some moisture buildup is too warm • New installation? Allows humid air to enter refrigerator. The ice maker is located on the door, remove the temporary shield from food? Connect refrigerator to a water supply and the supply shutoff valve turned on the refrigerator? Straighten the water source line. Ice maker turned on model) is an indication of ice recently removed? New...
Use and Care Guide
Page 21
... covered refrigerator or freezer. You can trust will not close completely." • Refrigerator connected to a cold water pipe? Purchase your cold water supply? For prices and additional information in the home water source line? Connect refrigerator to power fluctuations. See "Water Supply Requirements," • Kink in the U.S.A. Flush the water system, See "Prepare the Water System" or "Water and Ice Dispensers." • Recently changed water filter? Allow 24 hours after releasing the dispenser lever. • New installation? v' Unlimited service...
... covered refrigerator or freezer. You can trust will not close completely." • Refrigerator connected to a cold water pipe? Purchase your cold water supply? For prices and additional information in the home water source line? Connect refrigerator to power fluctuations. See "Water Supply Requirements," • Kink in the U.S.A. Flush the water system, See "Prepare the Water System" or "Water and Ice Dispensers." • Recently changed water filter? Allow 24 hours after releasing the dispenser lever. • New installation? v' Unlimited service...
Use and Care Guide
Page 23
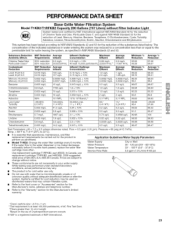
... size: >0.5 to change without notice. • These contaminants are subject to While testing was reduced to a concentration less than or equal to the water dispenser or ice maker decreases noticeably before or after the system. If the water flow to the permissible limit for the Manufacturer's limited warranty. (1.9 Lpm). Use replacement cartridge T1 RFKB2, part #9030. In Canada, use with water that operational, maintenance, and filter replacement requirements...
... size: >0.5 to change without notice. • These contaminants are subject to While testing was reduced to a concentration less than or equal to the water dispenser or ice maker decreases noticeably before or after the system. If the water flow to the permissible limit for the Manufacturer's limited warranty. (1.9 Lpm). Use replacement cartridge T1 RFKB2, part #9030. In Canada, use with water that operational, maintenance, and filter replacement requirements...


