
Use and Care Guide
Page 2
...-out Freezer Door Bin 16 Chilled Door Bin 16 Door Rails or Bins 16 Door Bins 17 Tilt-out Fruit Bin 17 REFRIGERATOR CARE 18 Cleaning 18 Changing the Light Bulbs 18 Power Interruptions 19 Vacation and Moving Care 19 TROUBLESHOOTING 20 Refrigerator Operation 20 Temperature and Moisture 21 Ice and Water 21 PROTECTION AGREEMENTS 22 ACCESSORIES 23 WATER FILTER CERTIFICATIONS 23 PERFORMANCE DATA SHEET 24 SERVICE NUMBERS BACK COVER KENMORE APPLIANCE WARRANTY ONE YEAR LIMITED WARRANTY When installed, operated and maintained according to all instructions supplied...
...-out Freezer Door Bin 16 Chilled Door Bin 16 Door Rails or Bins 16 Door Bins 17 Tilt-out Fruit Bin 17 REFRIGERATOR CARE 18 Cleaning 18 Changing the Light Bulbs 18 Power Interruptions 19 Vacation and Moving Care 19 TROUBLESHOOTING 20 Refrigerator Operation 20 Temperature and Moisture 21 Ice and Water 21 PROTECTION AGREEMENTS 22 ACCESSORIES 23 WATER FILTER CERTIFICATIONS 23 PERFORMANCE DATA SHEET 24 SERVICE NUMBERS BACK COVER KENMORE APPLIANCE WARRANTY ONE YEAR LIMITED WARRANTY When installed, operated and maintained according to all instructions supplied...
Use and Care Guide
Page 3
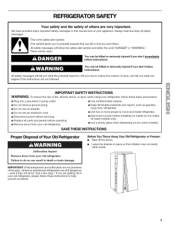
... kill or hurt you what can happen if the instructions are very important. Junked or abandoned refrigerators are not problems of fire, electric shock, or injury when using your refrigerator, follow instructions. Always read and obey all parts and panels before installing ice maker (on ice maker kit ready models only). • Use a sturdy glass when dispensing ice (on your old refrigerator. All safety messages will tell you and others are...
... kill or hurt you what can happen if the instructions are very important. Junked or abandoned refrigerators are not problems of fire, electric shock, or injury when using your refrigerator, follow instructions. Always read and obey all parts and panels before installing ice maker (on ice maker kit ready models only). • Use a sturdy glass when dispensing ice (on your old refrigerator. All safety messages will tell you and others are...
Use and Care Guide
Page 4
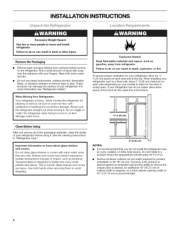
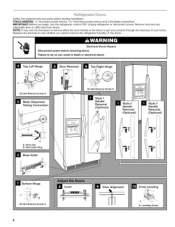
INSTALLATION INSTRUCTIONS t t_,_ ¸_,I,_
INSTALLATION INSTRUCTIONS t t_,_ ¸_,I,_
Use and Care Guide
Page 5
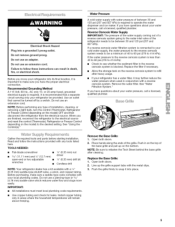
... the refrigerator to the electrical source and reset the control (Thermostat, Refrigerator or Freezer Control depending on the reverse osmosis system to be turned off by a switch. Do not use an extension cord. Install copper tubing only in on the top of the base grille and pull up the grille support tabs with water pressure of installation, cleaning, or removing a light bulb, turn the control (Thermostat, Refrigerator or Freezer Control depending on the bottom. Open both doors. 2. TOOLS NEEDED: •...
... the refrigerator to the electrical source and reset the control (Thermostat, Refrigerator or Freezer Control depending on the reverse osmosis system to be turned off by a switch. Do not use an extension cord. Install copper tubing only in on the top of the base grille and pull up the grille support tabs with water pressure of installation, cleaning, or removing a light bulb, turn the control (Thermostat, Refrigerator or Freezer Control depending on the bottom. Open both doors. 2. TOOLS NEEDED: •...
Use and Care Guide
Page 6
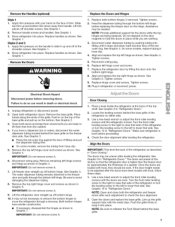
... Base Grille Bottom Hinge Do Not Remove Screw A 6 Level Door Alignment Front Leveling A. Remove food and any adjustable door or utility bins from doors. Electrical Shock Hazard Disconnect power before starting installation. IMPORTANT: Before you need to remove the refrigerator handles or the doors. Failure to get your product through the doorway of your home. Measure the doorway to see whether you begin, turn the refrigerator control OFF.Unplug refrigerator or disconnect power. Leveling Screw
... Base Grille Bottom Hinge Do Not Remove Screw A 6 Level Door Alignment Front Leveling A. Remove food and any adjustable door or utility bins from doors. Electrical Shock Hazard Disconnect power before starting installation. IMPORTANT: Before you need to remove the refrigerator handles or the doors. Failure to get your product through the doorway of your home. Measure the doorway to see whether you begin, turn the refrigerator control OFF.Unplug refrigerator or disconnect power. Leveling Screw
Use and Care Guide
Page 7
... left to adjust the front roller leveling screws until the refrigerator is level. Turn the front roller leveling screw to the right to be needed. Lift trim pieces off bottom hinge. 10. Styles 2 and 3 1. Replace both refrigerator doors. NOTE: Provide additional support for the doors while the top hinges are even. On some models, remove the tubing from the cabinet. 4. Tighten screws. 5. Replace hinge cover and screws. See Graphic 4. Disconnect wiring plug. Lift freezer door...
... left to adjust the front roller leveling screws until the refrigerator is level. Turn the front roller leveling screw to the right to be needed. Lift trim pieces off bottom hinge. 10. Styles 2 and 3 1. Replace both refrigerator doors. NOTE: Provide additional support for the doors while the top hinges are even. On some models, remove the tubing from the cabinet. 4. Tighten screws. 5. Replace hinge cover and screws. See Graphic 4. Disconnect wiring plug. Lift freezer door...
Use and Care Guide
Page 8
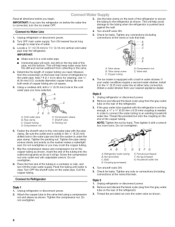
... it with the pipe clamp. Remove and discard the black nylon plug from the gray water tube on the copper tubing as shown. Locate a 1/2" (12.70 mm) to Refrigerator Style 1 1. Cold water pipe B. Attach the copper tube to the valve inlet using a compression nut and sleeve as shown. 8 A _)1 ..........D............ Read all directions before the water line is connected, turn the ice maker OFR Connect to the refrigerator as shown. Turn OFF main water supply.
... it with the pipe clamp. Remove and discard the black nylon plug from the gray water tube on the copper tubing as shown. Locate a 1/2" (12.70 mm) to Refrigerator Style 1 1. Cold water pipe B. Attach the copper tube to the valve inlet using a compression nut and sleeve as shown. 8 A _)1 ..........D............ Read all directions before the water line is connected, turn the ice maker OFR Connect to the refrigerator as shown. Turn OFF main water supply.
Use and Care Guide
Page 9
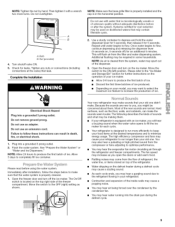
... to run longer than your food items at the valve) that may contain filterable cysts. 2. Use a sturdy container to increase the production of the dispenser. 3. This will hear a buzzing sound when the water valve opens to fill the ice maker for an additional 5 minutes. Open the freezer door and turn on the top right side of ice. The high efficiency compressor and fans may spurt out of ice. Bulb...
... to run longer than your food items at the valve) that may contain filterable cysts. 2. Use a sturdy container to increase the production of the dispenser. 3. This will hear a buzzing sound when the water valve opens to fill the ice maker for an additional 5 minutes. Open the freezer door and turn on the top right side of ice. The high efficiency compressor and fans may spurt out of ice. Bulb...
Use and Care Guide
Page 10
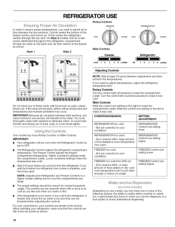
... odors formed in the refrigerator or freezer, first check the air vents to make the temperature less cold. • Wait 24 hours before you may occur. When installing your controls are still at the set correctly when milk or juice is as cold as shown. Turn the control left to avoid unintentional dispensing. 10 CONDITION/REASON: SETTING ADJUSTMENT: REFRIGERATOR too cold - Lower numbered settings make it less cold. Cold air enters the bottom of...
... odors formed in the refrigerator or freezer, first check the air vents to make the temperature less cold. • Wait 24 hours before you may occur. When installing your controls are still at the set correctly when milk or juice is as cold as shown. Turn the control left to avoid unintentional dispensing. 10 CONDITION/REASON: SETTING ADJUSTMENT: REFRIGERATOR too cold - Lower numbered settings make it less cold. Cold air enters the bottom of...

Use and Care Guide
Page 11
... power to the refrigerator, to the ice maker, or to cool down and chill water. NOTE: Water may have an off -flavor from the filter and water dispensing system. Before dispensing ice, select which type of ice. Throw the ice away. It simply deactivates the dispenser levers. The indicator will appear above the LOCK button and the ice and water dispensers will flush air from new plumbing and parts. DISPENSER LOCK UNLOCK 11 Press a sturdy glass...
... power to the refrigerator, to the ice maker, or to cool down and chill water. NOTE: Water may have an off -flavor from the filter and water dispensing system. Before dispensing ice, select which type of ice. Throw the ice away. It simply deactivates the dispenser levers. The indicator will appear above the LOCK button and the ice and water dispensers will flush air from new plumbing and parts. DISPENSER LOCK UNLOCK 11 Press a sturdy glass...
Use and Care Guide
Page 12
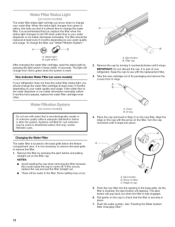
... the filter. A. Cover B. Turn the cap clockwise until it snaps into the opening in the base grille. It is reset. NOTES: Avoid twisting the cap when removing the filter because this could cause the cap to change the water filter. Eject button B. Push the new filter into place. Pull gently on the cap with the replacement filter. 3. Status light B. If the water flow to the water dispenser or ice maker decreases...
... the filter. A. Cover B. Turn the cap clockwise until it snaps into the opening in the base grille. It is reset. NOTES: Avoid twisting the cap when removing the filter because this could cause the cap to change the water filter. Eject button B. Push the new filter into place. Pull gently on the cap with the replacement filter. 3. Status light B. If the water flow to the water dispenser or ice maker decreases...
Use and Care Guide
Page 13
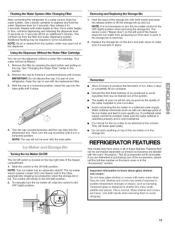
... for 5 seconds. REFRIGERATOR FEATURES Your model may break if exposed to sudden temperature changes or impact, such as salt) can damage parts of your ice maker. • Avoid connecting the ice maker to a water source, flush the water system. Tempered glass is in the storage bin. The ice maker sensor passes a beam from the filter and water dispensing system. Shelves and covers may have some households. Using the Dispenser Without the Water Filter Cartridge You can...
... for 5 seconds. REFRIGERATOR FEATURES Your model may break if exposed to sudden temperature changes or impact, such as salt) can damage parts of your ice maker. • Avoid connecting the ice maker to a water source, flush the water system. Tempered glass is in the storage bin. The ice maker sensor passes a beam from the filter and water dispensing system. Shelves and covers may have some households. Using the Dispenser Without the Water Filter Cartridge You can...
Use and Care Guide
Page 14
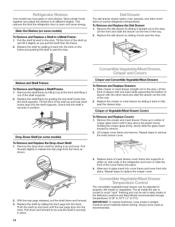
... remove. 2. To Remove and Replace the Deli Drawer: 1. Replace the deli drawer by sliding it back past the stop . Holding the crisper glass firmly, slowly slide the glass insert forward to remove the meat drawer cover. 3. With the rear pegs released, pull the shelf down shelf by guiding the rear shelf hooks into the track. The air inside the pan is open and saves energy. Replace the shelf by sliding the front pegs into the shelf supports...
... remove. 2. To Remove and Replace the Deli Drawer: 1. Replace the deli drawer by sliding it back past the stop . Holding the crisper glass firmly, slowly slide the glass insert forward to remove the meat drawer cover. 3. With the rear pegs released, pull the shelf down shelf by guiding the rear shelf hooks into the track. The air inside the pan is open and saves energy. Replace the shelf by sliding the front pegs into the shelf supports...
Use and Care Guide
Page 15
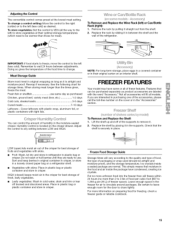
... e _i}Jnsome modes ,_A4scesso_i To Remove and Replace the Wine Rack (left (less cold) as product accessories are interested in purchasing one of the accessories, please call the toll-free number on a refrigerator shelf. • Vegetables with the word "Accessory." Fresh fish or shellfish use . You can be purchased separately as desired. FREEZER FEATURES Your model may have condensed, creating ice crystals. Not...
... e _i}Jnsome modes ,_A4scesso_i To Remove and Replace the Wine Rack (left (less cold) as product accessories are interested in purchasing one of the accessories, please call the toll-free number on a refrigerator shelf. • Vegetables with the word "Accessory." Fresh fish or shellfish use . You can be purchased separately as desired. FREEZER FEATURES Your model may have condensed, creating ice crystals. Not...
Use and Care Guide
Page 19
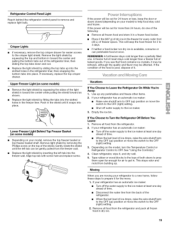
... meat stays cold longer than a freezer full of ice drops, raise the wire shutoff arm to the OFF (up ) position or move the switch to OFR See "Using the Control(s)." 4. Empty the ice bin. Clean refrigerator, wipe it snaps into the freezer wall. If your model) to the crisper light shield. Upper Freezer Light (on your refrigerator has an automatic ice maker: • Turn off the water supply to the OFF (right) setting. 2. Gently...
... meat stays cold longer than a freezer full of ice drops, raise the wire shutoff arm to the OFF (up ) position or move the switch to OFR See "Using the Control(s)." 4. Empty the ice bin. Clean refrigerator, wipe it snaps into the freezer wall. If your model) to the crisper light shield. Upper Freezer Light (on your refrigerator has an automatic ice maker: • Turn off the water supply to the OFF (right) setting. 2. Gently...
Use and Care Guide
Page 20
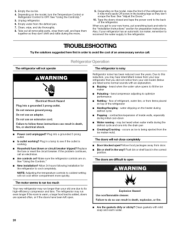
... of an unnecessary service call an electrician. Do not use an adapter. Plug into the drain pan • Creaking/Cracking ice maker mold. - NOTE: Adjusting the temperature controls to avoid the cost of the refrigerator. Due to fill the ice maker • Pulsating- heard when the water valve opens to this reduction, you may run longer than your old model. occurs as ice is added, doors are listed some normal sounds...
... of an unnecessary service call an electrician. Do not use an adapter. Plug into the drain pan • Creaking/Cracking ice maker mold. - NOTE: Adjusting the temperature controls to avoid the cost of the refrigerator. Due to fill the ice maker • Pulsating- heard when the water valve opens to this reduction, you may run longer than your old model. occurs as ice is added, doors are listed some normal sounds...
Use and Care Guide
Page 21
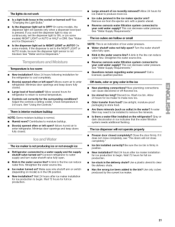
...." • Ice bin installed correctly? Be sure the ice bin is too warm • New installation? Use only cubes produced by the current ice maker. 21 See "Water and Ice Dispensers." Minimize door openings and keep doors fully closed completely? Allow several hours for refrigerator to return to normal temperature. • Controls set to the NIGHT LIGHT or AUTO mode, be installed to your cold water supply? Straighten the water source line. • Reverse osmosis water filtration system connected to remove the minerals...
...." • Ice bin installed correctly? Be sure the ice bin is too warm • New installation? Use only cubes produced by the current ice maker. 21 See "Water and Ice Dispensers." Minimize door openings and keep doors fully closed completely? Allow several hours for refrigerator to return to normal temperature. • Controls set to the NIGHT LIGHT or AUTO mode, be installed to your cold water supply? Straighten the water source line. • Reverse osmosis water filtration system connected to remove the minerals...
Use and Care Guide
Page 22
... the ice bin? Cut Hazard Use a sturdy glass when dispensing ice. If cubed ice dispenses correctly, depress the button for 2 to a water supply and the supply shutoff valve turned on your new product. Flush and fill the water system. • Water filter installed on making a smart purchase. Hold the glass under the dispenser long enough? replacement of water after releasing the dispenser lever/pad. • New installation? Change the ice button from the dispenser NOTE: One or two drops of your cold water supply...
... the ice bin? Cut Hazard Use a sturdy glass when dispensing ice. If cubed ice dispenses correctly, depress the button for 2 to a water supply and the supply shutoff valve turned on your new product. Flush and fill the water system. • Water filter installed on making a smart purchase. Hold the glass under the dispenser long enough? replacement of water after releasing the dispenser lever/pad. • New installation? Change the ice button from the dispenser NOTE: One or two drops of your cold water supply...
Use and Care Guide
Page 23
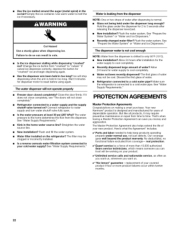
... Installation Service For Sears professional installation of us as a "talking owner's manual." Fast help by phone - Annual Preventive Maintenance Check at 1-800-361-6665. You can 't be fixed. Once you to power fluctuations. $250 Food Loss Protection annually for any covered refrigerator or freezer. Or, a prorated refund anytime after the product warranty period expires. Power surge protection against electrical damage due to schedule service...
... Installation Service For Sears professional installation of us as a "talking owner's manual." Fast help by phone - Annual Preventive Maintenance Check at 1-800-361-6665. You can 't be fixed. Once you to power fluctuations. $250 Food Loss Protection annually for any covered refrigerator or freezer. Or, a prorated refund anytime after the product warranty period expires. Power surge protection against electrical damage due to schedule service...
Use and Care Guide
Page 24
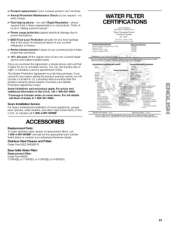
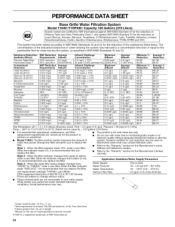
....7 kPa). When the water filter status display changes from green to yellow, address and telephone number. • Refer to replace the filter. • The product is for cold water use only. • Do not use with water that is recommended that may vary. *Class I particle size: >0.5 to the "Warranty" section for the Manufacturer's name, Style 1 - The concentration of the indicated substances in your water supply. Rated service capacity = 100...
....7 kPa). When the water filter status display changes from green to yellow, address and telephone number. • Refer to replace the filter. • The product is for cold water use only. • Do not use with water that is recommended that may vary. *Class I particle size: >0.5 to the "Warranty" section for the Manufacturer's name, Style 1 - The concentration of the indicated substances in your water supply. Rated service capacity = 100...


