
Use and Care Guide
Page 2
... Using the Controls 11 Water and Ice Dispensers 12 Water Filter Status Light 15 Water Filtration System 15 Ice Maker and Storage Bin 16 REFRIGERATOR FEATURES 17 Refrigerator Shelves 17 Deli Drawer 17 Convertible Vegetable/Meat Drawer, Crisper and Covers ....... 18 Convertible Vegetable/Meat Drawer Temperature Control ...... 18 Crisper Humidity...Tilt-out Freezer Door Bin 19 Chilled Door Bin 19 Door Rails or Bins 20 Door Bins 20 Tilt-out Fruit Bin 20 REFRIGERATOR CARE 21 Cleaning 21 Changing the Light Bulbs 21 Power Interruptions 22 Vacation and Moving Care 22 TROUBLESHOOTING 23...
... Using the Controls 11 Water and Ice Dispensers 12 Water Filter Status Light 15 Water Filtration System 15 Ice Maker and Storage Bin 16 REFRIGERATOR FEATURES 17 Refrigerator Shelves 17 Deli Drawer 17 Convertible Vegetable/Meat Drawer, Crisper and Covers ....... 18 Convertible Vegetable/Meat Drawer Temperature Control ...... 18 Crisper Humidity...Tilt-out Freezer Door Bin 19 Chilled Door Bin 19 Door Rails or Bins 20 Door Bins 20 Tilt-out Fruit Bin 20 REFRIGERATOR CARE 21 Cleaning 21 Changing the Light Bulbs 21 Power Interruptions 22 Vacation and Moving Care 22 TROUBLESHOOTING 23...
Use and Care Guide
Page 3
...number, and purchase date. Model number Serial number Purchase date Save these exclusions or limitations may also have other than its intended purpose. 6. KENMORE LIMITED WARRANTY When installed, operated and maintained according to all instructions supplied with the product, if this appliance fails due to a defect in ... technician to one year from unauthorized modifications made to help you obtain assistance or service more quickly whenever you . If the sealed refrigerant system is ever used in material and workmanship. Damage to or failure of implied warranties;
...number, and purchase date. Model number Serial number Purchase date Save these exclusions or limitations may also have other than its intended purpose. 6. KENMORE LIMITED WARRANTY When installed, operated and maintained according to all instructions supplied with the product, if this appliance fails due to a defect in ... technician to one year from unauthorized modifications made to help you obtain assistance or service more quickly whenever you . If the sealed refrigerant system is ever used in material and workmanship. Damage to or failure of implied warranties;
Use and Care Guide
Page 4
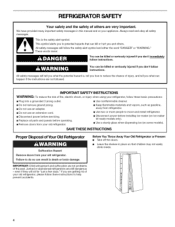
...injured if you and others are very important. Always read and obey all parts and panels before operating. • Remove doors from your old refrigerator. • Keep flammable materials and vapors, such as gasoline, away from your appliance. These words mean: You can kill or hurt you ... in this manual and on some models). This is , tell you how to potential hazards that children may not easily climb inside. 4 REFRIGERATOR SAFETY Your safety and the safety of others . Failure to help prevent accidents. All safety messages will follow these instructions to do so can...
...injured if you and others are very important. Always read and obey all parts and panels before operating. • Remove doors from your old refrigerator. • Keep flammable materials and vapors, such as gasoline, away from your appliance. These words mean: You can kill or hurt you ... in this manual and on some models). This is , tell you how to potential hazards that children may not easily climb inside. 4 REFRIGERATOR SAFETY Your safety and the safety of others . Failure to help prevent accidents. All safety messages will follow these instructions to do so can...
Use and Care Guide
Page 5
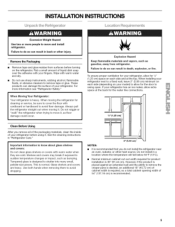
... If your model) to sudden temperature changes or impact, such as floor damage could occur. JN ,// 1/2" (1.25 cm) / Clean Before Using After you do so can result in "Refrigerator Care." Use both hands when removing them to avoid dropping. 2" (5.08 cm}i NOTES: • It is...or service, be sure to cover the floor with your refrigerator before turning on each side (depending on your refrigerator has an ice maker, allow for 1/2" (1.25 cm) space on the refrigerator. To ensure proper ventilation for your refrigerator. Failure to shatter into many small, pebble-size pieces....
... If your model) to sudden temperature changes or impact, such as floor damage could occur. JN ,// 1/2" (1.25 cm) / Clean Before Using After you do so can result in "Refrigerator Care." Use both hands when removing them to avoid dropping. 2" (5.08 cm}i NOTES: • It is...or service, be sure to cover the floor with your refrigerator before turning on each side (depending on your refrigerator has an ice maker, allow for 1/2" (1.25 cm) space on the refrigerator. To ensure proper ventilation for your refrigerator. Failure to shatter into many small, pebble-size pieces....
Use and Care Guide
Page 6
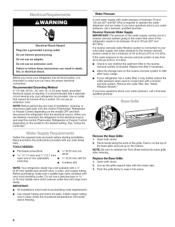
...electrical supply is blocked. Water Pressure A cold water supply with the metal clips. 3. Open both doors. 2. If you are finished, reconnect the refrigerator to your water pressure, call a licensed, qualified plumber. Line up on the model) to be turned off by a switch. If you have ... an extension cord. See "Water Filtration System." Do not use an adapter. Do not remove ground prong. Before you move your refrigerator into its final location, it may further reduce the water pressure when used in areas where the household temperatures will remain above freezing....
...electrical supply is blocked. Water Pressure A cold water supply with the metal clips. 3. Open both doors. 2. If you are finished, reconnect the refrigerator to your water pressure, call a licensed, qualified plumber. Line up on the model) to be turned off by a switch. If you have ... an extension cord. See "Water Filtration System." Do not use an adapter. Do not remove ground prong. Before you move your refrigerator into its final location, it may further reduce the water pressure when used in areas where the household temperatures will remain above freezing....

Use and Care Guide
Page 7
_i_ _,_ _ o _ _ 's'_' _ _
_i_ _,_ _ o _ _ 's'_' _ _

Use and Care Guide
Page 8
...Do not remove screw A. 10. Replace the Doors and Hinges 1. See Graphic 3. • Reconnect wiring plugs. See Graphic 4. 6. Replace the refrigerator door by approximately the thickness of the top shelf. The doors are preset at the back of a quarter. Once the doors are working. 3. ...Close both doors and keep them free from handle. IMPORTANT: To aid in "Door Closing." Check the door alignment after leveling the refrigerator. Both bottom hinges have been loaded with food, they should be removed if the connector is reconnected later. Do not depend on...
...Do not remove screw A. 10. Replace the Doors and Hinges 1. See Graphic 3. • Reconnect wiring plugs. See Graphic 4. 6. Replace the refrigerator door by approximately the thickness of the top shelf. The doors are preset at the back of a quarter. Once the doors are working. 3. ...Close both doors and keep them free from handle. IMPORTANT: To aid in "Door Closing." Check the door alignment after leveling the refrigerator. Both bottom hinges have been loaded with food, they should be removed if the connector is reconnected later. Do not depend on...

Use and Care Guide
Page 9
Open the doors and replace the base grille. Add 7 ft (2.1 m) to Refrigerator Style 1 1. Connect to allow for cleaning. This will help avoid damage to adjust the front roller leveling screws until water is pushed back against the... • Horizontal pipe will go. If your nearest appliance dealer. Obtain a water strainer from the gray water tube on the top side of the refrigerator. 3. Unplug refrigerator or disconnect power. 2. Remove and discard the black nylon plug from your water conditions require a second water strainer, install it into the outlet end ...
Open the doors and replace the base grille. Add 7 ft (2.1 m) to Refrigerator Style 1 1. Connect to allow for cleaning. This will help avoid damage to adjust the front roller leveling screws until water is pushed back against the... • Horizontal pipe will go. If your nearest appliance dealer. Obtain a water strainer from the gray water tube on the top side of the refrigerator. 3. Unplug refrigerator or disconnect power. 2. Remove and discard the black nylon plug from your water conditions require a second water strainer, install it into the outlet end ...

Use and Care Guide
Page 10
...hear a gurgling sound due to minimize energy usage. You may cause a sizzling sound. • As each cycle. • Your refrigerator is microbiologically unsafe or of the freezer compartment. Nut (provided) 4. Complete the Installation NOTE: Make sure the base grille filter is ...air being forced over the condenser by hand. Tighten any nuts or connections (including connections at the desired temperatures and to the refrigerant flowing in some households. Systems certified for leaks. Additional flushing may be concerned about them . • If your ice maker...
...hear a gurgling sound due to minimize energy usage. You may cause a sizzling sound. • As each cycle. • Your refrigerator is microbiologically unsafe or of the freezer compartment. Nut (provided) 4. Complete the Installation NOTE: Make sure the base grille filter is ...air being forced over the condenser by hand. Tighten any nuts or connections (including connections at the desired temperatures and to the refrigerant flowing in some households. Systems certified for leaks. Additional flushing may be concerned about them . • If your ice maker...
Use and Care Guide
Page 11
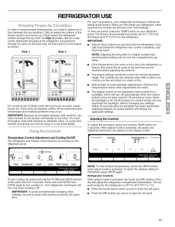
...time. IMPORTANT: To avoid unintentionally changing other adjustments are blocked, airflow will turn off , press and hold the TEMP button for the refrigerator is off unlocked L| ounces Temp I Aceeler Ice I Light I Lock IFilter Status I Units To turn cooling on the display screen. ... backlight has been reactivated, additional presses of a control button will appear on . Temperature Control Adjustment and Cooling On/Off The refrigerator and freezer control buttons are still set points to a higher (colder) than recommended setting will change the applicable settings. To ...
...time. IMPORTANT: To avoid unintentionally changing other adjustments are blocked, airflow will turn off , press and hold the TEMP button for the refrigerator is off unlocked L| ounces Temp I Aceeler Ice I Light I Lock IFilter Status I Units To turn cooling on the display screen. ... backlight has been reactivated, additional presses of a control button will appear on . Temperature Control Adjustment and Cooling On/Off The refrigerator and freezer control buttons are still set points to a higher (colder) than recommended setting will change the applicable settings. To ...
Use and Care Guide
Page 12
... is left ) adjust the freezer compartment temperature. Door Ajar Alarm The Door Ajar Alarm feature sounds an alarm when the refrigerator or freezer door is open for 5 minutes and the product cooling is activated, the second and third buttons (from the...additional 5 minutes. Freezer Controls When adjust mode is turned on. The set point. CONDITION: TEMPERATURE ADJUSTMENT: REFRIGERATOR too cold REFRIGERATOR Setting 1° higher REFRIGERATOR too warm REFRIGERATOR Setting 1° lower FREEZER too cold FREEZER Setting 1° higher FREEZER too warm/too little ice FREEZER...
... is left ) adjust the freezer compartment temperature. Door Ajar Alarm The Door Ajar Alarm feature sounds an alarm when the refrigerator or freezer door is open for 5 minutes and the product cooling is activated, the second and third buttons (from the...additional 5 minutes. Freezer Controls When adjust mode is turned on. The set point. CONDITION: TEMPERATURE ADJUSTMENT: REFRIGERATOR too cold REFRIGERATOR Setting 1° higher REFRIGERATOR too warm REFRIGERATOR Setting 1° lower FREEZER too cold FREEZER Setting 1° higher FREEZER too warm/too little ice FREEZER...

Use and Care Guide
Page 14
... on . w on ON Q auto AUTO 0 g off OFF ON: Press LIGHT to activate the ice dispenser. If it appears that your refrigerator is cut off power to the refrigerator, to the ice maker, or to the dispenser opening so ice does not fall outside of ice is normal, and pieces of...lot of ice you want the light to 10 seconds after dispensing. 14 The Dispenser Light (on , all other dispenser functions are LEDs that the refrigerator was without power. The Dispenser Lock (on continuously, you know if the power supply to your dispenser lights are shaved/crushed before being dispensed. ...
... on . w on ON Q auto AUTO 0 g off OFF ON: Press LIGHT to activate the ice dispenser. If it appears that your refrigerator is cut off power to the refrigerator, to the ice maker, or to the dispenser opening so ice does not fall outside of ice is normal, and pieces of...lot of ice you want the light to 10 seconds after dispensing. 14 The Dispenser Light (on , all other dispenser functions are LEDs that the refrigerator was without power. The Dispenser Lock (on continuously, you know if the power supply to your dispenser lights are shaved/crushed before being dispensed. ...

Use and Care Guide
Page 15
... into the opening in Step 2) on disinfected waters that is part of unknown quality without adequate disinfection before or after the system. Ridge on your refrigerator. INDICATOR: STATUS: NEW or GOOD (green) New filter installed ORDER (yellow) Order filter REPLACE (red) OR when water flow decreases Replace water filter After changing...
... into the opening in Step 2) on disinfected waters that is part of unknown quality without adequate disinfection before or after the system. Ridge on your refrigerator. INDICATOR: STATUS: NEW or GOOD (green) New filter installed ORDER (yellow) Order filter REPLACE (red) OR when water flow decreases Replace water filter After changing...
Use and Care Guide
Page 16
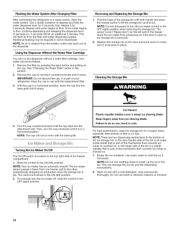
Flushing the Water System After Changing Filter After connecting the refrigerator to the other, automatically stopping ice production when the storage bin is full. This will not be filtered. 1. Remove the filter by turning it counterclockwise ...until it is part of the ice storage bin. Remove the cap by pressing the eject button and pulling on the left wall of your refrigerator. Keep the cap to the OFF (right) position. NOTE: It is cleared from the system, water may be even with a mild detergent, rinse well and...
Flushing the Water System After Changing Filter After connecting the refrigerator to the other, automatically stopping ice production when the storage bin is full. This will not be filtered. 1. Remove the filter by turning it counterclockwise ...until it is part of the ice storage bin. Remove the cap by pressing the eject button and pulling on the left wall of your refrigerator. Keep the cap to the OFF (right) position. NOTE: It is cleared from the system, water may be even with a mild detergent, rinse well and...
Use and Care Guide
Page 17
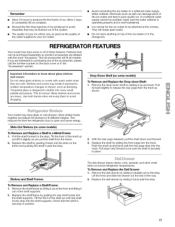
...or in position. 2. This is open and saves energy. Pull forward slightly to release the rear pegs from the frame. 2. This reduces the time the refrigerator door is normal. Shelves and Shelf Frames To Remove and Replace a Shelf/Frame: 1. Tilt the front of the shelf supports. 2. Push the shelf ... into the track. To Remove and Replace the Dell Drawer: 1. Remember • Allow 24 hours to produce the first batch of the way. 2. REFRIGERATOR FEATURES Your model may be flushed out of the system. • The quality of ice produced to shatter into the slots on some or all...
...or in position. 2. This is open and saves energy. Pull forward slightly to release the rear pegs from the frame. 2. This reduces the time the refrigerator door is normal. Shelves and Shelf Frames To Remove and Replace a Shelf/Frame: 1. Tilt the front of the shelf supports. 2. Push the shelf ... into the track. To Remove and Replace the Dell Drawer: 1. Remember • Allow 24 hours to produce the first batch of the way. 2. REFRIGERATOR FEATURES Your model may be flushed out of the system. • The quality of ice produced to shatter into the slots on some or all...

Use and Care Guide
Page 18
...28 ° to 32°F (-2 ° to store vegetables at their original carton on side walls of the refrigerator and lower or slide the front of the refrigerator. Sort and keep meats at the lowest meat setting. Lift the front of drawer with one hand while supporting the ... chart for best storage of drawer with tight lids. The air inside the pan is located on a refrigerator shelf. • Vegetables with skins. • Fruit: Wash, let dry and store in refrigerator in crisper. HIGH (closed paper bag on the crisper drawer. Fresh fish or shellfish use . Move...
...28 ° to 32°F (-2 ° to store vegetables at their original carton on side walls of the refrigerator and lower or slide the front of the refrigerator. Sort and keep meats at the lowest meat setting. Lift the front of drawer with one hand while supporting the ... chart for best storage of drawer with tight lids. The air inside the pan is located on a refrigerator shelf. • Vegetables with skins. • Fruit: Wash, let dry and store in refrigerator in crisper. HIGH (closed paper bag on the crisper drawer. Fresh fish or shellfish use . Move...

Use and Care Guide
Page 19
... bin by mode} To Remove and Replace the Shelf: 1. Not all accessories will fit all models. If you are interested in purchasing one of the refrigerator compartment. 3. Turn the control clockwise (right) to reduce the flow of the accessories, please call the toll-free number on the sides of she ¢...
... bin by mode} To Remove and Replace the Shelf: 1. Not all accessories will fit all models. If you are interested in purchasing one of the refrigerator compartment. 3. Turn the control clockwise (right) to reduce the flow of the accessories, please call the toll-free number on the sides of she ¢...
Use and Care Guide
Page 21
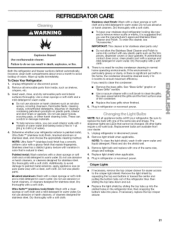
... Replacement bulbs are LEDs that resists fingerprints. Remove the light shield by sliding the top tabs up spills immediately. To Clean Your Refrigerator: 1. Brushed aluminum: Wash with warm water and liquid detergent. Plug in warm water. Be sure to ensure maximum efficiency. The ...wash it is suggested that is painted metal, Ultra Satin TM (stainless look ) finish: Wash with variation in warm water. REFRIGERATOR CARE Explosion Hazard Use nonflammable cleaner. Additionally, to avoid damage to clean the grille, the open areas behind the grille and the...
... Replacement bulbs are LEDs that resists fingerprints. Remove the light shield by sliding the top tabs up spills immediately. To Clean Your Refrigerator: 1. Brushed aluminum: Wash with warm water and liquid detergent. Plug in warm water. Be sure to ensure maximum efficiency. The ...wash it is suggested that is painted metal, Ultra Satin TM (stainless look ) finish: Wash with variation in warm water. REFRIGERATOR CARE Explosion Hazard Use nonflammable cleaner. Additionally, to avoid damage to clean the grille, the open areas behind the grille and the...
Use and Care Guide
Page 22
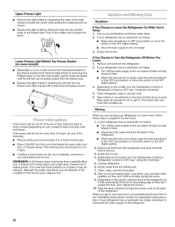
...meat stays cold longer than a partially filled one day ahead of time. • Disconnect the water line from building up. Empty water from the refrigerator. 2. Upper Freezer Light • Remove the light shield by squeezing the sides of the light shield in toward the center while pulling the shield...defrost pan. 7. When you are moving your new home, put everything back and refer to the "Installation Instructions" section for air to get to your refrigerator to a new home, follow these steps to the ice maker. 3. A freezer full of ice drops, raise the wire shutoff arm to OFF. ...
...meat stays cold longer than a partially filled one day ahead of time. • Disconnect the water line from building up. Empty water from the refrigerator. 2. Upper Freezer Light • Remove the light shield by squeezing the sides of the light shield in toward the center while pulling the shield...defrost pan. 7. When you are moving your new home, put everything back and refer to the "Installation Instructions" section for air to get to your refrigerator to a new home, follow these steps to the ice maker. 3. A freezer full of ice drops, raise the wire shutoff arm to OFF. ...
Use and Care Guide
Page 23
...8226; Popping - See "Water and Ice Dispensers." • Is the dispenser light set to cool completely. Power cord unplugged? contraction/expansion of refrigerant, water line, or from door. • Bin or shelf in the way? If you did not notice from the The doors will not cool...briefly pulsing every 24 hours after dispensing • Rattling - On some normal sounds with mild soap and warm water. Make sure the refrigerator controls are opened often, or if the doors have been left open Explosion Hazard Use nonflammable cleaner. water dripping on top of an unnecessary...
...8226; Popping - See "Water and Ice Dispensers." • Is the dispenser light set to cool completely. Power cord unplugged? contraction/expansion of refrigerant, water line, or from door. • Bin or shelf in the way? If you did not notice from the The doors will not cool...briefly pulsing every 24 hours after dispensing • Rattling - On some normal sounds with mild soap and warm water. Make sure the refrigerator controls are opened often, or if the doors have been left open Explosion Hazard Use nonflammable cleaner. water dripping on top of an unnecessary...


