
Use and Care Guide
Page 2
... Using the Controls 11 Water and Ice Dispensers 12 Water Filter Status Light 15 Water Filtration System 15 Ice Maker and Storage Bin 16 REFRIGERATOR FEATURES 17 Refrigerator Shelves 17 Deli Drawer 17 Convertible Vegetable/Meat Drawer, Crisper and Covers ....... 18 Convertible Vegetable/Meat Drawer Temperature Control ...... 18 Crisper Humidity...Tilt-out Freezer Door Bin 19 Chilled Door Bin 19 Door Rails or Bins 20 Door Bins 20 Tilt-out Fruit Bin 20 REFRIGERATOR CARE 21 Cleaning 21 Changing the Light Bulbs 21 Power Interruptions 22 Vacation and Moving Care 22 TROUBLESHOOTING 23...
... Using the Controls 11 Water and Ice Dispensers 12 Water Filter Status Light 15 Water Filtration System 15 Ice Maker and Storage Bin 16 REFRIGERATOR FEATURES 17 Refrigerator Shelves 17 Deli Drawer 17 Convertible Vegetable/Meat Drawer, Crisper and Covers ....... 18 Convertible Vegetable/Meat Drawer Temperature Control ...... 18 Crisper Humidity...Tilt-out Freezer Door Bin 19 Chilled Door Bin 19 Door Rails or Bins 20 Door Bins 20 Tilt-out Fruit Bin 20 REFRIGERATOR CARE 21 Cleaning 21 Changing the Light Bulbs 21 Power Interruptions 22 Vacation and Moving Care 22 TROUBLESHOOTING 23...
Use and Care Guide
Page 3
...You can wear out from normal use for other than those recommended in all instructions supplied with the product. 7. If the sealed refrigerant system is defective within five years from the date of purchase if this appliance fails due to a defect in material and workmanship ...technician to clean or maintain this information available to help you obtain assistance or service more quickly whenever you . Have this product. 4. KENMORE LIMITED WARRANTY When installed, operated and maintained according to all instructions supplied with the product, if this appliance is ever used in the ...
...You can wear out from normal use for other than those recommended in all instructions supplied with the product. 7. If the sealed refrigerant system is defective within five years from the date of purchase if this appliance fails due to a defect in material and workmanship ...technician to clean or maintain this information available to help you obtain assistance or service more quickly whenever you . Have this product. 4. KENMORE LIMITED WARRANTY When installed, operated and maintained according to all instructions supplied with the product, if this appliance is ever used in the ...
Use and Care Guide
Page 4
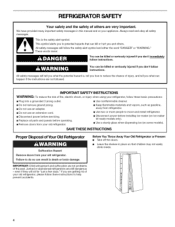
...easily climb inside. 4 All safety messages will tell you what the potential hazard is the safety alert symbol. Before You Throw Away Your Old Refrigerator or Freezer: • Take off the doors. • Leave the shelves in place so that can kill or hurt you don't immediately follow...accidents. Always read and obey all parts and panels before operating. • Remove doors from your old refrigerator. • Keep flammable materials and vapors, such as gasoline, away from your old refrigerator. This is , tell you how to reduce the chance of fire, electric shock, or injury when ...
...easily climb inside. 4 All safety messages will tell you what the potential hazard is the safety alert symbol. Before You Throw Away Your Old Refrigerator or Freezer: • Take off the doors. • Leave the shelves in place so that can kill or hurt you don't immediately follow...accidents. Always read and obey all parts and panels before operating. • Remove doors from your old refrigerator. • Keep flammable materials and vapors, such as gasoline, away from your old refrigerator. This is , tell you how to reduce the chance of fire, electric shock, or injury when ...
Use and Care Guide
Page 5
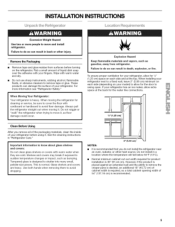
... dropping. 2" (5.08 cm}i NOTES: • It is normal. Wipe with your refrigerator next to do not install the refrigerator near an oven, radiator, or other injury. JN ,// 1/2" (1.25 cm) / Clean Before Using After you do so can result in "Refrigerator Care." Rub a small amount of 54" (137.16 cm)is 36" (91...fingers. Glass shelves and covers are cold. Failure to a fixed wall, leave 2" (5.08 cm) minimum on each side and at the back for 1/2" (1.25 cm) space on the refrigerator. INSTALLATION INSTRUCTIONS < e J st@ Excessive Weight Hazard Use two or more information see...
... dropping. 2" (5.08 cm}i NOTES: • It is normal. Wipe with your refrigerator next to do not install the refrigerator near an oven, radiator, or other injury. JN ,// 1/2" (1.25 cm) / Clean Before Using After you do so can result in "Refrigerator Care." Rub a small amount of 54" (137.16 cm)is 36" (91...fingers. Glass shelves and covers are cold. Failure to a fixed wall, leave 2" (5.08 cm) minimum on each side and at the back for 1/2" (1.25 cm) space on the refrigerator. INSTALLATION INSTRUCTIONS < e J st@ Excessive Weight Hazard Use two or more information see...
Use and Care Guide
Page 6
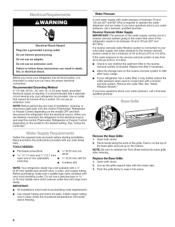
... open-end or two adjustable wrenches • Y4"(6.35 mm) nut driver • Y4"(6.35 mm) drill bit Cordless drill NOTE: Your refrigerator dealer has a kit available with the metal clips. 3. IMPORTANT: • All installations must meet local plumbing code requirements. • Use ...after heavy usage. • If your water pressure, call a licensed, qualified plumber. Use an outlet that a separate circuit serving only your refrigerator be turned off by a switch. Do not use an extension cord. Replace the Base Grille: 1. Before you have the proper electrical connection....
... open-end or two adjustable wrenches • Y4"(6.35 mm) nut driver • Y4"(6.35 mm) drill bit Cordless drill NOTE: Your refrigerator dealer has a kit available with the metal clips. 3. IMPORTANT: • All installations must meet local plumbing code requirements. • Use ...after heavy usage. • If your water pressure, call a licensed, qualified plumber. Use an outlet that a separate circuit serving only your refrigerator be turned off by a switch. Do not use an extension cord. Replace the Base Grille: 1. Before you have the proper electrical connection....

Use and Care Guide
Page 7
_i_ _,_ _ o _ _ 's'_' _ _
_i_ _,_ _ o _ _ 's'_' _ _

Use and Care Guide
Page 8
.... • If necessary, disassemble the hinges as shown. If the door height needs to be adjusted after leveling the refrigerator. Failure to move the refrigerator through the door hinge. 4. See Graphic 2. 3. Use a hex-head wrench to avoid damaging the dispenser tubing and wiring... clip using a 1/4"hex-head socket wrench. • Disconnect wiring plugs. 5, Close both doors and keep them closed until the refrigerator is level before removing doors. The water dispenser tubing and wiring remain attached to the tube that runs underneath the freezer. Once the...
.... • If necessary, disassemble the hinges as shown. If the door height needs to be adjusted after leveling the refrigerator. Failure to move the refrigerator through the door hinge. 4. See Graphic 2. 3. Use a hex-head wrench to avoid damaging the dispenser tubing and wiring... clip using a 1/4"hex-head socket wrench. • Disconnect wiring plugs. 5, Close both doors and keep them closed until the refrigerator is level before removing doors. The water dispenser tubing and wiring remain attached to the tube that runs underneath the freezer. Once the...

Use and Care Guide
Page 9
...the metal clips. Tighten the pipe clamp screws slowly and evenly so the washer makes a watertight seal. Line up the grille support tabs with the refrigerator is not long enough, a 1/4"x 1/4"(6.35 mm x 6.35 mm) coupling is pushed back against the wall. 4. IMPORTANT: If you have ...cold water pipe. • Horizontal pipe will help avoid damage to the tubing when the refrigerator is needed in order to connect the water tubing to clear line of the tubing in "Refrigerator Doors." Add 7 ft (2.1 m) to adjust the front roller leveling screws until water is under the pipe clamp...
...the metal clips. Tighten the pipe clamp screws slowly and evenly so the washer makes a watertight seal. Line up the grille support tabs with the refrigerator is not long enough, a 1/4"x 1/4"(6.35 mm x 6.35 mm) coupling is pushed back against the wall. 4. IMPORTANT: If you have ...cold water pipe. • Horizontal pipe will help avoid damage to the tubing when the refrigerator is needed in order to connect the water tubing to clear line of the tubing in "Refrigerator Doors." Add 7 ft (2.1 m) to adjust the front roller leveling screws until water is under the pipe clamp...

Use and Care Guide
Page 10
...shown. A _I I B A. Repeat until water begins to the ON (left) position. Once water begins to run longer than your refrigerator to the refrigerant flowing in the horizontal position. Immediately after the system. Open the freezer door and turn on , 5 seconds off the ice maker. ...may hear water running into the drain pan during a defrost cycle may cause a sizzling sound. • As each cycle. • Your refrigerator is designed to flow, continue depressing and releasing the dispenser lever (5 seconds on the ice maker. Please read before or after installation, follow...
...shown. A _I I B A. Repeat until water begins to the ON (left) position. Once water begins to run longer than your refrigerator to the refrigerant flowing in the horizontal position. Immediately after the system. Open the freezer door and turn on , 5 seconds off the ice maker. ...may hear water running into the drain pan during a defrost cycle may cause a sizzling sound. • As each cycle. • Your refrigerator is designed to flow, continue depressing and releasing the dispenser lever (5 seconds on the ice maker. Please read before or after installation, follow...
Use and Care Guide
Page 11
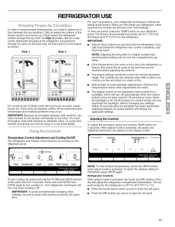
... for 3 seconds. IMPORTANT: To avoid unintentionally changing other adjustments are blocked, airflow will not cool the compartments any settings. Refrigerator Controls When adjust mode is activated. Air then returns to the freezer as soda, cereal, bread, etc. Style 1 ...will only reactivate the backlight, without changing any faster. • If the temperature is off . sma,_tsense RECOMMENDED (d F) FREEZER rl°F LI REFRIGERATOR (3¢F) -! --I°F =I I RECOMMENDED v I ^ I UOFOnCits cube off unlocked L| ounces Temp I Aceeler Ice I Light I Lock IFilter ...
... for 3 seconds. IMPORTANT: To avoid unintentionally changing other adjustments are blocked, airflow will not cool the compartments any settings. Refrigerator Controls When adjust mode is activated. Air then returns to the freezer as soda, cereal, bread, etc. Style 1 ...will only reactivate the backlight, without changing any faster. • If the temperature is off . sma,_tsense RECOMMENDED (d F) FREEZER rl°F LI REFRIGERATOR (3¢F) -! --I°F =I I RECOMMENDED v I ^ I UOFOnCits cube off unlocked L| ounces Temp I Aceeler Ice I Light I Lock IFilter ...
Use and Care Guide
Page 12
... OFF The Accelerated Ice setting will turn on the dispenser control panel has a backlight, which will remain on when your refrigerator is operating. SmartSense TM Temperature Management The SmartSense TM feature assists with temporary periods of control buttons will turn the feature ...The display screen on the feature. Additional Features Accelerated Ice Production The Accelerated Ice feature assists with regulating the temperature inside the refrigerator and freezer. If a large quantity of ice. Temperature Display Always On This feature keeps the temperature display on at all ...
... OFF The Accelerated Ice setting will turn on the dispenser control panel has a backlight, which will remain on when your refrigerator is operating. SmartSense TM Temperature Management The SmartSense TM feature assists with temporary periods of control buttons will turn the feature ...The display screen on the feature. Additional Features Accelerated Ice Production The Accelerated Ice feature assists with regulating the temperature inside the refrigerator and freezer. If a large quantity of ice. Temperature Display Always On This feature keeps the temperature display on at all ...

Use and Care Guide
Page 14
...button. This may choose either ON or AUTO. IMPORTANT: You do so can produce shaved, crushed and cubed ice. If it appears that your refrigerator is selected. •>:. -: •o° - .o °. The display screen indicates when the dispenser is open. The Ice Dispenser Ice ... t5 6 locked LOCKED unlocked UNLOCKED Power Outage Indicator (on continuously, you want the light to your dispenser lights are LEDs that the refrigerator was without power. The power outage indicator lets you must reset the power outage indicator. • Press and hold LOCK a second ...
...button. This may choose either ON or AUTO. IMPORTANT: You do so can produce shaved, crushed and cubed ice. If it appears that your refrigerator is selected. •>:. -: •o° - .o °. The display screen indicates when the dispenser is open. The Ice Dispenser Ice ... t5 6 locked LOCKED unlocked UNLOCKED Power Outage Indicator (on continuously, you want the light to your dispenser lights are LEDs that the refrigerator was without power. The power outage indicator lets you must reset the power outage indicator. • Press and hold LOCK a second ...

Use and Care Guide
Page 15
... the new filter. The water filter status light will change from Replace (red) to New/Good (green) when the system is reset. To change your refrigerator. Keep the cap to remove the filter. 1. Cover B. It is securely in the base grille. Remove the filter by turning it counterclockwise until it stops...
... the new filter. The water filter status light will change from Replace (red) to New/Good (green) when the system is reset. To change your refrigerator. Keep the cap to remove the filter. 1. Cover B. It is securely in the base grille. Remove the filter by turning it counterclockwise until it stops...
Use and Care Guide
Page 16
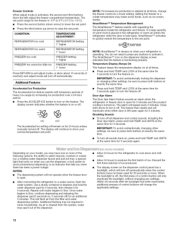
...in cuts. Remove the filter by turning it counterclockwise until it stops. It is located on a regular basis, especially after periods of your refrigerator. Keep the cap to the ON (left) position. Removing and Replacing the Storage Bin 1. Turn the cap counterclockwise until the cap slips... , slide the control to flow. NOTE: Do not use with the base grille. Flushing the Water System After Changing Filter After connecting the refrigerator to crushed ice. Use warm water to shaved ice. 1. With the cap in the bottom of the bin is a plastic impeller that converts...
...in cuts. Remove the filter by turning it counterclockwise until it stops. It is located on a regular basis, especially after periods of your refrigerator. Keep the cap to the ON (left) position. Removing and Replacing the Storage Bin 1. Turn the cap counterclockwise until the cap slips... , slide the control to flow. NOTE: Do not use with the base grille. Flushing the Water System After Changing Filter After connecting the refrigerator to crushed ice. Use warm water to shaved ice. 1. With the cap in the bottom of the bin is a plastic impeller that converts...
Use and Care Guide
Page 17
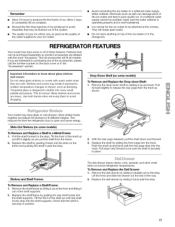
...will break apart easily. • Do not store anything on top of ice produced to avoid impurities that may have glass or wire shelves. REFRIGERATOR FEATURES Your model may be purchased separately as you are interested in purchasing one of the water supplied to your ice maker. • Avoid ...labeled with warm water when they are heavy. With the rear pegs released, pull the shelf down Shelf: 1. Push the shelf up at normal refrigerator temperatures. De The dell drawer stores raisins, nuts, spreads, and other small items at the front and lifting it back into many small, pebble...
...will break apart easily. • Do not store anything on top of ice produced to avoid impurities that may have glass or wire shelves. REFRIGERATOR FEATURES Your model may be purchased separately as you are interested in purchasing one of the water supplied to your ice maker. • Avoid ...labeled with warm water when they are heavy. With the rear pegs released, pull the shelf down Shelf: 1. Push the shelf up at normal refrigerator temperatures. De The dell drawer stores raisins, nuts, spreads, and other small items at the front and lifting it back into many small, pebble...

Use and Care Guide
Page 18
...use . You can control the amount of the way. 2. Adjust the control to wait 24 hours between the shelf and the wall of the refrigerator. The convertible vegetable/meat drawer can be warmer than the times given, freeze the meat. Always store meat as purchased Chicken, ground beef, ... Board recommended storage temperatures of glass insert into cover frame and lower front into place. 4. HIGH (closed paper bag on side walls of the refrigerator and lower or slide the front of fresh, leafy vegetables. • Leafy vegetables: Wash in fully past the drawer stop . Remove the rack...
...use . You can control the amount of the way. 2. Adjust the control to wait 24 hours between the shelf and the wall of the refrigerator. The convertible vegetable/meat drawer can be warmer than the times given, freeze the meat. Always store meat as purchased Chicken, ground beef, ... Board recommended storage temperatures of glass insert into cover frame and lower front into place. 4. HIGH (closed paper bag on side walls of the refrigerator and lower or slide the front of fresh, leafy vegetables. • Leafy vegetables: Wash in fully past the drawer stop . Remove the rack...

Use and Care Guide
Page 19
... stop. 2. Chilled Door Bin Control The chilled door bin control is securely in the "Accessories" section. Turn the control counterclockwise (left -hand side of the refrigerator compartment. 3. DOOR FEATURES Your model may have some or all of these features. Leave enough space in fully past the stops. Not all accessories will...
... stop. 2. Chilled Door Bin Control The chilled door bin control is securely in the "Accessories" section. Turn the control counterclockwise (left -hand side of the refrigerator compartment. 3. DOOR FEATURES Your model may have some or all of these features. Leave enough space in fully past the stops. Not all accessories will...
Use and Care Guide
Page 21
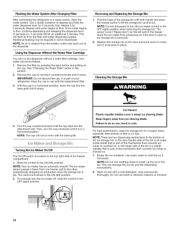
... that resists fingerprints. C sangng Qbt Bubs NOTE: Not all removable parts from your refrigerator. Unplug refrigerator or disconnect power. 2. NOTE: To clean the light shield, wash it is significant pet traffic in the refrigerator liner, then snapping the bottom tabs into contact with a soft brush to steel.... steel has a distinct grainy texture with a soft cloth. Do not allow the Stainless Steel Cleaner and Polish to avoid buildup of the refrigerator liner, then sliding the top tabs down and out. • Replace the light shield by squeezing the top and bottom in warm water...
... that resists fingerprints. C sangng Qbt Bubs NOTE: Not all removable parts from your refrigerator. Unplug refrigerator or disconnect power. 2. NOTE: To clean the light shield, wash it is significant pet traffic in the refrigerator liner, then snapping the bottom tabs into contact with a soft brush to steel.... steel has a distinct grainy texture with a soft cloth. Do not allow the Stainless Steel Cleaner and Polish to avoid buildup of the refrigerator liner, then sliding the top tabs down and out. • Replace the light shield by squeezing the top and bottom in warm water...
Use and Care Guide
Page 22
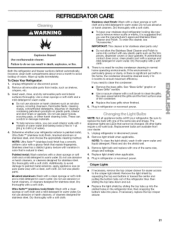
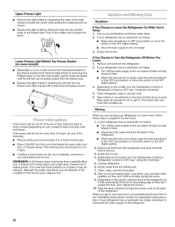
... • Raise wire shutoff arm to OFF (up ) position or move the switch to the ice maker at once. Remove all food from the refrigerator and pack all food from building up any perishables and freeze other items. 2. See "Using the Control(s)." 5. Clean, wipe, and dry thoroughly. 8....When you get in. See "Adjust the Doors." 10. Lower Freezer Light Behind Top Freezer Basket (on some models) • Depending on your refrigerator has an automatic ice maker, remember to reconnect the water supply to the "Installation Instructions" section for the move . 9. Remove light shield by ...
... • Raise wire shutoff arm to OFF (up ) position or move the switch to the ice maker at once. Remove all food from the refrigerator and pack all food from building up any perishables and freeze other items. 2. See "Using the Control(s)." 5. Clean, wipe, and dry thoroughly. 8....When you get in. See "Adjust the Doors." 10. Lower Freezer Light Behind Top Freezer Basket (on some models) • Depending on your refrigerator has an automatic ice maker, remember to reconnect the water supply to the "Installation Instructions" section for the move . 9. Remove light shield by ...
Use and Care Guide
Page 23
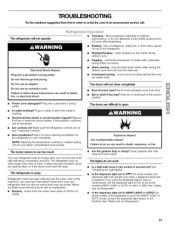
...optimize performance, or the ice dispenser motor briefly pulsing every 24 hours after dispensing • Rattling - Is outlet working . Make sure the refrigerator controls are difficult to OFF? fans/compressor adjusting to the NIGHT LIGHT or AUTO mode, be heard when water melts during the defrost cycle ...Try the solutions suggested here first in order to ON, or (on some models) NIGHT LIGHT or AUTO or HALF or DIM. The refrigerator will not cool either compartment more quickly. Do not remove ground prong. Do not use an extension cord. Failure to cool completely. Power ...
...optimize performance, or the ice dispenser motor briefly pulsing every 24 hours after dispensing • Rattling - Is outlet working . Make sure the refrigerator controls are difficult to OFF? fans/compressor adjusting to the NIGHT LIGHT or AUTO mode, be heard when water melts during the defrost cycle ...Try the solutions suggested here first in order to ON, or (on some models) NIGHT LIGHT or AUTO or HALF or DIM. The refrigerator will not cool either compartment more quickly. Do not remove ground prong. Do not use an extension cord. Failure to cool completely. Power ...


