Owners Manual
Page 2
...owner's instructions furnished with the product, Sears will repair the sealed refrigeration system (consisting of refrigerant, connecting tubing, and compressor motor) free of charge, if defective in materials or workmanship. TABLE OF CONTENTS 2 WARRANTY 2 SAFETY INSTRUCTIONS 3 ELECTRICAL REQUIREMENTS 4 INSTALLING YOUR DEHUMIDIFIER 5 Defrost Control Function 5 CHOOSING THE PROPER LOCATION ....... 5 AUTOMATIC SHUT OFF 5 OPERATION 6 Features 6 Control Panel 7 OPTIONS FOR DISPOSING OF COLLECTED WATER 8 MAINTENANCE 9 Grille and case 9 Air filter 9 General cleaning 9 Water bucket...
...owner's instructions furnished with the product, Sears will repair the sealed refrigeration system (consisting of refrigerant, connecting tubing, and compressor motor) free of charge, if defective in materials or workmanship. TABLE OF CONTENTS 2 WARRANTY 2 SAFETY INSTRUCTIONS 3 ELECTRICAL REQUIREMENTS 4 INSTALLING YOUR DEHUMIDIFIER 5 Defrost Control Function 5 CHOOSING THE PROPER LOCATION ....... 5 AUTOMATIC SHUT OFF 5 OPERATION 6 Features 6 Control Panel 7 OPTIONS FOR DISPOSING OF COLLECTED WATER 8 MAINTENANCE 9 Grille and case 9 Air filter 9 General cleaning 9 Water bucket...
Owners Manual
Page 3
... the area you want to direct air flow. area • When removing the filter be • Do not use the water collected in the power cord properly. Otherwise, it will be aware that some metal parts may cause fire and electric shock. • Do not operate with this product. -3- It may not operate efficiently if the room temperature is below 42°F(6°C). Unplugging...
... the area you want to direct air flow. area • When removing the filter be • Do not use the water collected in the power cord properly. Otherwise, it will be aware that some metal parts may cause fire and electric shock. • Do not operate with this product. -3- It may not operate efficiently if the room temperature is below 42°F(6°C). Unplugging...
Owners Manual
Page 4
... is the personal responsibility and obligation of the customer to follow these instructions can result in accordance with a 3-prong grounding plug. Do not use an adapter. Do not remove ground prong. Do not use an extension cord. DO NOT, UNDER ANY CIRCUMSTANCES, REMOVE THE POWER SUPPLY CORD GROUND PRONG. A time delay fuse or time delay circuit breaker is required. RECOMMENDED GROUNDING METHOD For your personal...
... is the personal responsibility and obligation of the customer to follow these instructions can result in accordance with a 3-prong grounding plug. Do not use an adapter. Do not remove ground prong. Do not use an extension cord. DO NOT, UNDER ANY CIRCUMSTANCES, REMOVE THE POWER SUPPLY CORD GROUND PRONG. A time delay fuse or time delay circuit breaker is required. RECOMMENDED GROUNDING METHOD For your personal...
Owners Manual
Page 5
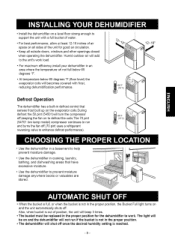
... on the evaporator coils.During defrost the 50 pint (54501)will becomes covered with a full bucket of water. • For best performance, allow at least 12-18 inches of air space on all sides of position, the unit will beep 3 times. • The bucket must be on and the dehumidifier will not run and turns the fan off . The light will shut off once the desired humidity setting is not...
... on the evaporator coils.During defrost the 50 pint (54501)will becomes covered with a full bucket of water. • For best performance, allow at least 12-18 inches of air space on all sides of position, the unit will beep 3 times. • The bucket must be on and the dehumidifier will not run and turns the fan off . The light will shut off once the desired humidity setting is not...
Owners Manual
Page 6
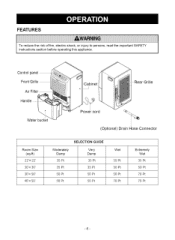
Control panel Front Grille Air Filter Handle Cabinet Grille Water bucket Power cord > (Optional) Drain Hose Connector Room Size (sq-ft) 22'x 22' 30'x 30' 30'x 50' 40'x 50' SELECTION GUIDE Moderately Damp 35 Pt 35 Pt 50 Pt 50 Pt Very Damp 35 Pt 35 Pt 50 Pt 50 Pt Wet 35 Pt 50 Pt 50 Pt 70 Pt Extremely Wet 35 Pt 50 Pt 70 Pt 70 Pt -6- FEATURES To reduce the risk of fire, electric shock, or injury to persons, read the important SAFETY instructions section before operating this appliance.
Control panel Front Grille Air Filter Handle Cabinet Grille Water bucket Power cord > (Optional) Drain Hose Connector Room Size (sq-ft) 22'x 22' 30'x 30' 30'x 50' 40'x 50' SELECTION GUIDE Moderately Damp 35 Pt 35 Pt 50 Pt 50 Pt Very Damp 35 Pt 35 Pt 50 Pt 50 Pt Wet 35 Pt 50 Pt 50 Pt 70 Pt Extremely Wet 35 Pt 50 Pt 70 Pt 70 Pt -6- FEATURES To reduce the risk of fire, electric shock, or injury to persons, read the important SAFETY instructions section before operating this appliance.
Owners Manual
Page 7
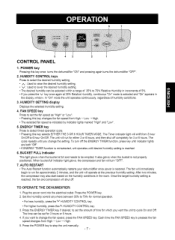
... cycle repeats until desired humidity setting is selected and "On" appears in the display window. BUCKET FULL Indicator This light glows when the bucket is indicated by indicator lights marked "High" and "Low". 5. The fan will operate at 35% Relative Humidity, continuous "On" mode is reached. 6. Set the Humidity control anywhere between 35% to stop the unit manually. -7- ENERGY TIMER key Press to cycle On and Off. To turn "OFF". 7. Plug the power cord...
... cycle repeats until desired humidity setting is selected and "On" appears in the display window. BUCKET FULL Indicator This light glows when the bucket is indicated by indicator lights marked "High" and "Low". 5. The fan will operate at 35% Relative Humidity, continuous "On" mode is reached. 6. Set the Humidity control anywhere between 35% to stop the unit manually. -7- ENERGY TIMER key Press to cycle On and Off. To turn "OFF". 7. Plug the power cord...
Owners Manual
Page 8
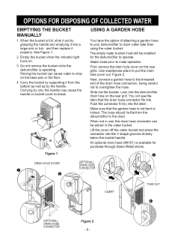
... the cover off the water bucket and place the connector into the stem. Empty the bucket when the indicator light turns on the rear grille. Next, connect a garden hose to the threaded end of attaching a garden hose to your dehumidifier to overtighten the hose. When not in the water bucket. Look into . First, remove the drain hole cover on . 3. Carrying by supporting it properly. Attach hose prior to operate. An optional drain hose (#9181...
... the cover off the water bucket and place the connector into the stem. Empty the bucket when the indicator light turns on the rear grille. Next, connect a garden hose to the threaded end of attaching a garden hose to your dehumidifier to overtighten the hose. When not in the water bucket. Look into . First, remove the drain hole cover on . 3. Carrying by supporting it properly. Attach hose prior to operate. An optional drain hose (#9181...
Owners Manual
Page 9
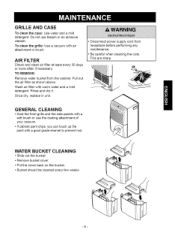
... out the bucket. • Remove bucket cover. • Put the cover back on the bucket. • Bucket should be cleaned every few weeks. -9- To clean the grille: Use a vacuum with warm water and a mild detergent. Pull out the air filter as shown above. Rinse and dry it. TO REMOVE: Remove water bucket from receptacle before performing any maintenance. • Be careful when cleaning the coils. Do not use the dusting attachment of...
... out the bucket. • Remove bucket cover. • Put the cover back on the bucket. • Bucket should be cleaned every few weeks. -9- To clean the grille: Use a vacuum with warm water and a mild detergent. Pull out the air filter as shown above. Rinse and dry it. TO REMOVE: Remove water bucket from receptacle before performing any maintenance. • Be careful when cleaning the coils. Do not use the dusting attachment of...
Owners Manual
Page 10
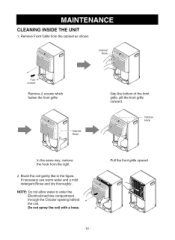
Remove Front Grille from the cabinet as shown Internal Hook," Remove 2 screws which fasten the front grille Grip the bottom of the front grille, pill the front grille outward Internal Hook In the same way, remove the hook from the right 2. NOTE: Do not allow water to enter the Electrical/machine compartment through the Circular opening behind the coil. Do not spray the coil with a hose. -10- Pull the front grille upward CLEANING INSIDE THE UNIT 1. If necessary use warm water and a mild detergent.Rinse and dry thoroughly. Brush the coil gently like in the figure.
Remove Front Grille from the cabinet as shown Internal Hook," Remove 2 screws which fasten the front grille Grip the bottom of the front grille, pill the front grille outward Internal Hook In the same way, remove the hook from the right 2. NOTE: Do not allow water to enter the Electrical/machine compartment through the Circular opening behind the coil. Do not spray the coil with a hose. -10- Pull the front grille upward CLEANING INSIDE THE UNIT 1. If necessary use warm water and a mild detergent.Rinse and dry thoroughly. Brush the coil gently like in the figure.
Owners Manual
Page 11
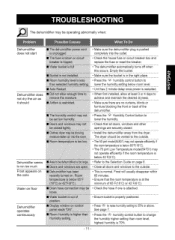
... and windows to change the humidity higher setting than room level, highest humidity is 70%. -11 - Thedehumidifiemr aybeoperatingabnormallwyhen: Dehumidifier doesnotstart Dehumidifiedroes notdrytheairas it should be vented to the outside . • This is normal. See page 7. [ Press the @ humidity control button to the outside . • The50 pintmodel(54501m) aynotoperateefficientlyif theroomtemperatureis below65°F(18°C). • The 70 pint Low Temperature model(54701) may not operate...
... and windows to change the humidity higher setting than room level, highest humidity is 70%. -11 - Thedehumidifiemr aybeoperatingabnormallwyhen: Dehumidifier doesnotstart Dehumidifiedroes notdrytheairas it should be vented to the outside . • This is normal. See page 7. [ Press the @ humidity control button to the outside . • The50 pintmodel(54501m) aynotoperateefficientlyif theroomtemperatureis below65°F(18°C). • The 70 pint Low Temperature model(54701) may not operate...

Owners Manual
Page 24
...or night (U.S.A. For the replacement parts, accessories and owner's manuals that you need to do-it ! and Canada) www.sears.com www.sears.ca For expert home solutions advice: www.managemyhome.com Our Home For repair of carry-in your nearest Sears Parts & Repair Service Center 1-800-488-1222 (U.S.A.)... de Sears Brands, LLC ® Sears Brands, LLC Part No.: 3828A20803B Your Home For repair- For Sears professional installation of home appliances and items like vacuums, lawn equipment, and electronics, call or go on a product serviced by Sears: 1-800-827-6655 (U.S.A.) 1-800-361-6665...
...or night (U.S.A. For the replacement parts, accessories and owner's manuals that you need to do-it ! and Canada) www.sears.com www.sears.ca For expert home solutions advice: www.managemyhome.com Our Home For repair of carry-in your nearest Sears Parts & Repair Service Center 1-800-488-1222 (U.S.A.)... de Sears Brands, LLC ® Sears Brands, LLC Part No.: 3828A20803B Your Home For repair- For Sears professional installation of home appliances and items like vacuums, lawn equipment, and electronics, call or go on a product serviced by Sears: 1-800-827-6655 (U.S.A.) 1-800-361-6665...


