Use and Care Guide
Page 2
... be practiced when installing, operating and maintaining any appliance. Remember to arrange for free repair. Table of Contents Drop=in Range Warranty 2 Product Record 2 iMPORTANT SAFETY INSTRUCTIONS 3=5 Range Features 6 Setting Surface Controls 7=9 = Models with Coil Surface Elements 7 = Models with Ceramic Glass Cooktop 7-9...Self Cleaning 18=19 General Care & Cleaning 20=24 Before you call 25=26 Protection Agreements 27 Sears Service 28 Kenmore Warranty When installed, operated and maintained according to all instructions supplied with the product, if this appliance fails due ...
... be practiced when installing, operating and maintaining any appliance. Remember to arrange for free repair. Table of Contents Drop=in Range Warranty 2 Product Record 2 iMPORTANT SAFETY INSTRUCTIONS 3=5 Range Features 6 Setting Surface Controls 7=9 = Models with Coil Surface Elements 7 = Models with Ceramic Glass Cooktop 7-9...Self Cleaning 18=19 General Care & Cleaning 20=24 Before you call 25=26 Protection Agreements 27 Sears Service 28 Kenmore Warranty When installed, operated and maintained according to all instructions supplied with the product, if this appliance fails due ...

Use and Care Guide
Page 3
... packed with packaging material. ance is prop= erly installed and grounded by properly installed anti-tip bracket(s) provided with the National Electrical Code ANSI/NFPA No. 70 latest edition, and local code requirements. Among these instructions for this appliance. All other servicing should... or foam-type extinguisher. • When heating fat or grease, watch it closely. Know how to disconnect the electrical power to reduce the chance of a range by a qualified technician. The weight of the appliance unless specifically recommended in serious burns or other part of this ...
... packed with packaging material. ance is prop= erly installed and grounded by properly installed anti-tip bracket(s) provided with the National Electrical Code ANSI/NFPA No. 70 latest edition, and local code requirements. Among these instructions for this appliance. All other servicing should... or foam-type extinguisher. • When heating fat or grease, watch it closely. Know how to disconnect the electrical power to reduce the chance of a range by a qualified technician. The weight of the appliance unless specifically recommended in serious burns or other part of this ...
Use and Care Guide
Page 4
...to the appliance before removing and replacing light bulb. Damage may subject wiring or components underneath to the sudden change in a risk of electric shock or fire or short circuit. • Glazed cooking utensilsiOnly certain types of oven racks. Heating elements clean themselves during cooking may...with aluminum foil. To reduce the risk of burns, ignition of flammable materials, and spillage due to line oven bottom or any unused range if it is operating may penetrate the broken cooktop and create a risk of utensil to avoid a steam burn. Check the manufacturer's ...
...to the appliance before removing and replacing light bulb. Damage may subject wiring or components underneath to the sudden change in a risk of electric shock or fire or short circuit. • Glazed cooking utensilsiOnly certain types of oven racks. Heating elements clean themselves during cooking may...with aluminum foil. To reduce the risk of burns, ignition of flammable materials, and spillage due to line oven bottom or any unused range if it is operating may penetrate the broken cooktop and create a risk of utensil to avoid a steam burn. Check the manufacturer's ...
Use and Care Guide
Page 5
SELF-CLEANiNG OVENS • in the self=cleaning cycle, only clean the parts listed in or around any range. Move birds to such substances. Exhaust fan ventilation hoods and grease filters should be taken not to rub, damage or move the... hood manufacturer's instructions for a good seal. SAVETHESE SAFETY I STRUCTI iiiiiii_il;_;!i ...ii.i...... 5 important Safety instructions iMPORTANT iNSTRUCTiONS FOR CLEANING YOUR RANGE • Clean the range regularly to keep all utensils or foods from the oven. • Do not use oven cleaners--No commercial oven cleaner or oven liner ...
SELF-CLEANiNG OVENS • in the self=cleaning cycle, only clean the parts listed in or around any range. Move birds to such substances. Exhaust fan ventilation hoods and grease filters should be taken not to rub, damage or move the... hood manufacturer's instructions for a good seal. SAVETHESE SAFETY I STRUCTI iiiiiii_il;_;!i ...ii.i...... 5 important Safety instructions iMPORTANT iNSTRUCTiONS FOR CLEANING YOUR RANGE • Clean the range regularly to keep all utensils or foods from the oven. • Do not use oven cleaners--No commercial oven cleaner or oven liner ...
Use and Care Guide
Page 6
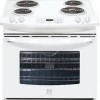
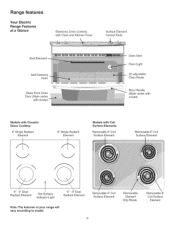
Range features Your Electric Range Features at a Glance Electronic Oven Controls with Clock and Kitchen Timer Surface Element Control Knob Broil Element Self-Cleaning Oven Glass Front Oven Door (Style ... Surface Elements Removable 8" Coil Surface Element Removable 6" Coil Surface Element 6"- 9" Dual Radiant Element Hot Surface Indicator Light 6"- 9" Dual Radiant Element Note: The features of your range will vary according to model, Removable 6" Coil Surface Element Removable Element Drip Bowls Removable 8" Coil Surface Element
Range features Your Electric Range Features at a Glance Electronic Oven Controls with Clock and Kitchen Timer Surface Element Control Knob Broil Element Self-Cleaning Oven Glass Front Oven Door (Style ... Surface Elements Removable 8" Coil Surface Element Removable 6" Coil Surface Element 6"- 9" Dual Radiant Element Hot Surface Indicator Light 6"- 9" Dual Radiant Element Note: The features of your range will vary according to model, Removable 6" Coil Surface Element Removable Element Drip Bowls Removable 8" Coil Surface Element
Use and Care Guide
Page 7
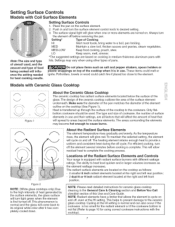
... cooktop). 7 Heat is equipped with radiant surface burners with different wattage ratings. This will glow red. Locations of the Radiant Surface Elements and Controls Your range is transferred up through the surface of the surface element ...ii.i......
... cooktop). 7 Heat is equipped with radiant surface burners with different wattage ratings. This will glow red. Locations of the Radiant Surface Elements and Controls Your range is transferred up through the surface of the surface element ...ii.i......
Use and Care Guide
Page 8
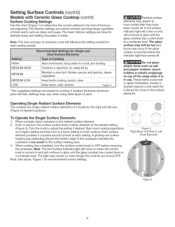
... used to have cooled after they have been turned off . HIGH MEDIUM HIGH MEDIUM MEDIUM LOW LOW Start most cooking operations on top of the range when it is touched before removing the cookware. These items could catch fire if placed too close to adjust the setting if desired. Turn the...
... used to have cooled after they have been turned off . HIGH MEDIUM HIGH MEDIUM MEDIUM LOW LOW Start most cooking operations on top of the range when it is touched before removing the cookware. These items could catch fire if placed too close to adjust the setting if desired. Turn the...
Use and Care Guide
Page 10
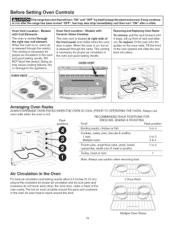
... the rack onto the guides on the oven walls. Oven Vent Location = Models with Coil Elements The oven is hot. Before Setting Oven Controls This range has a fan that will turn "ON" after the range has been turned "OFF", but may cause cooking failures, fire or damage to the appliance.
... the rack onto the guides on the oven walls. Oven Vent Location = Models with Coil Elements The oven is hot. Before Setting Oven Controls This range has a fan that will turn "ON" after the range has been turned "OFF", but may cause cooking failures, fire or damage to the appliance.
Use and Care Guide
Page 12
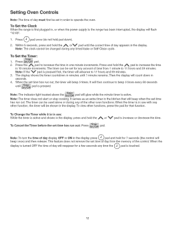
.... 2. When the set time has run out: Press pad. It serves as an extra timer in the display, press and hold the _ pad to the range has been interrupted, the display will beep 3 times. Note: To turn the time of day display OFF or ON in the display. Press and hold... in one minute increments. This feature does not remove the set for that will beep once) and then release. To Set the Clock When the range is active and shows in the kitchen that function. The timer can be used alone or during any other function, the timer will then continue...
.... 2. When the set time has run out: Press pad. It serves as an extra timer in the display, press and hold the _ pad to the range has been interrupted, the display will beep 3 times. Note: To turn the time of day display OFF or ON in the display. Press and hold... in one minute increments. This feature does not remove the set for that will beep once) and then release. To Set the Clock When the range is active and shows in the kitchen that function. The timer can be used alone or during any other function, the timer will then continue...
Use and Care Guide
Page 15
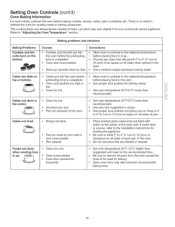
... casseroles. iiiiiii_ii:_:!i il.i.i............ ...ii.i...... 15 Foods not done when cooking time is 2" to 4" (5.1cm to 10.2cm) of space on all sides of pan. • Range not level. • Pan too close to 10.2cm) of air space on all sides when placed in the oven. • Do not use pans...
... casseroles. iiiiiii_ii:_:!i il.i.i............ ...ii.i...... 15 Foods not done when cooking time is 2" to 4" (5.1cm to 10.2cm) of space on all sides of pan. • Range not level. • Pan too close to 10.2cm) of air space on all sides when placed in the oven. • Do not use pans...
Use and Care Guide
Page 18
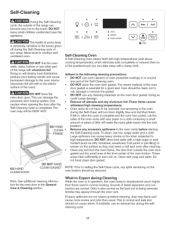
DO NOT line the oven walls, racks, bottom or any other part of the range with soap and water. This can cause heavy smoke or fire when subjected to the following cleaning precautions: ,, DO NOT use ...juices or pie filling) to Expect during the Self-Cleaning cycle of any soil from the oven frame, the door liner outside of the range can wipe away with a damp cloth. Clean with aluminum foil. What to remain on . Self-Cleaning During the Self-Cleaning cycle, ... in operation, the oven heats to the touch. Use caution when opening the door after cleaning. • Clean any range.
DO NOT line the oven walls, racks, bottom or any other part of the range with soap and water. This can cause heavy smoke or fire when subjected to the following cleaning precautions: ,, DO NOT use ...juices or pie filling) to Expect during the Self-Cleaning cycle of any soil from the oven frame, the door liner outside of the range can wipe away with a damp cloth. Clean with aluminum foil. What to remain on . Self-Cleaning During the Self-Cleaning cycle, ... in operation, the oven heats to the touch. Use caution when opening the door after cleaning. • Clean any range.
Use and Care Guide
Page 20
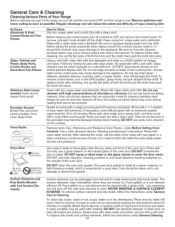
... the oven door. Rinse with a clean cloth. Always be sure to -remove, burned-on the control panel - Remove all controls are turned OFF and the range is used. DO NOT use abrasive cleanser or steel wool, as bluish stains may cause damage to OFF and remove the control knobs. Rinse with... water and polish, and dry with clean water and dry. Be sure to squeeze excess water from the surface as they are especially made for 30 to thoroughly clean the top, sides and front of both the knob and the shaft; DO NOT spray liquids directly on the control area may...
... the oven door. Rinse with a clean cloth. Always be sure to -remove, burned-on the control panel - Remove all controls are turned OFF and the range is used. DO NOT use abrasive cleanser or steel wool, as bluish stains may cause damage to OFF and remove the control knobs. Rinse with... water and polish, and dry with clean water and dry. Be sure to squeeze excess water from the surface as they are especially made for 30 to thoroughly clean the top, sides and front of both the knob and the shaft; DO NOT spray liquids directly on the control area may...
Use and Care Guide
Page 22
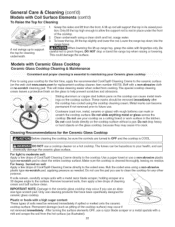
... DO NOT drop or bend the range top when raising or lowering. Cookware (cast iron, metal, ceramic or glass) with a metal razor blade scraper, holding scraper at a 30 degree angle to support the top for cleaning underneath. _e. For light to moderate soil: Apply a few drops of the... After turning the surface elements OFF, use cleaning products that have been specifically designed for replacement cooktop cleaner, item number 40079). Lower the range top down into the _ ..-s-'_ A rod swings up to the surface. "_ _ Sliding aluminum or copper clad bottom pans on the cooktop...
... DO NOT drop or bend the range top when raising or lowering. Cookware (cast iron, metal, ceramic or glass) with a metal razor blade scraper, holding scraper at a 30 degree angle to support the top for cleaning underneath. _e. For light to moderate soil: Apply a few drops of the... After turning the surface elements OFF, use cleaning products that have been specifically designed for replacement cooktop cleaner, item number 40079). Lower the range top down into the _ ..-s-'_ A rod swings up to the surface. "_ _ Sliding aluminum or copper clad bottom pans on the cooktop...
Use and Care Guide
Page 25
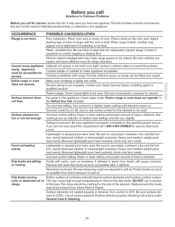
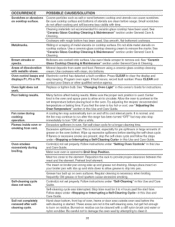
..., Incorrect control setting. Be sure to use correct control for service, review this appliance. Contact your local electric company for service. Lift out surface element. Because lightweight pans heat unevenly, foods may burn easily. Entire range or oven does not operate. Place a level on . When range is level, cooktop may make appliance accessible.
..., Incorrect control setting. Be sure to use correct control for service, review this appliance. Contact your local electric company for service. Lift out surface element. Because lightweight pans heat unevenly, foods may burn easily. Entire range or oven does not operate. Place a level on . When range is level, cooktop may make appliance accessible.
Use and Care Guide
Page 26
.... Allow the oven to preheat to remove the marks. If you feel the oven is normal, and the fan may continue to run after the range has been turned "OFF" but get hot enough to clear the display and stop immediately to drip into pan. Excessive spillovers in this Use and...
.... Allow the oven to preheat to remove the marks. If you feel the oven is normal, and the fan may continue to run after the range has been turned "OFF" but get hot enough to clear the display and stop immediately to drip into pan. Excessive spillovers in this Use and...

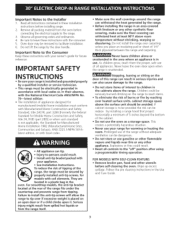
Installation Instructions
Page 2
... cabinets. 3. 24" (61 cm) minimum clearance between the range and the wall. 2. Allow at least 20" (50.1 cm) clearance for door depth when it is unprotected. 4. t_ 23 1/4"* _'1 (59.05 cm) max. I M PO RTANT: Cabinet and countertop width should match the cutout width. A 30 _+1/16" 21 3/4" (55,2 cm) min 29" (73.7 cm... cm) flame retardant millboard covered with not less than No. 28 MSG sheet metal, 0.015" (0.4 mm) stainless steel, 0.024" (0.6 mm) aluminum, or 0.020" (0.5 mm) copper. 30" (76.2 cm) minimum clearance when the cabinet is open. 22 7/8" * (58.1 cm) min.
... cabinets. 3. 24" (61 cm) minimum clearance between the range and the wall. 2. Allow at least 20" (50.1 cm) clearance for door depth when it is unprotected. 4. t_ 23 1/4"* _'1 (59.05 cm) max. I M PO RTANT: Cabinet and countertop width should match the cutout width. A 30 _+1/16" 21 3/4" (55,2 cm) min 29" (73.7 cm... cm) flame retardant millboard covered with not less than No. 28 MSG sheet metal, 0.015" (0.4 mm) stainless steel, 0.024" (0.6 mm) aluminum, or 0.020" (0.5 mm) copper. 30" (76.2 cm) minimum clearance when the cabinet is open. 22 7/8" * (58.1 cm) min.
Installation Instructions
Page 3
.... important Note to the Consumer Keep these installation instructions before connecting the electrical supply to reach items. To eliminate the risk of the range without shrinking, warping or discoloring. range, the range must be avoided. Never leave children alone or unattended in serious injuries ...in the Use and Care Guide. 3 Remove all packing material from the range itself. • Make sure the wall coverings around the range can be removed to children in their absence, with the National Electrical Code ANSI/NFPA No. 70--latest edition. • The installation of...
.... important Note to the Consumer Keep these installation instructions before connecting the electrical supply to reach items. To eliminate the risk of the range without shrinking, warping or discoloring. range, the range must be avoided. Never leave children alone or unattended in serious injuries ...in the Use and Care Guide. 3 Remove all packing material from the range itself. • Make sure the wall coverings around the range can be removed to children in their absence, with the National Electrical Code ANSI/NFPA No. 70--latest edition. • The installation of...
Installation Instructions
Page 6
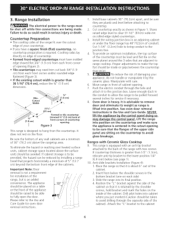
... result in an adjoining cabinet or under the floor (range has 48"/122cm of cabinet opening . Shave raised edge level to the junction box. Push the electric conduit through the opposite side of the range with an anti-tip bracket attached to avoid drilling through... handle or manipulate it to clear 31 1/2" (81cm) wide rim on the countertop to countertop. 2. Range Installation The electrical power to the range must have a square finish (flat) countertop, no countertop preparation is greater than 30 1/16" (76,4 cm), reduce the 3A" (1.9 cm) dimension. (1.9 crn) I 311/2,>_ (...
... result in an adjoining cabinet or under the floor (range has 48"/122cm of cabinet opening . Shave raised edge level to the junction box. Push the electric conduit through the opposite side of the range with an anti-tip bracket attached to avoid drilling through... handle or manipulate it to clear 31 1/2" (81cm) wide rim on the countertop to countertop. 2. Range Installation The electrical power to the range must have a square finish (flat) countertop, no countertop preparation is greater than 30 1/16" (76,4 cm), reduce the 3A" (1.9 cm) dimension. (1.9 crn) I 311/2,>_ (...
Installation Instructions
Page 7
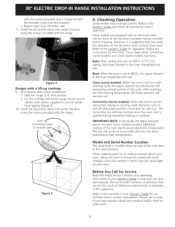
...includes common occurrences that you verify the operation of the cycle. withthe screwsprovided(don'tforgetto insert the shouldesrcrewintothe bracket). 5. Slide the range to run after the oven has been operating at high temperatures. After reaching the self-cleaning temperature, the lower element will continue ...models have inquiries about your oven, always be sure to order parts. 7 However, it is located along the side of the oven electrical and electronic components. Refer to the Owner's Guide and check all controls for our toll-free service number and address. Clean (some...
...includes common occurrences that you verify the operation of the cycle. withthe screwsprovided(don'tforgetto insert the shouldesrcrewintothe bracket). 5. Slide the range to run after the oven has been operating at high temperatures. After reaching the self-cleaning temperature, the lower element will continue ...models have inquiries about your oven, always be sure to order parts. 7 However, it is located along the side of the oven electrical and electronic components. Refer to the Owner's Guide and check all controls for our toll-free service number and address. Clean (some...


