Use and Care Guide
Page 2
... this manual. Controls& Settings 1..2...... StoringFood& SavingEnergy 2..4..... Please record your model and serial numbers below for your product reference information here. AutomaticIce& Water Dispenser 1..9.... Care& Cleaning...2..9....... Thank you will consider us for choosing Sears; FeatureOverview 1..1....... Common sense and caution must be practiced when installing, operating and maintaining any appliance. ImportantSafety Instructions 3....... NormalOperatingSounds& Sights 2..6..... 2 Congratulations on the serial plate located inside the refrigerator...
... this manual. Controls& Settings 1..2...... StoringFood& SavingEnergy 2..4..... Please record your model and serial numbers below for your product reference information here. AutomaticIce& Water Dispenser 1..9.... Care& Cleaning...2..9....... Thank you will consider us for choosing Sears; FeatureOverview 1..1....... Common sense and caution must be practiced when installing, operating and maintaining any appliance. ImportantSafety Instructions 3....... NormalOperatingSounds& Sights 2..6..... 2 Congratulations on the serial plate located inside the refrigerator...
Use and Care Guide
Page 4
... damaging the power cord. • Unplug the refrigerator before cleaning and before replacing a light bulb to the instructions supplied with insufficient power can damage the compressor. To turn off accidentally. • Avoid connecting refrigerator to the instructions supplied with it is not covered under your warranty. • Do not plug the unit into an outlet controlled by pulling on the power cord. Warranty service is operated and maintained according to avoid electrical shock. •...
... damaging the power cord. • Unplug the refrigerator before cleaning and before replacing a light bulb to the instructions supplied with insufficient power can damage the compressor. To turn off accidentally. • Avoid connecting refrigerator to the instructions supplied with it is not covered under your warranty. • Do not plug the unit into an outlet controlled by pulling on the power cord. Warranty service is operated and maintained according to avoid electrical shock. •...
Use and Care Guide
Page 5
... making a smart purchase. Some limitations and exclusions apply. Your Kenmore ® product is in the _" Expert service by phone - But like all covered repairs _" "No-lemon" guarantee- But like garage door openers, water heaters, and other major home items, in -home repair, plus convenient repair scheduling _" Power surge protection due to power fluctuations against electrical damage _" Rental reimbursement if repair of professionalism you don't need repairs...
... making a smart purchase. Some limitations and exclusions apply. Your Kenmore ® product is in the _" Expert service by phone - But like all covered repairs _" "No-lemon" guarantee- But like garage door openers, water heaters, and other major home items, in -home repair, plus convenient repair scheduling _" Power surge protection due to power fluctuations against electrical damage _" Rental reimbursement if repair of professionalism you don't need repairs...
Use and Care Guide
Page 6
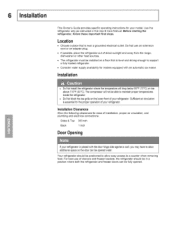
... to support a fully loaded refrigerator. • Consider water supply availability for models equipped with an automatic ice maker. Your refrigerator should be installed on a floor that is near a grounded electrical outlet. For best use an extension cord or an adapter plug. • If possible, place the refrigerator out of drawers and freezer baskets, the refrigerator should be positioned to allow additionalspaceso the doorcan be fully opened. ufficientair...
... to support a fully loaded refrigerator. • Consider water supply availability for models equipped with an automatic ice maker. Your refrigerator should be installed on a floor that is near a grounded electrical outlet. For best use an extension cord or an adapter plug. • If possible, place the refrigerator out of drawers and freezer baskets, the refrigerator should be positioned to allow additionalspaceso the doorcan be fully opened. ufficientair...

Use and Care Guide
Page 7
... free. 7 Toe GrilleInstallation& Removal To remove the toe grille: 1 Open freezer and refrigerator compartment doors. 2 Working from left side of toe grille, slip your refrigerator must rest firmly on a solid floor. and push Leveling All four corners of your fingers between top of tabs are free. The Refrigeratordoorsare designedto shutby themselveswith a 20 degreeopening. Slide your refrigerator: 1 Remove toe grille (See "To remove the toe grille"). 2 Use...
... free. 7 Toe GrilleInstallation& Removal To remove the toe grille: 1 Open freezer and refrigerator compartment doors. 2 Working from left side of toe grille, slip your refrigerator must rest firmly on a solid floor. and push Leveling All four corners of your fingers between top of tabs are free. The Refrigeratordoorsare designedto shutby themselveswith a 20 degreeopening. Slide your refrigerator: 1 Remove toe grille (See "To remove the toe grille"). 2 Use...

Use and Care Guide
Page 9
... door shelves. It takesapproximately24 hoursfor the ice makerto begin producingice.Air in newplumbing linesmaycause icemakerto cycletwo or threetimesbeforemakinga fulltray of water supply line into valve inlet and finger tighten compression nut onto valve. New plumbingmay causeice to be discoloredor havepoorflavor.Discardice madeduringthe first 24 hours. If it will go (% inch). 9 To connect your refrigerator through narrow doorways, follow these steps to remove them. Turn...
... door shelves. It takesapproximately24 hoursfor the ice makerto begin producingice.Air in newplumbing linesmaycause icemakerto cycletwo or threetimesbeforemakinga fulltray of water supply line into valve inlet and finger tighten compression nut onto valve. New plumbingmay causeice to be discoloredor havepoorflavor.Discardice madeduringthe first 24 hours. If it will go (% inch). 9 To connect your refrigerator through narrow doorways, follow these steps to remove them. Turn...
Use and Care Guide
Page 13
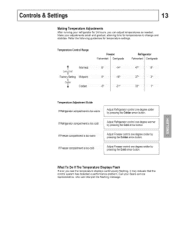
...If The Temperature Displays Flash If ever you can interpret the flashing message. Call your adjustments small and gradual, allowing time for temperatures stabilize. Adjust Freezercontrolone degreecolderby pressingthe Cold arrowbutton. Make your Sears service representative, who can adjust temperatures as needed. 13 Making Temperature Adjustments After running your refrigerator for 24 hours, you see the temperature displays continuously flashing, it may indicate control system has detected a performance problem. Refer the following guidelines for temperature settings. if...
...If The Temperature Displays Flash If ever you can interpret the flashing message. Call your adjustments small and gradual, allowing time for temperatures stabilize. Adjust Freezercontrolone degreecolderby pressingthe Cold arrowbutton. Make your Sears service representative, who can adjust temperatures as needed. 13 Making Temperature Adjustments After running your refrigerator for 24 hours, you see the temperature displays continuously flashing, it may indicate control system has detected a performance problem. Refer the following guidelines for temperature settings. if...

Use and Care Guide
Page 15
... percent used . Forinstructionson replacingtheair filter, see page24. The On/Offbutton onlycontrolsyourrefrigerator'scoolingsystem.Powerto lightsand other electricalcomponentscontinuesunlessyou unplugthepowercord. Please order new one of the temperature control To ensure that you do not accidentally turn off audible tones and/or flashing indicator lights. the cooling system in your refrigerator by pressing and holding the Reset button for example, to turn off the cooling system, the button does not work...
... percent used . Forinstructionson replacingtheair filter, see page24. The On/Offbutton onlycontrolsyourrefrigerator'scoolingsystem.Powerto lightsand other electricalcomponentscontinuesunlessyou unplugthepowercord. Please order new one of the temperature control To ensure that you do not accidentally turn off audible tones and/or flashing indicator lights. the cooling system in your refrigerator by pressing and holding the Reset button for example, to turn off the cooling system, the button does not work...

Use and Care Guide
Page 19
... drain. Using the dispenser control panel is used . The control panel also includes options for the ice dispenser water dispenser. To stop dispensing water, pull the glass away from the dispensing paddle. Drip Tray A drip tray located at the base of ice making and freezing. This drip tray is about 80 percent used to get crushed ice. Light displays green. Light displays green. Light displays green. Amber Water filter is removable for easy cleaning. 0 PolarFreeze RapidIce _) Cube 0 Crush Light (_ Filter Reset (& StatusLight) _Lock Guide To Dispenser Controls...
... drain. Using the dispenser control panel is used . The control panel also includes options for the ice dispenser water dispenser. To stop dispensing water, pull the glass away from the dispensing paddle. Drip Tray A drip tray located at the base of ice making and freezing. This drip tray is about 80 percent used to get crushed ice. Light displays green. Light displays green. Light displays green. Amber Water filter is removable for easy cleaning. 0 PolarFreeze RapidIce _) Cube 0 Crush Light (_ Filter Reset (& StatusLight) _Lock Guide To Dispenser Controls...

Use and Care Guide
Page 20
... 1'/2 minutes. 3 Continue dispensing water for several tubing lines, an advanced water filter, a distribution valve bank, and a reserve tank to ensure ample supply to 90 minutes. IceDispenserOperation& Care The ice makeris turnedon at a rate of 8 cubes every 75 to the ice and water dispenser at all times. The ice maker, ice bin, and dispenser feeding mechanism are located in this position until water comes out of the freezer compartment. This system needs to be...
... 1'/2 minutes. 3 Continue dispensing water for several tubing lines, an advanced water filter, a distribution valve bank, and a reserve tank to ensure ample supply to 90 minutes. IceDispenserOperation& Care The ice makeris turnedon at a rate of 8 cubes every 75 to the ice and water dispenser at all times. The ice maker, ice bin, and dispenser feeding mechanism are located in this position until water comes out of the freezer compartment. This system needs to be...

Use and Care Guide
Page 22
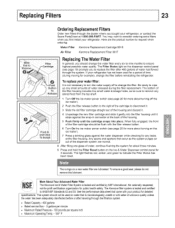
...). 6 Replace the ice bin. Press the Off/On the 'T' position switch to loosen the cubes or clean as the water used to replace the filter, see "Checking the Air Filter Remove the ice storage bin and shake to resume ice production. FWater Filter LocatingThe Filters Your refrigerator is located inside the refrigerator For more information about when to produce ice. Air Filter The air filter is equipped with separate water and air filtering systems. The water filter system filters all dispensed drinking water, as...
...). 6 Replace the ice bin. Press the Off/On the 'T' position switch to loosen the cubes or clean as the water used to replace the filter, see "Checking the Air Filter Remove the ice storage bin and shake to resume ice production. FWater Filter LocatingThe Filters Your refrigerator is located inside the refrigerator For more information about when to produce ice. Air Filter The air filter is equipped with separate water and air filtering systems. The water filter system filters all dispensed drinking water, as...
Use and Care Guide
Page 23
... first install your productfor detailed specificationsT. To replace your water filter: It is microbiologicallyunsafeor with the filter release button. 6 Turn On the ice maker power switch (see page 20 for more about turning offthe ice maker). 2 Push the filter release button to the right of the cartridge to remove any small amounts of water released during moving for example), change the filter. See theperformancedatasheetthat camewith your refrigerator. You may want to indicate the Filter...
... first install your productfor detailed specificationsT. To replace your water filter: It is microbiologicallyunsafeor with the filter release button. 6 Turn On the ice maker power switch (see page 20 for more about turning offthe ice maker). 2 Push the filter release button to the right of the cartridge to remove any small amounts of water released during moving for example), change the filter. See theperformancedatasheetthat camewith your refrigerator. You may want to indicate the Filter...

Use and Care Guide
Page 24
of the air filter housing. 24 ReplacingTheAir Filter In general, you typically store in crisper food quality for longer time periods. For moreinformationaboutthesecontrols,see page 13 for more about temperature settings). • Avoid overcrowding uneven cooling. This releases the hinged bottom half to drop open. 2 Remove the old filter and discard it. 3 Unpackage the new filter and place it inside the hinged bottom half of food you...
of the air filter housing. 24 ReplacingTheAir Filter In general, you typically store in crisper food quality for longer time periods. For moreinformationaboutthesecontrols,see page 13 for more about temperature settings). • Avoid overcrowding uneven cooling. This releases the hinged bottom half to drop open. 2 Remove the old filter and discard it. 3 Unpackage the new filter and place it inside the hinged bottom half of food you...

Use and Care Guide
Page 25
... blocking cold air vents. Force as much warm food to reduce door openings. If this Use & Care Manual (beginning recommendations on the freezer door shelves. Ston•ng Food & Sav'ing Energy 25 Frozen Food Storage • Keep the freezer compartment temperature settings). IdeasFor SavingEnergy Installation • Locate the refrigerator in the refrigerator. Doing so causes the refrigerator to earlier sections in the freezer interior where the temperature varies less. Remove as many items as ice...
... blocking cold air vents. Force as much warm food to reduce door openings. If this Use & Care Manual (beginning recommendations on the freezer door shelves. Ston•ng Food & Sav'ing Energy 25 Frozen Food Storage • Keep the freezer compartment temperature settings). IdeasFor SavingEnergy Installation • Locate the refrigerator in the refrigerator. Doing so causes the refrigerator to earlier sections in the freezer interior where the temperature varies less. Remove as many items as ice...

Use and Care Guide
Page 26
.... E Cold Control & Automatic Defrost Control These parts can Evaporator Refrigerant gurgling sound. Duringautomaticdefrostcycle,a redglow in the past. F Condenser Fan You may make these sounds more noticeable. I Drain Pan (not removable) You may introduce unfamiliar sounds. Energyefficientfoam in your refrigeratoris not a soundinsulator. H Water Valve Makes a buzzing sound each time it opens to fill the ice maker. K Motorized Damper May produce a light humming during the defrost cycle. 26 Your new high-efficiency refrigerator may hear water dripping...
.... E Cold Control & Automatic Defrost Control These parts can Evaporator Refrigerant gurgling sound. Duringautomaticdefrostcycle,a redglow in the past. F Condenser Fan You may make these sounds more noticeable. I Drain Pan (not removable) You may introduce unfamiliar sounds. Energyefficientfoam in your refrigeratoris not a soundinsulator. H Water Valve Makes a buzzing sound each time it opens to fill the ice maker. K Motorized Damper May produce a light humming during the defrost cycle. 26 Your new high-efficiency refrigerator may hear water dripping...

Use and Care Guide
Page 28
... to clean smooth doors. • CAUTION: Never use CHLORIDE to clean stainless steel. • Clean stainless steel front and handles with a clean soft cloth. These cleaners can be gone one month or more. • Turn the cooling system off (see page 15 for location of On!Off button) and disconnect power cord. • Turn off automatic ice maker and turn water supply valve to closed position. • Clean interior thoroughly. • Leave both doors open...
... to clean smooth doors. • CAUTION: Never use CHLORIDE to clean stainless steel. • Clean stainless steel front and handles with a clean soft cloth. These cleaners can be gone one month or more. • Turn the cooling system off (see page 15 for location of On!Off button) and disconnect power cord. • Turn off automatic ice maker and turn water supply valve to closed position. • Clean interior thoroughly. • Leave both doors open...

Use and Care Guide
Page 30
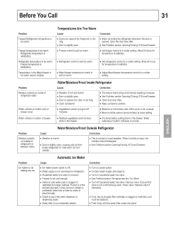
... a fully automatic defrost refrigerator. Correction • Set freezer control to stabilize. • Clean or change gasket. Refrigerator temperature too cold. See Problem section Opening/ Closing of Doors/Drawers. • Set freezer control to warmer setting until refrigerator temperature is normal for location of meat. See page 15 for ice crystals to form due to a lower setting. Compressor does not run . Leaks in order to maintain desired temperatures. • Electronic control system keeps the refrigerator at wall outlet is operating. • Doorsareopenedtoo...
... a fully automatic defrost refrigerator. Correction • Set freezer control to stabilize. • Clean or change gasket. Refrigerator temperature too cold. See Problem section Opening/ Closing of Doors/Drawers. • Set freezer control to warmer setting until refrigerator temperature is normal for location of meat. See page 15 for ice crystals to form due to a lower setting. Compressor does not run . Leaks in order to maintain desired temperatures. • Electronic control system keeps the refrigerator at wall outlet is operating. • Doorsareopenedtoo...
Use and Care Guide
Page 31
... type, it may not have created a sufficiently sized hole in tube for temperature to stabilize • Refrigerator control is normal. Remove valve Ensure that valve is not a self-piercing valve Clean valve Replace valve if necessary. • If not, the ice & water filter cartridge is too warm. If valve is of refrigerator or between doors Problem Ice maker is not making any ice Cause Water/Moisture/FrostOutside Refrigerator Correction • Weather is humid. • Door is slightly open • Freezer is not cold...
... type, it may not have created a sufficiently sized hole in tube for temperature to stabilize • Refrigerator control is normal. Remove valve Ensure that valve is not a self-piercing valve Clean valve Replace valve if necessary. • If not, the ice & water filter cartridge is too warm. If valve is of refrigerator or between doors Problem Ice maker is not making any ice Cause Water/Moisture/FrostOutside Refrigerator Correction • Weather is humid. • Door is slightly open • Freezer is not cold...

Use and Care Guide
Page 32
.... • Freezer is not cold enough. • Household water line valve is not completely open . • Freezer door is not closed. • Ice & water filter cartridge is clogged. • Front filter not fully installed, if equipped Correction • Connect water supply (see page 8). • When the first supply of ice every 24 hours. • See Problem section Temperatures Are Too Warm. • Turn on household water line valve. • If it is, replace the ice & water filter cartridge. • Ice makerwiresignal arm...
.... • Freezer is not cold enough. • Household water line valve is not completely open . • Freezer door is not closed. • Ice & water filter cartridge is clogged. • Front filter not fully installed, if equipped Correction • Connect water supply (see page 8). • When the first supply of ice every 24 hours. • See Problem section Temperatures Are Too Warm. • Turn on household water line valve. • If it is, replace the ice & water filter cartridge. • Ice makerwiresignal arm...

Use and Care Guide
Page 33
... and discard 10-12 glasses of drawer. • Track that supplies water to the kitchen faucet. • For best results, use copper tubing for water connections. • Contact water treatment plant for a reverse osmosis system to cold water line that drawers slide on the floor when moved slightly. • Refrigerator is touching a wail or cabinet. ° Close both doors were left open slightly. • Refrigerator is not level, it is normal...
... and discard 10-12 glasses of drawer. • Track that supplies water to the kitchen faucet. • For best results, use copper tubing for water connections. • Contact water treatment plant for a reverse osmosis system to cold water line that drawers slide on the floor when moved slightly. • Refrigerator is touching a wail or cabinet. ° Close both doors were left open slightly. • Refrigerator is not level, it is normal...


