
Use and Care Guide
Page 2
.... 7. Disclaimer of thermal shock. 2. Table of Contents Warranty 2 iMPORTANT SAFETY iNSTRUCTiONS 3-4 Serial Plate Location 5 Product Record 5 Surface Cooking 5 Setting Surface Controls 6-8 General Cooktop Information 6-7 Operating the Single Radiant Surface Elements 7 Operating the Dual Surface Element 8 General Care & Cleaning 8-9 Cleaning Various Parts of Your Cooktop 8 Ceramic Glass Cooktop Cleaning & Maintenance .......... 9 Before You Call 10 Protection Agreements 11 Sears Service 12 Kenmore Elite Warranty When installed, operated and maintained according to all...
.... 7. Disclaimer of thermal shock. 2. Table of Contents Warranty 2 iMPORTANT SAFETY iNSTRUCTiONS 3-4 Serial Plate Location 5 Product Record 5 Surface Cooking 5 Setting Surface Controls 6-8 General Cooktop Information 6-7 Operating the Single Radiant Surface Elements 7 Operating the Dual Surface Element 8 General Care & Cleaning 8-9 Cleaning Various Parts of Your Cooktop 8 Ceramic Glass Cooktop Cleaning & Maintenance .......... 9 Before You Call 10 Protection Agreements 11 Sears Service 12 Kenmore Elite Warranty When installed, operated and maintained according to all...

Use and Care Guide
Page 3
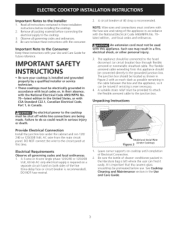
... appliance at the circuit breaker or fuse box. • User Servicing--Do not repair or replace any part of the appliance unless specifically recommended in serious injuries and may also cause damage to the cooktop. Be sure your appliance for this cooktop can result in the manuals. Stepping or leaning on Appliance. They should be allowed to climb or play with National Electrical Code ANSI/NFPA...
... appliance at the circuit breaker or fuse box. • User Servicing--Do not repair or replace any part of the appliance unless specifically recommended in serious injuries and may also cause damage to the cooktop. Be sure your appliance for this cooktop can result in the manuals. Stepping or leaning on Appliance. They should be allowed to climb or play with National Electrical Code ANSI/NFPA...

Use and Care Guide
Page 4
... cover will occur if the hot covers are suitable for range top service without breaking due to avoid a steam burn. Only use aluminum foil as recommended for cooktop use aluminum foil to line any part of potential exposure to the appliance. This could cause glass to warn customers of the appliance. To reduce the risk of burns, ignition of electric shock or fire or short circuit. ,, Glazed Cooking...
... cover will occur if the hot covers are suitable for range top service without breaking due to avoid a steam burn. Only use aluminum foil as recommended for cooktop use aluminum foil to line any part of potential exposure to the appliance. This could cause glass to warn customers of the appliance. To reduce the risk of burns, ignition of electric shock or fire or short circuit. ,, Glazed Cooking...

Use and Care Guide
Page 5
... best cooking results. Serial plate is well balanced. Serial No. Figure 2 Note: The size and type of material that make good contact with the entire surface heating element. CORRECT INCORRECT t" 1" • Flat bottom and straight sides. = Tight fitting lids. Pan is located under the burner box. Made of cookware used will influence the setting needed for exact location. The serial plate is located under the cooktop. This serial plate is located...
... best cooking results. Serial plate is well balanced. Serial No. Figure 2 Note: The size and type of material that make good contact with the entire surface heating element. CORRECT INCORRECT t" 1" • Flat bottom and straight sides. = Tight fitting lids. Pan is located under the burner box. Made of cookware used will influence the setting needed for exact location. The serial plate is located under the cooktop. This serial plate is located...

Use and Care Guide
Page 6
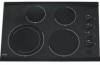
... 7 inch radiant element located at the right rear position; ,, And one Turbo Boil 9 inch radiant element located at the HI setting. Locations of the glass. The radiant surface elements are located on page 5 of this Use and Care Guide. Due to the high intensity of this Use and Care Guide) NOTE: (White glass cooktops only). Setting Surface Controls General Cooktop information About the Ceramic Glass Cooktop The ceramic cooktop has radiant surface elements located below the surface of the Radiant Surface Elements and Controls Your cooktop is equipped with radiant surface burners...
... 7 inch radiant element located at the right rear position; ,, And one Turbo Boil 9 inch radiant element located at the HI setting. Locations of the glass. The radiant surface elements are located on page 5 of this Use and Care Guide. Due to the high intensity of this Use and Care Guide) NOTE: (White glass cooktops only). Setting Surface Controls General Cooktop information About the Ceramic Glass Cooktop The ceramic cooktop has radiant surface elements located below the surface of the Radiant Surface Elements and Controls Your cooktop is equipped with radiant surface burners...

Use and Care Guide
Page 7
..., melt, simmer Operating the Single Radiant Surface Elements ......... Potholders, towels or wooden spoons could melt or ignite. Do not allow aluminum foil, or ANY material that will come on and will damage the ceramic cooktop. A glowing red surface heating area extending beyond the bottom edge of the cookware indicates the cookware is in either direction to the desired setting (Figure 3). Note: The Hot Surface Indicator light will...
..., melt, simmer Operating the Single Radiant Surface Elements ......... Potholders, towels or wooden spoons could melt or ignite. Do not allow aluminum foil, or ANY material that will come on and will damage the ceramic cooktop. A glowing red surface heating area extending beyond the bottom edge of the cookware indicates the cookware is in either direction to the desired setting (Figure 3). Note: The Hot Surface Indicator light will...

Use and Care Guide
Page 8
Setting Surface Controls Operating the Dual Surface Radiant Element The cooktop is equipped with a dual radiant surface element located at any time during heating that cannot be removed. You may switch between settings at the left front (See Figures 1 & 2) position. The light may occur during cooking. REGULAR CLEANINGS NOW WILL REDUCE THE DIFFICULTY AND EXTENT OF A MAJOR CLEANING LATER. Stainless Steel, Chrome parts Decorative Trim Cooktop Clean with a damp cloth and dry. Only use kitchen cleaners that will...
Setting Surface Controls Operating the Dual Surface Radiant Element The cooktop is equipped with a dual radiant surface element located at any time during heating that cannot be removed. You may switch between settings at the left front (See Figures 1 & 2) position. The light may occur during cooking. REGULAR CLEANINGS NOW WILL REDUCE THE DIFFICULTY AND EXTENT OF A MAJOR CLEANING LATER. Stainless Steel, Chrome parts Decorative Trim Cooktop Clean with a damp cloth and dry. Only use kitchen cleaners that will...

Use and Care Guide
Page 9
...'_G _ ___ Special Caution for Aluminum Foil and Aluminum Cooking Utensils • Aluminum foil: Use of CookTop® Cleaning Creme directly to clean the entire cooktop surface. For light to moderate soil: Apply a few drops of aluminum foil will make cleaning easier when soiled from the hot surface (as they can be removed immediately if spilled or melted onto the ceramic cooktop surface. If soils remain, carefully scrape them with a non-abrasive...
...'_G _ ___ Special Caution for Aluminum Foil and Aluminum Cooking Utensils • Aluminum foil: Use of CookTop® Cleaning Creme directly to clean the entire cooktop surface. For light to moderate soil: Apply a few drops of aluminum foil will make cleaning easier when soiled from the hot surface (as they can be removed immediately if spilled or melted onto the ceramic cooktop surface. If soils remain, carefully scrape them with a non-abrasive...

Use and Care Guide
Page 10
... lightweight pans heat unevenly, foods may burn easily. Small scratches do not affect cooking and will vary slightly. Use smooth, flat-bottomed cookware. See Ceramic Glass Cooktop Cleaning & Maintenance in this occurrence use correct control for ceramic-glass cooktop have cooked onto surface. See Ceramic Glass Cooktop Cleaning & Maintenance in this Use and Care Guide. Wiring connection is obtained. Call your local electric company for ceramic-glass cooktop have this requirement call 1-800-4-MY-HOME® for service (see back cover). Surface element too hot...
... lightweight pans heat unevenly, foods may burn easily. Small scratches do not affect cooking and will vary slightly. Use smooth, flat-bottomed cookware. See Ceramic Glass Cooktop Cleaning & Maintenance in this occurrence use correct control for ceramic-glass cooktop have cooked onto surface. See Ceramic Glass Cooktop Cleaning & Maintenance in this Use and Care Guide. Wiring connection is obtained. Call your local electric company for ceramic-glass cooktop have this requirement call 1-800-4-MY-HOME® for service (see back cover). Surface element too hot...

Use and Care Guide
Page 12
...like vacuums, lawn equipment, and electronics, call anytime for the location of all major brand appliances, lawn and garden equipment, or heating and cooling systems, no matter who made it, no matter who sold it -yourself. For Sears professional installation of Sears Brands, LLC ® Marca Registrada / TM ... door openers and water heaters. 1-800-4-MY-HOME ® (1-800-469-4663) Call anytime, day or night (U.S.A. For the replacement parts, accessories and owner's manuals that you need to do-it ! Your Home For expert troubleshooting and home solutions advice: www.managemyhome.com For...
...like vacuums, lawn equipment, and electronics, call anytime for the location of all major brand appliances, lawn and garden equipment, or heating and cooling systems, no matter who made it, no matter who sold it -yourself. For Sears professional installation of Sears Brands, LLC ® Marca Registrada / TM ... door openers and water heaters. 1-800-4-MY-HOME ® (1-800-469-4663) Call anytime, day or night (U.S.A. For the replacement parts, accessories and owner's manuals that you need to do-it ! Your Home For expert troubleshooting and home solutions advice: www.managemyhome.com For...
Installation Instructions
Page 1
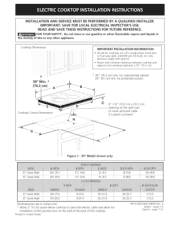
... SERVICE MUST BE PERFORMED BY A QUALiFiED iNSTALLER. for protected surface Cooktop Cutout Dimensions G C 4" X 8" (1 0.2 cm x 20.3 cm) opening at the back of this or any other appliance. pages 1-6 Espahol - iMPORTANT: SAVE FOR LOCAL ELECTRICAL iNSPECTOR'S USE. Cooktop Dimensions iMPORTANT INSTALLATION-INFORMATION All electric cooktops run off a single phase, three-wire or four-wire cable, 240/208 volt, 60 hertz, AC only electrical supply with ground. Please note minimum...
... SERVICE MUST BE PERFORMED BY A QUALiFiED iNSTALLER. for protected surface Cooktop Cutout Dimensions G C 4" X 8" (1 0.2 cm x 20.3 cm) opening at the back of this or any other appliance. pages 1-6 Espahol - iMPORTANT: SAVE FOR LOCAL ELECTRICAL iNSPECTOR'S USE. Cooktop Dimensions iMPORTANT INSTALLATION-INFORMATION All electric cooktops run off a single phase, three-wire or four-wire cable, 240/208 volt, 60 hertz, AC only electrical supply with ground. Please note minimum...

Installation Instructions
Page 2
... of Cutout to Front Edge of Countertop Approximate Location of Junction Box Letters on front page except for installation purpose. _To eliminate the risk of burns or fire by reaching over heated surfaces, cabinet storage space located above the cooktop should be reduced by Not Less Than 1/8" Flame Retardant Millboard Covered With Not Less Than No. 28 MGS Sheet Steel, 0.015" (0.4 mm) Stainless Steel, 0.024" (0.6 mm) Aluminum...
... of Cutout to Front Edge of Countertop Approximate Location of Junction Box Letters on front page except for installation purpose. _To eliminate the risk of burns or fire by reaching over heated surfaces, cabinet storage space located above the cooktop should be reduced by Not Less Than 1/8" Flame Retardant Millboard Covered With Not Less Than No. 28 MGS Sheet Steel, 0.015" (0.4 mm) Stainless Steel, 0.024" (0.6 mm) Aluminum...
Installation Instructions
Page 3
... the ceramic-glass smoothtop be shut off while line connections are being made. The junction box should be connected directly to the cooktop must not be used with this appliance should be connected to the circuit panel at this time. Unpacking Instructions _The electrical power to the grounded junction box. The flexible armored cable extending from the main circuit panel. Electrical Requirements Observe all governing codes and ordinances. 4. Provide Electrical Connection Install the junction box under the cabinet...
... the ceramic-glass smoothtop be shut off while line connections are being made. The junction box should be connected directly to the cooktop must not be used with this appliance should be connected to the circuit panel at this time. Unpacking Instructions _The electrical power to the grounded junction box. The flexible armored cable extending from the main circuit panel. Electrical Requirements Observe all governing codes and ordinances. 4. Provide Electrical Connection Install the junction box under the cabinet...

Installation Instructions
Page 4
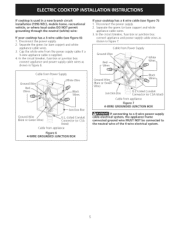
... aluminum wires in a new branch circuit installation (1996 NEC), mobile home, recreational vehicle, or where local codes do not permit grounding through the neutral (white) wire is required on the power. DO NOT connect to electrical power supply until appliance is made to aluminum house wiring, use a 4-wire power supply cable. Disconnect the power supply. 2. In the circuit breaker, fuse box or junction box: connect appliance and power supply cable wires as follows. See Figure 6 & 7. If connection...
... aluminum wires in a new branch circuit installation (1996 NEC), mobile home, recreational vehicle, or where local codes do not permit grounding through the neutral (white) wire is required on the power. DO NOT connect to electrical power supply until appliance is made to aluminum house wiring, use a 4-wire power supply cable. Disconnect the power supply. 2. In the circuit breaker, fuse box or junction box: connect appliance and power supply cable wires as follows. See Figure 6 & 7. If connection...
Installation Instructions
Page 5
... circuit breaker, fuse box or junction box: connect appliance and power supply cable wires as shown in a new branch circuit installation (1996 NEC), mobile home, recreational vehicle, or where local codes DO NOT permit grounding through the neutral (white) wire: If your cooktop has a 4 wire cable (see figure 6): 1. If your cooktop has a 3-wire cable (see figure 7): 1. Cable from Power Supply Ground Wire _-'-m Red /-White ires] Cable from Power Supply Ground Wire Red Wires .White Wire Wires Box...
... circuit breaker, fuse box or junction box: connect appliance and power supply cable wires as shown in a new branch circuit installation (1996 NEC), mobile home, recreational vehicle, or where local codes DO NOT permit grounding through the neutral (white) wire: If your cooktop has a 4 wire cable (see figure 6): 1. If your cooktop has a 3-wire cable (see figure 7): 1. Cable from Power Supply Ground Wire _-'-m Red /-White ires] Cable from Power Supply Ground Wire Red Wires .White Wire Wires Box...
Installation Instructions
Page 6
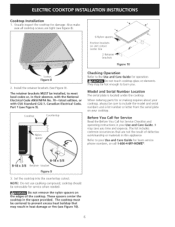
... brackets " ....... The retainer brackets MUST be removable for Service Checklist and operating instructions in this appliance. Cooktop Installation 1. Also make sure all cooktop screws are not the result of the cooktop, These spacers center the cooktop in the space provided. Model and Serial Number Location The serial plate is located under the cooktop. Do not remove the nylon spacers on your Use and Care Guide for operation. _Do not touch cooktop glass or elements...
... brackets " ....... The retainer brackets MUST be removable for Service Checklist and operating instructions in this appliance. Cooktop Installation 1. Also make sure all cooktop screws are not the result of the cooktop, These spacers center the cooktop in the space provided. Model and Serial Number Location The serial plate is located under the cooktop. Do not remove the nylon spacers on your Use and Care Guide for operation. _Do not touch cooktop glass or elements...


