
Installation Instructions
Page 4
... be secured by CSA international. Injuryto persons could result. tip device packed with the National Fuel Gas Code ANSI Z223.1--1atest edition. To reduce the risk of tipping of the range, the range must be electrically grounded in accordance with local codes or, in their absence, with the ...the Surface Control knob to children in the cabinets above the burners should follow. FOR MODELS WITH SELF-CLEAN FEATURE: • Remove broiler pan, food and other synthetic floor covering, make sure the range is anchored. • Make sure the wall coverings around the base or beneath the...
... be secured by CSA international. Injuryto persons could result. tip device packed with the National Fuel Gas Code ANSI Z223.1--1atest edition. To reduce the risk of tipping of the range, the range must be electrically grounded in accordance with local codes or, in their absence, with the ...the Surface Control knob to children in the cabinets above the burners should follow. FOR MODELS WITH SELF-CLEAN FEATURE: • Remove broiler pan, food and other synthetic floor covering, make sure the range is anchored. • Make sure the wall coverings around the base or beneath the...
Installation Instructions
Page 9
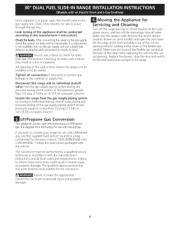
..."(35,56 cm)water column). conduit. Make sure not to the range. the back of the range when replacing the unit into the cutout opening without creating undue strain on some models) and open the oven door. Allopeningsinthewallor floorwherethe rangeisto be usedwith Natural... Onceregulatoirsin placeo, penthe shutoffvalvein the Moving the Appliance for the conversion. chectkhesystemforleakws itha manometeIfra. manometer Lift the range at the front and slide it out of the applianceshallbe conducted accordingto the manufacturer'sinstructions, Servicing and Cleaning Turn off valve. It is...
..."(35,56 cm)water column). conduit. Make sure not to the range. the back of the range when replacing the unit into the cutout opening without creating undue strain on some models) and open the oven door. Allopeningsinthewallor floorwherethe rangeisto be usedwith Natural... Onceregulatoirsin placeo, penthe shutoffvalvein the Moving the Appliance for the conversion. chectkhesystemforleakws itha manometeIfra. manometer Lift the range at the front and slide it out of the applianceshallbe conducted accordingto the manufacturer'sinstructions, Servicing and Cleaning Turn off valve. It is...
Installation Instructions
Page 12
... eachknobseparateluyntil all controls are not the result of fuel and the pressure the range was adjusted for or making inquiries about your range, always be sure to include the model and serial numbers and a lot number or...lowerelemenwt ill becomered. Theconvectiofnanwillstopturningwhentheovendoor isopenedduringconvectiobnakingor roasting. flameuntilyoucanquickltyurnknobfromLITtEo LOWEST Refer to the range is located on the oven front frame behind the oven door (some models or on the OFF position. WarmerDrawer(somemodels)-Setthecontrolknob to thetop burner....
... eachknobseparateluyntil all controls are not the result of fuel and the pressure the range was adjusted for or making inquiries about your range, always be sure to include the model and serial numbers and a lot number or...lowerelemenwt ill becomered. Theconvectiofnanwillstopturningwhentheovendoor isopenedduringconvectiobnakingor roasting. flameuntilyoucanquickltyurnknobfromLITtEo LOWEST Refer to the range is located on the oven front frame behind the oven door (some models or on the OFF position. WarmerDrawer(somemodels)-Setthecontrolknob to thetop burner....
Use and Care Guide
Page 2
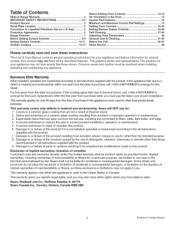
...pay for free part replacement. This warranty applies for several models. Cracks in material and workmanship within one year or the... misuse or use , including but not limited to the all the described features. Kenmore Elite Warranty When installed, operated and maintained according to all instructions supplied with the product, if this ... practiced when installing, operating and maintaining any appliance. Table of Contents Slide-in material and workmanship. Gas 5 Protection Agreements 6 Range Features 7 Before Setting Surface Controls 8-9 Setting Surface Controls 10-11 Surface...
...pay for free part replacement. This warranty applies for several models. Cracks in material and workmanship within one year or the... misuse or use , including but not limited to the all the described features. Kenmore Elite Warranty When installed, operated and maintained according to all instructions supplied with the product, if this ... practiced when installing, operating and maintaining any appliance. Table of Contents Slide-in material and workmanship. Gas 5 Protection Agreements 6 Range Features 7 Before Setting Surface Controls 8-9 Setting Surface Controls 10-11 Surface...
Use and Care Guide
Page 5
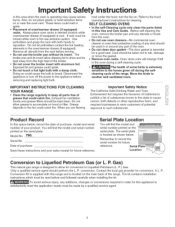
... conversion to Liquefied Petroleum (L. The serial plate "_ is located as shown below , record the date of purchase, model and serial You will find the model and number of the range. Refer to reposition. Before self cleaning the oven, remove the broiler pan and any kind should perform the L. Gas...) This natural gas range is operating may cause severe burns. Also, do not place plastic or heat-sensitive...
... conversion to Liquefied Petroleum (L. The serial plate "_ is located as shown below , record the date of purchase, model and serial You will find the model and number of the range. Refer to reposition. Before self cleaning the oven, remove the broiler pan and any kind should perform the L. Gas...) This natural gas range is operating may cause severe burns. Also, do not place plastic or heat-sensitive...
Use and Care Guide
Page 7
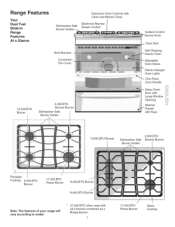
Range Features Your Dual Fuel Slide-in Range Features At a Glance Electronic Oven Controls with Clock and Kitchen Timer Dishwasher Safe Burner Grates Electronic Warmer Drawer Control Broil Element Convection Fan Cover 14,... Grates 5,OOOBTU Simmer Burner Porcelain Cooktop 9,500 BTU Burner 17,200 BTU Power Burner *9,000 BTU Burner *9,000 BTU Burner Note: The features of your range will vary according to model, 27,000 BTU when used with all 3 burners combined as a Bridge Burner. 7 17,200 BTU Power Burner Glass Cooktop
Range Features Your Dual Fuel Slide-in Range Features At a Glance Electronic Oven Controls with Clock and Kitchen Timer Dishwasher Safe Burner Grates Electronic Warmer Drawer Control Broil Element Convection Fan Cover 14,... Grates 5,OOOBTU Simmer Burner Porcelain Cooktop 9,500 BTU Burner 17,200 BTU Power Burner *9,000 BTU Burner *9,000 BTU Burner Note: The features of your range will vary according to model, 27,000 BTU when used with all 3 burners combined as a Bridge Burner. 7 17,200 BTU Power Burner Glass Cooktop
Use and Care Guide
Page 12
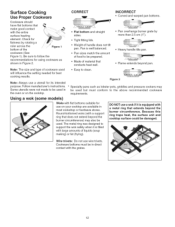
... suitable for best cooking results. CORRECT INCORRECT = Curved and warped pan bottoms. • Flat bottom and straight sides. • Tight fitting lids. Using a wok (some models) Woks with the entire surface heating element.
... suitable for best cooking results. CORRECT INCORRECT = Curved and warped pan bottoms. • Flat bottom and straight sides. • Tight fitting lids. Using a wok (some models) Woks with the entire surface heating element.
Use and Care Guide
Page 13
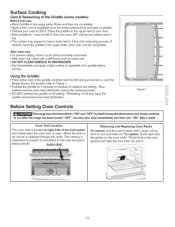
...To replace, fit the rack onto the guides on HI setting. Preheating on , hot air is open. Surface Cooking Care & Seasoning of the Griddle (some models) Before first use , clean with a stiff brush and hot water only. • DO NOT CLEAN GRIDDLE IN DISHWASHER. ,, Dry Immediately and apply a light... your oven to 350°R Place the griddle on medium to Figure 1. ,, Preheat the griddle for 1 hour at right side of rack and slide out. OVEN VENT Removing and Replacing Oven Racks To remove, pull the rack forward until it from the seasoning process, if desired, wash the griddle...
...To replace, fit the rack onto the guides on HI setting. Preheating on , hot air is open. Surface Cooking Care & Seasoning of the Griddle (some models) Before first use , clean with a stiff brush and hot water only. • DO NOT CLEAN GRIDDLE IN DISHWASHER. ,, Dry Immediately and apply a light... your oven to 350°R Place the griddle on medium to Figure 1. ,, Preheat the griddle for 1 hour at right side of rack and slide out. OVEN VENT Removing and Replacing Oven Racks To remove, pull the rack forward until it from the seasoning process, if desired, wash the griddle...
Use and Care Guide
Page 14
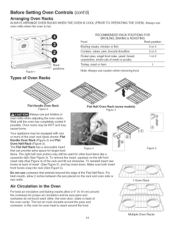
... Frozen pies, angel food cake, yeast, bread, casseroles, small cuts of the oven rack types shown; Multiple Oven Racks 14 Flat Half Oven Rack (some models) Figure 3 Your appliance may cause burns. To reinstall insert rear hooks at back of the oven cavity. For best results, allow 2 inches between the pan...
... Frozen pies, angel food cake, yeast, bread, casseroles, small cuts of the oven rack types shown; Multiple Oven Racks 14 Flat Half Oven Rack (some models) Figure 3 Your appliance may cause burns. To reinstall insert rear hooks at back of the oven cavity. For best results, allow 2 inches between the pan...
Use and Care Guide
Page 15
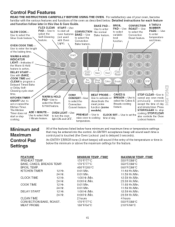
... Hr. 24 Hr. DELAY START 12 Hr. 24 Hr. Control Pad Features READ THE INSTRUCTIONS CAREFULLY BEFORE USING THE OVEN. of day and minute timer. models). COOK TIME 12 Hr. 24 Hr. start or stop Use to cancel any oven mode previously entered except the time of the baking time. CLEAN...
... Hr. 24 Hr. DELAY START 12 Hr. 24 Hr. Control Pad Features READ THE INSTRUCTIONS CAREFULLY BEFORE USING THE OVEN. of day and minute timer. models). COOK TIME 12 Hr. 24 Hr. start or stop Use to cancel any oven mode previously entered except the time of the baking time. CLEAN...
Use and Care Guide
Page 23
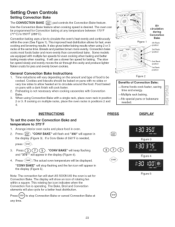
... a fan to 550°F (288°C). It also gives better baking results when using Convection Bake with multiple fan speeds for a better heat distribution. Some models are equipped with a single rack, place oven rack in position 2 or 3. When using 2 or 3 racks at the same time. If a Conv Bake of Convection Bake...
... a fan to 550°F (288°C). It also gives better baking results when using Convection Bake with multiple fan speeds for a better heat distribution. Some models are equipped with a single rack, place oven rack in position 2 or 3. When using 2 or 3 racks at the same time. If a Conv Bake of Convection Bake...
Use and Care Guide
Page 29
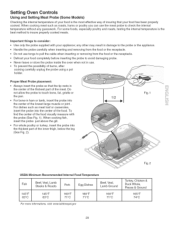
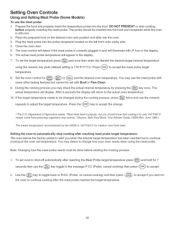
... of insuring that the tip rests in the center of the thickest part of the meat. Setting Oven Controls Using and Setting Meat Probe (Some Models) Checking the internal temperature of your food is the best method to insure properly cooked meats. When cooking fish, insert the probe just above the...
... of insuring that the tip rests in the center of the thickest part of the meat. Setting Oven Controls Using and Setting Meat Probe (Some Models) Checking the internal temperature of your food is the best method to insure properly cooked meats. When cooking fish, insert the probe just above the...
Use and Care Guide
Page 30
...176;C for the oven to continue cooking after the meat probe reaches the target temperature. 3O Setting Oven Controls Using and Setting Meat Probe (Some Models) To use the numeric keypads to adjust the target temperature. You may use the ___,_ key toggle to the message P CO (Probe, cancel... fresh beef. Prepare the food and properly insert the temperature probe into the probe receptacle located on the desired oven rack position and slide into the food and receptacle while the oven is 170°F/77°C)t. The actual meat probe temperature will illuminate with Broil or ...
...176;C for the oven to continue cooking after the meat probe reaches the target temperature. 3O Setting Oven Controls Using and Setting Meat Probe (Some Models) To use the numeric keypads to adjust the target temperature. You may use the ___,_ key toggle to the message P CO (Probe, cancel... fresh beef. Prepare the food and properly insert the temperature probe into the probe receptacle located on the desired oven rack position and slide into the food and receptacle while the oven is 170°F/77°C)t. The actual meat probe temperature will illuminate with Broil or ...
Use and Care Guide
Page 32
...5:00 6:00 10:00 6:00 n/a n/a 7:00 8:00 Rare Medium Well Well Well Well Well Medium Well Searing Grill Supplied with some models Figure 6 DO NOT put water or flour on the second side. Place Searing Grill on the broiler pan insert. The broil pan and ...grease could ignite. 2. Before placing the meat, be kept away from the oven broiler for 10 minutes. Electric Range Broiling Table Recommendations Food Rack Temp Cook Time Supplied with some models Figure 5 Item Position Setting 1st side 2nd side Doneness Steak 1" thick 2nd 2nd Pork Chops 3/4" thick 2nd ...
...5:00 6:00 10:00 6:00 n/a n/a 7:00 8:00 Rare Medium Well Well Well Well Well Medium Well Searing Grill Supplied with some models Figure 6 DO NOT put water or flour on the second side. Place Searing Grill on the broiler pan insert. The broil pan and ...grease could ignite. 2. Before placing the meat, be kept away from the oven broiler for 10 minutes. Electric Range Broiling Table Recommendations Food Rack Temp Cook Time Supplied with some models Figure 5 Item Position Setting 1st side 2nd side Doneness Steak 1" thick 2nd 2nd Pork Chops 3/4" thick 2nd ...
Use and Care Guide
Page 34
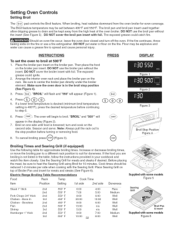
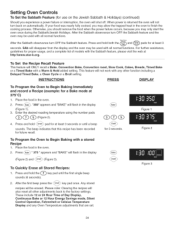
... stored recipes will flash in the oven, Baking Immediately for a Bake mode at htt p:\\www.star-k.org. These include 12 or 24 Hour Time of models with any Oven Temperature adjustments that this recipe has been recorded for future recall, O(2bdb for 3 seconds. Setting Oven Controls To Set the Sabbath Feature...
... stored recipes will flash in the oven, Baking Immediately for a Bake mode at htt p:\\www.star-k.org. These include 12 or 24 Hour Time of models with any Oven Temperature adjustments that this recipe has been recorded for future recall, O(2bdb for 3 seconds. Setting Oven Controls To Set the Sabbath Feature...
Use and Care Guide
Page 35
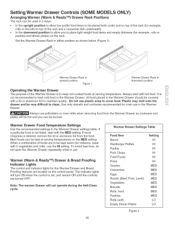
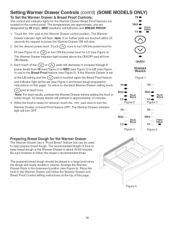
Setting Warmer Drawer Controls (SOME MODELS ONLY) Arranging Warmer (Warm & Ready TM) Drawer Rack Positions The rack can be used in 2 ways: • in the upright position to allow you can ...
Setting Warmer Drawer Controls (SOME MODELS ONLY) Arranging Warmer (Warm & Ready TM) Drawer Rack Positions The rack can be used in 2 ways: • in the upright position to allow you can ...
Use and Care Guide
Page 36
... Warmer Drawer is touched again the Bread Proof feature and indicator light will nearly double in volume. Figure 6 36 Setting Warmer Drawer Controls (cont'd) (SOME MODELS ONLY) To Set the Warmer Drawer & Bread Proof Controls: HIo The control and indicator lights for LO (see Figure 4).
... Warmer Drawer is touched again the Bread Proof feature and indicator light will nearly double in volume. Figure 6 36 Setting Warmer Drawer Controls (cont'd) (SOME MODELS ONLY) To Set the Warmer Drawer & Bread Proof Controls: HIo The control and indicator lights for LO (see Figure 4).
Use and Care Guide
Page 41
... with high concentrations of both the knob and the shaft; Rinse well. Care should be sure to slide. To remove, pull each knob straight off from the cloth before wiping the panel; Excess water in... directly on the cooktop. It is important that are turned OFF and the range is made for 30 to OFF and remove the control knobs. Rinse and wipe dry with hot,...with a 1:1 solution of vinegar and water. Do not use harsh scrubbing cleaners. Stainless Steel (some models) Oven door & drawer front panel Clean with a clean cloth. Rinse with an ammonia-soaked paper...
... with high concentrations of both the knob and the shaft; Rinse well. Care should be sure to slide. To remove, pull each knob straight off from the cloth before wiping the panel; Excess water in... directly on the cooktop. It is important that are turned OFF and the range is made for 30 to OFF and remove the control knobs. Rinse and wipe dry with hot,...with a 1:1 solution of vinegar and water. Do not use harsh scrubbing cleaners. Stainless Steel (some models) Oven door & drawer front panel Clean with a clean cloth. Rinse with an ammonia-soaked paper...
Use and Care Guide
Page 42
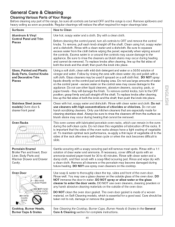
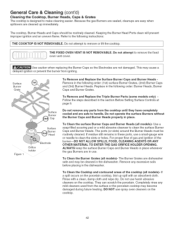
.... Because the gas Burners are sealed, cleanups are easy when spillovers are safe to handle. To Remove and Replace the Triple Burner Parts (some models only) Follow the steps described in the following order: Burner Heads, Burner Caps and Burner Grates. To Clean the Burner Grates (all..., FOOD, CLEANING AGENTS OR ANY OTHER MATERIAL TO ENTER THE GAS ORIFICE HOLDER OPENING. For proper flow of gas and ignition of the cooktop (all models)- They can scratch the porcelain. General Care & Cleaning (cont'd) Cleaning the Cooktop, Burner Heads, Caps & Grates The cooktop is designed to clean the ...
.... Because the gas Burners are sealed, cleanups are easy when spillovers are safe to handle. To Remove and Replace the Triple Burner Parts (some models only) Follow the steps described in the following order: Burner Heads, Burner Caps and Burner Grates. To Clean the Burner Grates (all..., FOOD, CLEANING AGENTS OR ANY OTHER MATERIAL TO ENTER THE GAS ORIFICE HOLDER OPENING. For proper flow of gas and ignition of the cooktop (all models)- They can scratch the porcelain. General Care & Cleaning (cont'd) Cleaning the Cooktop, Burner Heads, Caps & Grates The cooktop is designed to clean the ...
Use and Care Guide
Page 44
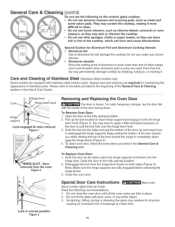
... Hinge lever Hinge leve_ hook Hin( support _.... For safe, temporary storage, lay the door flat with the inside of Stainless Steel (StainlessSteel models only) Some models are used. Open the door to the fully opened position. 2. Pull up and toward you while rotating the top of aluminum is heavy.... Keep pulling the bottom of other object. 3. Most oven doors contain glass that of the door toward the range to pull the lock ...
... Hinge lever Hinge leve_ hook Hin( support _.... For safe, temporary storage, lay the door flat with the inside of Stainless Steel (StainlessSteel models only) Some models are used. Open the door to the fully opened position. 2. Pull up and toward you while rotating the top of aluminum is heavy.... Keep pulling the bottom of other object. 3. Most oven doors contain glass that of the door toward the range to pull the lock ...

