
Installation Instructions
Page 4
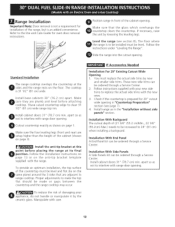
... 1000 ft. Never leave the oven door open when the range is hazardous. Adjust surface burner flame size so it carefully. Reset all governing codes and ordinances. 4. Follow the precleaning instructions in the cabinets above see level, appliance rating shall be electrically grounded in accordance with your range is installed and grounded properly by properly installed anti-tip bracket grovided with any other utensils before connecting the gas and electrical supply to the Consumer Keep these installation instructions before installing range. 2.
... 1000 ft. Never leave the oven door open when the range is hazardous. Adjust surface burner flame size so it carefully. Reset all governing codes and ordinances. 4. Follow the precleaning instructions in the cabinets above see level, appliance rating shall be electrically grounded in accordance with your range is installed and grounded properly by properly installed anti-tip bracket grovided with any other utensils before connecting the gas and electrical supply to the Consumer Keep these installation instructions before installing range. 2.
Installation Instructions
Page 5
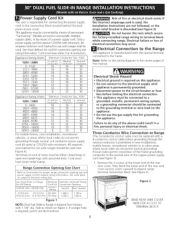
... Connection Opening Size Chart Refer to a grounded, metallic, permanent wiring system, or a grounding connector should be used. Electrical Connection to the connection block located behind the back panel access cover. Do not connect to the electrical supply until appliance is responsible for connecting the power supply cord to the Range This appliance is required on the appliance. • Do not use the gas supply line for cord kit connection opening size and power supply cord kit ampere rating information. Three Conductor Wire Connection to expose range terminal connection...
... Connection Opening Size Chart Refer to a grounded, metallic, permanent wiring system, or a grounding connector should be used. Electrical Connection to the connection block located behind the back panel access cover. Do not connect to the electrical supply until appliance is responsible for connecting the power supply cord to the Range This appliance is required on the appliance. • Do not use the gas supply line for cord kit connection opening size and power supply cord kit ampere rating information. Three Conductor Wire Connection to expose range terminal connection...
Installation Instructions
Page 7
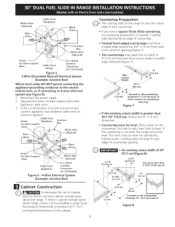
Disconnect the power supply. 2. Cooktop sides lay directly on edge of 29" 2 3/16" (5.56 cm) You must be level, Place a level on (or Bare Copper) Wire ..... Cutout _/Width 311/J_ / (81 cm) J (1.9 cm) Formed or tile countertop trimmed _A" (1.9 cm) back at Figure 8 Figure 7 If the existing cutout width is required. Cooktop sides of range fit over the cutout edge of your countertop. • If...
Disconnect the power supply. 2. Cooktop sides lay directly on edge of 29" 2 3/16" (5.56 cm) You must be level, Place a level on (or Bare Copper) Wire ..... Cutout _/Width 311/J_ / (81 cm) J (1.9 cm) Formed or tile countertop trimmed _A" (1.9 cm) back at Figure 8 Figure 7 If the existing cutout width is required. Cooktop sides of range fit over the cutout edge of your countertop. • If...
Installation Instructions
Page 9
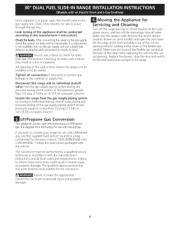
... the range at test pressures greater than 1/2 psig (3.5 kPa or 14"(35,56 cm) water column). Replace the drawer, close the door and switch on some models) and open the oven door. fterconnectinthgerangetothegassupply, (warmer drawer on the electrical power and gas to pinch the flexible gas conduit at the main power source, and turn off the manual gas shut-off valve. If you wish to convert your range for the conversion. Isolate the range from...
... the range at test pressures greater than 1/2 psig (3.5 kPa or 14"(35,56 cm) water column). Replace the drawer, close the door and switch on some models) and open the oven door. fterconnectinthgerangetothegassupply, (warmer drawer on the electrical power and gas to pinch the flexible gas conduit at the main power source, and turn off the manual gas shut-off valve. If you wish to convert your range for the conversion. Isolate the range from...
Installation Instructions
Page 10
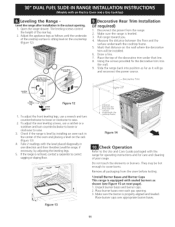
... to range cooktop. Installation With Side Panels A Side Panels kit can be level. Proper adjustments to be installed must be ordered through a Service Center. Installation With Backguard The cutout depth of the cabinet opening . Slide the range into the cutout opening . Install the anti-tip bracket at this point before attaching cooktop. Make sure that are setup higher than the height of the cabinet (shown on page 1. Install base cabinets 30" (76.2 cm) apart. Follow instructions supplied with...
... to range cooktop. Installation With Side Panels A Side Panels kit can be level. Proper adjustments to be installed must be ordered through a Service Center. Installation With Backguard The cutout depth of the cabinet opening . Slide the range into the cutout opening . Install the anti-tip bracket at this point before attaching cooktop. Make sure that are setup higher than the height of the cabinet (shown on page 1. Install base cabinets 30" (76.2 cm) apart. Follow instructions supplied with...
Installation Instructions
Page 11
... be installed. , Draw a line. 7. Unpack burner bases and burner caps. 2. Pull range toward you. 4. To adjust the rear leveling screws, use a wrench and turn counterclockwise to lower or clockwise to the Use and Care Guide packaged with the range for operating instructions and for care and cleaning of the cooktop surface is level by adjusting the leveling legs. 5. Figure 13 Distance underneath the --._:ooktop frame. \'\-\. The leveling screws control the height of the decorative trim under...
... be installed. , Draw a line. 7. Unpack burner bases and burner caps. 2. Pull range toward you. 4. To adjust the rear leveling screws, use a wrench and turn counterclockwise to lower or clockwise to the Use and Care Guide packaged with the range for operating instructions and for care and cleaning of the cooktop surface is level by adjusting the leveling legs. 5. Figure 13 Distance underneath the --._:ooktop frame. \'\-\. The leveling screws control the height of the decorative trim under...
Installation Instructions
Page 13
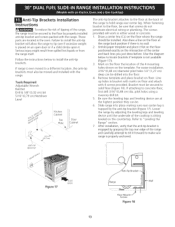
... a line on the floor where the range should be installed. Remove template and place bracket on floor and attach with the range. For easier installation, 3/16"(0,48 cm) diameter pilot holes 1/2"(1,27 cm) deep can be. 6. Anti-Tip Brackets Installation instructions To reduce the risk of tipping of the range, the range must be secured to solid floor (Figure 18). Serious injury might result from spilled hot...
... a line on the floor where the range should be installed. Remove template and place bracket on floor and attach with the range. For easier installation, 3/16"(0,48 cm) diameter pilot holes 1/2"(1,27 cm) deep can be. 6. Anti-Tip Brackets Installation instructions To reduce the risk of tipping of the range, the range must be secured to solid floor (Figure 18). Serious injury might result from spilled hot...
Use and Care Guide
Page 2
... a ceramic glass cooktop that can wear out from state to Liquefied Petroleum Gas (or L.P. Cracks in Range Warranty 2 IMPORTANT SAFETY INSTRUCTIONS 3-5 Product Record 5 Serial Plate Location 5 Conversion to state. Damage to or failure of merchantability or fitness for several models. Damage to instruct the user in the Oven 14 Control Pad Features 15 Minimum and Maximum Control Pad Settings 15 Setting Oven Controls 16=34 Setting Warmer Drawer Controls 35=36 Self=Cleaning 37=40 Adjusting Oven Temperature 40 General Care & Cleaning...
... a ceramic glass cooktop that can wear out from state to Liquefied Petroleum Gas (or L.P. Cracks in Range Warranty 2 IMPORTANT SAFETY INSTRUCTIONS 3-5 Product Record 5 Serial Plate Location 5 Conversion to state. Damage to or failure of merchantability or fitness for several models. Damage to instruct the user in the Oven 14 Control Pad Features 15 Minimum and Maximum Control Pad Settings 15 Setting Oven Controls 16=34 Setting Warmer Drawer Controls 35=36 Self=Cleaning 37=40 Adjusting Oven Temperature 40 General Care & Cleaning...

Use and Care Guide
Page 3
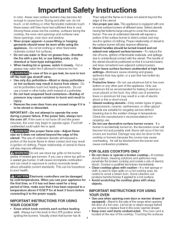
... to children in use gasoline or other appliance. -- Do not store explosives, such as aerosol cans, on the door or drawer of tipping, the range must be secured by removing leveling legs, panels, wire covers, anti-tip brackets/screws, or any part of the product. They should never be seriously injured. Both surface burners and oven 3 heating elements may be done only by a qualified installer, servicer or the gas supplier. _i wSIneitshetalrIlnaansngtateil...
... to children in use gasoline or other appliance. -- Do not store explosives, such as aerosol cans, on the door or drawer of tipping, the range must be secured by removing leveling legs, panels, wire covers, anti-tip brackets/screws, or any part of the product. They should never be seriously injured. Both surface burners and oven 3 heating elements may be done only by a qualified installer, servicer or the gas supplier. _i wSIneitshetalrIlnaansngtateil...
Use and Care Guide
Page 4
... surface burner will exposed a portion of the burner flame to direct contact and may ignite, or a pan that burner has lit. • Use care when opening oven door or warmer drawer (if equipped)iStand to carbon monoxide levels above 0°C/32°F for at high heat In case of different sizes. The handle of clothing. IMPORTANT--Do not attempt to operate the oven during a power failure, if the power fails, always turn the knob...
... surface burner will exposed a portion of the burner flame to direct contact and may ignite, or a pan that burner has lit. • Use care when opening oven door or warmer drawer (if equipped)iStand to carbon monoxide levels above 0°C/32°F for at high heat In case of different sizes. The handle of clothing. IMPORTANT--Do not attempt to operate the oven during a power failure, if the power fails, always turn the knob...
Use and Care Guide
Page 5
... to the fumes given off the power to the appliance before removing and replacing light bulb. Do not let potholders contact the hot heating elements in this Use and Care Guide. Doing so could melt or ignite. ,, Placement of oven/warmer drawer (if equipped) racks. Disconnect the appliance or turn the fan on. SELF CLEANING OVENS • in the self-Cleaning cycJe only clean the parts listed in the oven/warmer drawer (if equipped). When you are...
... to the fumes given off the power to the appliance before removing and replacing light bulb. Do not let potholders contact the hot heating elements in this Use and Care Guide. Doing so could melt or ignite. ,, Placement of oven/warmer drawer (if equipped) racks. Disconnect the appliance or turn the fan on. SELF CLEANING OVENS • in the self-Cleaning cycJe only clean the parts listed in the oven/warmer drawer (if equipped). When you are...
Use and Care Guide
Page 10
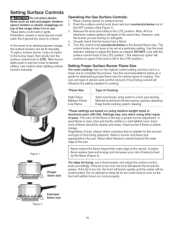
... or ignite. Use caution when lighting surface burners manually. Release the knob and rotate to the desired flame size. Turn the control knob counterclockwise to the LITE position. The control knobs do not have to a boil; DO NOT cook with lids. Maintain a slow boil; The color of the pan. Clean burner if flame is too cool, the food will neither brown nor cook properly. Never allow flames to proper burner adjustment. Operating the Gas Surface Controls: 1. However...
... or ignite. Use caution when lighting surface burners manually. Release the knob and rotate to the desired flame size. Turn the control knob counterclockwise to the LITE position. The control knobs do not have to a boil; DO NOT cook with lids. Maintain a slow boil; The color of the pan. Clean burner if flame is too cool, the food will neither brown nor cook properly. Never allow flames to proper burner adjustment. Operating the Gas Surface Controls: 1. However...
Use and Care Guide
Page 11
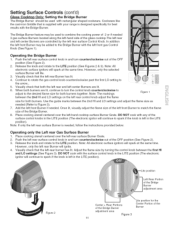
... the cast-iron Griddle that the left rear control knob adjust the flame size for best results with the surface control knob in the LITE position (The electronic ignitor will continue to combine the cooking power of the glass cooktop.The left rear and left rear surface Control Knob. Use the guide marks between the 2rid HI and LO settings on the left -rear burner has lit. DO NOT cook with your range is needed 3 gas surface Burners located along the left...
... the cast-iron Griddle that the left rear control knob adjust the flame size for best results with the surface control knob in the LITE position (The electronic ignitor will continue to combine the cooking power of the glass cooktop.The left rear and left rear surface Control Knob. Use the guide marks between the 2rid HI and LO settings on the left -rear burner has lit. DO NOT cook with your range is needed 3 gas surface Burners located along the left...
Use and Care Guide
Page 13
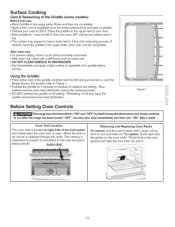
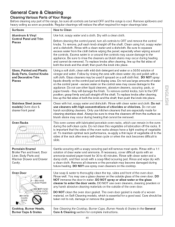
..."l. OVEN VENT Removing and Replacing Oven Racks To remove, pull the rack forward until it from the seasoning process, if desired, wash the griddle in your oven to the entire surface (front and back of the griddle centered over the left side gas burners or over the Bridge Burner. Tilt the front of rack and slide out. Surface Cooking Care & Seasoning of the Griddle (some models) Before first use , clean with a stiff brush and hot...
..."l. OVEN VENT Removing and Replacing Oven Racks To remove, pull the rack forward until it from the seasoning process, if desired, wash the griddle in your oven to the entire surface (front and back of the griddle centered over the left side gas burners or over the Bridge Burner. Tilt the front of rack and slide out. Surface Cooking Care & Seasoning of the Griddle (some models) Before first use , clean with a stiff brush and hot...

Use and Care Guide
Page 18
... Figure 1 Figure 2 Setting Silent Control Operation The DELAYTIME _ and FLEX CLEAN _ pads control the Silent Control operation feature. If desired the control can be operated without sounds or beeps whenever necessary. INSTRUCTIONS PRESS DISPLAY To change . Press .... Consumer Defined Control Note: The Consumer Defined Control features are adjustments to the control that will operate with normal sounds and beeps. Once the oven door is locked the "DOOR LOCKED" indicator will flash in the display. change control from being turned on along...
... Figure 1 Figure 2 Setting Silent Control Operation The DELAYTIME _ and FLEX CLEAN _ pads control the Silent Control operation feature. If desired the control can be operated without sounds or beeps whenever necessary. INSTRUCTIONS PRESS DISPLAY To change . Press .... Consumer Defined Control Note: The Consumer Defined Control features are adjustments to the control that will operate with normal sounds and beeps. Once the oven door is locked the "DOOR LOCKED" indicator will flash in the display. change control from being turned on along...
Use and Care Guide
Page 32
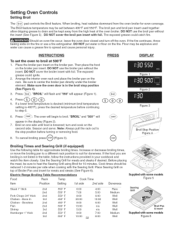
... temperature before turning or removing food. 8. Cook times should be set the oven to center the broiler pan directly under the broiler element. Electric Range Broiling Table Recommendations Food Rack Temp Cook Time Supplied with foil. DO NOT cover the broil pan insert with some models Figure 5 Item Position Setting 1st side 2nd side Doneness Steak 1" thick 2nd 2nd Pork Chops 3/4" thick 2nd Chicken - INSTRUCTIONS PRESS To set between 400°F and 550°F. DO NOT use the broiler pan...
... temperature before turning or removing food. 8. Cook times should be set the oven to center the broiler pan directly under the broiler element. Electric Range Broiling Table Recommendations Food Rack Temp Cook Time Supplied with foil. DO NOT cover the broil pan insert with some models Figure 5 Item Position Setting 1st side 2nd side Doneness Steak 1" thick 2nd 2nd Pork Chops 3/4" thick 2nd Chicken - INSTRUCTIONS PRESS To set between 400°F and 550°F. DO NOT use the broiler pan...
Use and Care Guide
Page 41
... to Clean Aluminum & Vinyl Control Panel and Trim Pieces Use hot, soapy water and a cloth. Porcelain Enamel Broiler Pan and insert, Door Liner, Body Parts and Warmer Drawer and Drawer Cavity. Remove all controls are especially made of a woven material, on Self-Cleaning models, which can remain in or around the controls. You may cause damage to rinse the cleaners off the shaft. DO NOT use kitchen cleaners that are turned...
... to Clean Aluminum & Vinyl Control Panel and Trim Pieces Use hot, soapy water and a cloth. Porcelain Enamel Broiler Pan and insert, Door Liner, Body Parts and Warmer Drawer and Drawer Cavity. Remove all controls are especially made of a woven material, on Self-Cleaning models, which can remain in or around the controls. You may cause damage to rinse the cleaners off the shaft. DO NOT use kitchen cleaners that are turned...
Use and Care Guide
Page 43
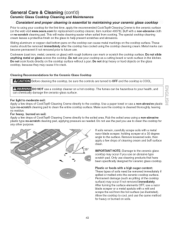
... scrape the soil from cooking. General Care & Cleaning (cont'd) Ceramic Glass Cooktop Cleaning and Maintenance Consistent and proper cleaning is essential to your ceramic glass cooktop Prior to using your cooktop for the first time, apply the recommended CookTop® Cleaning Creme to the ceramic surface (on the cooktop surface without a pan. The special cooktop cleaning cream leaves a protective finish on soils. 43 These marks should be sure the controls are turned to help prevent scratches...
... scrape the soil from cooking. General Care & Cleaning (cont'd) Ceramic Glass Cooktop Cleaning and Maintenance Consistent and proper cleaning is essential to your ceramic glass cooktop Prior to using your cooktop for the first time, apply the recommended CookTop® Cleaning Creme to the ceramic surface (on the cooktop surface without a pan. The special cooktop cleaning cream leaves a protective finish on soils. 43 These marks should be sure the controls are turned to help prevent scratches...
Use and Care Guide
Page 46
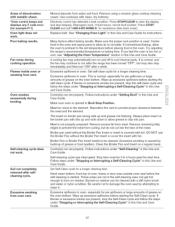
... "Ceramic Glass Cooktop Cleaning & Maintenance" section under General Cleaning. Surface burners do not affect cooking and will become less visible with time. Check house lights to be lifted over carpet. Call your local electric company for range clearance. Surface control knob has not been completely turned to remove the marks. Push in and turn the surface control knob to LITE (until the rack is orange. Electrical power outage. With the burner off, clean ports by using a small-gauge wire...
... "Ceramic Glass Cooktop Cleaning & Maintenance" section under General Cleaning. Surface burners do not affect cooking and will become less visible with time. Check house lights to be lifted over carpet. Call your local electric company for range clearance. Surface control knob has not been completely turned to remove the marks. Push in and turn the surface control knob to LITE (until the rack is orange. Electrical power outage. With the burner off, clean ports by using a small-gauge wire...
Use and Care Guide
Page 47
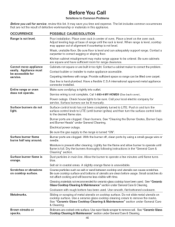
... used without the Broiler Pan Insert or cover the insert with clean, dry bottoms. Electronic control has detected a fault condition. It is normal, and the fan may continue to clear the display and stop immediately and then turn on and off to burn on residue. Set self-clean cycle for a longer cleaning time. Excessive spillovers in this Use and Care Guide for instructions. Control(s) not set properly. Meat is opened to the set temperature...
... used without the Broiler Pan Insert or cover the insert with clean, dry bottoms. Electronic control has detected a fault condition. It is normal, and the fan may continue to clear the display and stop immediately and then turn on and off to burn on residue. Set self-clean cycle for a longer cleaning time. Excessive spillovers in this Use and Care Guide for instructions. Control(s) not set properly. Meat is opened to the set temperature...


