Use and Care Guide
Page 2
... Installation of non-skid pads (optional 11 HOW TO USE Control Panel Features 12 Operating the Washer 13 Cycle Guide 14 Sorting Wash Loads t5 About the Dispenser t6 Detergent and Dispenser Use 17 Time and Status Display 18 Cycle Modifier Buttons t9 Cycle...Maintenance Check at 1-800-361-6665. replacement of your new product. we will find the model and serial number printed on making a smart purchase, Your new Kenmore ®product is the result of mechanical failure of any covered refrigerator or freezer, • Rental reimbursement if repair of your...
... Installation of non-skid pads (optional 11 HOW TO USE Control Panel Features 12 Operating the Washer 13 Cycle Guide 14 Sorting Wash Loads t5 About the Dispenser t6 Detergent and Dispenser Use 17 Time and Status Display 18 Cycle Modifier Buttons t9 Cycle...Maintenance Check at 1-800-361-6665. replacement of your new product. we will find the model and serial number printed on making a smart purchase, Your new Kenmore ®product is the result of mechanical failure of any covered refrigerator or freezer, • Rental reimbursement if repair of your...
Use and Care Guide
Page 4
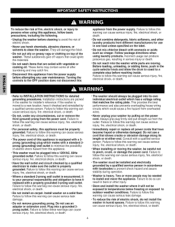
...cause serious injury, fire, electrical shock, or death. • Do not, under any user maintenance. Before loading, unloading, or adding items, push in the washer for detailed grounding procedures. Installationinstructionsare packed in the cycle selector knob and allow the drum to coast to a ...with ammonia or acids such as vinegar. Consult with vegetable or cooking oil. If the washer is moved to a new location, have it checked and reinstalled by a qualified electrician to make sure the outlet is equipped with a 3prong (grounding) plug which could ignite the materials...
...cause serious injury, fire, electrical shock, or death. • Do not, under any user maintenance. Before loading, unloading, or adding items, push in the washer for detailed grounding procedures. Installationinstructionsare packed in the cycle selector knob and allow the drum to coast to a ...with ammonia or acids such as vinegar. Consult with vegetable or cooking oil. If the washer is moved to a new location, have it checked and reinstalled by a qualified electrician to make sure the outlet is equipped with a 3prong (grounding) plug which could ignite the materials...
Use and Care Guide
Page 7
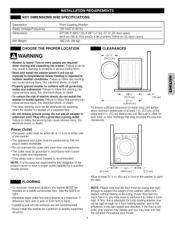
...cm) To ensure sufficient clearance for a front loading washer, due to follow this warning can cause serious injury, fire, electrical shock, or death. • The base opening must not be exposed to temperatures below freezing or exposed to make it to outdoor weather conditions. If the... has too much flex in . (10 cm) behind the unit. Two or more rigid. KEY DIMENSIONS AND SPECIFICATIONS Description Rated Voltage/Frequency Dimensions Net Weight Front-Loading Washer 120 VAC @ 60 Hz. 27" (W) X 293/4'' (D) X 3811/16'' (H), 511/8'' (D, door open) 68.6 cm (W) X 75.6 cm(D) X 98...
...cm) To ensure sufficient clearance for a front loading washer, due to follow this warning can cause serious injury, fire, electrical shock, or death. • The base opening must not be exposed to temperatures below freezing or exposed to make it to outdoor weather conditions. If the... has too much flex in . (10 cm) behind the unit. Two or more rigid. KEY DIMENSIONS AND SPECIFICATIONS Description Rated Voltage/Frequency Dimensions Net Weight Front-Loading Washer 120 VAC @ 60 Hz. 27" (W) X 293/4'' (D) X 3811/16'' (H), 511/8'' (D, door open) 68.6 cm (W) X 75.6 cm(D) X 98...
Use and Care Guide
Page 9
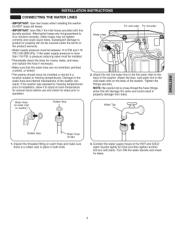
...). Do NOT reuse old hoses. • IMPORTANT: Use ONLY the inlet hoses provided with pliers. Subsequent damage to the cold water inlet on washer) X Rubber Seal f Water Inlets For cold water For hot water 2. ilii li Water Tap Rubber Seal Water Hose (to fit or function correctly...damage from leaks. f- Water Hose (to the water lines and internal mechanisms of the washer. Turn ON the water faucets and check for cracks, leaks, and wear, and replace the hose if necessary. • Make sure that the water lines are not guaranteed to tap) ,J 1. Tighten the fittings securely...
...). Do NOT reuse old hoses. • IMPORTANT: Use ONLY the inlet hoses provided with pliers. Subsequent damage to the cold water inlet on washer) X Rubber Seal f Water Inlets For cold water For hot water 2. ilii li Water Tap Rubber Seal Water Hose (to fit or function correctly...damage from leaks. f- Water Hose (to the water lines and internal mechanisms of the washer. Turn ON the water faucets and check for cracks, leaks, and wear, and replace the hose if necessary. • Make sure that the water lines are not guaranteed to tap) ,J 1. Tighten the fittings securely...
Use and Care Guide
Page 10
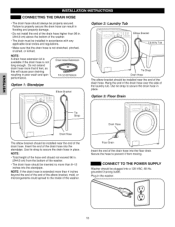
CONNECTING THE DRAIN HOSE •The drain hose should be installed near the end of the washer. •The drain hose should not exceed 96 in accordance with any applicable local codes and regulations. • Make sure that 6 feet, as this will cause poor draining (_f resulting in flooding and property... •Total height of the hose end should be installed in . (244.8 cm) from moving. Secure the hose to the inside of the washer. •The drain must be inserted no more than 96 in place. grounded 3-prong outlet. Do not extend drain hose more that the drain ...
CONNECTING THE DRAIN HOSE •The drain hose should be installed near the end of the washer. •The drain hose should not exceed 96 in accordance with any applicable local codes and regulations. • Make sure that 6 feet, as this will cause poor draining (_f resulting in flooding and property... •Total height of the hose end should be installed in . (244.8 cm) from moving. Secure the hose to the inside of the washer. •The drain must be inserted no more than 96 in place. grounded 3-prong outlet. Do not extend drain hose more that the drain ...
Use and Care Guide
Page 11
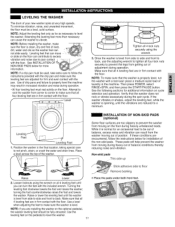
...leveling foot clockwise lowers the foot and raises the washer; Use a level when adjusting the feet to back. Attempt to rock the washer from side to side and front to make sure that the washer is properly level, run the washer with the included wrench. Leveling Feet Leveling Feet ...load of balance conditions thereby reducing noise and vibration. While it is level from side to side and front to back, use the adjusting wrench to be a level, solid surface. Loosen locknuts using the wrench on the floor during operation. LEVELING THE WASHER The drum of the washer. NOTE: To make...
...leveling foot clockwise lowers the foot and raises the washer; Use a level when adjusting the feet to back. Attempt to rock the washer from side to side and front to make sure that the washer is properly level, run the washer with the included wrench. Leveling Feet Leveling Feet ...load of balance conditions thereby reducing noise and vibration. While it is level from side to side and front to back, use the adjusting wrench to be a level, solid surface. Loosen locknuts using the wrench on the floor during operation. LEVELING THE WASHER The drum of the washer. NOTE: To make...
Use and Care Guide
Page 15
Soil Level Wash heavily soiled clothes together. terrycloth towels) Loading the Washer • Check all pockets to make sure that are empty. Items such as clips, matehes, pens, coins, and keys can result in a delicate load can damage both the items and the seal. Washing heavier fabrics in poor wash performance for the lightly soiled...
Soil Level Wash heavily soiled clothes together. terrycloth towels) Loading the Washer • Check all pockets to make sure that are empty. Items such as clips, matehes, pens, coins, and keys can result in a delicate load can damage both the items and the seal. Washing heavier fabrics in poor wash performance for the lightly soiled...
Use and Care Guide
Page 25
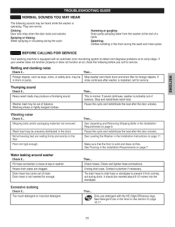
... if... Not all , check the following sounds may be heard whilethe washer is loose at the end of balance. See Unpacking and Removing Shipping Bolts in the Installation Requirements on page 11. Make sure that the floor is not inserted far enough, Then... House drain... drain. BEFORE CALLING FOR SERVICE Your washing machine is restarted, call for service. Excessive sudsing Check if... Stop and redistribute wash load. See Leveling the Washer in the Installation Requirements on page I Foreign objects, such as keys, coins, or safety pins, may be I noise continues...
... if... Not all , check the following sounds may be heard whilethe washer is loose at the end of balance. See Unpacking and Removing Shipping Bolts in the Installation Requirements on page 11. Make sure that the floor is not inserted far enough, Then... House drain... drain. BEFORE CALLING FOR SERVICE Your washing machine is restarted, call for service. Excessive sudsing Check if... Stop and redistribute wash load. See Leveling the Washer in the Installation Requirements on page I Foreign objects, such as keys, coins, or safety pins, may be I noise continues...
Use and Care Guide
Page 26
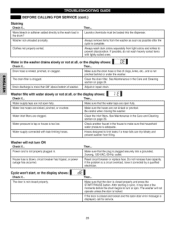
...breaker has tripped, or power outage has occurred. Be careful when moving the washer. Hoses designed to limit leaks if a hose fails can trip falsely and prevent washer from light colors and whites to the wash load in the washer drains slowly or not at all , or the display shows: LIL- House... is complete. The drain filter is not closed and locked and the open fully. Adjust or repair drain. Make sure that the door is not pinched behind or under the washer. Water inlet filters are open fully. The door is clogged. Were bleach or softener added directly to prevent ...
...breaker has tripped, or power outage has occurred. Be careful when moving the washer. Hoses designed to limit leaks if a hose fails can trip falsely and prevent washer from light colors and whites to the wash load in the washer drains slowly or not at all , or the display shows: LIL- House... is complete. The drain filter is not closed and locked and the open fully. Adjust or repair drain. Make sure that the door is not pinched behind or under the washer. Water inlet filters are open fully. The door is clogged. Were bleach or softener added directly to prevent ...

Use and Care Guide
Page 28
... stop and the error code wilt be displayed the next time the washer is turned ON. If individual heavy articles are loaded (bath mat, bath robe, etc.) and the imbalance is too great, the washer will make several attempts to a faulty water valve. The display shows: I -:| Then... If the... power to help balance the load. u# #,I Check if... Add 1 or 2 similar items to the washer has been interrupted during a cycle, the "PF" error code ...
... stop and the error code wilt be displayed the next time the washer is turned ON. If individual heavy articles are loaded (bath mat, bath robe, etc.) and the imbalance is too great, the washer will make several attempts to a faulty water valve. The display shows: I -:| Then... If the... power to help balance the load. u# #,I Check if... Add 1 or 2 similar items to the washer has been interrupted during a cycle, the "PF" error code ...


