Use and Care Guide
Page 2
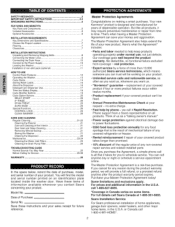
... Installation of non-skid pads (optional 11 HOW TO USE Control Panel Features 12 Operating the Washer 13 Cycle Guide 14 Sorting Wash Loads t5 About the Dispenser t6 Detergent and Dispenser Use 17 Time and Status Display 18 Cycle Modifier ... appointment online. Model No. Master Protection Agreements Congratulations on an identification plate located inside the washer door. we will find the model and serial number printed on making a smart purchase, Your new Kenmore ®product is a risk-free purchase. real protection. • Expert service by phone...
... Installation of non-skid pads (optional 11 HOW TO USE Control Panel Features 12 Operating the Washer 13 Cycle Guide 14 Sorting Wash Loads t5 About the Dispenser t6 Detergent and Dispenser Use 17 Time and Status Display 18 Cycle Modifier ... appointment online. Model No. Master Protection Agreements Congratulations on an identification plate located inside the washer door. we will find the model and serial number printed on making a smart purchase, Your new Kenmore ®product is a risk-free purchase. real protection. • Expert service by phone...
Use and Care Guide
Page 3
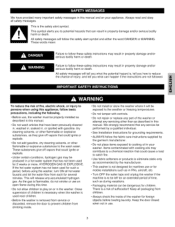
... using this manual. HYDROGEN GAS IS EXPLOSIVE. We strongly recommend that could cause a load to catch fire. • Use fabric softeners or products to the wash water. There is a risk of the washer for grounding requirements. • ALWAYS follow basic precautions, including the following. •...for mobile installations such as in RVs, aircraft, etc. • Turn OFF the water taps and unplug the washer if the machine is used for such a period, before loading laundry. Items contaminated with gasoline, dry cleaning solvents, or other than as during this manual. • Do...
... using this manual. HYDROGEN GAS IS EXPLOSIVE. We strongly recommend that could cause a load to catch fire. • Use fabric softeners or products to the wash water. There is a risk of the washer for grounding requirements. • ALWAYS follow basic precautions, including the following. •...for mobile installations such as in RVs, aircraft, etc. • Turn OFF the water taps and unplug the washer if the machine is used for such a period, before loading laundry. Items contaminated with gasoline, dry cleaning solvents, or other than as during this manual. • Do...
Use and Care Guide
Page 4
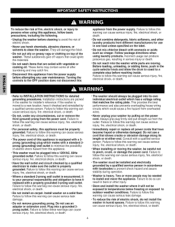
... or death. • Refer to INSTALLATION INSTRUCTIONS for detailed grounding procedures. Do not use harsh chemicals, abrasive cleaners, or solvents to clean the washer. Failure to follow this warning can cause serious injury, fire, electrical shock, or death. •The power cord of electric shock. • ...by pulling on the label. • Do not mix chlorine bleach with vegetable or cooking oil. Install washer on top of electric shock, do so can result in one load unless specified on the power cord. Do not use in back or other laundry products from overheated wires...
... or death. • Refer to INSTALLATION INSTRUCTIONS for detailed grounding procedures. Do not use harsh chemicals, abrasive cleaners, or solvents to clean the washer. Failure to follow this warning can cause serious injury, fire, electrical shock, or death. •The power cord of electric shock. • ...by pulling on the label. • Do not mix chlorine bleach with vegetable or cooking oil. Install washer on top of electric shock, do so can result in one load unless specified on the power cord. Do not use in back or other laundry products from overheated wires...

Use and Care Guide
Page 5
...by a qualified electrician. Failure to comply with all local codes and ordinances. 3-prong grounding plug Ensure proper ground exists before your washer is properly grounded. To prevent personal injury, observe all appliances. The plug must be plugged into an appropriate outlet that is ...properly installed and grounded in accordance with these warnings could result in the washer. Close supervision of all warnings on or in serious personal injuries. • Keep laundry products out of children's reach. Children...
...by a qualified electrician. Failure to comply with all local codes and ordinances. 3-prong grounding plug Ensure proper ground exists before your washer is properly grounded. To prevent personal injury, observe all appliances. The plug must be plugged into an appropriate outlet that is ...properly installed and grounded in accordance with these warnings could result in the washer. Close supervision of all warnings on or in serious personal injuries. • Keep laundry products out of children's reach. Children...
Use and Care Guide
Page 6
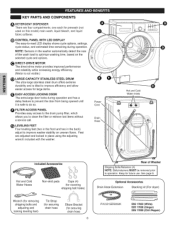
... easier access for securing drain hose J 6 Rear of the wash load to do so. 1 KEY PARTS AND COMPONENTS Q DETERGENT DBPENSER There are adjusted and locked in the washer automatically detect the size of Washer Shipping Bolts/Retainers (4) NOTE: Bolts/retainers MUST be removed prior to...pump filter, which allows you to clean the filter or retrieve lost items without a service call, LEVELING FEET Four leveling feet (two in the front and two in the back) adjust to operation. f Optional Accessories Drain Hose Extension Stacking kit (For dryer) ,-q P/N 5215ER2002K r-J D26 17002 ...
... easier access for securing drain hose J 6 Rear of the wash load to do so. 1 KEY PARTS AND COMPONENTS Q DETERGENT DBPENSER There are adjusted and locked in the washer automatically detect the size of Washer Shipping Bolts/Retainers (4) NOTE: Bolts/retainers MUST be removed prior to...pump filter, which allows you to clean the filter or retrieve lost items without a service call, LEVELING FEET Four leveling feet (two in the front and two in the back) adjust to operation. f Optional Accessories Drain Hose Extension Stacking kit (For dryer) ,-q P/N 5215ER2002K r-J D26 17002 ...
Use and Care Guide
Page 7
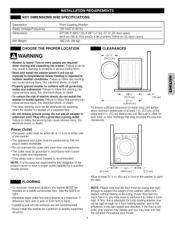
...the outlet with more than one appliance. • The outlet must be rigid enough for a top-loading washer may increase the required clearances. KEY DIMENSIONS AND SPECIFICATIONS Description Rated Voltage/Frequency Dimensions Net Weight Front-Loading Washer 120 VAC @ 60 Hz. 27" (W) X 293/4'' (D) X 3811/16'' (H), 511/8'' (D, ... be exposed to temperatures below freezing or exposed to have a proper outlet installed by carpeting when the washer is adequate for a front loading washer, due to the difference in accordance with all governing codes and ordinances. Failure to make it will not...
...the outlet with more than one appliance. • The outlet must be rigid enough for a top-loading washer may increase the required clearances. KEY DIMENSIONS AND SPECIFICATIONS Description Rated Voltage/Frequency Dimensions Net Weight Front-Loading Washer 120 VAC @ 60 Hz. 27" (W) X 293/4'' (D) X 3811/16'' (H), 511/8'' (D, ... be exposed to temperatures below freezing or exposed to have a proper outlet installed by carpeting when the washer is adequate for a front loading washer, due to the difference in accordance with all governing codes and ordinances. Failure to make it will not...

Use and Care Guide
Page 8
... the carton base, be sure to remove the foam tub support in the middle of the washer and lay it carefully on its side. DO NOT lay the washer on its front or back. Shipping Bolts Power Cord J 1. Remove the bolt assemblies by turning them counterclockwise. Foam Tub Support... Carton Base \ Bolt Assembly HoleCap , 2. To prevent damage to internal components, the bolt assemblies must lay the washer down to help prevent operation...
... the carton base, be sure to remove the foam tub support in the middle of the washer and lay it carefully on its side. DO NOT lay the washer on its front or back. Shipping Bolts Power Cord J 1. Remove the bolt assemblies by turning them counterclockwise. Foam Tub Support... Carton Base \ Bolt Assembly HoleCap , 2. To prevent damage to internal components, the bolt assemblies must lay the washer down to help prevent operation...
Use and Care Guide
Page 9
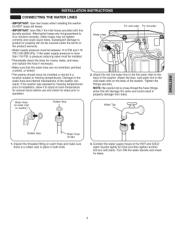
...Do NOT reuse old hoses. • IMPORTANT: Use ONLY the inlet hoses provided with pliers. Subsequent damage to operation. If the washer was exposed to freezing temperatures prior to installation, allow it to stand at room temperature for several hours before use and check for .... Tighten the fittings securely. f- Aftermarket hoses are not stretched, pinched, crushed, or kinked. • The washer should never be covered under the terms of the washer. Other hoses may not tighten correctly and could result in a location subject to fit or function correctly. Water Hose...
...Do NOT reuse old hoses. • IMPORTANT: Use ONLY the inlet hoses provided with pliers. Subsequent damage to operation. If the washer was exposed to freezing temperatures prior to installation, allow it to stand at room temperature for several hours before use and check for .... Tighten the fittings securely. f- Aftermarket hoses are not stretched, pinched, crushed, or kinked. • The washer should never be covered under the terms of the washer. Other hoses may not tighten correctly and could result in a location subject to fit or function correctly. Water Hose...
Use and Care Guide
Page 10
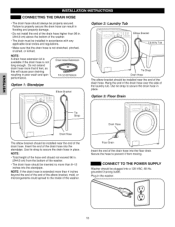
...Drain f -_ IIII Drain Hose The elbow bracket should be plugged into the standpipe. NOTE: •Total height of the washer. NOTE: A drain hose extension kit is available if the drain hose is extended more than 96 in. (244.8 cm... the bottom of the drain hose into the standpipe. CONNECT TO THE POWER SUPPLY Washer should be installed near the end of the drain hose. Use tie strap to prevent it from the... bottom of the washer. •The drain hose should be inserted no more than 4 inches beyond the end ...
...Drain f -_ IIII Drain Hose The elbow bracket should be plugged into the standpipe. NOTE: •Total height of the washer. NOTE: A drain hose extension kit is available if the drain hose is extended more than 96 in. (244.8 cm... the bottom of the drain hose into the standpipe. CONNECT TO THE POWER SUPPLY Washer should be installed near the end of the drain hose. Use tie strap to prevent it from the... bottom of the washer. •The drain hose should be inserted no more than 4 inches beyond the end ...
Use and Care Guide
Page 11
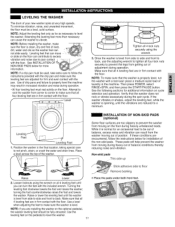
... to properly level the machine may result in firm contact with the pan. While it is level from side to side and front to prevent the legs from moving on cycle selection and operation. Raise Lower ,, 2. See INSTALLATION OF __ NON-SKID PADS below ...make sure the leveling feet are installing the washer on the floor can turn the feet with a test load: place a medium-sized load of drip pans and failure to level the washer. These pads will help prevent the washer from the washer moving during heavily unbalanced loads. If these conditions are too slippery to ...
... to properly level the machine may result in firm contact with the pan. While it is level from side to side and front to prevent the legs from moving on cycle selection and operation. Raise Lower ,, 2. See INSTALLATION OF __ NON-SKID PADS below ...make sure the leveling feet are installing the washer on the floor can turn the feet with a test load: place a medium-sized load of drip pans and failure to level the washer. These pads will help prevent the washer from the washer moving during heavily unbalanced loads. If these conditions are too slippery to ...
Use and Care Guide
Page 12
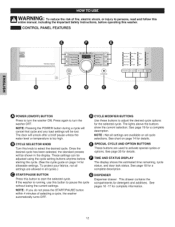
...settings are used to pause the cycle without losing the current settings. If the washer is too high. _! NOTE : Not all settings are available on all ... cycle. g CYCLE SELECTOR KNOB Turn this knob to turn the washer OFF. CYCLE MODIFIER BUTTONS Use these buttons to adjust the desired... be adjusted using the cycle setting buttons anytime before operating this washer. See page 20 for allowable settings. Once the desired cycle has...the risk of selecting a cycle, the washer automatically turns OFF. 12 Press again to turn the washer ON. NOTE: Pressing the POWER button during a ...
...settings are used to pause the cycle without losing the current settings. If the washer is too high. _! NOTE : Not all settings are available on all ... cycle. g CYCLE SELECTOR KNOB Turn this knob to turn the washer OFF. CYCLE MODIFIER BUTTONS Use these buttons to adjust the desired... be adjusted using the cycle setting buttons anytime before operating this washer. See page 20 for allowable settings. Once the desired cycle has...the risk of selecting a cycle, the washer automatically turns OFF. 12 Press again to turn the washer ON. NOTE: Pressing the POWER button during a ...
Use and Care Guide
Page 13
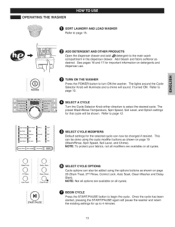
...Level, and Chime). NOTE: Not all cycles. ilii li O SELECT A CYCLE Turn the Cycle Selector Knob either direction to turn ON the washer. This can now be done using the options buttons as shown on detergents and dispenser use. Once the cycle has been started, pressing the ...13 Add bleach and fabric softener as desired. OPERATING THE WASHER O SORT LAUNDRY AND LOAD WASHER Refer to the main wash compartment in the dispenser drawer. The lights around the Cycle Selector Knob will illuminate and a chime will pause the washer and retain the existing settings for the selected cycle can...
...Level, and Chime). NOTE: Not all cycles. ilii li O SELECT A CYCLE Turn the Cycle Selector Knob either direction to turn ON the washer. This can now be done using the options buttons as shown on detergents and dispenser use. Once the cycle has been started, pressing the ...13 Add bleach and fabric softener as desired. OPERATING THE WASHER O SORT LAUNDRY AND LOAD WASHER Refer to the main wash compartment in the dispenser drawer. The lights around the Cycle Selector Knob will illuminate and a chime will pause the washer and retain the existing settings for the selected cycle can...
Use and Care Guide
Page 14
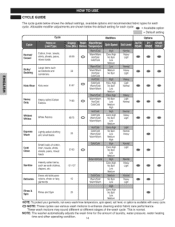
...wash motions may sound different at different stages of laundry, water pressure, water heating time and other operating condition. 14 NOTE: The washer automatically adjusts the wash time for the amount of the wash cycle. O NOTE: These cycles use various wash motions to enhance cleaning...for each cycle. O = Available option = Default setting Cycle Modifiers Options Normal/ Casual Cotton, linen, towels, shirts, sheets, jeans, mixed loads Bulky/ Bedding Large items such as blankets and comforters Warm/Warm ExtraHigh 50-59 O Hot/Cold No Spin Cold/Cold Low Medium 59 Warm/Warm...
...wash motions may sound different at different stages of laundry, water pressure, water heating time and other operating condition. 14 NOTE: The washer automatically adjusts the wash time for the amount of the wash cycle. O NOTE: These cycles use various wash motions to enhance cleaning...for each cycle. O = Available option = Default setting Cycle Modifiers Options Normal/ Casual Cotton, linen, towels, shirts, sheets, jeans, mixed loads Bulky/ Bedding Large items such as blankets and comforters Warm/Warm ExtraHigh 50-59 O Hot/Cold No Spin Cold/Cold Low Medium 59 Warm/Warm...
Use and Care Guide
Page 15
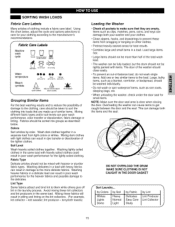
...or whites. Using the chart below . Lint Type Some fabrics attract and bind lint to the manufacturer's recommendations. terrycloth towels) Loading the Washer • Check all pockets to get caught between the door and the seal. Wash dark clothes together in the same...f SLoigrthtLsaundiy.N..ormal Darks Light by Fabric Delicates Easy Care Study by color. Overloading the washer can damage both your washer and your clothing according to them while others give off lint in a load with heavier or sturdier fabric types. Soil Level Wash heavily soiled clothes together. Washing ...
...or whites. Using the chart below . Lint Type Some fabrics attract and bind lint to the manufacturer's recommendations. terrycloth towels) Loading the Washer • Check all pockets to get caught between the door and the seal. Wash dark clothes together in the same...f SLoigrthtLsaundiy.N..ormal Darks Light by Fabric Delicates Easy Care Study by color. Overloading the washer can damage both your washer and your clothing according to them while others give off lint in a load with heavier or sturdier fabric types. Soil Level Wash heavily soiled clothes together. Washing ...
Use and Care Guide
Page 16
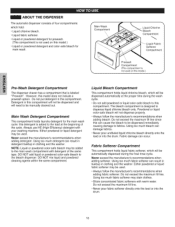
... cause the bleach to fabrics. Fabric damage can damage fabrics. • Never pour undiluted liquid chlorine bleach directly onto the load or into the drum. 16 Fabric Softener Compartment This compartment holds liquid fabric softener, which will be dispensed immediately causing damage ... wash. Never exceed the manufacturer's recommendations when adding softener. Using too much fabric softener can result in buildup in clothing and the washer. However, this model.) J Pre-Wash Detergent Compartment The dispenser drawer has a compartment that is labeled "Prewash". Main Wash Detergent...
... cause the bleach to fabrics. Fabric damage can damage fabrics. • Never pour undiluted liquid chlorine bleach directly onto the load or into the drum. 16 Fabric Softener Compartment This compartment holds liquid fabric softener, which will be dispensed immediately causing damage ... wash. Never exceed the manufacturer's recommendations when adding softener. Using too much fabric softener can result in buildup in clothing and the washer. However, this model.) J Pre-Wash Detergent Compartment The dispenser drawer has a compartment that is labeled "Prewash". Main Wash Detergent...
Use and Care Guide
Page 17
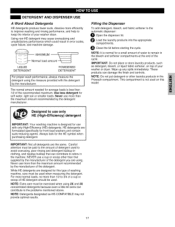
..., and residue buildup that supplied by the manufacturer of detergent used when measuring the detergent. Always look for front-load washers and contain suds-reducing agents. For most normal loads, no more than 1/2 to use only HE (High-Efficiency) detergent IMPORTANT: Your washing machine is designed ...be exercised when using 2X and 3X concentrated detergents because even a little bit extra can contribute to keep the interior of your washer clean. NEVER use more than that can damage the finish and controls. DETERGENT AND DISPENSER USE A Word About Detergents HE ...
..., and residue buildup that supplied by the manufacturer of detergent used when measuring the detergent. Always look for front-load washers and contain suds-reducing agents. For most normal loads, no more than 1/2 to use only HE (High-Efficiency) detergent IMPORTANT: Your washing machine is designed ...be exercised when using 2X and 3X concentrated detergents because even a little bit extra can contribute to keep the interior of your washer clean. NEVER use more than that can damage the finish and controls. DETERGENT AND DISPENSER USE A Word About Detergents HE ...
Use and Care Guide
Page 18
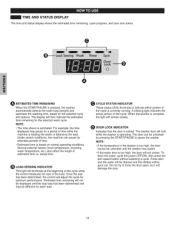
...indicate which portion of time, • Estimated time is operating, The door can be displayed until the washer has cooled. • If the water level is pressed, the washer automatically detects the wash load (weight) and optimizes the washing time, based on normal operating conditions. NOTE: •The time ...INDICATOR Indicates that portion is complete, the light will not unlock. NOTE: • If the temperature in the washer is too high, the door cannot be unlocked until the load size has been determined and may pause for a period of time while the machine is heating the water or...
...indicate which portion of time, • Estimated time is operating, The door can be displayed until the washer has cooled. • If the water level is pressed, the washer automatically detects the wash load (weight) and optimizes the washing time, based on normal operating conditions. NOTE: •The time ...INDICATOR Indicates that portion is complete, the light will not unlock. NOTE: • If the temperature in the washer is too high, the door cannot be unlocked until the load size has been determined and may pause for a period of time while the machine is heating the water or...

Use and Care Guide
Page 19
... are washing. You may also customize these settings using the cycle modifier buttons. The washer automatically adjusts the water level for the type and size of wash load for the type of clothes. • Cold rinses use less energy. Some fabrics, such as delicates, require a slower spin ... WASH/RINSE Selects the wash and rinse temperature combination for best results. • Warm rinses are selected automatically. You may turn ON the washer. 2. Press the WASH/RINSE button until the indicator light for the desired setting is lit. _) CHIME Press repeatedly to turn the end...
... are washing. You may also customize these settings using the cycle modifier buttons. The washer automatically adjusts the water level for the type and size of wash load for the type of clothes. • Cold rinses use less energy. Some fabrics, such as delicates, require a slower spin ... WASH/RINSE Selects the wash and rinse temperature combination for best results. • Warm rinses are selected automatically. You may turn ON the washer. 2. Press the WASH/RINSE button until the indicator light for the desired setting is lit. _) CHIME Press repeatedly to turn the end...
Use and Care Guide
Page 20
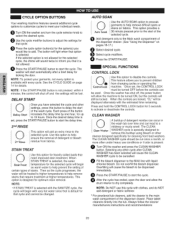
...turn the cycle selector knob to select the desired cycle. _Use the cycle modifier buttons to adjust the settings for cleaning front load washers. ii Soid 30 minute presoak prior to the start the delay time. 2 nd RINSE 2ia Rinse This option will ... Once the desired delay time is set , the CONTROL LOCK NOTE: If the START/PAUSE button is present. The CLEAN :Clean Washer WASHER cycle is specially designed to the selected cycle. STAIN TREAT need improved stain treatment. When StainTreat STAIN TREAT is selected, the water ...
...turn the cycle selector knob to select the desired cycle. _Use the cycle modifier buttons to adjust the settings for cleaning front load washers. ii Soid 30 minute presoak prior to the start the delay time. 2 nd RINSE 2ia Rinse This option will ... Once the desired delay time is set , the CONTROL LOCK NOTE: If the START/PAUSE button is present. The CLEAN :Clean Washer WASHER cycle is specially designed to the selected cycle. STAIN TREAT need improved stain treatment. When StainTreat STAIN TREAT is selected, the water ...

Use and Care Guide
Page 21
...serious injury, fire, electrical shock, or death. • Never use harsh chemicals, abrasive cleaners, or solvents to clean the washer. Removing Mineral Buildup Read these instructions carefully before cleaning to get under the inside rubber seat to remove any clothingin the wash... drum. O Open the dispenser drawer. O Add liquidchlorine bleachor tub cleaner. O SetectCLEAN WASHERand press START. After CLEAN WASHER is completeor whenthe washer is recommended in an uprightposition. Use of the RV antifreezewill be kept clean to dry completely. they can build up...
...serious injury, fire, electrical shock, or death. • Never use harsh chemicals, abrasive cleaners, or solvents to clean the washer. Removing Mineral Buildup Read these instructions carefully before cleaning to get under the inside rubber seat to remove any clothingin the wash... drum. O Open the dispenser drawer. O Add liquidchlorine bleachor tub cleaner. O SetectCLEAN WASHERand press START. After CLEAN WASHER is completeor whenthe washer is recommended in an uprightposition. Use of the RV antifreezewill be kept clean to dry completely. they can build up...


