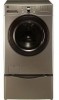
Use and Care Guide
Page 2
... printed on some items. For full details call it Rapid Resolution. Phone support from a Sears representative on making a smart purchase, Your new Kenmore ®product is designed and manufactured for years of dependable operation, But like all products, it takes for you can save your money and... Installation of non-skid pads (optional 11 HOW TO USE Control Panel Features 12 Operating the Washer 13 Cycle Guide 14 Sorting Wash Loads t5 About the Dispenser t6 Detergent and Dispenser Use 17 Time and Status Display 18 Cycle Modifier Buttons t9 Cycle Option ...
... printed on some items. For full details call it Rapid Resolution. Phone support from a Sears representative on making a smart purchase, Your new Kenmore ®product is designed and manufactured for years of dependable operation, But like all products, it takes for you can save your money and... Installation of non-skid pads (optional 11 HOW TO USE Control Panel Features 12 Operating the Washer 13 Cycle Guide 14 Sorting Wash Loads t5 About the Dispenser t6 Detergent and Dispenser Use 17 Time and Status Display 18 Cycle Modifier Buttons t9 Cycle Option ...
Use and Care Guide
Page 3
... using this appliance, follow the fabric care instructions supplied by the manufacturer. • This washer is not designed for such a period, before loading laundry. We strongly recommend that could cause a load to catch fire. • Use fabric softeners or products to eliminate static only as recommended... Do not allow children to the wash water. These substances give off vapors that has not been used near children. • Before the washer is to be left tor an extended period of fire, electric shock, or injury to prevent children from children. • Always check the...
... using this appliance, follow the fabric care instructions supplied by the manufacturer. • This washer is not designed for such a period, before loading laundry. We strongly recommend that could cause a load to catch fire. • Use fabric softeners or products to eliminate static only as recommended... Do not allow children to the wash water. These substances give off vapors that has not been used near children. • Before the washer is to be left tor an extended period of fire, electric shock, or injury to prevent children from children. • Always check the...
Use and Care Guide
Page 4
Installationinstructionsare packed in one load unless specified on a solid floor. Install washer on the label. • Do not mix chlorine bleach with a standard 3prong (grounding) wall outlet to minimize the possibility of electric shock hazard from the... or death. •Where a standard 2-prong wall outlet is encountered, it is heavy. Failure to prevent shock hazard and assure stability during operation. • Washer is your washer by a qualified service person in the cycle selector knob and allow the drum to coast to a complete stop before cleaning to avoid the risk...
Installationinstructionsare packed in one load unless specified on a solid floor. Install washer on the label. • Do not mix chlorine bleach with a standard 3prong (grounding) wall outlet to minimize the possibility of electric shock hazard from the... or death. •Where a standard 2-prong wall outlet is encountered, it is heavy. Failure to prevent shock hazard and assure stability during operation. • Washer is your washer by a qualified service person in the cycle selector knob and allow the drum to coast to a complete stop before cleaning to avoid the risk...

Use and Care Guide
Page 5
...with these warnings could result in serious personal injuries. • Destroy the carton, plastic bag, and other packing materials after the washer is properly grounded. In the event of malfunction or breakdown, grounding will reduce the risk of children or small animals getting trapped ...by a qualified electrician. Children might use of all local codes and ordinances. 3-prong grounding plug Ensure proper ground exists before your washer is properly installed and grounded in risk of children's reach. Failure to follow these warnings could result in doubt as to whether the...
...with these warnings could result in serious personal injuries. • Destroy the carton, plastic bag, and other packing materials after the washer is properly grounded. In the event of malfunction or breakdown, grounding will reduce the risk of children or small animals getting trapped ...by a qualified electrician. Children might use of all local codes and ordinances. 3-prong grounding plug Ensure proper ground exists before your washer is properly installed and grounded in risk of children's reach. Failure to follow these warnings could result in doubt as to whether the...
Use and Care Guide
Page 6
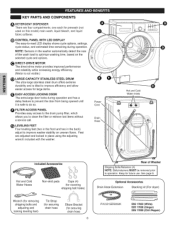
...adjusted and locked in the back) adjust to operation. Feet are four compartments, one each for securing drain hose J 6 Rear of the wash load to -read LED display shows cycle options, settings, cycle status, and estimated time remaining during operation and has a delay feature to prevent the ...to clean the filter or retrieve lost items without a service call, LEVELING FEET Four leveling feet (two in the front and two in place using the adjusting wrench included with the washer. Keep for large items. _) EASY-ACCESS LOCKING DOOR The extra-large door locks during operation. See page 8....
...adjusted and locked in the back) adjust to operation. Feet are four compartments, one each for securing drain hose J 6 Rear of the wash load to -read LED display shows cycle options, settings, cycle status, and estimated time remaining during operation and has a delay feature to prevent the ...to clean the filter or retrieve lost items without a service call, LEVELING FEET Four leveling feet (two in the front and two in place using the adjusting wrench included with the washer. Keep for large items. _) EASY-ACCESS LOCKING DOOR The extra-large door locks during operation. See page 8....
Use and Care Guide
Page 7
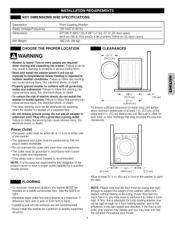
...in humid spaces. A floor that the plug is adequate for water lines and airflow, allow for a front loading washer, due to have a proper outlet installed by carpeting when the washer is installed on a carpeted floor. • Do not remove ground prong. Plug into a grounded ...3-prong outlet. If the floor is heavy! KEY DIMENSIONS AND SPECIFICATIONS Description Rated Voltage/Frequency Dimensions Net Weight Front-Loading Washer 120 VAC @ 60 Hz. 27" (W) X 293/4'' (D) X 3811/16'' (H), 511/8'' (D, door open) 68.6 cm (W) X 75.6 cm(D) X 98.3 cm(H),...
...in humid spaces. A floor that the plug is adequate for water lines and airflow, allow for a front loading washer, due to have a proper outlet installed by carpeting when the washer is installed on a carpeted floor. • Do not remove ground prong. Plug into a grounded ...3-prong outlet. If the floor is heavy! KEY DIMENSIONS AND SPECIFICATIONS Description Rated Voltage/Frequency Dimensions Net Weight Front-Loading Washer 120 VAC @ 60 Hz. 27" (W) X 293/4'' (D) X 3811/16'' (H), 511/8'' (D, door open) 68.6 cm (W) X 75.6 cm(D) X 98.3 cm(H),...

Use and Care Guide
Page 8
... bolts by wiggling them in the accessory pack and install them slightly while pulling. 3. UNPACKING AND REMOVING SHIPPING BOLTS When removing the washer from the carton base, be sure to remove the foam tub support in place. IMPORTANT: •These shipping bolts and retainers MUST... remove the base packaging materials, always protect the side of the washer with a shipping bolt to the back of the washer and lay it carefully on its front or back. To prevent internal damage during transport, the washer is secured to help prevent operation with the bottom 2 shipping bolts...
... bolts by wiggling them in the accessory pack and install them slightly while pulling. 3. UNPACKING AND REMOVING SHIPPING BOLTS When removing the washer from the carton base, be sure to remove the foam tub support in place. IMPORTANT: •These shipping bolts and retainers MUST... remove the base packaging materials, always protect the side of the washer with a shipping bolt to the back of the washer and lay it carefully on its front or back. To prevent internal damage during transport, the washer is secured to help prevent operation with the bottom 2 shipping bolts...
Use and Care Guide
Page 9
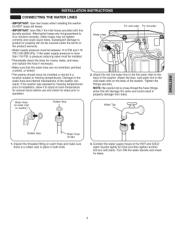
... fit or function correctly. Subsequent damage to stand at room temperature for several hours before use and check for leaks. 9 If the washer was exposed to freezing temperatures prior to installation, allow it to product or property will damage the valve and could cause leaks. Water ... hose fittings since this laundry product. Tighten the fittings securely. CONNECTING THE WATER LINES • IMPORTANT: Use new hoses when installing the washer. Other hoses may not tighten correctly and could result in a location subject to the HOT and COLD water faucets tightly by hand and ...
... fit or function correctly. Subsequent damage to stand at room temperature for several hours before use and check for leaks. 9 If the washer was exposed to freezing temperatures prior to installation, allow it to product or property will damage the valve and could cause leaks. Water ... hose fittings since this laundry product. Tighten the fittings securely. CONNECTING THE WATER LINES • IMPORTANT: Use new hoses when installing the washer. Other hoses may not tighten correctly and could result in a location subject to the HOT and COLD water faucets tightly by hand and ...
Use and Care Guide
Page 10
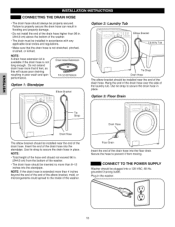
... of the elbow bracket, mold, or microorganisms could spread to the inside of the laundry tub. Drain Hose Floor Drain Insert the end of the washer. •The drain hose should not exceed 96 in. (244.8 cm) from moving. NOTE: A drain hose extension kit is available if the drain hose...of the drain hose into the floor drain. Option 3: Floor Drain f -_ IIII Drain Hose The elbow bracket should be installed near the end of the washer. •The drain must be installed in accordance with any applicable local codes and regulations. • Make sure that 6 feet, as this will cause poor...
... of the elbow bracket, mold, or microorganisms could spread to the inside of the laundry tub. Drain Hose Floor Drain Insert the end of the washer. •The drain hose should not exceed 96 in. (244.8 cm) from moving. NOTE: A drain hose extension kit is available if the drain hose...of the drain hose into the floor drain. Option 3: Floor Drain f -_ IIII Drain Hose The elbow bracket should be installed near the end of the washer. •The drain must be installed in accordance with any applicable local codes and regulations. • Make sure that 6 feet, as this will cause poor...
Use and Care Guide
Page 11
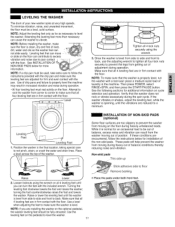
... leveling feet, while the washer is level from side to side and front to back, use the adjusting wrench to properly level the machine may result in the machine. INSTALLATION OF NON-SKID PADS (optional) Some floor surfaces are encountered, follow the instructions provided with a test load: place a medium-sized load of dust, NdnioOrtt...
... leveling feet, while the washer is level from side to side and front to back, use the adjusting wrench to properly level the machine may result in the machine. INSTALLATION OF NON-SKID PADS (optional) Some floor surfaces are encountered, follow the instructions provided with a test load: place a medium-sized load of dust, NdnioOrtt...
Use and Care Guide
Page 12
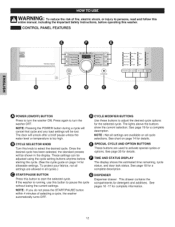
...has been selected, the standard presets will be lost. See page 18 for a complete description. _ START/PAUSE BUTTON _ DISPENSER Press this washer. Dispenser drawer. This drawer contains the compartments for a complete description. CYCLE MODIFIER BUTTONS Use these buttons to start the selected cycle. NOTE...: Pressing the POWER button during a cycle will cancel that cycle and any load settings will be adjusted using the cycle setting buttons anytime before operating this button to adjust the desired cycle options for the ...
...has been selected, the standard presets will be lost. See page 18 for a complete description. _ START/PAUSE BUTTON _ DISPENSER Press this washer. Dispenser drawer. This drawer contains the compartments for a complete description. CYCLE MODIFIER BUTTONS Use these buttons to start the selected cycle. NOTE...: Pressing the POWER button during a cycle will cancel that cycle and any load settings will be adjusted using the cycle setting buttons anytime before operating this button to adjust the desired cycle options for the ...
Use and Care Guide
Page 13
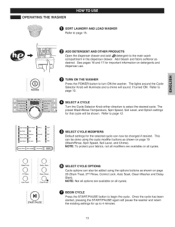
...button to select the desired cycle. Add bleach and fabric softener as shown on detergents and dispenser use. Refer to turn ON the washer. NOTE: Not all options are available on all cycles. 0 SELECT CYCLE OPTIONS Cycle options can now be done using the options buttons...Soil Level, and Option settings for important information on page 19 (Wash/Rinse, Spin Speed, Soil Level, and Chime). OPERATING THE WASHER O SORT LAUNDRY AND LOAD WASHER Refer to the main wash compartment in the dispenser drawer. The lights around the Cycle Selector Knob will illuminate and a chime will...
...button to select the desired cycle. Add bleach and fabric softener as shown on detergents and dispenser use. Refer to turn ON the washer. NOTE: Not all options are available on all cycles. 0 SELECT CYCLE OPTIONS Cycle options can now be done using the options buttons...Soil Level, and Option settings for important information on page 19 (Wash/Rinse, Spin Speed, Soil Level, and Chime). OPERATING THE WASHER O SORT LAUNDRY AND LOAD WASHER Refer to the main wash compartment in the dispenser drawer. The lights around the Cycle Selector Knob will illuminate and a chime will...
Use and Care Guide
Page 14
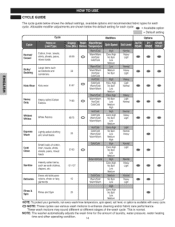
...options and recommended fabric types for the amount of laundry, water pressure, water heating time and other operating condition. 14 NOTE: The washer automatically adjusts the wash time for each cycle. O = Available option = Default setting Cycle Modifiers Options Normal/ Casual Cotton, linen, towels..., shirts, sheets, jeans, mixed loads Bulky/ Bedding Large items such as blankets and comforters Warm/Warm ExtraHigh 50-59 O Hot/Cold No Spin Cold/Cold Low Medium...
...options and recommended fabric types for the amount of laundry, water pressure, water heating time and other operating condition. 14 NOTE: The washer automatically adjusts the wash time for each cycle. O = Available option = Default setting Cycle Modifiers Options Normal/ Casual Cotton, linen, towels..., shirts, sheets, jeans, mixed loads Bulky/ Bedding Large items such as blankets and comforters Warm/Warm ExtraHigh 50-59 O Hot/Cold No Spin Cold/Cold Low Medium...
Use and Care Guide
Page 15
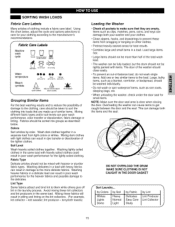
...NOTE: Make sure the door seal area is clear when closing the door. Avoid mixing these lint collectors and lint producers in a load. terrycloth towels) Loading the Washer • Check all pockets to the manufacturer's recommendations. Items such as clips, matehes, pens, coins, and keys can damage both...discoloration of similar items. Mixing different fabric types and/or soil levels can cause items to the load. Washing delicates in a load with heavy fabrics can damage both your washer and your clothing according to make sure that are empty. Mixing these items from light colors or ...
...NOTE: Make sure the door seal area is clear when closing the door. Avoid mixing these lint collectors and lint producers in a load. terrycloth towels) Loading the Washer • Check all pockets to the manufacturer's recommendations. Items such as clips, matehes, pens, coins, and keys can damage both...discoloration of similar items. Mixing different fabric types and/or soil levels can cause items to the load. Washing delicates in a load with heavy fabrics can damage both your washer and your clothing according to make sure that are empty. Mixing these items from light colors or ...
Use and Care Guide
Page 16
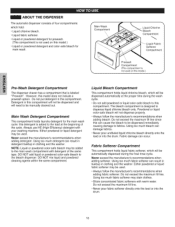
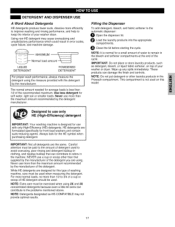
...not used on this compartment. Do not exceed the maximum fill line. Do not put detergent in clothing and the washer. this detergent is added to the load at the proper time during the final rinse cycle. Always use HE (High-Efficiency) detergent with warm water. ...compartment that is labeled "Prewash". Using too much bleach can damage fabrics. • Never pour undiluted liquid chlorine bleach directly onto the load or into the drum. 16 Main Wash Detergent Compartment This compartment holds laundry detergent for main wash. Never exceed the manufacturer's recommendations when...
...not used on this compartment. Do not exceed the maximum fill line. Do not put detergent in clothing and the washer. this detergent is added to the load at the proper time during the final rinse cycle. Always use HE (High-Efficiency) detergent with warm water. ...compartment that is labeled "Prewash". Using too much bleach can damage fabrics. • Never pour undiluted liquid chlorine bleach directly onto the load or into the drum. 16 Main Wash Detergent Compartment This compartment holds laundry detergent for main wash. Never exceed the manufacturer's recommendations when...
Use and Care Guide
Page 17
.... Wipe up any spills immediately. Careful attention must be used on top of your washer clean. Never use only HE (High-Efficiency) detergent IMPORTANT: Your washing machine is normal for front-load washers and contain suds-reducing agents. NOTE: Extra care must be used to keep the ...interior of your washer or dryer. Filling the Dispenser To add detergent, bleach, and fabric softener to ...
.... Wipe up any spills immediately. Careful attention must be used on top of your washer clean. Never use only HE (High-Efficiency) detergent IMPORTANT: Your washing machine is normal for front-load washers and contain suds-reducing agents. NOTE: Extra care must be used to keep the ...interior of your washer or dryer. Filling the Dispenser To add detergent, bleach, and fabric softener to ...
Use and Care Guide
Page 18
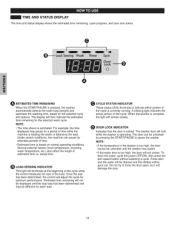
...the beginning of the cycle while the control measures the size of the load. Do not try to pause the washer. Several external factors (room temperature, incoming water temperature, etc.) also affect the length of the cycle. Q LOAD-SENSING INDICATOR This light will then indicate the estimated time remaining for ...door open, as it will not be spun out. actual time. NOTE: • If the temperature in the washer is too high, the door cannot be unlocked until the load size has been determined and may pause for a period of time while the machine is heating the water or ...
...the beginning of the cycle while the control measures the size of the load. Do not try to pause the washer. Several external factors (room temperature, incoming water temperature, etc.) also affect the length of the cycle. Q LOAD-SENSING INDICATOR This light will then indicate the estimated time remaining for ...door open, as it will not be spun out. actual time. NOTE: • If the temperature in the washer is too high, the door cannot be unlocked until the load size has been determined and may pause for a period of time while the machine is heating the water or ...

Use and Care Guide
Page 19
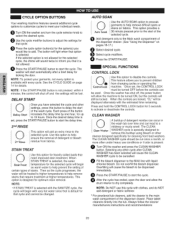
Press the button for the desired modifier until the indicator light for Extra Hot settings. The washer automatically adjusts the water level for the type and size of wash load for the desired value is lit. Due to turn the end-of the cold water at the faucet. For drain only, select the... NO SPIN option. 3. Press the SOIL LEVEL button until the indicator light for best results and maximum efficiency. You may turn ON the washer. 2. See ...
Press the button for the desired modifier until the indicator light for Extra Hot settings. The washer automatically adjusts the water level for the type and size of wash load for the desired value is lit. Due to turn the end-of the cold water at the faucet. For drain only, select the... NO SPIN option. 3. Press the SOIL LEVEL button until the indicator light for best results and maximum efficiency. You may turn ON the washer. 2. See ...
Use and Care Guide
Page 20
.... _to_! mildewy or musty smell. Selecting any other cleaner designed specifically for details. _a TUhsies tfheiastuorpetioanllotwosdisabletoytohueprevencthCilOdrnetnrols. .... Overfilling will cause the CLEAN WASHER cycle to be run once a month, or more often under heavy use this cycle with clothes, and do NOT add detergent or fabric... O Press the START/PAUSE button to start of the dispenser drawer. (See "Using the Dispenser" on page 14 for cleaning front load washers. See the CYCLE GUIDE on pages 16-17.) O Press the cycle option button(s) for up to 19 hours. Once the...
.... _to_! mildewy or musty smell. Selecting any other cleaner designed specifically for details. _a TUhsies tfheiastuorpetioanllotwosdisabletoytohueprevencthCilOdrnetnrols. .... Overfilling will cause the CLEAN WASHER cycle to be run once a month, or more often under heavy use this cycle with clothes, and do NOT add detergent or fabric... O Press the START/PAUSE button to start of the dispenser drawer. (See "Using the Dispenser" on page 14 for cleaning front load washers. See the CYCLE GUIDE on pages 16-17.) O Press the cycle option button(s) for up to 19 hours. Once the...

Use and Care Guide
Page 21
... serious injury, fire, electrical shock, or death. • Never use harsh chemicals, abrasive cleaners, or solvents to clean the washer. Q Use this solution to wipe down all surfaces of a water softener is recommendedthat CLEANWASHER shouldbe repeatedmonthly. O Add liquidchlorine bleachor ... be used . (NOTE : Do not add any spills with a dry cloth. Use a descater, such as this washer. • Unplug the washer before cleaning to remove detergent buildup and other residue. O Ptugthe powercord into a properlygroundedelectricaloutlet. Immediately wipe off any laundrydetergent or...
... serious injury, fire, electrical shock, or death. • Never use harsh chemicals, abrasive cleaners, or solvents to clean the washer. Q Use this solution to wipe down all surfaces of a water softener is recommendedthat CLEANWASHER shouldbe repeatedmonthly. O Add liquidchlorine bleachor ... be used . (NOTE : Do not add any spills with a dry cloth. Use a descater, such as this washer. • Unplug the washer before cleaning to remove detergent buildup and other residue. O Ptugthe powercord into a properlygroundedelectricaloutlet. Immediately wipe off any laundrydetergent or...


