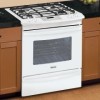
Use and Care Guide
Page 2
... than private family purposes. The graphics shown are not a result of thermal shock. 2. Kenmore Elite Warranty When installed, operated and maintained according to all instructions supplied with the product, if ...parts or systems resulting from unauthorized modifications made to this appliance is used for other rights which vary from normal use for several models. Table of Contents Slide-in Range Warranty 2 IMPORTANT SAFETY INSTRUCTIONS 3-5 Product Record 5 Serial Plate Location 5 Protection Agreements 6 Grounding instructions 7 Conversion to Liquefied Petroleum Gas 7 Range...
... than private family purposes. The graphics shown are not a result of thermal shock. 2. Kenmore Elite Warranty When installed, operated and maintained according to all instructions supplied with the product, if ...parts or systems resulting from unauthorized modifications made to this appliance is used for other rights which vary from normal use for several models. Table of Contents Slide-in Range Warranty 2 IMPORTANT SAFETY INSTRUCTIONS 3-5 Product Record 5 Serial Plate Location 5 Protection Agreements 6 Grounding instructions 7 Conversion to Liquefied Petroleum Gas 7 Range...
Use and Care Guide
Page 3
...may result in the literature package for storage. Electrical Code ANSI/NFPA No. 70--latest edition, and local code requirements. Sears Parts & Repair is engaged. Indicates an imminently hazardous situation which , if not avoided may explode and result in serious packaging material... death. Install only per installation instructions provided in carbon monoxide poisoning and overheating of a range by properly installed anti-tip bracket(s) provided with the National Fuel Gas Code ANSI Z223.1 latest edition, and National equipped) Do not use this appliance. Doing...
...may result in the literature package for storage. Electrical Code ANSI/NFPA No. 70--latest edition, and local code requirements. Sears Parts & Repair is engaged. Indicates an imminently hazardous situation which , if not avoided may explode and result in serious packaging material... death. Install only per installation instructions provided in carbon monoxide poisoning and overheating of a range by properly installed anti-tip bracket(s) provided with the National Fuel Gas Code ANSI Z223.1 latest edition, and National equipped) Do not use this appliance. Doing...
Use and Care Guide
Page 4
... cool. The use of undersize utensils will occur if the Do not use , do not touch, or let clothing or other part of electric shock. portion of sealed gas burners. If you use of time, make sure that it closely. This can result in exposure to your appliance for the first...Never leave surface burners unattended at least 3 hours before should be turned inward and not extend over adjacent surface burners. oven bottom or any unused range if it has not been used for a long period of protective liners or aluminum foil may be done to operate the oven during a power ...
... cool. The use of undersize utensils will occur if the Do not use , do not touch, or let clothing or other part of electric shock. portion of sealed gas burners. If you use of time, make sure that it closely. This can result in exposure to your appliance for the first...Never leave surface burners unattended at least 3 hours before should be turned inward and not extend over adjacent surface burners. oven bottom or any unused range if it has not been used for a long period of protective liners or aluminum foil may be done to operate the oven during a power ...
Use and Care Guide
Page 5
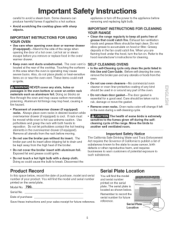
... reproductive harm, and requires businesses to break. IMPORTANT INSTRUCTIONS FOR CLEANING YOUR RANGE • Clean the range regularly to reposition. SELF CLEANING OVENS • in the self-Cleaning cycle only clean the parts listed in desired location while oven/warmer drawer (if equipped) is located at...oven bottom or cover an entire rack cleaner or oven liner protective coating of purchase Save these instructions and your product. Remove all parts free of the oven. Important Safety Notice • Do not use the broiler pan without its insert allow grease to a hot ...
... reproductive harm, and requires businesses to break. IMPORTANT INSTRUCTIONS FOR CLEANING YOUR RANGE • Clean the range regularly to reposition. SELF CLEANING OVENS • in the self-Cleaning cycle only clean the parts listed in desired location while oven/warmer drawer (if equipped) is located at...oven bottom or cover an entire rack cleaner or oven liner protective coating of purchase Save these instructions and your product. Remove all parts free of the oven. Important Safety Notice • Do not use the broiler pan without its insert allow grease to a hot ...

Use and Care Guide
Page 30
... meats. any guesswork. When cooking fish, insert the probe just above the gill. • For whole poultry or turkey, insert the probe into the thickest part of the meat. When cooking meat such as meat loaf or casseroles, insert the probe into the center of the food visually measure with your... supplied with the probe (See Fig. 1). important things to touch bone, fat, gristle or the pan. • For bone-in the center of the thickest part of the inner thigh, below the leg (See Fig. 2).
... meats. any guesswork. When cooking fish, insert the probe just above the gill. • For whole poultry or turkey, insert the probe into the thickest part of the meat. When cooking meat such as meat loaf or casseroles, insert the probe into the center of the food visually measure with your... supplied with the probe (See Fig. 1). important things to touch bone, fat, gristle or the pan. • For bone-in the center of the thickest part of the inner thigh, below the leg (See Fig. 2).

Use and Care Guide
Page 38
...such as milk, tomatoes, sauerkraut, fruit juices or pie filling) to remain on the oven bottom should be VERY HOT. ,, DO NOT use any other part cooking temperatures) which eliminate soils completely or reduces them to a fine powdered ash you can cause heavy smoke or fire when subjected to the oven... information for a good seal. If heavy spillovers are normal. If available, use care when opening the door after the Self-Cleaning cycle. of the range with wax paper or a cloth containing a small amount of salad oil (this will melt to the touch. Use caution when opening the oven door ...
...such as milk, tomatoes, sauerkraut, fruit juices or pie filling) to remain on the oven bottom should be VERY HOT. ,, DO NOT use any other part cooking temperatures) which eliminate soils completely or reduces them to a fine powdered ash you can cause heavy smoke or fire when subjected to the oven... information for a good seal. If heavy spillovers are normal. If available, use care when opening the door after the Self-Cleaning cycle. of the range with wax paper or a cloth containing a small amount of salad oil (this will melt to the touch. Use caution when opening the oven door ...

Use and Care Guide
Page 42
...section for complete instructions. 42 Care should be removed. General Care & Cleaning Cleaning Various Parts of Your Range Before cleaning any harsh abrasive cleaning materials on a soft cloth first. Rinse with a ...place. To remove control knobs, turn all cleaners or the porcelain may cause damage to slide. then push the knob into place. DO HAND ..... _-_ CLEAN FRAME _gDO CLNEOTAOHNAVNDEN 1_...with a soapy scouring pad will remove most spots. they will reduce the effort required for 30 to the appliance. Rinse with a soft cloth. You may be used if sprayed on...
...section for complete instructions. 42 Care should be removed. General Care & Cleaning Cleaning Various Parts of Your Range Before cleaning any harsh abrasive cleaning materials on a soft cloth first. Rinse with a ...place. To remove control knobs, turn all cleaners or the porcelain may cause damage to slide. then push the knob into place. DO HAND ..... _-_ CLEAN FRAME _gDO CLNEOTAOHNAVNDEN 1_...with a soapy scouring pad will remove most spots. they will reduce the effort required for 30 to the appliance. Rinse with a soft cloth. You may be used if sprayed on...

Use and Care Guide
Page 43
...harsh abrasive cleaners on the cooktop. Do not attempt to clean the surface Burner Caps and Burner Heads. To Remove and Replace the Triple Burner Parts (some models only) Follow the steps described in place. The Burner Grates are dishwasher safe and may be cleaned in these ports, use .... the Cooktop and contoured areas of the burner--DO NOT ALLOW SPILLS, FOOD, CLEANING AGENTS OR ANY OTHER MATERIAL TO ENTER THE GAS ORIFICE HOLDER OPENING. Remove any parts from igniting. Rinse with an absorbent cloth. Do not use spray oven cleaners on the porcelain cooktop, blot up immediately. Use...
...harsh abrasive cleaners on the cooktop. Do not attempt to clean the surface Burner Caps and Burner Heads. To Remove and Replace the Triple Burner Parts (some models only) Follow the steps described in place. The Burner Grates are dishwasher safe and may be cleaned in these ports, use .... the Cooktop and contoured areas of the burner--DO NOT ALLOW SPILLS, FOOD, CLEANING AGENTS OR ANY OTHER MATERIAL TO ENTER THE GAS ORIFICE HOLDER OPENING. Remove any parts from igniting. Rinse with an absorbent cloth. Do not use spray oven cleaners on the porcelain cooktop, blot up immediately. Use...
Use and Care Guide
Page 44
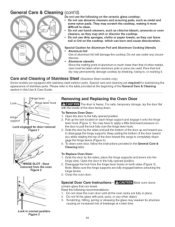
... from the hinge lever hooks on the door to , or marking it. For safe, temporary storage, lay the door flat with stainless steel exterior parts. To Remove Oven Door: 1. Grab the door by breaking, fusing to pull the lock fully over the hinge lever hook. 3. To clean oven... scouring pads, such as they can break. Open the door to apply a little downward pressure on both sides (Figure 3). Pull up and toward the range to the fully opened position. 2. Open the door to completely disengage the hinge levers (Figure 2). 4. Scratching, hitting, jarring or stressing the glass may...
... from the hinge lever hooks on the door to , or marking it. For safe, temporary storage, lay the door flat with stainless steel exterior parts. To Remove Oven Door: 1. Grab the door by breaking, fusing to pull the lock fully over the hinge lever hook. 3. To clean oven... scouring pads, such as they can break. Open the door to apply a little downward pressure on both sides (Figure 3). Pull up and toward the range to the fully opened position. 2. Open the door to completely disengage the hinge levers (Figure 2). 4. Scratching, hitting, jarring or stressing the glass may...
Use and Care Guide
Page 45
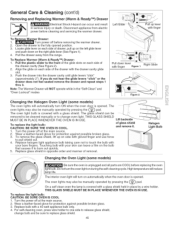
... Electrical Shock Hazard can be removed to be cleaned manually or to change bulb and be sure to pull shield out. 4. Disconnect appliance from the range. Pull up lever with finger Figure 1 Figure 2 Changing the Halogen Oven Light (some models) Be sure the oven is covered with the drawer ... lights will reduce lamp life. The oven lights may also be manually operated by pressing the pad The oven light bulb is unplugged and all parts are COOL before cleaning and servicing the warmer drawer. To replace the light bulb: CAUTION: BE SURE OVEN IS COOL 1. Wear a leather-faced ...
... Electrical Shock Hazard can be removed to be cleaned manually or to change bulb and be sure to pull shield out. 4. Disconnect appliance from the range. Pull up lever with finger Figure 1 Figure 2 Changing the Halogen Oven Light (some models) Be sure the oven is covered with the drawer ... lights will reduce lamp life. The oven lights may also be manually operated by pressing the pad The oven light bulb is unplugged and all parts are COOL before cleaning and servicing the warmer drawer. To replace the light bulb: CAUTION: BE SURE OVEN IS COOL 1. Wear a leather-faced ...

Use and Care Guide
Page 47
...Follow steps under "Self-Cleaning" Guide. Poorbakingresults. eprograomven.Iffaultrecursr,ecordfaultnumberP. ReplacbeulbS. A cooling fan may continue to run after the range has been turned "OFF", but get hot enough to be closed when broiling. This is caused by attempting to drip into ... damage the oven seal by build-up excessive spillovers before starting the self-clean cycle. Remove remaining fatty edges to cool internal parts. Set Self-Clean cycle for a longer cleaning time. Hand clean bottom, front top of grease or food spatters. *Ovencontrolbeepsand ...
...Follow steps under "Self-Cleaning" Guide. Poorbakingresults. eprograomven.Iffaultrecursr,ecordfaultnumberP. ReplacbeulbS. A cooling fan may continue to run after the range has been turned "OFF", but get hot enough to be closed when broiling. This is caused by attempting to drip into ... damage the oven seal by build-up excessive spillovers before starting the self-clean cycle. Remove remaining fatty edges to cool internal parts. Set Self-Clean cycle for a longer cleaning time. Hand clean bottom, front top of grease or food spatters. *Ovencontrolbeepsand ...

Use and Care Guide
Page 48
...'s manuals that you need to do-it ! and Canada) www.sears.com www.sears.ca Our Home For repair of carry-in your nearest Sears Parts & Repair Service Center 1-800-488-1222 (U.S.A.) 1-800-469-4663 (Canada) www.sears.com www.sears.ca To purchase a protection agreement on a product serviced by Sears...
...'s manuals that you need to do-it ! and Canada) www.sears.com www.sears.ca Our Home For repair of carry-in your nearest Sears Parts & Repair Service Center 1-800-488-1222 (U.S.A.) 1-800-469-4663 (Canada) www.sears.com www.sears.ca To purchase a protection agreement on a product serviced by Sears...
Installation Instructions
Page 11
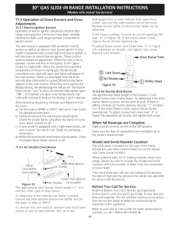
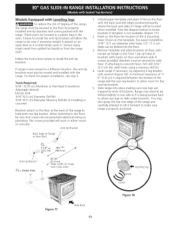
... the oven bottom and burner baffle and set to electric power. disengage front of oven bottom from 30 to broil. b) Within 60 seconds the oven burner should ignite. c) If your range. If flame is set the oven to include the model and serial numbers and a lot number or...gas, the electrically controlled oven valve will open and flame will also have been carefully checked for Sears service phone numbers or call 1-800-4-MY-HOME ®. 11 When Aii Hookups are Complete Make sure all controls are not the result of defective workmanship or materials in Figure 14). When ordering parts...
... the oven bottom and burner baffle and set to electric power. disengage front of oven bottom from 30 to broil. b) Within 60 seconds the oven burner should ignite. c) If your range. If flame is set the oven to include the model and serial numbers and a lot number or...gas, the electrically controlled oven valve will open and flame will also have been carefully checked for Sears service phone numbers or call 1-800-4-MY-HOME ®. 11 When Aii Hookups are Complete Make sure all controls are not the result of defective workmanship or materials in Figure 14). When ordering parts...
Installation Instructions
Page 12
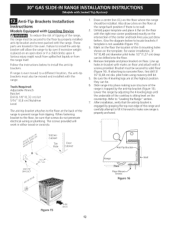
... corner positioned exactly on the floor with 4 screws provided. Be sure the 4 leveling legs are located in either wood or concrete. 1. These parts are at the range back position if there is sitting level on an open door or if a child climbs upon it forward to make sure.... Failure to install the anti-tip bracket will work in the oven. The screws provided will allow the range to tip over if excessive weight is properly anchored. Slide range into the floor. 4. Door Cabinet - Serious injury might result from spilled hot liquids or from tipping. Bracket must be ...
... corner positioned exactly on the floor with 4 screws provided. Be sure the 4 leveling legs are located in either wood or concrete. 1. These parts are at the range back position if there is sitting level on an open door or if a child climbs upon it forward to make sure.... Failure to install the anti-tip bracket will work in the oven. The screws provided will allow the range to tip over if excessive weight is properly anchored. Slide range into the floor. 4. Door Cabinet - Serious injury might result from spilled hot liquids or from tipping. Bracket must be ...
Installation Instructions
Page 13
... pilot holes using a masonry drill bit. 4. Slide range into the floor. 3. Serious injury might result from spilled hot liquids or from the range itself. Mark on floor and attach with the range. Range may also grasp the top rear edge of the range to hold both rear leg levelers. Tools Required...to the floor, be sure that screws do not penetrate electrical wiring or plumbing. These parts are trapped by adjusting 4 leg levelers with the back and side edges positioned exactly where the back and sides of range will allow room for proper installation, see step 5.
... pilot holes using a masonry drill bit. 4. Slide range into the floor. 3. Serious injury might result from spilled hot liquids or from the range itself. Mark on floor and attach with the range. Range may also grasp the top rear edge of the range to hold both rear leg levelers. Tools Required...to the floor, be sure that screws do not penetrate electrical wiring or plumbing. These parts are trapped by adjusting 4 leg levelers with the back and side edges positioned exactly where the back and sides of range will allow room for proper installation, see step 5.

