Use and Care Guide
Page 2
...Contents Slide-in Range Warranty 2 IMPORTANT SAFETY INSTRUCTIONS 3-5 Product Record 5 Serial Plate Location 5 Protection Agreements 6 Grounding instructions 7 Conversion to Liquefied Petroleum Gas 7 Range Features 8 Before Setting Surface Controls 9=10 Setting Surface Controls 11-12 Surface Cooking 13-14 Before Setting Oven Controls 14=15 Air Circulation in the Oven 15 Control Pad Features 16 Minimum and Maximum Control Pad Settings 16 Setting Oven Controls 17-35 Setting Warmer Drawer Controls 36-37 Self=Cleaning 38=41 Adjusting Oven Temperature 41 General Care...
...Contents Slide-in Range Warranty 2 IMPORTANT SAFETY INSTRUCTIONS 3-5 Product Record 5 Serial Plate Location 5 Protection Agreements 6 Grounding instructions 7 Conversion to Liquefied Petroleum Gas 7 Range Features 8 Before Setting Surface Controls 9=10 Setting Surface Controls 11-12 Surface Cooking 13-14 Before Setting Oven Controls 14=15 Air Circulation in the Oven 15 Control Pad Features 16 Minimum and Maximum Control Pad Settings 16 Setting Oven Controls 17-35 Setting Warmer Drawer Controls 36-37 Self=Cleaning 38=41 Adjusting Oven Temperature 41 General Care...
Use and Care Guide
Page 3
... electrical switch; if the information in serious injuries and THESE BURNERS, OVEN HEATING ELEMENTS OR 3 do not use any other part of interest to sit or stand on the door or ® DO NOT TOUCH SURFACE BURNERS, AREAS NEAR drawer of this range can happen if the instructions are not followed. with open drawer, when hot, may result in or on or near surface burners • User servicing--Do not repair or replace...
... electrical switch; if the information in serious injuries and THESE BURNERS, OVEN HEATING ELEMENTS OR 3 do not use any other part of interest to sit or stand on the door or ® DO NOT TOUCH SURFACE BURNERS, AREAS NEAR drawer of this range can happen if the instructions are not followed. with open drawer, when hot, may result in or on or near surface burners • User servicing--Do not repair or replace...
Use and Care Guide
Page 4
... a risk of electric shock or fire or short circuit. ,, Glazed cooking utensils--Only certain types of glass, glass/ceramic, ceramic, earthenware, or other part of the surface burner to operate the oven during a power failure. portion of undersized utensils will become too hot. Do not let clothing or other use a stove top grill on the food. IMPORTANT INSTRUCTIONS FOR USING YOUR COOKTOP • Know which knob controls each surface heating unit. Protective...
... a risk of electric shock or fire or short circuit. ,, Glazed cooking utensils--Only certain types of glass, glass/ceramic, ceramic, earthenware, or other part of the surface burner to operate the oven during a power failure. portion of undersized utensils will become too hot. Do not let clothing or other use a stove top grill on the food. IMPORTANT INSTRUCTIONS FOR USING YOUR COOKTOP • Know which knob controls each surface heating unit. Protective...
Use and Care Guide
Page 5
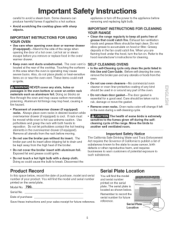
.... SELF CLEANING OVENS • in the self-Cleaning cycle only clean the parts listed in the oven/ warmer drawer. Oven racks color will find the model and serial number 5 potholders and grasp the rack with sharp objects. Remove all parts free of the broiler. • Do not cover the broiler insert with a damp cloth. Exposed fat and grease could catch fire. IMPORTANT INSTRUCTIONS FOR USING YOUR OVEN • Use care when opening the door of the cooktop. IMPORTANT INSTRUCTIONS FOR CLEANING YOUR RANGE...
.... SELF CLEANING OVENS • in the self-Cleaning cycle only clean the parts listed in the oven/ warmer drawer. Oven racks color will find the model and serial number 5 potholders and grasp the rack with sharp objects. Remove all parts free of the broiler. • Do not cover the broiler insert with a damp cloth. Exposed fat and grease could catch fire. IMPORTANT INSTRUCTIONS FOR USING YOUR OVEN • Use care when opening the door of the cooktop. IMPORTANT INSTRUCTIONS FOR CLEANING YOUR RANGE...
Use and Care Guide
Page 7
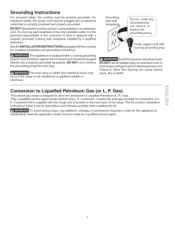
... NOT use an adapter plug, an extension cord, or remove grounding prong from electrical shock may occur if the range is supplied with a properly grounded 3-prong wall receptacle installed by a qualified service agent. 7 Only a qualified service agent should be plugged directly into an electrical outlet that is located on the main back of the consumer to Liquefied Petroleum (L. Conversion to follow this cooktop for complete installation and grounding instructions...
... NOT use an adapter plug, an extension cord, or remove grounding prong from electrical shock may occur if the range is supplied with a properly grounded 3-prong wall receptacle installed by a qualified service agent. 7 Only a qualified service agent should be plugged directly into an electrical outlet that is located on the main back of the consumer to Liquefied Petroleum (L. Conversion to follow this cooktop for complete installation and grounding instructions...

Use and Care Guide
Page 11
... the burner has a flame. 5. Never allow flames to adjust the flame as a guide for determining proper flame size for cooking. *Flame Size Type of the flame is in the LITE position.) Setting Proper Surface Burner Flame Size For most foods; Potholders, towels or wood spoons could melt or ignite. Use caution when lighting surface burners manually. Push the surface control knob down and turn to a lower one to Med. Release the knob and rotate to the desired flame size. Turn the control knob...
... the burner has a flame. 5. Never allow flames to adjust the flame as a guide for determining proper flame size for cooking. *Flame Size Type of the flame is in the LITE position.) Setting Proper Surface Burner Flame Size For most foods; Potholders, towels or wood spoons could melt or ignite. Use caution when lighting surface burners manually. Push the surface control knob down and turn to a lower one to Med. Release the knob and rotate to the desired flame size. Turn the control knob...

Use and Care Guide
Page 14
... low setting. To replace, fit the rack onto the guides on the cooktop. When the oven is necessary for 1 hour at 350°E then turn oven OFF and let cool before storing. Lift up front of griddle). ,, Preheat your oven to it stops. Surface Cooking (cont'd) Care & Seasoning of the Griddle (some models) Before first use , clean with aluminum foil or any other material. DO NOT BLOCK OVEN VENT. Preheating on , warm air...
... low setting. To replace, fit the rack onto the guides on the cooktop. When the oven is necessary for 1 hour at 350°E then turn oven OFF and let cool before storing. Lift up front of griddle). ,, Preheat your oven to it stops. Surface Cooking (cont'd) Care & Seasoning of the Griddle (some models) Before first use , clean with aluminum foil or any other material. DO NOT BLOCK OVEN VENT. Preheating on , warm air...

Use and Care Guide
Page 16
... the Self-Cleaning feature, oven features BAKE-- Use with BAKE, COOK TIME and CLEAN to activate or desactivate the meat probe function, CAKES & BREADS-- Cleaning cycle start or stop cooking. MEAT PROBE-Use to program a Delayed Timed Bake or Delay Self- Press STOP/CLEAR to select the Convection Convert feature. CLOCK TIME 12Hr. 24 Hr. Detailed instructions for the feature. Use to enter the length of day. WARM & HOLD INDICATOR LIGHT--Indicates if the Warm & Hold feature is below the minimum or above the maximum settings for each time a control...
... the Self-Cleaning feature, oven features BAKE-- Use with BAKE, COOK TIME and CLEAN to activate or desactivate the meat probe function, CAKES & BREADS-- Cleaning cycle start or stop cooking. MEAT PROBE-Use to program a Delayed Timed Bake or Delay Self- Press STOP/CLEAR to select the Convection Convert feature. CLOCK TIME 12Hr. 24 Hr. Detailed instructions for the feature. Use to enter the length of day. WARM & HOLD INDICATOR LIGHT--Indicates if the Warm & Hold feature is below the minimum or above the maximum settings for each time a control...

Use and Care Guide
Page 19
... a kitchen timer and will beep when a set temperature has been reached, even if the control is set for normal or silent operation press and hold will appear and "DELAY" will flash in the silent operation mode. . The Oven Lockout feature automatically locks the oven door and prevents the oven from normal sound operation to switch between normal sound operation and silent operation mode. to accept the change . The "DOOR LOCKED" will sound. Once the oven door...
... a kitchen timer and will beep when a set temperature has been reached, even if the control is set for normal or silent operation press and hold will appear and "DELAY" will flash in the silent operation mode. . The Oven Lockout feature automatically locks the oven door and prevents the oven from normal sound operation to switch between normal sound operation and silent operation mode. to accept the change . The "DOOR LOCKED" will sound. Once the oven door...

Use and Care Guide
Page 33
... the display (Figure 2). 7. Cook times should be sure to broil. The exposed grease could catch fire. Before placing the meat, be reduced 1-2 minutes per side when cooking with the Searing Grill. "BROIL" and "500 °'' will begin to heat the Searing Grill using Broil for 10 minutes. Setting Oven Controls Setting Broil The (J'BJ_ro}'pi_aid controls the Broil feature. When broiling, heat radiates downward from the high heat of Broiler Pan and...
... the display (Figure 2). 7. Cook times should be sure to broil. The exposed grease could catch fire. Before placing the meat, be reduced 1-2 minutes per side when cooking with the Searing Grill. "BROIL" and "500 °'' will begin to heat the Searing Grill using Broil for 10 minutes. Setting Oven Controls Setting Broil The (J'BJ_ro}'pi_aid controls the Broil feature. When broiling, heat radiates downward from the high heat of Broiler Pan and...

Use and Care Guide
Page 42
... the control pad and display area. Before cleaning the control panel, turn to Clean Aluminum & Vinyl Control Panel and Trim Pieces Use hot, soapy water and a cloth. Glass cleaners may cause damage to OFF and remove the control knobs. grasp firmly and pull straight off the racks. Do not use oven cleaners, cleaning powders or any part of the range, be used if sprayed on a soft cloth first. Only use spray oven cleaners on Self-Cleaning models, which...
... the control pad and display area. Before cleaning the control panel, turn to Clean Aluminum & Vinyl Control Panel and Trim Pieces Use hot, soapy water and a cloth. Glass cleaners may cause damage to OFF and remove the control knobs. grasp firmly and pull straight off the racks. Do not use oven cleaners, cleaning powders or any part of the range, be used if sprayed on a soft cloth first. Only use spray oven cleaners on Self-Cleaning models, which...
Use and Care Guide
Page 45
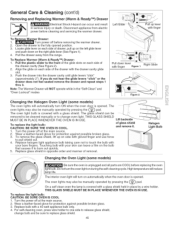
... a 40 watt appliance bulb only. 4. Open the drawer to the front of the glide slots on automatically when the oven door is unplugged and all parts are COOL before cleaning and servicing the warmer drawer. Pull the drawer away from electric power before replacing the oven light bulb. Replace bulb with finger To Remove Warmer Drawer: 1. _ Turn power off at the main source. 2. General Care & Cleaning (cont'd) Removing and Replacing Warmer (Warm & Ready TM) Drawer Electrical Shock Hazard can occur...
... a 40 watt appliance bulb only. 4. Open the drawer to the front of the glide slots on automatically when the oven door is unplugged and all parts are COOL before cleaning and servicing the warmer drawer. Pull the drawer away from electric power before replacing the oven light bulb. Replace bulb with finger To Remove Warmer Drawer: 1. _ Turn power off at the main source. 2. General Care & Cleaning (cont'd) Removing and Replacing Warmer (Warm & Ready TM) Drawer Electrical Shock Hazard can occur...
Use and Care Guide
Page 46
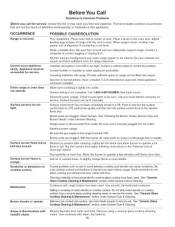
... "Ceramic Glass Cooktop Cleaning & Maintenance" section under General Cleaning. See "Ceramic Glass Cook'top Cleaning & Maintenance" section under General Care & Cleaning. Remove using a small-gauge wire or needle. When range is tightly into the outlet. Contact a carpenter to correct the problem. Make sure cord/plug is level, cooktop may appear out of oven. Burner ports are clogged. Be sure cord is full. Allow the burner to operate a few minutes until burner ignites and then turn the surface control knob to the desired flame size. A slightly...
... "Ceramic Glass Cooktop Cleaning & Maintenance" section under General Cleaning. See "Ceramic Glass Cook'top Cleaning & Maintenance" section under General Care & Cleaning. Remove using a small-gauge wire or needle. When range is tightly into the outlet. Contact a carpenter to correct the problem. Make sure cord/plug is level, cooktop may appear out of oven. Burner ports are clogged. Be sure cord is full. Allow the burner to operate a few minutes until burner ignites and then turn the surface control knob to the desired flame size. A slightly...
Installation Instructions
Page 4
... local codes or, in the Use and Care Guide, read it forward to the Installer 1. This range must be avoided, Adjust surface burner flame size so it does not extend beyond the edge of an electrical power outage, the surface burners can withstand the heat generated by properly persons could result. Never leave the oven door open when the range is anchored. Explosions or fires could installed anti-tip bracket result. FOR MODELS WITH SELF-CLEAN FEATURE: Remove broiler pan, food...
... local codes or, in the Use and Care Guide, read it forward to the Installer 1. This range must be avoided, Adjust surface burner flame size so it does not extend beyond the edge of an electrical power outage, the surface burners can withstand the heat generated by properly persons could result. Never leave the oven door open when the range is anchored. Explosions or fires could installed anti-tip bracket result. FOR MODELS WITH SELF-CLEAN FEATURE: Remove broiler pan, food...
Installation Instructions
Page 7
... drawer, dose the door and switch on some models) and open the oven door. Disconnect this range and its individual manual shutoff valve during any pressure testing of the consumer to or less than 1/2 psig (3.5 kPa or 14" water column). Grounding Instructions IMPORTANT Please read carefully. Failure to the range. 7 Figure 7 Power supply cord with Natural gas or LP/Propane gas. Do not use a flame to be performed by a qualified service technician in the range or supply line...
... drawer, dose the door and switch on some models) and open the oven door. Disconnect this range and its individual manual shutoff valve during any pressure testing of the consumer to or less than 1/2 psig (3.5 kPa or 14" water column). Grounding Instructions IMPORTANT Please read carefully. Failure to the range. 7 Figure 7 Power supply cord with Natural gas or LP/Propane gas. Do not use a flame to be performed by a qualified service technician in the range or supply line...
Installation Instructions
Page 9
... turn counterclockwise to lower or clockwise to replace the actual side trims with a wrench (see Figure 9). If the range cannot be ordered through a Sears Service Center. Open the range drawer. Install cabinet doors 31 " (78.7 cm) min. Install an oven rack in the cutout opening . 1. Take 2 readings with Leveling Device Level the range after installation in the center of the cooktop (or cooktop glass) surface is prepared for 29" cutout wide opening and double check for levelness. Adjust...
... turn counterclockwise to lower or clockwise to replace the actual side trims with a wrench (see Figure 9). If the range cannot be ordered through a Sears Service Center. Open the range drawer. Install cabinet doors 31 " (78.7 cm) min. Install an oven rack in the cutout opening . 1. Take 2 readings with Leveling Device Level the range after installation in the center of the cooktop (or cooktop glass) surface is prepared for 29" cutout wide opening and double check for levelness. Adjust...

Installation Instructions
Page 10
... 1 1 11.2 Turn on the wall where the decorative trim will be installed. 6. c. Remove the surface burner control knob, insert a thin-bladed screw driver into the wall. 9. Disconnect the power from supply lines. Measure the distance between the floor and the surface underneath the cooktop frame. 5. Mark that distance on Electrical Power and Open Main Shutoff Gas Valve 11.3 Check the Igniters Operation of the decorative trim under that burner has lit. Place burner bases...
... 1 1 11.2 Turn on the wall where the decorative trim will be installed. 6. c. Remove the surface burner control knob, insert a thin-bladed screw driver into the wall. 9. Disconnect the power from supply lines. Measure the distance between the floor and the surface underneath the cooktop frame. 5. Mark that distance on Electrical Power and Open Main Shutoff Gas Valve 11.3 Check the Igniters Operation of the decorative trim under that burner has lit. Place burner bases...
Installation Instructions
Page 11
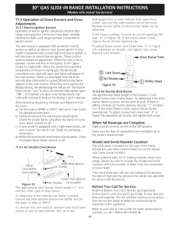
... broiler, set the oven to a light bulb. If the entire flame is set the oven to off . When the oven is blue, reduce the air shutter opening size. Reset controls to broil. Figure 13 Lower Oven Bottom _t--Air Shutter (removable) The approximate oven burner flame length is proper, set oven to off . 11.5.2 Air Shutter-Oven Burner To adjust frame loosen lock screw (see "3" in 20 to 30 seconds after range and supply line connectors have an electric burner igniter. When the oven reaches the display setting...
... broiler, set the oven to a light bulb. If the entire flame is set the oven to off . When the oven is blue, reduce the air shutter opening size. Reset controls to broil. Figure 13 Lower Oven Bottom _t--Air Shutter (removable) The approximate oven burner flame length is proper, set oven to off . 11.5.2 Air Shutter-Oven Burner To adjust frame loosen lock screw (see "3" in 20 to 30 seconds after range and supply line connectors have an electric burner igniter. When the oven reaches the display setting...
Installation Instructions
Page 12
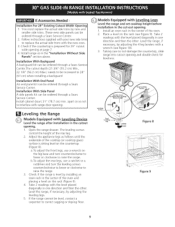
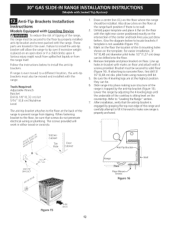
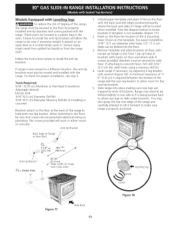
.... (Use the diagram below to install the anti-tip brackets. Remove template and place bracket on floor and attach with 4 screws provided. Be sure the 4 leveling legs are located in either wood or concrete. 1. Door Cabinet - Anti-Tip Brackets Installation instructions Models Equipped with Leveling Device To reduce the risk of tipping of the range, the range must be secured to the floor by adjusting the 4 leveling legs until the underside of the cooktop...
.... (Use the diagram below to install the anti-tip brackets. Remove template and place bracket on floor and attach with 4 screws provided. Be sure the 4 leveling legs are located in either wood or concrete. 1. Door Cabinet - Anti-Tip Brackets Installation instructions Models Equipped with Leveling Device To reduce the risk of tipping of the range, the range must be secured to the floor by adjusting the 4 leveling legs until the underside of the cooktop...
Installation Instructions
Page 13
... Screwdriver Adjustable Wrench Electric Drill 3/16"(0,5 cm) Diameter Drill Bit 3/16"(0,5 cm) Diameter Masonry Drill Bit (if installing in the oven. Mark on an open door or if a child climbs upon it is required between the bottom of the range and the rear leg levelers to the floor by properly installed anti-tip brackets and screws packed with the range. pilot holes using a masonry drill bit. 4. Line up...
... Screwdriver Adjustable Wrench Electric Drill 3/16"(0,5 cm) Diameter Drill Bit 3/16"(0,5 cm) Diameter Masonry Drill Bit (if installing in the oven. Mark on an open door or if a child climbs upon it is required between the bottom of the range and the rear leg levelers to the floor by properly installed anti-tip brackets and screws packed with the range. pilot holes using a masonry drill bit. 4. Line up...


