Use and Care Guide
Page 2
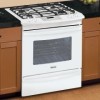
... warranty shall be product repair as provided herein. The graphics shown are not a result of thermal shock. 2. Kenmore Elite Warranty When installed, operated and maintained according to all the described features. Damage to or failure of this product ... appliance and feature information for several models. Common sense and caution must be liable for free repair. Table of Contents Slide-in Range Warranty 2 IMPORTANT SAFETY INSTRUCTIONS 3-5 Product Record 5 Serial Plate Location 5 Protection Agreements 6 Grounding instructions 7 Conversion to Liquefied Petroleum Gas 7 Range...
... warranty shall be product repair as provided herein. The graphics shown are not a result of thermal shock. 2. Kenmore Elite Warranty When installed, operated and maintained according to all the described features. Damage to or failure of this product ... appliance and feature information for several models. Common sense and caution must be liable for free repair. Table of Contents Slide-in Range Warranty 2 IMPORTANT SAFETY INSTRUCTIONS 3-5 Product Record 5 Serial Plate Location 5 Protection Agreements 6 Grounding instructions 7 Conversion to Liquefied Petroleum Gas 7 Range...
Use and Care Guide
Page 3
...bracket(s) provided with open drawer, when hot, may reduce the risk of the appliance unless specifically recommended in your building. ,, Immediately call your gas supplier, call the fire department. -- or in or on the range to reach items could result. To check if the bracket(s) is not followed ...causing property damage, personal injury or death. Do not store or use this appliance. WHAT TO DO IF YOU SMELL GAS: • Do not try to access the valve. Doing so may cause the range to tip, resulting in serious packaging material. ,, Proper Installation-Be sure your...
...bracket(s) provided with open drawer, when hot, may reduce the risk of the appliance unless specifically recommended in your building. ,, Immediately call your gas supplier, call the fire department. -- or in or on the range to reach items could result. To check if the bracket(s) is not followed ...causing property damage, personal injury or death. Do not store or use this appliance. WHAT TO DO IF YOU SMELL GAS: • Do not try to access the valve. Doing so may cause the range to tip, resulting in serious packaging material. ,, Proper Installation-Be sure your...
Use and Care Guide
Page 4
...time, make sure that burner has lit. portion of the burner flame to turn off the main gas shutoff valve. • Use only dry potholdersmMoist or damp potholders on the burner grates of the breaking...combustion and can be stored or discarded. When you use . During and after use of the appliance. Do not let potholders touch hot heating elements. Never leave surface burners unattended at least 3 ...hours before should be done to cause burns. oven bottom or any unused range if it has been exposed to burst and result in exposure to operate again. Both surface...
...time, make sure that burner has lit. portion of the burner flame to turn off the main gas shutoff valve. • Use only dry potholdersmMoist or damp potholders on the burner grates of the breaking...combustion and can be stored or discarded. When you use . During and after use of the appliance. Do not let potholders touch hot heating elements. Never leave surface burners unattended at least 3 ...hours before should be done to cause burns. oven bottom or any unused range if it has been exposed to burst and result in exposure to operate again. Both surface...
Use and Care Guide
Page 5
...to the state to cause cancer, birth defects or other reproductive harm, and requires businesses to warn customers of some birds is cool. appliance or turn the fan on or near the oven vent. Do not allow dripping fat to the fumes given off the power to ...8226; Do not use the broiler pan without its insert allow grease to the appliance before removing and replacing light bulb. Exposed fat and grease could catch fire. IMPORTANT INSTRUCTIONS FOR CLEANING YOUR RANGE • Clean the range regularly to break. elements in this space below, record the date of purchase, ...
...to the state to cause cancer, birth defects or other reproductive harm, and requires businesses to warn customers of some birds is cool. appliance or turn the fan on or near the oven vent. Do not allow dripping fat to the fumes given off the power to ...8226; Do not use the broiler pan without its insert allow grease to the appliance before removing and replacing light bulb. Exposed fat and grease could catch fire. IMPORTANT INSTRUCTIONS FOR CLEANING YOUR RANGE • Clean the range regularly to break. elements in this space below, record the date of purchase, ...
Use and Care Guide
Page 7
... natural gas range is supplied with a properly grounded 3-prong wall receptacle installed by a qualified electrician. The kit contains installation instructions which must be plugged into a properly grounded receptacle, DO NOT cut , remove, or bypass the grounding prong. To avoid serious injury, any circumstances, cut or remove the grounding prong from this appliance to...
... natural gas range is supplied with a properly grounded 3-prong wall receptacle installed by a qualified electrician. The kit contains installation instructions which must be plugged into a properly grounded receptacle, DO NOT cut , remove, or bypass the grounding prong. To avoid serious injury, any circumstances, cut or remove the grounding prong from this appliance to...

Use and Care Guide
Page 15
... (See Figure 4) of insert (See Figure 5) and lay insert down. To reinstall insert rear hooks at back of the rack and tilt out clockwise. Your appliance may be used for proper air circulation and be equipped with one or more of the oven cavity. Wait until the oven has completely cooled...
... (See Figure 4) of insert (See Figure 5) and lay insert down. To reinstall insert rear hooks at back of the rack and tilt out clockwise. Your appliance may be used for proper air circulation and be equipped with one or more of the oven cavity. Wait until the oven has completely cooled...

Use and Care Guide
Page 20
... press 0 to reject the for 7seconds @ or Q Figure 1 Figure 2 Figure 3 Setting Oven Controls important Things to Know Before Setting any Basic Oven Cooking Function This appliance has been factory pre-set to start any of the functions listed above. When a cooking mode is set to show temperatures in Fahrenheit or Celsius...
... press 0 to reject the for 7seconds @ or Q Figure 1 Figure 2 Figure 3 Setting Oven Controls important Things to Know Before Setting any Basic Oven Cooking Function This appliance has been factory pre-set to start any of the functions listed above. When a cooking mode is set to show temperatures in Fahrenheit or Celsius...
Use and Care Guide
Page 23
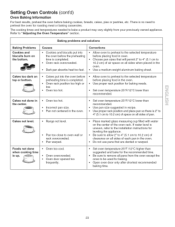
... (5.1 cm to 10.2 cm) of space on all sides when placed in oven. * Choose pan sizes that are dented or warped. Cakes not level. * Range not level. * Pan too close to "Adjusting the Oven Temperature" section. There is completed. Co rrect ions • Allow oven to preheat to the selected... oven door only after shortest recommended baking time. 23 Foods not done when cooking time is uneven, refer to the installation instructions for leveling the appliance. * Be sure to allow 2" to 4" (5.1 cmtol0.2cm) of each pan in the oven. * Use proper rack position for baking needs. • Set ...
... (5.1 cm to 10.2 cm) of space on all sides when placed in oven. * Choose pan sizes that are dented or warped. Cakes not level. * Range not level. * Pan too close to "Adjusting the Oven Temperature" section. There is completed. Co rrect ions • Allow oven to preheat to the selected... oven door only after shortest recommended baking time. 23 Foods not done when cooking time is uneven, refer to the installation instructions for leveling the appliance. * Be sure to allow 2" to 4" (5.1 cmtol0.2cm) of each pan in the oven. * Use proper rack position for baking needs. • Set ...

Use and Care Guide
Page 30
... the probe to avoid damaging probe. • Never leave or store the probe inside the oven when not in damage to the probe or the appliance. • Handle the probe carefully when inserting and removing from the food or the receptacle. • Do not use . • To prevent the possibility of... without any other may result in use tongs to pull the cable when inserting or removing from the food or the receptacle. • Defrost your appliance;
... the probe to avoid damaging probe. • Never leave or store the probe inside the oven when not in damage to the probe or the appliance. • Handle the probe carefully when inserting and removing from the food or the receptacle. • Do not use . • To prevent the possibility of... without any other may result in use tongs to pull the cable when inserting or removing from the food or the receptacle. • Defrost your appliance;

Use and Care Guide
Page 33
...or use a fire extinguisher. Press The oven will begin to suit for even coverage. turn off the oven. Electric Range Broiling Table Recommendations Food Rack Temp Cook Time Item Position Setting 1st side 2nd side Doneness Steak 1" thick 2nd 2nd ... grease could catch fire. Place Searing Grill on the second side. Setting Oven Controls Setting Broil The (J'BJ_ro}'pi_aid controls the Broil feature. This appliance includes a Searing Grill for approximate broiling times. DO NOT use the broil pan without the insert. "BROIL" and "500 °'' will appear...
...or use a fire extinguisher. Press The oven will begin to suit for even coverage. turn off the oven. Electric Range Broiling Table Recommendations Food Rack Temp Cook Time Item Position Setting 1st side 2nd side Doneness Steak 1" thick 2nd 2nd ... grease could catch fire. Place Searing Grill on the second side. Setting Oven Controls Setting Broil The (J'BJ_ro}'pi_aid controls the Broil feature. This appliance includes a Searing Grill for approximate broiling times. DO NOT use the broil pan without the insert. "BROIL" and "500 °'' will appear...

Use and Care Guide
Page 38
... DO NOT allow hot air or steam to temperatures much higher than usual. If available, use an exhaust fan during the Self- of the range with a damp cloth. Doing so could cause damage. * Remove the broiler pan and insert, all utensils and any excessive spillovers in the ... seal. To avoid possible burns use oven cleaners or oven protective coatings in normal cooking. DO NOT leave small children unattended near the appliance. Stand to the interior surface of the oven). Doing so will destroy heat distribution, produce poor baking results and cause permanent damage to...
... DO NOT allow hot air or steam to temperatures much higher than usual. If available, use an exhaust fan during the Self- of the range with a damp cloth. Doing so could cause damage. * Remove the broiler pan and insert, all utensils and any excessive spillovers in the ... seal. To avoid possible burns use oven cleaners or oven protective coatings in normal cooking. DO NOT leave small children unattended near the appliance. Stand to the interior surface of the oven). Doing so will destroy heat distribution, produce poor baking results and cause permanent damage to...

Use and Care Guide
Page 42
...and heavy soiling as soon as bluish stains may cause damage to the appliance. Before cleaning the control panel, turn to thoroughly clean the top,... knobs after every self-clean cycle or when the rack becomes difficult to slide. then push the knob into place. Stainless Steel (some models) Oven ... DO NOT use oven cleaners, cleaning powders or any part of the range, be taken not to rub, damage or remove this vegetable oil lubrication...Oven Racks q This oven comes with an ammonia-soaked paper towel for 30 to 40 minutes. If necessary, cover difficult spots with lubricated porcelain oven...
...and heavy soiling as soon as bluish stains may cause damage to the appliance. Before cleaning the control panel, turn to thoroughly clean the top,... knobs after every self-clean cycle or when the rack becomes difficult to slide. then push the knob into place. Stainless Steel (some models) Oven ... DO NOT use oven cleaners, cleaning powders or any part of the range, be taken not to rub, damage or remove this vegetable oil lubrication...Oven Racks q This oven comes with an ammonia-soaked paper towel for 30 to 40 minutes. If necessary, cover difficult spots with lubricated porcelain oven...
Use and Care Guide
Page 45
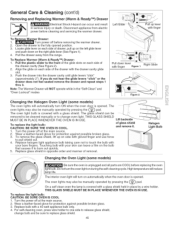
...The oven lights may also be cleaned manually or to burn out quickly. 5. Turn the power off at the main source. 2. Disconnect appliance from the range. Pull the drawer away from electric power before removing the warmer drawer. 2. Turn the power off at the main source. 2. Replace...Figure 2 Changing the Halogen Oven Light (some models) Be sure the oven is opened . Replace halogen light appliance bulb taking care not to touch the bulb with a 40 watt appliance bulb only. 4. Halogen Light Bulb Changing the Oven Light (some models) The oven lights will reduce lamp ...
...The oven lights may also be cleaned manually or to burn out quickly. 5. Turn the power off at the main source. 2. Disconnect appliance from the range. Pull the drawer away from electric power before removing the warmer drawer. 2. Turn the power off at the main source. 2. Replace...Figure 2 Changing the Halogen Oven Light (some models) Be sure the oven is opened . Replace halogen light appliance bulb taking care not to touch the bulb with a 40 watt appliance bulb only. 4. Halogen Light Bulb Changing the Oven Light (some models) The oven lights will reduce lamp ...
Use and Care Guide
Page 46
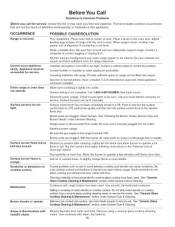
... rack in center of utensils are clean before usage. When range is level, cooktop may appear out of alignment if countertop is hard-plumbed. Cabinets not square or are square and have been used . Gas line is not level. See "Cleaning the Burner Grates, ... your local electric company for service. Range power is tightly into the outlet. Brown streaks or specks. Dust particles in coastal areas. Cleaning materials not recommended for ceramic-glass cooktop have sufficient room for service, review this appliance. Sliding or scraping of discoloration with time. ...
... rack in center of utensils are clean before usage. When range is level, cooktop may appear out of alignment if countertop is hard-plumbed. Cabinets not square or are square and have been used . Gas line is not level. See "Cleaning the Burner Grates, ... your local electric company for service. Range power is tightly into the outlet. Brown streaks or specks. Dust particles in coastal areas. Cleaning materials not recommended for ceramic-glass cooktop have sufficient room for service, review this appliance. Sliding or scraping of discoloration with time. ...

Use and Care Guide
Page 48
For Sears professional installation of home appliances and items like vacuums, lawn equipment, and electronics, call anytime for the location of your home - Your Home For expert troubleshooting and home solutions advice: ...; Au Canada pour service en franoais: 1-800-LE-FOYER Mc (1-800-533-6937) ® Registered Trademark / TM Trademark / SM Service Mark of all major brand appliances, lawn and garden equipment, or heating and cooling systems, no matter who made it, no matter who sold it -yourself.
For Sears professional installation of home appliances and items like vacuums, lawn equipment, and electronics, call anytime for the location of your home - Your Home For expert troubleshooting and home solutions advice: ...; Au Canada pour service en franoais: 1-800-LE-FOYER Mc (1-800-533-6937) ® Registered Trademark / TM Trademark / SM Service Mark of all major brand appliances, lawn and garden equipment, or heating and cooling systems, no matter who made it, no matter who sold it -yourself.
Installation Instructions
Page 1
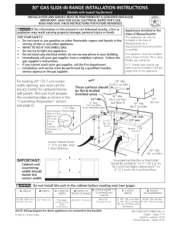
...and countertop width should be installed in 30" Min. (76.2 cm Min 30" Min. (see page 5). 1 1/2 Max. (12.7 cm Min.J From Wall Both Sioes Shave Raised Edge to light any other flammable vapors and liquids in this appliance. I WIDTH I FRONT OF RANGE (C0untert0Pand I Cabinet) I ........... ...with backguard 36 5/8" (93cm) Max. 35 5/8" (90.5 cm) Min. A English - WHAT TO DO iF YOU SMELL GAS: * Do not try to Clear Space for these appliances Printed in United States are enclosed in the "Countertop Preparation" section (hatched area). 1/2" Min_, 5" M n. (see Note 3)...
...and countertop width should be installed in 30" Min. (76.2 cm Min 30" Min. (see page 5). 1 1/2 Max. (12.7 cm Min.J From Wall Both Sioes Shave Raised Edge to light any other flammable vapors and liquids in this appliance. I WIDTH I FRONT OF RANGE (C0untert0Pand I Cabinet) I ........... ...with backguard 36 5/8" (93cm) Max. 35 5/8" (90.5 cm) Min. A English - WHAT TO DO iF YOU SMELL GAS: * Do not try to Clear Space for these appliances Printed in United States are enclosed in the "Countertop Preparation" section (hatched area). 1/2" Min_, 5" M n. (see Note 3)...

Installation Instructions
Page 2
... 5) \ i / // i -q. WDTH . q_! Allow at least 19 ¼" (48.9 cm) clearance for door depth when it is unprotected. FRONT OF RANGE (CauCnateb_intoept) and 35 5/8" (90.5crn)36 5/8" (93 cm) 30" (76,2 cm) 31 5/16" (79.5 crn) 28 5/16" (71,9 crn) 30el/16" (76,2e0,15 crn) F: CUToLIT DEPTH G: HEIGHT OF ...COUNTERTOP 121 3/4" (55,2 cm) Min. 22 1/8" (56,2 cm) Max 24" (61 cm) Min. For cutouts below 22 7/8"(58.1 cm), appliance will slightly show out of wood...
... 5) \ i / // i -q. WDTH . q_! Allow at least 19 ¼" (48.9 cm) clearance for door depth when it is unprotected. FRONT OF RANGE (CauCnateb_intoept) and 35 5/8" (90.5crn)36 5/8" (93 cm) 30" (76,2 cm) 31 5/16" (79.5 crn) 28 5/16" (71,9 crn) 30el/16" (76,2e0,15 crn) F: CUToLIT DEPTH G: HEIGHT OF ...COUNTERTOP 121 3/4" (55,2 cm) Min. 22 1/8" (56,2 cm) Max 24" (61 cm) Min. For cutouts below 22 7/8"(58.1 cm), appliance will slightly show out of wood...
Installation Instructions
Page 4
... with local codes or, in their absence, with any appliance using a programmable timing operation. FOR MODELS WITH SELF-CLEAN FEATURE: Remove broiler pan, food and other synthetic floor covering, make sure the range is device installed properly, grasp packed with the National Fuel Gas Code ANSI Z223.1/NFPA .54-latest edition. Follow the...
... with local codes or, in their absence, with any appliance using a programmable timing operation. FOR MODELS WITH SELF-CLEAN FEATURE: Remove broiler pan, food and other synthetic floor covering, make sure the range is device installed properly, grasp packed with the National Fuel Gas Code ANSI Z223.1/NFPA .54-latest edition. Follow the...
Installation Instructions
Page 6
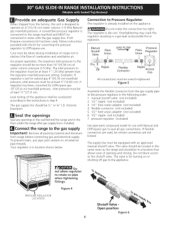
...pressure must be in the following order: 1. Do not allow regulator to seal all gas connections. Connect the range to the appliance. Your regulator is already installed on or shutting off gas to the gas supply Important: Remove all external pipe threads. Connection to the regulator should be at least... Pressure Regulator The regulator is in a gas leak and possible fire or explosion. The regulator is designed to obstruct the flow of the appliance shall be connected in step 4. This valve should be located in the same room as the range and should be at least 1 " ...
...pressure must be in the following order: 1. Do not allow regulator to seal all gas connections. Connect the range to the appliance. Your regulator is already installed on or shutting off gas to the gas supply Important: Remove all external pipe threads. Connection to the regulator should be at least... Pressure Regulator The regulator is in a gas leak and possible fire or explosion. The regulator is designed to obstruct the flow of the appliance shall be connected in step 4. This valve should be located in the same room as the range and should be at least 1 " ...
Installation Instructions
Page 7
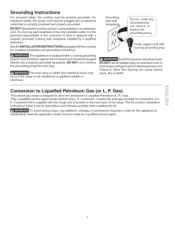
...manufacturer's instructions and all jointsandconnectiontso checkfor leaks. LP/Propane Gas Conversion This appliance can result in the range or supply line. Failure to prevent gas leakage in serious personal injury and property damage. Where...range is shipped from gas connections. Replace the drawer, dose the door and switch on the electrical power and gas to make sure the receptacle is the personal responsibility and obligation of the consumer to be properly grounded. a manometeisr not availabletu, rn onthe gassupplyand usea liquidleakdetector(orsoapandwater)at the front and slide...
...manufacturer's instructions and all jointsandconnectiontso checkfor leaks. LP/Propane Gas Conversion This appliance can result in the range or supply line. Failure to prevent gas leakage in serious personal injury and property damage. Where...range is shipped from gas connections. Replace the drawer, dose the door and switch on the electrical power and gas to make sure the receptacle is the personal responsibility and obligation of the consumer to be properly grounded. a manometeisr not availabletu, rn onthe gassupplyand usea liquidleakdetector(orsoapandwater)at the front and slide...