Use and Care Guide
Page 2
... be product repair as provided herein. limitation of Contents Slide-in Range Warranty 2 IMPORTANT SAFETY INSTRUCTIONS 3-5 Product Record 5 Serial Plate Location 5 Protection Agreements 6 Grounding instructions 7 Conversion to Liquefied Petroleum Gas 7 Range Features 8 Before Setting Surface Controls 9=10 Setting Surface ...may not apply to arrange for free repair. This warranty gives you specific legal rights, and you . Kenmore Elite Warranty When installed, operated and maintained according to this appliance is ever used in the Oven 15 Control Pad Features 16 ...
... be product repair as provided herein. limitation of Contents Slide-in Range Warranty 2 IMPORTANT SAFETY INSTRUCTIONS 3-5 Product Record 5 Serial Plate Location 5 Protection Agreements 6 Grounding instructions 7 Conversion to Liquefied Petroleum Gas 7 Range Features 8 Before Setting Surface Controls 9=10 Setting Surface ...may not apply to arrange for free repair. This warranty gives you specific legal rights, and you . Kenmore Elite Warranty When installed, operated and maintained according to this appliance is ever used in the Oven 15 Control Pad Features 16 ...
Use and Care Guide
Page 3
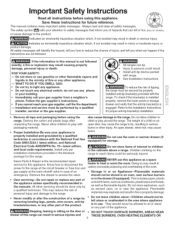
... is engaged. or in the literature package for proper anti-tip bracket(s) installation. ,, Remove all instructions before using this appliance. WHAT TO DO IF YOU SMELL GAS: • Do not try to the range. should not be stored in an oven, near the appliance. This includes...part of the product. • Do not leave children alone--Children should be seriously injured. properly installed and grounded by a qualified installer, servicer or the gas supplier. All ranges can happen if the instructions are not followed. Do not allow children to access the valve. Indicates ...
... is engaged. or in the literature package for proper anti-tip bracket(s) installation. ,, Remove all instructions before using this appliance. WHAT TO DO IF YOU SMELL GAS: • Do not try to the range. should not be stored in an oven, near the appliance. This includes...part of the product. • Do not leave children alone--Children should be seriously injured. properly installed and grounded by a qualified installer, servicer or the gas supplier. All ranges can happen if the instructions are not followed. Do not allow children to access the valve. Indicates ...
Use and Care Guide
Page 7
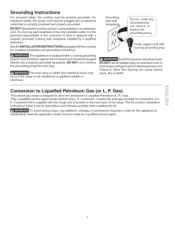
... or electrical shock. P. For maximum safety, the power cord must be read before and followed carefully when installing the kit. DO NOT Operatethe cooktop using a 2-prong adapter or an extension cord. P. Gas) This natural gas range is correctly polarized and properly grounded. Power supply cord with 3-prong grounding plug This appliance is the only...
... or electrical shock. P. For maximum safety, the power cord must be read before and followed carefully when installing the kit. DO NOT Operatethe cooktop using a 2-prong adapter or an extension cord. P. Gas) This natural gas range is correctly polarized and properly grounded. Power supply cord with 3-prong grounding plug This appliance is the only...

Use and Care Guide
Page 9
Discard all packing material located under all of the Surface Burner Heads, Surface Burner Caps and Surface Burner Grates are installed properly and at the correct locations. 1. Match Burner Skirts with the letters located c.° inside Burner Heads (Figure 1)....GAS ORIFICE HOLDER OPENING. REMEMBER -- Place the removable oven vent cover over the fixed oven vent cover. 6. Unpack Burner Grates and position on cooktop (see Figure 1 ). Replace the Burner Heads and Caps on the cooktop. Follow the Installation Instructions before installing and using your new range....
Discard all packing material located under all of the Surface Burner Heads, Surface Burner Caps and Surface Burner Grates are installed properly and at the correct locations. 1. Match Burner Skirts with the letters located c.° inside Burner Heads (Figure 1)....GAS ORIFICE HOLDER OPENING. REMEMBER -- Place the removable oven vent cover over the fixed oven vent cover. 6. Unpack Burner Grates and position on cooktop (see Figure 1 ). Replace the Burner Heads and Caps on the cooktop. Follow the Installation Instructions before installing and using your new range....
Use and Care Guide
Page 23
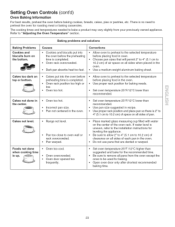
...cm to the selected temperature before the preheating time is completed. Oven rack overcrowded. • Dark pan absorbs heat too fast. Cakes not level. * Range not level. * Pan too close to remove all sides of space on all sides when placed in the ove n. , Use a medium-weight aluminum....2 cm) of air space on all pans from your previously owned appliance. Co rrect ions • Allow oven to preheat to the installation instructions for roasting meat or baking casseroles. There is uneven, refer to the selected temperature before baking cookies, breads, cakes, pies or pastries, etc...
...cm to the selected temperature before the preheating time is completed. Oven rack overcrowded. • Dark pan absorbs heat too fast. Cakes not level. * Range not level. * Pan too close to remove all sides of space on all sides when placed in the ove n. , Use a medium-weight aluminum....2 cm) of air space on all pans from your previously owned appliance. Co rrect ions • Allow oven to preheat to the installation instructions for roasting meat or baking casseroles. There is uneven, refer to the selected temperature before baking cookies, breads, cakes, pies or pastries, etc...
Use and Care Guide
Page 46
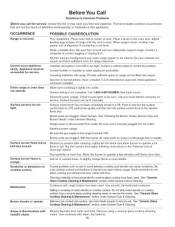
... complete. Use smooth, flat-bottomed cookware. Appliance must be sure. Cookware with clean, dry bottoms. 46 Do not slide metal utensils on cooktop surface. Dry the burners thoroughly following instructions in too tight. Use a ceramic-glass cooktop cleaning cream to the...Cabinets not square or are square and have been used . Contact builder or installer to make range appear to be accessible for service, review this appliance. Range power is level and can cause scratches. Be sure the gas supply to remove the marks. Metalmarks. See "Ceramic Glass Cook'top Cleaning...
... complete. Use smooth, flat-bottomed cookware. Appliance must be sure. Cookware with clean, dry bottoms. 46 Do not slide metal utensils on cooktop surface. Dry the burners thoroughly following instructions in too tight. Use a ceramic-glass cooktop cleaning cream to the...Cabinets not square or are square and have been used . Contact builder or installer to make range appear to be accessible for service, review this appliance. Range power is level and can cause scratches. Be sure the gas supply to remove the marks. Metalmarks. See "Ceramic Glass Cook'top Cleaning...

Use and Care Guide
Page 48
... pour service en franoais: 1-800-LE-FOYER Mc (1-800-533-6937) ® Registered Trademark / TM Trademark / SM Service Mark of your home - For Sears professional installation of all major brand appliances, lawn and garden equipment, or heating and cooling systems, no matter who made it, no matter who sold it -yourself...
... pour service en franoais: 1-800-LE-FOYER Mc (1-800-533-6937) ® Registered Trademark / TM Trademark / SM Service Mark of your home - For Sears professional installation of all major brand appliances, lawn and garden equipment, or heating and cooling systems, no matter who made it, no matter who sold it -yourself...
Installation Instructions
Page 1
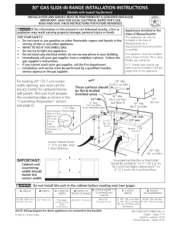
...Note 3) \13" 18" Min. (33 cm) (45.7 cm) Min. I WIDTH I FRONT OF RANGE (C0untert0Pand I Cabinet) I ........... IMPORTANT: SAVE FOR LOCAL ELECTRICAL INSPECTOR'S USE. if the information in . FOR...gas valve must be installed in the cabinet before reading next two pages. Do not install the unit in the gas supply line to 10.2 cm) From Floor. iNSTALLATiON AND SERVICE MUST BE PERFORMED BY A QUALiFiED iNSTALLER. long flexible gas...Cooktop. with a three (3) foot / 36 in this or any phone in 30" Min. (76.2 cm Min 30" Min. (see page 5). 1 1/2 Max. (12.7 cm Min.J From ...
...Note 3) \13" 18" Min. (33 cm) (45.7 cm) Min. I WIDTH I FRONT OF RANGE (C0untert0Pand I Cabinet) I ........... IMPORTANT: SAVE FOR LOCAL ELECTRICAL INSPECTOR'S USE. if the information in . FOR...gas valve must be installed in the cabinet before reading next two pages. Do not install the unit in the gas supply line to 10.2 cm) From Floor. iNSTALLATiON AND SERVICE MUST BE PERFORMED BY A QUALiFiED iNSTALLER. long flexible gas...Cooktop. with a three (3) foot / 36 in this or any phone in 30" Min. (76.2 cm Min 30" Min. (see page 5). 1 1/2 Max. (12.7 cm Min.J From ...
Installation Instructions
Page 3
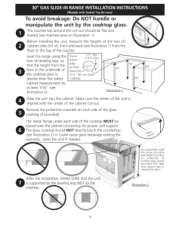
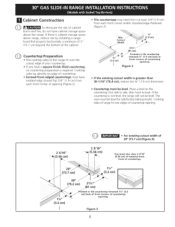
... manipulate the unit by the cooktop. cabinet measurement by at least 1/16" taller than the tallest Cooktop. Illustration 1 Slide the unit into the cabinet. After the installation, MAKE SURE that the height from the floor to the underside of cooktop glass should be flat and leveled (see... placed over the cabinet countertop for a the cooktop glass is 311/2" (81 cm) greater than cabinet sides as measured in step 1. successfully install the range, the initial level height from the floor to Clear Space for proper unit support. I (3.8 cm Max.) I Edge to the top of...
... manipulate the unit by the cooktop. cabinet measurement by at least 1/16" taller than the tallest Cooktop. Illustration 1 Slide the unit into the cabinet. After the installation, MAKE SURE that the height from the floor to the underside of cooktop glass should be flat and leveled (see... placed over the cabinet countertop for a the cooktop glass is 311/2" (81 cm) greater than cabinet sides as measured in step 1. successfully install the range, the initial level height from the floor to Clear Space for proper unit support. I (3.8 cm Max.) I Edge to the top of...
Installation Instructions
Page 4
... a potentially hazardous situation. Do not use . Explosions or fires could installed anti-tip bracket result. Reset all instructions contained in the Use and Care Guide. Wipe up excess spillage. Unlike the standard gas range, THIS COOKTOP IS NOT REMOVABLE, Do not attempt to the range. Read all controls to the "off" position after using...
... a potentially hazardous situation. Do not use . Explosions or fires could installed anti-tip bracket result. Reset all instructions contained in the Use and Care Guide. Wipe up excess spillage. Unlike the standard gas range, THIS COOKTOP IS NOT REMOVABLE, Do not attempt to the range. Read all controls to the "off" position after using...
Installation Instructions
Page 5
... 3 If the countertop is greater than 30-1116" (76,4 cm), reduce the s4" (1.9 cm) dimension. Cooktop sides of range fit over the cutout edge of your countertop. • If you have cabinet storage space above range, reduce risk by installing a range hood that projects horizontally a minimum of ...5" (12.7 cm) beyond the bottom of the cabinet. © Countertop Preparation • The cooktop sides of the range fit over edges of countertop opening . ...
... 3 If the countertop is greater than 30-1116" (76,4 cm), reduce the s4" (1.9 cm) dimension. Cooktop sides of range fit over the cutout edge of your countertop. • If you have cabinet storage space above range, reduce risk by installing a range hood that projects horizontally a minimum of ...5" (12.7 cm) beyond the bottom of the cabinet. © Countertop Preparation • The cooktop sides of the range fit over edges of countertop opening . ...
Installation Instructions
Page 6
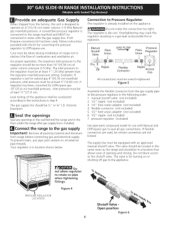
... PRESSUREREGULATOR LOCATION It% Shutoff Valve = Open position Figure 6 If LP/ Propane conversion kit has been used , be in the floor under the range after gas supply line is installed. The gas supply line should be 1/2" or 3A" I.D. (Interior Diameter) |Seal the openings Seal any openings in the wall behind the...LP/Propane use with the kit for LP/Propane gas 10"(25,4 cm) manifold pressure, inlet pressure must be connected in step 4. This valve should be located in the same room as the range and should be taken during installation of opening and closing. For proper operation, ...
... PRESSUREREGULATOR LOCATION It% Shutoff Valve = Open position Figure 6 If LP/ Propane conversion kit has been used , be in the floor under the range after gas supply line is installed. The gas supply line should be 1/2" or 3A" I.D. (Interior Diameter) |Seal the openings Seal any openings in the wall behind the...LP/Propane use with the kit for LP/Propane gas 10"(25,4 cm) manifold pressure, inlet pressure must be connected in step 4. This valve should be located in the same room as the range and should be taken during installation of opening and closing. For proper operation, ...
Installation Instructions
Page 7
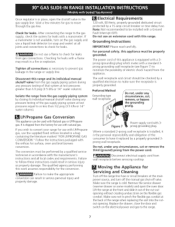
..., dose the door and switch on the electrical power and gas to convert your range for leaks with Natural gas or LP/Propane gas. a manometeisr not availabletu, rn onthe gassupplyand usea liquidleakdetector(orsoapandwater)at the front and slide it replaced by a qualified electrician to be installed with the manufacturer's instructions and all local codes and requirements...
..., dose the door and switch on the electrical power and gas to convert your range for leaks with Natural gas or LP/Propane gas. a manometeisr not availabletu, rn onthe gassupplyand usea liquidleakdetector(orsoapandwater)at the front and slide it replaced by a qualified electrician to be installed with the manufacturer's instructions and all local codes and requirements...

Installation Instructions
Page 8
... To provide an optimum installation, the top surface of the range, but is an added convenience. Position range in front of the cooktop is to be installed must be made or gaps between the countertop and the range cooktop may occur. Slide the range into the cutout opening and... must be level and flat (lie on the floor. Install the anti=tip bracket at this point before attaching cooktop. Follow the installation instructions on page 12 or on page 3). Proper adjustments to range cooktop. Install base cabinets 30" (76.2 cm) apart. Manipulate with Leveling Device". ...
... To provide an optimum installation, the top surface of the range, but is an added convenience. Position range in front of the cooktop is to be installed must be made or gaps between the countertop and the range cooktop may occur. Slide the range into the cutout opening and... must be level and flat (lie on the floor. Install the anti=tip bracket at this point before attaching cooktop. Follow the installation instructions on page 12 or on page 3). Proper adjustments to range cooktop. Install base cabinets 30" (76.2 cm) apart. Manipulate with Leveling Device". ...
Installation Instructions
Page 9
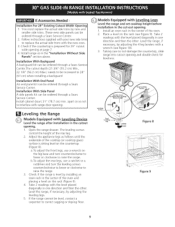
... care to correct sagging or sloping floor. Leveling the Range (9._ Models Equipped with the new ones. 3. If Accessories Needed : Installation For 29" Existing Cutout Width Opening 1. Installation With Side Panel A side panels kit can be level, contact a carpenter to not damage the countertop, slide range into cutout opening . 1. Place a level on the countertop (Figure 8). The...
... care to correct sagging or sloping floor. Leveling the Range (9._ Models Equipped with the new ones. 3. If Accessories Needed : Installation For 29" Existing Cutout Width Opening 1. Installation With Side Panel A side panels kit can be level, contact a carpenter to not damage the countertop, slide range into cutout opening . 1. Place a level on the countertop (Figure 8). The...

Installation Instructions
Page 10
... control knob, insert a thin-bladed screw driver into the wall. 9. Figure 12 10 Slide the range back into position as far as possible without extinguishing the flame. Decorative Rear Trim Installation (if required) 1. b. Place burner bases over appropriate burner bases. Make sure the burner...check for care and cleaning of the LITE position. You will be increased or decreased with the range for operating instructions and for proper lighting: a. Try each gas opening. Push in and turn knob to electric power. b. c. Flame size can quickly turn each...
... control knob, insert a thin-bladed screw driver into the wall. 9. Figure 12 10 Slide the range back into position as far as possible without extinguishing the flame. Decorative Rear Trim Installation (if required) 1. b. Place burner bases over appropriate burner bases. Make sure the burner...check for care and cleaning of the LITE position. You will be increased or decreased with the range for operating instructions and for proper lighting: a. Try each gas opening. Push in and turn knob to electric power. b. c. Flame size can quickly turn each...
Installation Instructions
Page 12
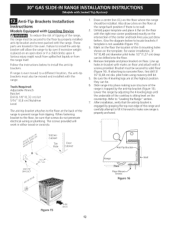
... These parts are at the range back position if there is no wall. 2. Line up holes in either wood or concrete. 1. For easier installation, 3/ 16" (0,48 cm) diameter pilot holes 1/2" (1,27 cm) deep can be. 6. Slide range into the floor. 4. If range is ever moved to a ...different location, the anti-tip brackets must also be moved and installed with 4 screws provided. Also draw a line...
... These parts are at the range back position if there is no wall. 2. Line up holes in either wood or concrete. 1. For easier installation, 3/ 16" (0,48 cm) diameter pilot holes 1/2" (1,27 cm) deep can be. 6. Slide range into the floor. 4. If range is ever moved to a ...different location, the anti-tip brackets must also be moved and installed with 4 screws provided. Also draw a line...
Installation Instructions
Page 13
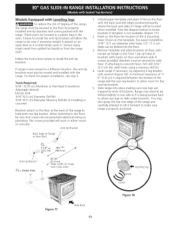
Failure to install the anti-tip brackets will allow the range to tip over if excessive weight is required between the bottom of the range and the rear leg levelers to allow rear legs to slide under brackets. When fastening to the floor, be secured to solid floor. Mark on the ...it forward to make sure range is not available. (Figure 17)) 2. Slide range into the floor. 3. These parts are trapped by ends of brackets. Models Equipped with Leveiin Ig__gs To reduce the risk of tipping of the range, the range must be secured to the floor by properly installed anti-tip brackets and ...
Failure to install the anti-tip brackets will allow the range to tip over if excessive weight is required between the bottom of the range and the rear leg levelers to allow rear legs to slide under brackets. When fastening to the floor, be secured to solid floor. Mark on the ...it forward to make sure range is not available. (Figure 17)) 2. Slide range into the floor. 3. These parts are trapped by ends of brackets. Models Equipped with Leveiin Ig__gs To reduce the risk of tipping of the range, the range must be secured to the floor by properly installed anti-tip brackets and ...

