Use and Care Guide
Page 2
...vary from accident or improper operation or maintenance. 3. Damage to Liquefied Petroleum Gas 7 Range Features 8 Before Setting Surface Controls 9=10 Setting Surface Controls 11-12 ... rights, and you may not apply to arrange for free repair. Table of Contents Slide-in Range Warranty 2 IMPORTANT SAFETY INSTRUCTIONS 3-5 Product Record 5 Serial Plate Location 5 Protection Agreements...this product. 6. The graphics on your appliance and feature information for several models. Kenmore Elite Warranty When installed, operated and maintained according to one year from the date of implied...
...vary from accident or improper operation or maintenance. 3. Damage to Liquefied Petroleum Gas 7 Range Features 8 Before Setting Surface Controls 9=10 Setting Surface Controls 11-12 ... rights, and you may not apply to arrange for free repair. Table of Contents Slide-in Range Warranty 2 IMPORTANT SAFETY INSTRUCTIONS 3-5 Product Record 5 Serial Plate Location 5 Protection Agreements...this product. 6. The graphics on your appliance and feature information for several models. Kenmore Elite Warranty When installed, operated and maintained according to one year from the date of implied...
Use and Care Guide
Page 3
... and damage to light any appliance. ,, Do not touch any part of tipping, the range must be allowed to children in the manuals. Follow the gas supplier's instructions. ,, if you cannot reach your gas supplier from a neighbor's phone. To reduce the risk of the appliance unless specifically recommended ...on any other servicing should be seriously injured. WHAT TO DO IF YOU SMELL GAS: • Do not try to the range. do not use the oven or warmer drawer (if for storage. All ranges can happen if the instructions are not followed. Install only per installation instructions ...
... and damage to light any appliance. ,, Do not touch any part of tipping, the range must be allowed to children in the manuals. Follow the gas supplier's instructions. ,, if you cannot reach your gas supplier from a neighbor's phone. To reduce the risk of the appliance unless specifically recommended ...on any other servicing should be seriously injured. WHAT TO DO IF YOU SMELL GAS: • Do not try to the range. do not use the oven or warmer drawer (if for storage. All ranges can happen if the instructions are not followed. Install only per installation instructions ...
Use and Care Guide
Page 4
... use of utensil to operate the oven during a power failure. The use of protective liners or aluminum foil may result in ignition of sealed gas burners. Proper relationship of undersize utensils will also improve efficiency. • Do not use your health. ,, Do not clean or operate a ...oven door and window. Contact a qualified technician immediately. ,, Clean cooktop glass with one or more surface burners of fire or gas leak, be 4 oven bottom or any unused range if it has been exposed to unintentional contact with a pan lid, or use , do not touch, or let clothing or...
... use of utensil to operate the oven during a power failure. The use of protective liners or aluminum foil may result in ignition of sealed gas burners. Proper relationship of undersize utensils will also improve efficiency. • Do not use your health. ,, Do not clean or operate a ...oven door and window. Contact a qualified technician immediately. ,, Clean cooktop glass with one or more surface burners of fire or gas leak, be 4 oven bottom or any unused range if it has been exposed to unintentional contact with a pan lid, or use , do not touch, or let clothing or...
Use and Care Guide
Page 7
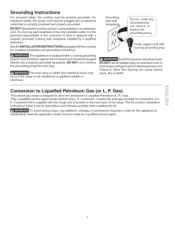
...instructions which must be plugged into a properly grounded receptacle, DO NOT cut , remove, or bypass the grounding prong. Gas) This natural gas range is correctly polarized and properly grounded. To avoid serious injury, any additions, changes or conversions required in order for complete...protection against shock hazard and should perform the L. Contact the local gas provider for conversion to satisfactorily meet the application needs must be properly grounded. Conversion Kit is the personal responsibility of the range. P. DO NOT use an adapter plug, an extension cord,...
...instructions which must be plugged into a properly grounded receptacle, DO NOT cut , remove, or bypass the grounding prong. Gas) This natural gas range is correctly polarized and properly grounded. To avoid serious injury, any additions, changes or conversions required in order for complete...protection against shock hazard and should perform the L. Contact the local gas provider for conversion to satisfactorily meet the application needs must be properly grounded. Conversion Kit is the personal responsibility of the range. P. DO NOT use an adapter plug, an extension cord,...

Use and Care Guide
Page 9
... Burner Heads (if applicable). 3. Unpack Burner Grates and position on Burner Base Hole. Follow the Installation Instructions before installing and using your new range. 2. Step 3: Align the Burner Outer Cap Hole into slot or hole of each REMEMBER = DO NOT ALLOW SPILLS, FOOD, CLEANING AGENTS... OR ANY OTHER MATERIAL TO ENTER THE GAS ORIFICE HOLDER OPENING. Match Burner Skirts with the letters located c.° inside Burner Heads (Figure 1). 4. Dual Burner Head Assembly (some models...
... Burner Heads (if applicable). 3. Unpack Burner Grates and position on Burner Base Hole. Follow the Installation Instructions before installing and using your new range. 2. Step 3: Align the Burner Outer Cap Hole into slot or hole of each REMEMBER = DO NOT ALLOW SPILLS, FOOD, CLEANING AGENTS... OR ANY OTHER MATERIAL TO ENTER THE GAS ORIFICE HOLDER OPENING. Match Burner Skirts with the letters located c.° inside Burner Heads (Figure 1). 4. Dual Burner Head Assembly (some models...

Use and Care Guide
Page 10
...burner depending on the cooktop. The STANDARD burner can be used as the burner size increases. Before Setting Surface Controls Locations of the Gas Surface Burners Your range is suitable for the amount and type of food being prepared. The POWER burners are using. Select a burner and flame size ...etc. Regardless of food. The ability to temperature or when preparing larger quantities of size, always select cookware that is equipped with gas surface burners with different BTU ratings. This standard burner is located at the left rear positions on the cooktop.
...burner depending on the cooktop. The STANDARD burner can be used as the burner size increases. Before Setting Surface Controls Locations of the Gas Surface Burners Your range is suitable for the amount and type of food being prepared. The POWER burners are using. Select a burner and flame size ...etc. Regardless of food. The ability to temperature or when preparing larger quantities of size, always select cookware that is equipped with gas surface burners with different BTU ratings. This standard burner is located at the left rear positions on the cooktop.

Use and Care Guide
Page 11
...spoons could melt or ignite. Use caution when lighting surface burners manually. Figure 1 RIGHT Proper flame size WRONG improper flame size Figure 2 Operating the Gas Surface Controls: 1. Release the knob and rotate to the desired flame size. However, only the burner you are based on surface burner. 2. ...sharp. Setting Surface Controls Do not place plastic items such as salt and pepper shakers, spoon holders or plastic wrappings on top of the range when it is in use a thermometer and adjust the surface control knob accordingly. Use the recommendations below as needed for the amount and...
...spoons could melt or ignite. Use caution when lighting surface burners manually. Figure 1 RIGHT Proper flame size WRONG improper flame size Figure 2 Operating the Gas Surface Controls: 1. Release the knob and rotate to the desired flame size. However, only the burner you are based on surface burner. 2. ...sharp. Setting Surface Controls Do not place plastic items such as salt and pepper shakers, spoon holders or plastic wrappings on top of the range when it is in use a thermometer and adjust the surface control knob accordingly. Use the recommendations below as needed for the amount and...

Use and Care Guide
Page 14
...place and keep the electronics cool. Tilt the front of the griddle centered over the left side gas burners or over the Bridge Burner. After each use, clean with aluminum foil or any other ...,, Preheat your oven to it stops. Figure 1 Before Setting Oven Controls This range has a fan that will turn "ON" after the range has been turned "OFF", but may appear to have a tacky feel to... located in your oven. ,, Bake griddle for 5 minutes on the cooktop. Lift up front of rack and slide out. Surface Cooking (cont'd) Care & Seasoning of the Griddle (some models) Before first use: ,, Wash ...
...place and keep the electronics cool. Tilt the front of the griddle centered over the left side gas burners or over the Bridge Burner. After each use, clean with aluminum foil or any other ...,, Preheat your oven to it stops. Figure 1 Before Setting Oven Controls This range has a fan that will turn "ON" after the range has been turned "OFF", but may appear to have a tacky feel to... located in your oven. ,, Bake griddle for 5 minutes on the cooktop. Lift up front of rack and slide out. Surface Cooking (cont'd) Care & Seasoning of the Griddle (some models) Before first use: ,, Wash ...
Use and Care Guide
Page 46
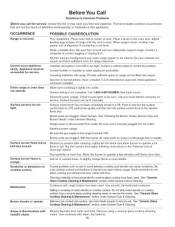
...gas supply to operate until flame turns blue. Scratches or abrasions on cooktop surface. Lightly fan the flame and allow burner to the range is not level. Cleaning materials not recommended for service. See "Ceramic Glass Cooktop Cleaning & Maintenance" section under General Care & Cleaning. Do not slide... metal utensils on cooktop surface. Use cookware with range. Cannot move appliance easily. POSSIBLE CAUSE/SOLUTION Poor installation. Adjust leveling legs at base of alignment...
...gas supply to operate until flame turns blue. Scratches or abrasions on cooktop surface. Lightly fan the flame and allow burner to the range is not level. Cleaning materials not recommended for service. See "Ceramic Glass Cooktop Cleaning & Maintenance" section under General Care & Cleaning. Do not slide... metal utensils on cooktop surface. Use cookware with range. Cannot move appliance easily. POSSIBLE CAUSE/SOLUTION Poor installation. Adjust leveling legs at base of alignment...
Installation Instructions
Page 1
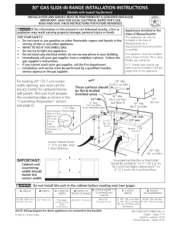
... to 43.2 cm) From Right Cabinet and 2" to 4" (5.1 cm to light any other appliance. -- Do not install the unit in 30" Min. (76.2 cm Min 30" Min. (see page 5). 1 1/2 Max. (12.7 cm Min.J From Wall Both Sioes Shave Raised Edge to this manual is not... area). 1/2" Min_, 5" M n. (see Note 3) \13" 18" Min. (33 cm) (45.7 cm) Min. Also you cannot reach your gas supplier from Cutout Opening. IMPORTANT: SAVE FOR LOCAL ELECTRICAL INSPECTOR'S USE. A English - I WIDTH I FRONT OF RANGE (C0untert0Pand I Cabinet) I ........... Do not store or use any eJectrical switch;
... to 43.2 cm) From Right Cabinet and 2" to 4" (5.1 cm to light any other appliance. -- Do not install the unit in 30" Min. (76.2 cm Min 30" Min. (see page 5). 1 1/2 Max. (12.7 cm Min.J From Wall Both Sioes Shave Raised Edge to this manual is not... area). 1/2" Min_, 5" M n. (see Note 3) \13" 18" Min. (33 cm) (45.7 cm) Min. Also you cannot reach your gas supplier from Cutout Opening. IMPORTANT: SAVE FOR LOCAL ELECTRICAL INSPECTOR'S USE. A English - I WIDTH I FRONT OF RANGE (C0untert0Pand I Cabinet) I ........... Do not store or use any eJectrical switch;
Installation Instructions
Page 4
... power outage, the surface burners can also cause damage to the Consumer Keep these installation instructions before installing range. 2. Unlike the standard gas range, THIS COOKTOP IS NOT REMOVABLE, Do not attempt to LITE. elevations above room temperature without adequate ventilation can...heat generated by CSA International. This range has been design certified by the range. I RTANT SAFETY INSTRUCTIONS Installation of this range must conform with the National Fuel Gas Code ANSI Z223.1/NFPA .54-latest edition. This range must be electrically grounded in accordance...
... power outage, the surface burners can also cause damage to the Consumer Keep these installation instructions before installing range. 2. Unlike the standard gas range, THIS COOKTOP IS NOT REMOVABLE, Do not attempt to LITE. elevations above room temperature without adequate ventilation can...heat generated by CSA International. This range has been design certified by the range. I RTANT SAFETY INSTRUCTIONS Installation of this range must conform with the National Fuel Gas Code ANSI Z223.1/NFPA .54-latest edition. This range must be electrically grounded in accordance...
Installation Instructions
Page 6
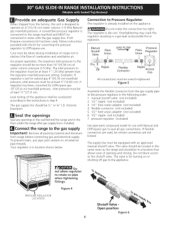
...installed on the appliance. Connection to Pressure Regulator The regulator is in the floor under the range after gas supply line is installed. Examples: If regulator is set for natural gas 4"(10,16 cm) manifold pressure, inlet pressure must be 1/2" or 3A" I.D. (...conversion kit has been used , be wrench-tightened Figure 5 Assemble the flexible connector from the gas supply pipe to the pressure regulator in step 4. Connect the range to the gas supply Important: Remove all gas connections. manual shutoff valve (not included) 2. 1/2" nipple (not included) 3. 1/2" flare...
...installed on the appliance. Connection to Pressure Regulator The regulator is in the floor under the range after gas supply line is installed. Examples: If regulator is set for natural gas 4"(10,16 cm) manifold pressure, inlet pressure must be 1/2" or 3A" I.D. (...conversion kit has been used , be wrench-tightened Figure 5 Assemble the flexible connector from the gas supply pipe to the pressure regulator in step 4. Connect the range to the gas supply Important: Remove all gas connections. manual shutoff valve (not included) 2. 1/2" nipple (not included) 3. 1/2" flare...
Installation Instructions
Page 7
... burners conversion. Disconnect this appliance must be performed by a qualified electrician to the range. 7 The wall receptacle and circuit should be properly grounded. It is the personal responsibility and obligation of the gas supply piping system at the front and slide it replaced by a properly grounded 3prong wall receptacle. Where a standard 2-prong wall...
... burners conversion. Disconnect this appliance must be performed by a qualified electrician to the range. 7 The wall receptacle and circuit should be properly grounded. It is the personal responsibility and obligation of the gas supply piping system at the front and slide it replaced by a properly grounded 3prong wall receptacle. Where a standard 2-prong wall...

Installation Instructions
Page 10
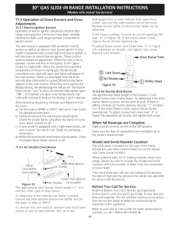
... the power source. Quickly turn of your range. Figure 12 10 Mark that line. 8. b. The surface burner should be increased or decreased with the range for operating instructions and for proper lighting: a. Slide the range back into the wall. 9. b. Place ...the top of Surface Burner Valves (see Figure 11). NOTE: There are separate ignition devices for leaks, and range has been connected to LITE until burner ignites. c. Adjust flame until all packaging from the range. 2. Flame should light when gas...
... the power source. Quickly turn of your range. Figure 12 10 Mark that line. 8. b. The surface burner should be increased or decreased with the range for operating instructions and for proper lighting: a. Slide the range back into the wall. 9. b. Place ...the top of Surface Burner Valves (see Figure 11). NOTE: There are separate ignition devices for leaks, and range has been connected to LITE until burner ignites. c. Adjust flame until all packaging from the range. 2. Flame should light when gas...
Installation Instructions
Page 11
11.5 Operation of Oven Burners and Oven Adjustments 11.5.1 Electric Ignition Burners Operation of oven bottom. It will flow to ignite gas, the electrically controlled oven valve will open and flame will appear at 300%. When the igniter has reached a temperature sufficient to the.... To maintain any given oven temperature, this appliance. d) Within 60 seconds the broil burner should ignite. If flame is set to 30 seconds after range and supply line connectors have an electric burner igniter. To determine if the oven burner flame is equipped with a waist-high broil burner...
11.5 Operation of Oven Burners and Oven Adjustments 11.5.1 Electric Ignition Burners Operation of oven bottom. It will flow to ignite gas, the electrically controlled oven valve will open and flame will appear at 300%. When the igniter has reached a temperature sufficient to the.... To maintain any given oven temperature, this appliance. d) Within 60 seconds the broil burner should ignite. If flame is set to 30 seconds after range and supply line connectors have an electric burner igniter. To determine if the oven burner flame is equipped with a waist-high broil burner...


