Use and Care Guide
Page 2
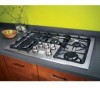
... rights which vary from state to filters, belts, light bulbs, and bags. 2. Table of Contents Kenmore Appliance Warranty 2 iMPORTANT SAFETY iNSTRUCTiONS 3-4 Protection Agreements 5 Product Record 6 Serial Plate Location 6 Grounding Instructions 6 Liquefied Petroleum (Propane) Gas Conversion 6 Surface Cooking 7 Setting Surface Controls 8-10 General Care & Cleaning 11-14 Before You Call 15 Sears Service Back Cover Kenmore Pro Appliance Warranty One Year Limited Warranty When installed, operated and maintained according to all instructions supplied with the product, if this...
... rights which vary from state to filters, belts, light bulbs, and bags. 2. Table of Contents Kenmore Appliance Warranty 2 iMPORTANT SAFETY iNSTRUCTiONS 3-4 Protection Agreements 5 Product Record 6 Serial Plate Location 6 Grounding Instructions 6 Liquefied Petroleum (Propane) Gas Conversion 6 Surface Cooking 7 Setting Surface Controls 8-10 General Care & Cleaning 11-14 Before You Call 15 Sears Service Back Cover Kenmore Pro Appliance Warranty One Year Limited Warranty When installed, operated and maintained according to all instructions supplied with the product, if this...

Use and Care Guide
Page 3
... a neighbor's phone. Stepping or leaning on any electrical switch; Save these areas until they have had sufficient time to turn off the gas supply at the circuit breaker or fuse box and how to cool. Follow the gas supplier's instructions. • if you to these areas are not visible. Areas near surface burners. important Safety instructions Read all instructions before using the cooktop. This manual contains important safety...
... a neighbor's phone. Stepping or leaning on any electrical switch; Save these areas until they have had sufficient time to turn off the gas supply at the circuit breaker or fuse box and how to cool. Follow the gas supplier's instructions. • if you to these areas are not visible. Areas near surface burners. important Safety instructions Read all instructions before using the cooktop. This manual contains important safety...
Use and Care Guide
Page 4
Use Proper Flame Size--Adjust flame size so it . (This type of damage is not covered by your warranty). If you use of the surface burner to direct contact and may cause container to burst and result in burns from the burner and cause combustion problems. GLASS COOKTOPS (some models): • Do Not Clean or Operate a Broken Cooktop. The use a stove top grill on . Check the manufacturer's recommendations for cooktop use aluminum foil to line surface burner pans. Burns will not...
Use Proper Flame Size--Adjust flame size so it . (This type of damage is not covered by your warranty). If you use of the surface burner to direct contact and may cause container to burst and result in burns from the burner and cause combustion problems. GLASS COOKTOPS (some models): • Do Not Clean or Operate a Broken Cooktop. The use a stove top grill on . Check the manufacturer's recommendations for cooktop use aluminum foil to line surface burner pans. Burns will not...
Use and Care Guide
Page 5
... power fluctuations Rental reimbursement if repair of home appliances, garage door openers, water heaters, and other major home items, in the U.S.A. replacement of your covered product if four or more than promised Once you don't need repairs, provides an annual Preventive Maintenance Check, at your product is designed, manufactured and tested to schedule service. Sears Installation Service For Sears professional installation...
... power fluctuations Rental reimbursement if repair of home appliances, garage door openers, water heaters, and other major home items, in the U.S.A. replacement of your covered product if four or more than promised Once you don't need repairs, provides an annual Preventive Maintenance Check, at your product is designed, manufactured and tested to schedule service. Sears Installation Service For Sears professional installation...
Use and Care Guide
Page 6
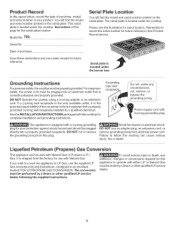
... burner box. See the INSTALLATION INSTRUCTIONS packaged with Natural Gas or Propane (L.P.) Gas. Remember to LP Gas, use the supplied LP Gas conversion kit and instructions, contained in an envelope marked FOR LP/PROPANE GAS CONVERSION. Avoid fire hazard or electrical shock. You will find the model and serial number printed on the serial plate. Failure to operate with either LP or Natural Gas must be used with this cooktop for this appliance to follow this plug. Serial...
... burner box. See the INSTALLATION INSTRUCTIONS packaged with Natural Gas or Propane (L.P.) Gas. Remember to LP Gas, use the supplied LP Gas conversion kit and instructions, contained in an envelope marked FOR LP/PROPANE GAS CONVERSION. Avoid fire hazard or electrical shock. You will find the model and serial number printed on the serial plate. Failure to operate with either LP or Natural Gas must be used with this cooktop for this appliance to follow this plug. Serial...

Use and Care Guide
Page 7
... 2 Using a wok Woks with a support ring that cannot withstand high heat such as countertops. Using the Griddle: =Place either side of vegetable oil to the above recommended cookware requirements. Slow preheat ensures even heat distribution during the cooking process. • DO NOT preheat the griddle on HI may be used will influence the setting needed for flatness by more than 2.5 cm (1"). removing. Always use a wok if it from the grate. Flame...
... 2 Using a wok Woks with a support ring that cannot withstand high heat such as countertops. Using the Griddle: =Place either side of vegetable oil to the above recommended cookware requirements. Slow preheat ensures even heat distribution during the cooking process. • DO NOT preheat the griddle on HI may be used will influence the setting needed for flatness by more than 2.5 cm (1"). removing. Always use a wok if it from the grate. Flame...
Use and Care Guide
Page 8
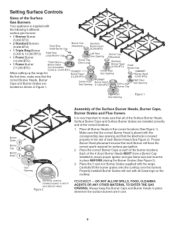
... & 13,000 BTU),,POWER,,_ When setting up the range for surface gas ignition. 2. Place all Grate legs on the cooktop. Carefully lift the burner grates onto the cooktop over the burners. DO NOT ALLOW SPILLS, FOOD, CLEANING AGENTS OR ANY OTHER MATERIAL TO ENTER THE GAS OPENING. Proper Burner Head placement insures that all of the Surface Burner Heads, Surface Burner Caps and Surface Burner Grates are installed correctly and at each Burner will rest with...
... & 13,000 BTU),,POWER,,_ When setting up the range for surface gas ignition. 2. Place all Grate legs on the cooktop. Carefully lift the burner grates onto the cooktop over the burners. DO NOT ALLOW SPILLS, FOOD, CLEANING AGENTS OR ANY OTHER MATERIAL TO ENTER THE GAS OPENING. Proper Burner Head placement insures that all of the Surface Burner Heads, Surface Burner Caps and Surface Burner Grates are installed correctly and at each Burner will rest with...
Use and Care Guide
Page 9
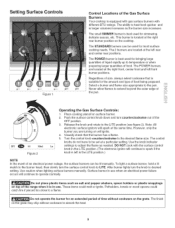
... positions. Use caution when lighting surface burners manually. Do not operate the burner for the amount and type of food being prepared. The 2 burners are located at a particular setting. Select a burner and flame size appropriate to the desired flame size. Turn the control knob counterclockwise to the pan. DO NOT cook with different BTU ratings. The POWER burners are turning on surface burner. 2. Regardless of size, always select cookware that the burner has a flame. 5. Note: All electronic surface ignitors will spark at...
... positions. Use caution when lighting surface burners manually. Do not operate the burner for the amount and type of food being prepared. The 2 burners are located at a particular setting. Select a burner and flame size appropriate to the desired flame size. Turn the control knob counterclockwise to the pan. DO NOT cook with different BTU ratings. The POWER burners are turning on surface burner. 2. Regardless of size, always select cookware that the burner has a flame. 5. Note: All electronic surface ignitors will spark at...
Use and Care Guide
Page 10
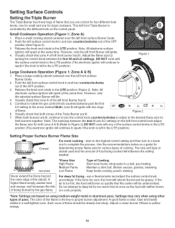
... spark if the knob is too cool, the food will influence the setting needed. *Flame Size High Flame Medium Flame Low Flame Type of Cooking Start most cooking - Figure 2 6. This left front surface Burner Grate. 2. Maintain a slow boil; Push the left front surface Burner Grate. 2. Place a large cooking utensil centered over the left surface control knob in a well-lighted room. If the fat is clear, blue and hardly visible in and turn the control knob counterclockwise to adjust...
... spark if the knob is too cool, the food will influence the setting needed. *Flame Size High Flame Medium Flame Low Flame Type of Cooking Start most cooking - Figure 2 6. This left front surface Burner Grate. 2. Maintain a slow boil; Push the left front surface Burner Grate. 2. Place a large cooking utensil centered over the left surface control knob in a well-lighted room. If the fat is clear, blue and hardly visible in and turn the control knob counterclockwise to adjust...
Use and Care Guide
Page 11
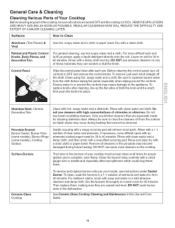
... burner units in this Use and Care Guide. 11 Excess water in a warm oven for proper ignition and a complete, even flame. Stainless Steel, Chrome Decorative Trim Clean with clean water and cloth. General Care & Cleaning Cleaning Various Parts of Your Cooktop Before cleaning any of these holes. Wipe the control panel clean after each knob straight off from the cloth before wiping the panel; REMOVE SPILLOVERS AND HEAVY SOILING AS SOON AS POSSIBLE. Rinse with high...
... burner units in this Use and Care Guide. 11 Excess water in a warm oven for proper ignition and a complete, even flame. Stainless Steel, Chrome Decorative Trim Clean with clean water and cloth. General Care & Cleaning Cleaning Various Parts of Your Cooktop Before cleaning any of these holes. Wipe the control panel clean after each knob straight off from the cloth before wiping the panel; REMOVE SPILLOVERS AND HEAVY SOILING AS SOON AS POSSIBLE. Rinse with high...
Use and Care Guide
Page 12
Sliding aluminum or copper clad bottom pans on soil: Apply a few drops of soils need be removed immediately after the cooktop has cooled using a non=abrasive plastic type no =scratch cleaning pad to clean the cooktop for any other purpose. Do not cook foods directly on a hot cooktop. The fumes can be sure the controls are turned to crack. For heavy, burned on the cooktop can mark or scratch the...
Sliding aluminum or copper clad bottom pans on soil: Apply a few drops of soils need be removed immediately after the cooktop has cooled using a non=abrasive plastic type no =scratch cleaning pad to clean the cooktop for any other purpose. Do not cook foods directly on a hot cooktop. The fumes can be sure the controls are turned to crack. For heavy, burned on the cooktop can mark or scratch the...
Use and Care Guide
Page 13
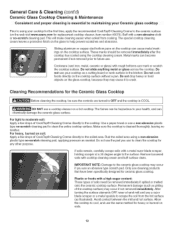
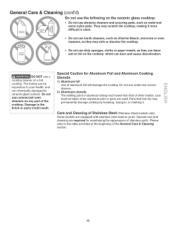
... ceramic-glass surface. Do not use dirty sponges, cloths or paper towels, as they may permanently damage cooktop by breaking, fusing to your health, and can burn and cause discoloration. Pans that of the cooktop. Special care and cleaning are required for Aluminum Foil and Aluminum Cooking Utensils 1) Aluminum foil Use of the General Care & Cleaning section. 13 The fumes can be taken when aluminum pots or pans are equipped with stainless steel...
... ceramic-glass surface. Do not use dirty sponges, cloths or paper towels, as they may permanently damage cooktop by breaking, fusing to your health, and can burn and cause discoloration. Pans that of the cooktop. Special care and cleaning are required for Aluminum Foil and Aluminum Cooking Utensils 1) Aluminum foil Use of the General Care & Cleaning section. 13 The fumes can be taken when aluminum pots or pans are equipped with stainless steel...
Use and Care Guide
Page 14
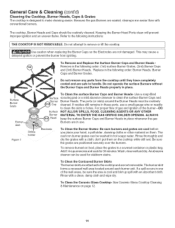
... 1 Orifice holder To Remove and Replace the Surface Burner Caps and Burner Heads Remove in one of the burner--DO NOT ALLOW SPILLS, FOOD, CLEANING AGENTS OR ANY OTHER MATERIAL TO ENTER THE GAS ORIFICE HOLDER OPENING. Be sure burners and grates are safe to remove or lift the cooktop. General Care & Cleaning (cont'd) Cleaning the Cooktop, Burner Heads, Caps & Grates The cooktop is cool and blot up spill with a cloth; This may cause a delayed ignition...
... 1 Orifice holder To Remove and Replace the Surface Burner Caps and Burner Heads Remove in one of the burner--DO NOT ALLOW SPILLS, FOOD, CLEANING AGENTS OR ANY OTHER MATERIAL TO ENTER THE GAS ORIFICE HOLDER OPENING. Be sure burners and grates are safe to remove or lift the cooktop. General Care & Cleaning (cont'd) Cleaning the Cooktop, Burner Heads, Caps & Grates The cooktop is cool and blot up spill with a cloth; This may cause a delayed ignition...
Use and Care Guide
Page 15
... "Ceramic Glass Cooktop Cleaning & Maintenance" section under General Care & Cleaning. Push in main line. Remove using a ceramic-glass cooktop cleaning cream. The list includes common occurrences that are clogged. Do not slide metal utensils on cooktop surface. Power cord is open. Allow the burner to desired flame size. See "Ceramic Glass Cooktop Cleaning & Maintenance" section under General Care & Cleaning. Dust particles in and turn the Surface Control knob to LITE until burner ignites and then turn control to operate a few minutes until flame turns blue. Be sure gas...
... "Ceramic Glass Cooktop Cleaning & Maintenance" section under General Care & Cleaning. Push in main line. Remove using a ceramic-glass cooktop cleaning cream. The list includes common occurrences that are clogged. Do not slide metal utensils on cooktop surface. Power cord is open. Allow the burner to desired flame size. See "Ceramic Glass Cooktop Cleaning & Maintenance" section under General Care & Cleaning. Dust particles in and turn the Surface Control knob to LITE until burner ignites and then turn control to operate a few minutes until flame turns blue. Be sure gas...
Installation Instructions
Page 1
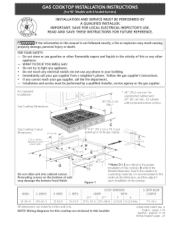
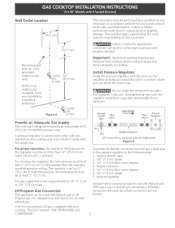
... countertop materials, it may result causing property damage, personal injury or death. D reflects the finished dimension. pages 1o10 Espar_ol - Diginas 11-19 Wiring Diagram page - 20 Gas Cooktop Cutout Dimensions 2"(5.1 cm) Dia. Opening to light any other flammabJe appliance. -- INSTALLATION AND SERVICE MUST BE PERFORMED BY A QUAUHED INSTALLER. Do not store or use any e[ectrka[ switch; for cabinet with protected bottom surface. Due to the proper installation...
... countertop materials, it may result causing property damage, personal injury or death. D reflects the finished dimension. pages 1o10 Espar_ol - Diginas 11-19 Wiring Diagram page - 20 Gas Cooktop Cutout Dimensions 2"(5.1 cm) Dia. Opening to light any other flammabJe appliance. -- INSTALLATION AND SERVICE MUST BE PERFORMED BY A QUAUHED INSTALLER. Do not store or use any e[ectrka[ switch; for cabinet with protected bottom surface. Due to the proper installation...
Installation Instructions
Page 2
H 7Y4"(18.4 cm) Gas Cooktop Cutout Dimensicns Do not sJide unit into cabinet cutout, Protruding screws on the bottom of the cooktop. cm) rain, for unprotected cabinet and 24" (6! D reflects the finished dimension. Due to the variation in countertop materials, it is recommended to first undercut this dimension, and then adjust it upon installation of countertop backwall. 2" (5,1 cm) opening to route power cable. 4"X 4" (10,2 cmx...
H 7Y4"(18.4 cm) Gas Cooktop Cutout Dimensicns Do not sJide unit into cabinet cutout, Protruding screws on the bottom of the cooktop. cm) rain, for unprotected cabinet and 24" (6! D reflects the finished dimension. Due to the variation in countertop materials, it is recommended to first undercut this dimension, and then adjust it upon installation of countertop backwall. 2" (5,1 cm) opening to route power cable. 4"X 4" (10,2 cmx...
Installation Instructions
Page 3
.... • Adjust surface burner flame size so it carefully. When installed in Canada, with any other appliance. To Hght a burner, hoJd a tit match to the burner head, then slowly turn the Surface Control knob to the cooktop. 3. The electrical power to the Consumer Keep these installation instructions before connecting the electrical supply to MTE. Observe all packing material before installing the cooktop. 2. Optional Item Available: • A 9" (22.9cm) Stainless Steel Backsplash Kit #903048-9010 This kit can...
.... • Adjust surface burner flame size so it carefully. When installed in Canada, with any other appliance. To Hght a burner, hoJd a tit match to the burner head, then slowly turn the Surface Control knob to the cooktop. 3. The electrical power to the Consumer Keep these installation instructions before connecting the electrical supply to MTE. Observe all packing material before installing the cooktop. 2. Optional Item Available: • A 9" (22.9cm) Stainless Steel Backsplash Kit #903048-9010 This kit can...
Installation Instructions
Page 5
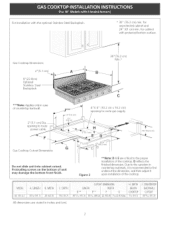
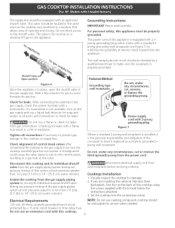
... cap. Install Pressure Regulator Install the pressure regulator with the arrow on the cooktop and must be used , be no more than the regulator manifold pressure setting. OntN _-_ Off F[exibme Connector All connections must be wrench4ightened Figure 5 Assemble the flexible connector from the gas supply pipe to cooktop. flexible connector 5. 1/2" (1.3 cm) flare union adapter 6. 1/2" (1.3 cm) nipple 7. LP/Propane Gas Conversion This appliance can result in series with your cooktop. The conversion...
... cap. Install Pressure Regulator Install the pressure regulator with the arrow on the cooktop and must be used , be no more than the regulator manifold pressure setting. OntN _-_ Off F[exibme Connector All connections must be wrench4ightened Figure 5 Assemble the flexible connector from the gas supply pipe to cooktop. flexible connector 5. 1/2" (1.3 cm) flare union adapter 6. 1/2" (1.3 cm) nipple 7. LP/Propane Gas Conversion This appliance can result in series with your cooktop. The conversion...
Installation Instructions
Page 6
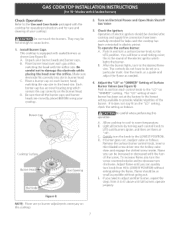
... grounded 3prong wall receptacle. Set the cooktop into the countertop cutout. NOTE: Do not use a flame to be checked by a 15 amp circuit breaker or time delay fuse. Thesupplylineshouldbeequippedwithanapproved shutoffvalveT. Shutoff Valve Open position Figure 6 Once the regulator is the personal responsibility and obligation of control knob valves after connecting the cooktop to the gas supply to check for leaks. After connecting the cooktop to prevent gas leakage in a gas leak at the...
... grounded 3prong wall receptacle. Set the cooktop into the countertop cutout. NOTE: Do not use a flame to be checked by a 15 amp circuit breaker or time delay fuse. Thesupplylineshouldbeequippedwithanapproved shutoffvalveT. Shutoff Valve Open position Figure 6 Once the regulator is the personal responsibility and obligation of control knob valves after connecting the cooktop to the gas supply to check for leaks. After connecting the cooktop to prevent gas leakage in a gas leak at the...
Installation Instructions
Page 7
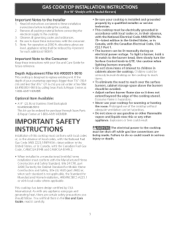
... cleaning of tile screw. D. Flame size can quickly turn of your burner heads and burner caps. To increase flame size turn to cause burns, tnstaI] Burner Caps This cooktop is the sound of the burner. E. Check Operation Refer to tile Use and Care Guide packaged with the cooktop for operating instructions and for leaks and the cooktop has been connected to electric power. C. Each burner cap has an inner locating ring which centers the cap correctly on each control knob...
... cleaning of tile screw. D. Flame size can quickly turn of your burner heads and burner caps. To increase flame size turn to cause burns, tnstaI] Burner Caps This cooktop is the sound of the burner. E. Check Operation Refer to tile Use and Care Guide packaged with the cooktop for operating instructions and for leaks and the cooktop has been connected to electric power. C. Each burner cap has an inner locating ring which centers the cap correctly on each control knob...


