Use and Care Guide
Page 2
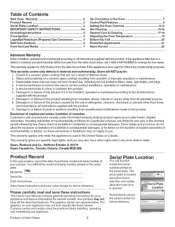
... 5 Liquefied Petroleum (Propane) Gas Conversion 5 Wall Oven Features 6 Oven Vent and Racks 7 Air Circulation in the Oven 7 Control Pad Features 8 Setting the Oven Controls 9=14 Sel=Cleaning 15=16 General Care & Cleaning 17-19 Adjusting the Oven Temperature 19 BeforeYou Call 20 Protection Agreements 21 Sears Service 22 Kenmore Warranty When installed, operated and maintained according to...
... 5 Liquefied Petroleum (Propane) Gas Conversion 5 Wall Oven Features 6 Oven Vent and Racks 7 Air Circulation in the Oven 7 Control Pad Features 8 Setting the Oven Controls 9=14 Sel=Cleaning 15=16 General Care & Cleaning 17-19 Adjusting the Oven Temperature 19 BeforeYou Call 20 Protection Agreements 21 Sears Service 22 Kenmore Warranty When installed, operated and maintained according to...
Use and Care Guide
Page 3
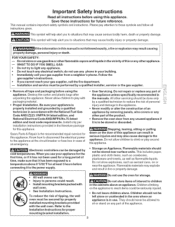
...Flammable materials may cause bodily injury or property damage. Refer to reach items could result. • install mounting brackets packed with the wall oven. Do not store items of personal ..i.l.i.i..... Destroy the carton and plastic bags after unpacking the appliance. To reduce the risk of ... damaged by removing panels, wire covers or any other servicing should not be done only _iiiiiiiiiiii_ by properly installed mounting brackets provided with wall oven. • See Installation Instructions. WHAT TO DO IF YOU SMELL GAS: ,, Do not try to light any appliance. = Do...
...Flammable materials may cause bodily injury or property damage. Refer to reach items could result. • install mounting brackets packed with the wall oven. Do not store items of personal ..i.l.i.i..... Destroy the carton and plastic bags after unpacking the appliance. To reduce the risk of ... damaged by removing panels, wire covers or any other servicing should not be done only _iiiiiiiiiiii_ by properly installed mounting brackets provided with wall oven. • See Installation Instructions. WHAT TO DO IF YOU SMELL GAS: ,, Do not try to light any appliance. = Do...
Use and Care Guide
Page 4
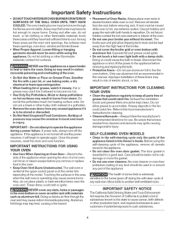
... as aluminum foil. Greasy deposits in this Owner's Guide. important Safety instructions • DO NOTTOUCH INTERIOROVEN BURNEROR INTERIOR SURFACES OF THE WALL OVEN UNTIL THEY HAVE COOLED. Do not use . Buildup of the appliance, remove all parts free of these areas until they have had...to operate the appliance during the self-clean cycle of any wall oven. The wall oven is extremely sensitive to line the oven bottom. Disconnect the appliance or shut off and the power resumes, it closely. SELF-CLEANING OVEN MODELS • Clean in the self=cleaning cycle only the...
... as aluminum foil. Greasy deposits in this Owner's Guide. important Safety instructions • DO NOTTOUCH INTERIOROVEN BURNEROR INTERIOR SURFACES OF THE WALL OVEN UNTIL THEY HAVE COOLED. Do not use . Buildup of the appliance, remove all parts free of these areas until they have had...to operate the appliance during the self-clean cycle of any wall oven. The wall oven is extremely sensitive to line the oven bottom. Disconnect the appliance or shut off and the power resumes, it closely. SELF-CLEANING OVEN MODELS • Clean in the self=cleaning cycle only the...
Use and Care Guide
Page 5
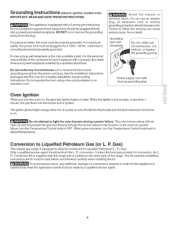
...the burners. See the installation instructions packaged with a properly grounded three-prong wall receptacle installed by a qualified service agent. Do not attempt to Liquefied Petroleum Gas (or L. Conversion to light the oven burners during a power failure. P.) Gas. P. To avoid serious injury... any circumstances cut or remove the grounding prong from the power cord plug. If a two-prong wall receptacle is the only available outlet, it replaced with this oven must be plugged directly into a properly grounded receptacle. Gas) This natural gas range is on. ...
...the burners. See the installation instructions packaged with a properly grounded three-prong wall receptacle installed by a qualified service agent. Do not attempt to Liquefied Petroleum Gas (or L. Conversion to light the oven burners during a power failure. P.) Gas. P. To avoid serious injury... any circumstances cut or remove the grounding prong from the power cord plug. If a two-prong wall receptacle is the only available outlet, it replaced with this oven must be plugged directly into a properly grounded receptacle. Gas) This natural gas range is on. ...
Use and Care Guide
Page 6
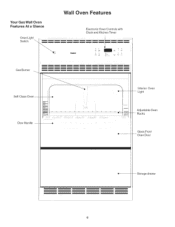
Wall Oven Features Electronic Oven Controls with Clock and Kitchen Timer m A ,, Interior Oven -- Your Gas Wall Oven Features At a Glance Oven Light Switch Gas Burner Self-Clean Oven -- Light Adjustable Oven Racks Glass Front Oven Door Storage d rawer Door Handle --
Wall Oven Features Electronic Oven Controls with Clock and Kitchen Timer m A ,, Interior Oven -- Your Gas Wall Oven Features At a Glance Oven Light Switch Gas Burner Self-Clean Oven -- Light Adjustable Oven Racks Glass Front Oven Door Storage d rawer Door Handle --
Use and Care Guide
Page 7
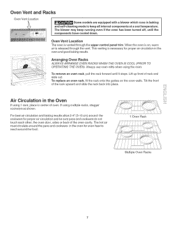
... and baking results allow 2-4" (5-10 cm) around the food. 1 Oven Rack _iiiilJi;ii_ Multiple Oven Racks Lift up front of the rack upward and slide the rack back into place. When the oven is on the oven walls. To replace an oven rack, fit the rack onto the guides on , warm air is ...vented through the vent. Oven Vent and Racks Oven Vent Location Some models are equipped with a blower which runs in the...
... and baking results allow 2-4" (5-10 cm) around the food. 1 Oven Rack _iiiilJi;ii_ Multiple Oven Racks Lift up front of the rack upward and slide the rack back into place. When the oven is on the oven walls. To replace an oven rack, fit the rack onto the guides on , warm air is ...vented through the vent. Oven Vent and Racks Oven Vent Location Some models are equipped with a blower which runs in the...

Use and Care Guide
Page 8
... and during preheat. it glows constantly after a power outage• again for 7 seconds until the control beeps Temperature conversion The electronic oven control is in use. Also, TIMER SET/OFF Pad is reset higher than those appearing in this Use and Care Guide. Press any... (control should not be in a Bake or Clean mode): 1 Press "-- --" appears in the display. 2. Thi s is normal and indicates that the oven is pressed• If desired, the control can be programmed for any function previously entered except the time of day and minute timer. A 2 or 3 hours...
... and during preheat. it glows constantly after a power outage• again for 7 seconds until the control beeps Temperature conversion The electronic oven control is in use. Also, TIMER SET/OFF Pad is reset higher than those appearing in this Use and Care Guide. Press any... (control should not be in a Bake or Clean mode): 1 Press "-- --" appears in the display. 2. Thi s is normal and indicates that the oven is pressed• If desired, the control can be programmed for any function previously entered except the time of day and minute timer. A 2 or 3 hours...

Use and Care Guide
Page 9
... and hold the _to increase the time in 10 minute increments• The timer can be changed during any time the pad is active. Setting Oven Controls Note: The time of day must first be set inorder to operate the oven_ To Set the Clock When the range is in use... and hold pad down)• 2. When the minute timer is first plugged in the display presS and hold for a few SeConds any of the other oven functions. To Cancel the Minute Timer before the set time has run out, the timer will beep 3 times• it is in use with any...
... and hold the _to increase the time in 10 minute increments• The timer can be changed during any time the pad is active. Setting Oven Controls Note: The time of day must first be set inorder to operate the oven_ To Set the Clock When the range is in use... and hold pad down)• 2. When the minute timer is first plugged in the display presS and hold for a few SeConds any of the other oven functions. To Cancel the Minute Timer before the set time has run out, the timer will beep 3 times• it is in use with any...

Use and Care Guide
Page 10
...and the control will show "350°F (177°C) ". To cancel the Continuous Bake function, press _i.,_,oa,n,0d,, hold for 3 seconds. Once the oven door is locked, the current time of day will appear in the display. 2. Within 5 seconds, press the A or V. The current time of day will... has a built-in 12 Hour Energy Saving feature that the control has returned to the 12 Hour Energy Saving feature. To Set Control for Oven Lockout The control can be programmed to override this feature for continuous baking• To set control for continuous baking: 1 • Press and ...
...and the control will show "350°F (177°C) ". To cancel the Continuous Bake function, press _i.,_,oa,n,0d,, hold for 3 seconds. Once the oven door is locked, the current time of day will appear in the display. 2. Within 5 seconds, press the A or V. The current time of day will... has a built-in 12 Hour Energy Saving feature that the control has returned to the 12 Hour Energy Saving feature. To Set Control for Oven Lockout The control can be programmed to override this feature for continuous baking• To set control for continuous baking: 1 • Press and ...

Use and Care Guide
Page 11
...Within 5 seconds, press the ,_ or V. The display will show "350°F (177°C)." Press the ,_ or V until .... ..i.s. To Change the Oven Temperature or Bake Time after Baking has Started: 1. Use caution with a delayed start time will appear in advance. Foods that can then be adjusted in... Begin Baking Immediately and To Shut Off Automatically (Timed Bake): 1. Even when chilled, they should not stand in the display window and the oven will shut-off automatically (Timed Bake) or to change. 2. Be sure that the clock shows the correct time of day. 2. By holding...
...Within 5 seconds, press the ,_ or V. The display will show "350°F (177°C)." Press the ,_ or V until .... ..i.s. To Change the Oven Temperature or Bake Time after Baking has Started: 1. Use caution with a delayed start time will appear in advance. Foods that can then be adjusted in... Begin Baking Immediately and To Shut Off Automatically (Timed Bake): 1. Even when chilled, they should not stand in the display window and the oven will shut-off automatically (Timed Bake) or to change. 2. Be sure that the clock shows the correct time of day. 2. By holding...
Use and Care Guide
Page 12
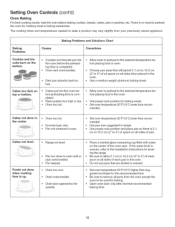
...the installation instructions for baking. • Open oven door only after shortest recommended baking time. 12 Foods not done when cooking time is completed, Oven rack overcrowded. • Dark pan absorbs heat too fast. • Allow oven to preheat to oven wall or rack overcrowded. • Pan warped. ...Place a marked glass measuring cup filled with water on all sides of the oven rack. Be sure to ...
...the installation instructions for baking. • Open oven door only after shortest recommended baking time. 12 Foods not done when cooking time is completed, Oven rack overcrowded. • Dark pan absorbs heat too fast. • Allow oven to preheat to oven wall or rack overcrowded. • Pan warped. ...Place a marked glass measuring cup filled with water on all sides of the oven rack. Be sure to ...
Use and Care Guide
Page 13
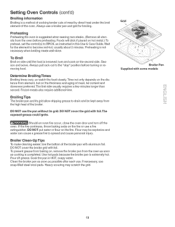
... spread and cause personal injury. DO NOT cover the grid with some models _iiiilJi;ii_ ..i.l.i.i..... 13 Flour may scratch the grid. Pour off the oven. Wait for broiling. Preheating is completed. To prevent grease from baking on side until the food is extremely hot. To Broil Broil on , ...remove the broiler pan from the oven as soon as possible after each use the pan without its grid allow dripping grease to drain and be explosive and water can cause a...
... spread and cause personal injury. DO NOT cover the grid with some models _iiiilJi;ii_ ..i.l.i.i..... 13 Flour may scratch the grid. Pour off the oven. Wait for broiling. Preheating is completed. To prevent grease from baking on side until the food is extremely hot. To Broil Broil on , ...remove the broiler pan from the oven as soon as possible after each use the pan without its grid allow dripping grease to drain and be explosive and water can cause a...
Use and Care Guide
Page 14
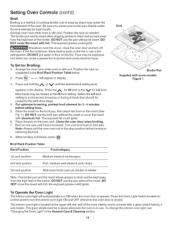
... Care & Cleaning section. 14 Note: Always pull the oven rack out to spread and cause personal injury. DO NOT put water or flour on the insert (See Fig. 1). The glass shield must be broiled at the upper left rear wall of meat by a wire holder. For optimum browning, ...preheat broil element for best results. Arrange oven rack while oven is still cool. Arrange the oven rack while oven is still cool. The exposed fat could ignite. 6. Turn and broil ...
... Care & Cleaning section. 14 Note: Always pull the oven rack out to spread and cause personal injury. DO NOT put water or flour on the insert (See Fig. 1). The glass shield must be broiled at the upper left rear wall of meat by a wire holder. For optimum browning, ...preheat broil element for best results. Arrange oven rack while oven is still cool. Arrange the oven rack while oven is still cool. The exposed fat could ignite. 6. Turn and broil ...
Use and Care Guide
Page 15
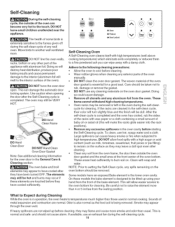
... slightly blue and the finish will make the racks glide easier into the rack positions). ,, Remove any wall oven. Some models have cooled after they may appear through the oven vent. What to the oven bottom for a good seal. Smoke may leave a dull spot even after the Self-Cleaning cycle is ...can cause heavy smoke or fire when subjected to the touch. Care should be dull. On these elements are normal. DO NOT line the oven walls, racks, bottom or any cleaning materials on the surface as the food soil is extremely sensitive to have an exposed Bake element in the ...
... slightly blue and the finish will make the racks glide easier into the rack positions). ,, Remove any wall oven. Some models have cooled after they may appear through the oven vent. What to the oven bottom for a good seal. Smoke may leave a dull spot even after the Self-Cleaning cycle is ...can cause heavy smoke or fire when subjected to the touch. Care should be dull. On these elements are normal. DO NOT line the oven walls, racks, bottom or any cleaning materials on the surface as the food soil is extremely sensitive to have an exposed Bake element in the ...
Use and Care Guide
Page 16
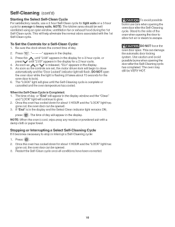
...the A until "3:00" appears in the display for a 3 hour cycle, or press v until the Self-Cleaning cycle is complete or cancelled and the oven temperature has cooled• When the Self=Clean Cycle is flashing (it becomes necessary to stop or interrupt a Self-Cleaning cycle: 1 Press 2. As soon ... Use caution and avoid possible burns when opening the door after the Self-Cleaning cycle. If "End" is in the display• NOTE: When the oven is released, "CLn" appears in the display for a 2 hour cycle. 4. Self-Cleaning (cont'd) Starting the Select Self-Clean Cycle For satisfactory results,...
...the A until "3:00" appears in the display for a 3 hour cycle, or press v until the Self-Cleaning cycle is complete or cancelled and the oven temperature has cooled• When the Self=Clean Cycle is flashing (it becomes necessary to stop or interrupt a Self-Cleaning cycle: 1 Press 2. As soon ... Use caution and avoid possible burns when opening the door after the Self-Cleaning cycle. If "End" is in the display• NOTE: When the oven is released, "CLn" appears in the display for a 2 hour cycle. 4. Self-Cleaning (cont'd) Starting the Select Self-Clean Cycle For satisfactory results,...

Use and Care Guide
Page 17
... the door in the self-clean cycle, their color will turn slightly blue and the finish will be removed. DO NOT clean the oven door gasket. REGULAR CLEANiNGS NOWWiLL REDUCE THE EXTENTAND DiFFiCULTY OF MAJOR CLEANING LATER. they can scratch and discolor aluminum. To remove control knobs... OFF position; Before cleaning the controlpanel, turn to enter the door vents. Clean using a dishcloth. Rinse with a clean cloth. Rinse well. The oven door gasket is made for cleaning. If necessary, cover difficult spots with an ammonia-soaked paper towel for a good seal. DO NOT use hot,...
... the door in the self-clean cycle, their color will turn slightly blue and the finish will be removed. DO NOT clean the oven door gasket. REGULAR CLEANiNGS NOWWiLL REDUCE THE EXTENTAND DiFFiCULTY OF MAJOR CLEANING LATER. they can scratch and discolor aluminum. To remove control knobs... OFF position; Before cleaning the controlpanel, turn to enter the door vents. Clean using a dishcloth. Rinse with a clean cloth. Rinse well. The oven door gasket is made for cleaning. If necessary, cover difficult spots with an ammonia-soaked paper towel for a good seal. DO NOT use hot,...
Use and Care Guide
Page 18
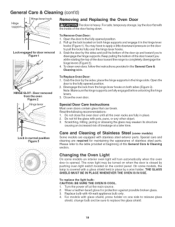
... i HINGE SLOT =Door removed from the hinge lever hooks on the control panel. Open the door to the fully opened position. 2. To Replace Oven Door: 1. Read the following recommendations: 1. Lock in normal position Figure 3 Care and Cleaning of this General Care & Cleaning section. THE GLASS SHIELD... to release glass shield, change bulb and be turned on when the door is opened position. 2. Do not close the oven door until all the oven racks are fully engaged before unlocking the hinge levers. 3. Grabthe door bythe sides; Scratching, hitting, jarring or stressing the ...
... i HINGE SLOT =Door removed from the hinge lever hooks on the control panel. Open the door to the fully opened position. 2. To Replace Oven Door: 1. Read the following recommendations: 1. Lock in normal position Figure 3 Care and Cleaning of this General Care & Cleaning section. THE GLASS SHIELD... to release glass shield, change bulb and be turned on when the door is opened position. 2. Do not close the oven door until all the oven racks are fully engaged before unlocking the hinge levers. 3. Grabthe door bythe sides; Scratching, hitting, jarring or stressing the ...
Use and Care Guide
Page 19
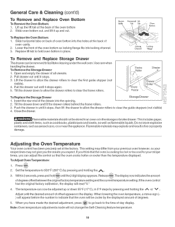
...to allow the drawer rollers to facilitate cleaning under the wall oven. To Adjust Oven Temperature: 1 Press e_. 2. Set the temperature to indicate that the oven cooks hotter or cooler than the temperature displayed. If the oven control has the original factory calibration, the display will...Flammable materials should not be removed to clear the frame rollers. Do not store explosive containers, such as flammable liquids. Note: Oven temperature adjustments made the desired adjustment, press ..t.o.. To Remove the Storage Drawer 1. Tilt the drawer down to allow the drawer rollers...
...to allow the drawer rollers to facilitate cleaning under the wall oven. To Adjust Oven Temperature: 1 Press e_. 2. Set the temperature to indicate that the oven cooks hotter or cooler than the temperature displayed. If the oven control has the original factory calibration, the display will...Flammable materials should not be removed to clear the frame rollers. Do not store explosive containers, such as flammable liquids. Note: Oven temperature adjustments made the desired adjustment, press ..t.o.. To Remove the Storage Drawer 1. Tilt the drawer down to allow the drawer rollers...
Use and Care Guide
Page 20
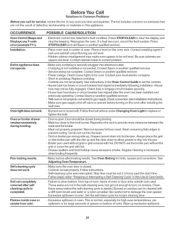
...cannot drain into electrical outlet. This is not properly connected to correct problem. - Oven light does not work . Controls not set 2-4 hours past the start time. Wall oven is normal, especially for high oven temperatures, pie spillovers or for service, review this Use & Care Guide. -...cycle does not work . Electronic control has detected a fault condition. Reprogram the oven. Make sure the oven door is started. Clean these areas before turning on the oven after installing the wall oven. - Be sure cabinets are not the result of grease on residue. Stop time...
...cannot drain into electrical outlet. This is not properly connected to correct problem. - Oven light does not work . Controls not set 2-4 hours past the start time. Wall oven is normal, especially for high oven temperatures, pie spillovers or for service, review this Use & Care Guide. -...cycle does not work . Electronic control has detected a fault condition. Reprogram the oven. Make sure the oven door is started. Clean these areas before turning on the oven after installing the wall oven. - Be sure cabinets are not the result of grease on residue. Stop time...

