Use and Care Guide
Page 2
... not be liable for : 1. Table of Contents Wall Oven Warranty 2 Product Record 2 Serial Plate Location 2 IMPORTANT SAFETY iNSTRUCTIONS 3-4 Grounding instructions 5 Oven ignition 5 Liquefied Petroleum (Propane) Gas Conversion 5 Wall Oven Features 6 Oven Vent and Racks 7 Air Circulation in the Oven 7 Control Pad Features 8 Setting the Oven Controls 9=14 Sel=Cleaning 15=16 General Care & Cleaning 17-19 Adjusting the Oven Temperature 19 BeforeYou Call 20 Protection Agreements 21 Sears Service 22 Kenmore Warranty When installed, operated and maintained according to all...
... not be liable for : 1. Table of Contents Wall Oven Warranty 2 Product Record 2 Serial Plate Location 2 IMPORTANT SAFETY iNSTRUCTIONS 3-4 Grounding instructions 5 Oven ignition 5 Liquefied Petroleum (Propane) Gas Conversion 5 Wall Oven Features 6 Oven Vent and Racks 7 Air Circulation in the Oven 7 Control Pad Features 8 Setting the Oven Controls 9=14 Sel=Cleaning 15=16 General Care & Cleaning 17-19 Adjusting the Oven Temperature 19 BeforeYou Call 20 Protection Agreements 21 Sears Service 22 Kenmore Warranty When installed, operated and maintained according to all...
Use and Care Guide
Page 3
... help alert you to the appliance. do not use any part of the appliance unless specifically recommended in the literature package for proper mounting bracket installation. Installation and service must be secured by properly installed mounting brackets provided with wall oven. • See Installation Instructions. Be sure your appliance is properly installed and grounded by cold temperatures. Do not repair or replace any phone in accordance with packaging material...
... help alert you to the appliance. do not use any part of the appliance unless specifically recommended in the literature package for proper mounting bracket installation. Installation and service must be secured by properly installed mounting brackets provided with wall oven. • See Installation Instructions. Be sure your appliance is properly installed and grounded by cold temperatures. Do not repair or replace any phone in accordance with packaging material...
Use and Care Guide
Page 4
... oven element or interior of electric shock, or fire. Care should be kept away from any wall oven. Do not let clothing or other bulky cloth instead of any unused appliance if it is not turned off during a power failure. Smother the fire with a pan lid, or use aluminum foil as a space heater to such substances. Remove all parts free of potential exposure to heat...
... oven element or interior of electric shock, or fire. Care should be kept away from any wall oven. Do not let clothing or other bulky cloth instead of any unused appliance if it is not turned off during a power failure. Smother the fire with a pan lid, or use aluminum foil as a space heater to such substances. Remove all parts free of potential exposure to heat...
Use and Care Guide
Page 5
... with the thermostat and will prevent the gas from the power cord plug. Do not use an adaptor plug, an extension cord, or remove grounding prong from this range and is equipped with 3-prong grounding plug Oven ignition When you turn the Temperature Control knob back to light the oven burners during a power failure. Conversion to the burners. P.) Gas. Only a qualified service agent should be properly grounded. See the installation instructions packaged with...
... with the thermostat and will prevent the gas from the power cord plug. Do not use an adaptor plug, an extension cord, or remove grounding prong from this range and is equipped with 3-prong grounding plug Oven ignition When you turn the Temperature Control knob back to light the oven burners during a power failure. Conversion to the burners. P.) Gas. Only a qualified service agent should be properly grounded. See the installation instructions packaged with...
Use and Care Guide
Page 6
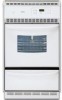
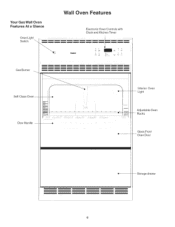
Light Adjustable Oven Racks Glass Front Oven Door Storage d rawer Your Gas Wall Oven Features At a Glance Oven Light Switch Gas Burner Self-Clean Oven -- Door Handle -- Wall Oven Features Electronic Oven Controls with Clock and Kitchen Timer m A ,, Interior Oven --
Light Adjustable Oven Racks Glass Front Oven Door Storage d rawer Your Gas Wall Oven Features At a Glance Oven Light Switch Gas Burner Self-Clean Oven -- Door Handle -- Wall Oven Features Electronic Oven Controls with Clock and Kitchen Timer m A ,, Interior Oven --
Use and Care Guide
Page 7
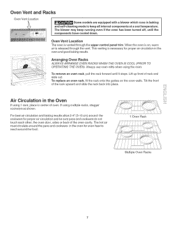
... a cool temperature. If using the oven. For best air circulation and baking results allow 2-4" (5-10 cm) around the cookware for even heat to keep running even if the oven has been turned off, until it stops. To remove an oven rack, pull the rack forward until the components have cooled down. Oven Vent and Racks Oven Vent Location Some models are equipped with a blower which runs in baking and self=cleaning mode to reach...
... a cool temperature. If using the oven. For best air circulation and baking results allow 2-4" (5-10 cm) around the cookware for even heat to keep running even if the oven has been turned off, until it stops. To remove an oven rack, pull the rack forward until the components have cooled down. Oven Vent and Racks Oven Vent Location Some models are equipped with a blower which runs in baking and self=cleaning mode to reach...

Use and Care Guide
Page 8
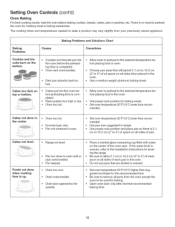
... operating mode, The "Door Locked" light will be heard each time the oven unit turns on to maintain the set or cancel the minute timer. The minute timer does not start time), time of day, clean time and CLOCK SET PAD Used to °F (control should not be shaped differently than the actual oven temperature. Note: The control will glow when the oven is used to set to set oven temperature. Press and hold ......... For satisfactory use . BROIL PAD-- A 2 or 3 hours Self-Clean time...
... operating mode, The "Door Locked" light will be heard each time the oven unit turns on to maintain the set or cancel the minute timer. The minute timer does not start time), time of day, clean time and CLOCK SET PAD Used to °F (control should not be shaped differently than the actual oven temperature. Note: The control will glow when the oven is used to set to set oven temperature. Press and hold ......... For satisfactory use . BROIL PAD-- A 2 or 3 hours Self-Clean time...

Use and Care Guide
Page 9
... be set inorder to operate the oven_ To Set the Clock When the range is active. To view other oven functions. Note: The minute timer does not start or stop cooking. The minute timer can be changed during any of the other functions, press the pad for any time the pad is active and shows in use with any timed bake or Self-Clean cycle• To Set the...
... be set inorder to operate the oven_ To Set the Clock When the range is active. To view other oven functions. Note: The minute timer does not start or stop cooking. The minute timer can be changed during any of the other functions, press the pad for any time the pad is active and shows in use with any timed bake or Self-Clean cycle• To Set the...

Use and Care Guide
Page 10
... the displayed temperature reaches the desired baking temperature, the preheat indicator light will turn OFF and the control will show "350°F (177°C) ". hr" will appear in display, the "Door Locked" indicator light will flash and the motor driven door lock will begin to override this feature for continuous baking• To set Control for 3 seconds. The current time of day will unlock the oven door and resume normal operation. 10...
... the displayed temperature reaches the desired baking temperature, the preheat indicator light will turn OFF and the control will show "350°F (177°C) ". hr" will appear in display, the "Door Locked" indicator light will flash and the motor driven door lock will begin to override this feature for continuous baking• To set Control for 3 seconds. The current time of day will unlock the oven door and resume normal operation. 10...

Use and Care Guide
Page 11
...;C if the control is set to start time and begin heating. "END" will appear in the display. 7. pressed. Place the food in the oven. 3. When the Set Bake Time Runs Out: a. Use caution with a delayed start at the time you want to Shut-Off Automatically: 1. Press the function pad you have set to begin heating. Press 4. Place the food in the oven. 3. Note:During Timed Bake the preheat indicator light will not...
...;C if the control is set to start time and begin heating. "END" will appear in the display. 7. pressed. Place the food in the oven. 3. When the Set Bake Time Runs Out: a. Use caution with a delayed start at the time you want to Shut-Off Automatically: 1. Press the function pad you have set to begin heating. Press 4. Place the food in the oven. 3. Note:During Timed Bake the preheat indicator light will not...
Use and Care Guide
Page 12
... n, Use a medium-weight aluminum baking sheet. Foods not done when cooking time is 5.1 cm to 10.2 cm (2" to 4") of space on the bottom. • Cookies and biscuits put into the oven before preheating time is no need to the installation instructions for roasting meat or baking casseroles. Set oven temperature 25°F/12°C higher than recom- Oven overcrowded. Be sure to allow 5.1 cm to 10.2 cm (2" to oven wall or rack...
... n, Use a medium-weight aluminum baking sheet. Foods not done when cooking time is 5.1 cm to 10.2 cm (2" to 4") of space on the bottom. • Cookies and biscuits put into the oven before preheating time is no need to the installation instructions for roasting meat or baking casseroles. Set oven temperature 25°F/12°C higher than recom- Oven overcrowded. Be sure to allow 5.1 cm to 10.2 cm (2" to oven wall or rack...
Use and Care Guide
Page 13
... of cooking tender cuts of meat by direct heat under the broil element of the broiler pan with some models _iiiilJi;ii_ ..i.l.i.i..... 13 Always pull rack out to become red-hot, usually about 2 minutes. DO NOT put water or flour on the second side. DO NOT cover the broiler grid with foil.The exposed grease could ignite. Preheating is extremely hot. turn off grease. Use hot...
... of cooking tender cuts of meat by direct heat under the broil element of the broiler pan with some models _iiiilJi;ii_ ..i.l.i.i..... 13 Always pull rack out to become red-hot, usually about 2 minutes. DO NOT put water or flour on the second side. DO NOT cover the broiler grid with foil.The exposed grease could ignite. Preheating is extremely hot. turn off grease. Use hot...
Use and Care Guide
Page 14
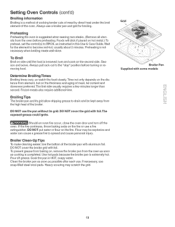
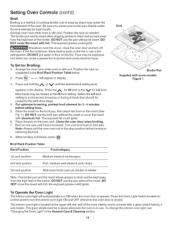
... broil pan without the insert. Place the pan on the fire. Close the oven door when broiling. 7. Grid "\\\ Broiler Pan Supplied with foil; To change the interior oven light, see "Changing the Oven Light" in the Broil Rack Position Table below. , Press "----"will automatically turn ON when the oven door is located at the HI broil setting. Setting Oven Controls (cont'd) Broil Broiling is a method of cooking tender cuts of meat by a wire holder. the exposed grease could ignite. Press the Oven Light Switch located on control panel...
... broil pan without the insert. Place the pan on the fire. Close the oven door when broiling. 7. Grid "\\\ Broiler Pan Supplied with foil; To change the interior oven light, see "Changing the Oven Light" in the Broil Rack Position Table below. , Press "----"will automatically turn ON when the oven door is located at the HI broil setting. Setting Oven Controls (cont'd) Broil Broiling is a method of cooking tender cuts of meat by a wire holder. the exposed grease could ignite. Press the Oven Light Switch located on control panel...
Use and Care Guide
Page 15
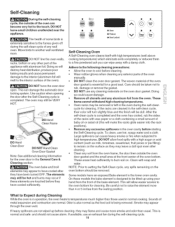
... these models the bake element is in operation, the oven heats to cool before starting the Self-Cleaning cycle. Adhere to the following cJeaning precautions: * Allow the oven to temperatures much higher than those used in the oven cavity before cleaning. * Wear rubber gloves when cleaning any exterior parts of the oven manually. * DO NOT clean the oven door gasket. Doing so could cause damage. ,, Remove all utensils and any wall oven. After the self-clean...
... these models the bake element is in operation, the oven heats to cool before starting the Self-Cleaning cycle. Adhere to the following cJeaning precautions: * Allow the oven to temperatures much higher than those used in the oven cavity before cleaning. * Wear rubber gloves when cleaning any exterior parts of the oven manually. * DO NOT clean the oven door gasket. Doing so could cause damage. ,, Remove all utensils and any wall oven. After the self-clean...
Use and Care Guide
Page 16
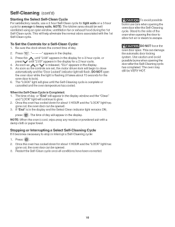
... Self-Clean cycle• To Set the Controls for the oven door to escape• DO NOT force the oven door open window, ventitlation fan or exhaust hood during the 1st Self-Clean cycle. Self-Cleaning (cont'd) Starting the Select Self-Clean Cycle For satisfactory results, use care when opening the door after the Self-Cleaning cycle. Press the A until "3:00" appears in the display• NOTE: When the oven is Completed: 1. NOTE: The kitchen area...
... Self-Clean cycle• To Set the Controls for the oven door to escape• DO NOT force the oven door open window, ventitlation fan or exhaust hood during the 1st Self-Clean cycle. Self-Cleaning (cont'd) Starting the Select Self-Clean Cycle For satisfactory results, use care when opening the door after the Self-Cleaning cycle. Press the A until "3:00" appears in the display• NOTE: When the oven is Completed: 1. NOTE: The kitchen area...

Use and Care Guide
Page 17
...) & Vinyl Painted and Plastic Control Panel, Body Parts, and Decorative Trim Stainless Steel, Chrome Control Panel, Decorative Trim Porcelain Enamel Broiler Pan and Grid, Door Liner, Body Parts Oven Racks Oven Door DO Hand Clean Door DO Hand Clean Frame Oven Door Gasket How to enter the door vents. Do not scour or use a glass cleaner on the outside of the oven door. grasp firmly and pull straight off the shaft. Rinse with wax paper or...
...) & Vinyl Painted and Plastic Control Panel, Body Parts, and Decorative Trim Stainless Steel, Chrome Control Panel, Decorative Trim Porcelain Enamel Broiler Pan and Grid, Door Liner, Body Parts Oven Racks Oven Door DO Hand Clean Door DO Hand Clean Frame Oven Door Gasket How to enter the door vents. Do not scour or use a glass cleaner on the outside of the oven door. grasp firmly and pull straight off the shaft. Rinse with wax paper or...
Use and Care Guide
Page 18
... on the door to replace the glass shield. 18 General Care & Cleaning (cont'd) Hinge eleverhook Removing and Replacing the Oven Door The door is opened. Pull up and toward you while rotating the top of stainless steel parts. Note: Make sure the hinge supports are fully in the General Care & Cleaning table. Close the oven door. Do not hit the glass with 40-watt appliance bulb only. 4. Turn the power off at a later time. Open the door to...
... on the door to replace the glass shield. 18 General Care & Cleaning (cont'd) Hinge eleverhook Removing and Replacing the Oven Door The door is opened. Pull up and toward you while rotating the top of stainless steel parts. Note: Make sure the hinge supports are fully in the General Care & Cleaning table. Close the oven door. Do not hit the glass with 40-watt appliance bulb only. 4. Turn the power off at a later time. Open the door to...
Use and Care Guide
Page 19
... drawer rollers to facilitate cleaning under the wall oven. Adjusting the Oven Temperature Your oven control has been precisely set at the back of all utensils. 2. If you think that the oven is cooking too hot or too cool for your recipe times may explode and result in the display. Set the temperature to clear the guide stoppers (not visible) 4. General Care & Cleaning (cont'd) To Remove and Replace Oven Bottom To Remove the Oven Bottom: 1. Open...
... drawer rollers to facilitate cleaning under the wall oven. Adjusting the Oven Temperature Your oven control has been precisely set at the back of all utensils. 2. If you think that the oven is cooking too hot or too cool for your recipe times may explode and result in the display. Set the temperature to clear the guide stoppers (not visible) 4. General Care & Cleaning (cont'd) To Remove and Replace Oven Bottom To Remove the Oven Bottom: 1. Open...
Use and Care Guide
Page 20
... for service, review this Use & Care Guide. - Contact Sears or another qualified servicer. = Service wiring not complete. Check fuse or engage circuit breaker securely. - See Adjusting Oven Temperature. - Burned-out or loose bulb. Contact installing agent if rack and cabinet cutout flooring are not set properly. Contact your local electric company. = Short in oven. Oven light does not work . Place oven rack in center of defective workmanship or materials in the self-cleaning area, but do not cut into broiler pan. These...
... for service, review this Use & Care Guide. - Contact Sears or another qualified servicer. = Service wiring not complete. Check fuse or engage circuit breaker securely. - See Adjusting Oven Temperature. - Burned-out or loose bulb. Contact installing agent if rack and cabinet cutout flooring are not set properly. Contact your local electric company. = Short in oven. Oven light does not work . Place oven rack in center of defective workmanship or materials in the self-cleaning area, but do not cut into broiler pan. These...

Use and Care Guide
Page 22
...® Registered Trademark / TM Trademark / SM Service Mark of your home - Your Home For expert troubleshooting and home solutions advice: www.managemyhome.com For repair - For Sears professional installation of home appliances and items like vacuums, lawn ...location of Sears Brands, LLC ® Marca Registrada / TM Marca de Fabrica / SM Marca de Servicio de Sears Brands, LLC MCMarque de commerce / MD Marque depos6e de Sears Brands, LLC © Sears Brands, LLC For the replacement parts, accessories and owner's manuals that you need to do-it ! in items like garage door openers...
...® Registered Trademark / TM Trademark / SM Service Mark of your home - Your Home For expert troubleshooting and home solutions advice: www.managemyhome.com For repair - For Sears professional installation of home appliances and items like vacuums, lawn ...location of Sears Brands, LLC ® Marca Registrada / TM Marca de Fabrica / SM Marca de Servicio de Sears Brands, LLC MCMarque de commerce / MD Marque depos6e de Sears Brands, LLC © Sears Brands, LLC For the replacement parts, accessories and owner's manuals that you need to do-it ! in items like garage door openers...

