Use and Care Guide
Page 1
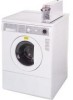
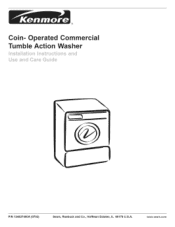
Coin- Operated Commercial Tumble Action Washer PIN 134837400A (0703) Sears, Roebuck and Co., Hoffman Estates, IL 60179 U.S.A. www.sears.com
Coin- Operated Commercial Tumble Action Washer PIN 134837400A (0703) Sears, Roebuck and Co., Hoffman Estates, IL 60179 U.S.A. www.sears.com
Use and Care Guide
Page 2
... thewasher door open the door, without exerting excessive force. Do not try to start the machine. Your washer isequipped with local codes and ordinances and the latest edition of injury, and tell you what can be killed or seriously injured if you cannot reach your appliance. THEWASHERMUSTNOTSTART! 2. Serial number NOTE: The instructions appearing in the Instructions/Use & Care Guide and on key and/or coin...
... thewasher door open the door, without exerting excessive force. Do not try to start the machine. Your washer isequipped with local codes and ordinances and the latest edition of injury, and tell you what can be killed or seriously injured if you cannot reach your appliance. THEWASHERMUSTNOTSTART! 2. Serial number NOTE: The instructions appearing in the Instructions/Use & Care Guide and on key and/or coin...
Use and Care Guide
Page 3
... covered with local codes. Incorrect usage can cause serious injury or death. The washer will release any user maintenance. Prevent Injury • Test door interlock system daily. Failure to the washer: -All repairs and servicing must be exposed to play . Prevent Fire Do not wash items that have it checked and reinstalled by an authorized servicer unless specifically recommended INSTALLATION AND SAFETY INSTRUCTIONS manual. To prevent serious...
... covered with local codes. Incorrect usage can cause serious injury or death. The washer will release any user maintenance. Prevent Injury • Test door interlock system daily. Failure to the washer: -All repairs and servicing must be exposed to play . Prevent Fire Do not wash items that have it checked and reinstalled by an authorized servicer unless specifically recommended INSTALLATION AND SAFETY INSTRUCTIONS manual. To prevent serious...
Use and Care Guide
Page 4
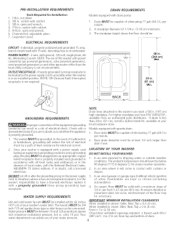
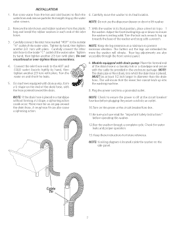
... slope of your washer's water inlet. Floor MUST be at your washer is equipped with a power supply cord having an equipment-grounding conductor and a grounding plug, the plug MUSTbe plugged into an appropriate, copper wired receptacle that is in an installed position. cold, 10 psi.) Your water department can reach a 58 in. (147 cm) high standpipe. Carpenter's level. branch circuit fused with gravity drain: 1. In the event...
... slope of your washer's water inlet. Floor MUST be at your washer is equipped with a power supply cord having an equipment-grounding conductor and a grounding plug, the plug MUSTbe plugged into an appropriate, copper wired receptacle that is in an installed position. cold, 10 psi.) Your water department can reach a 58 in. (147 cm) high standpipe. Carpenter's level. branch circuit fused with gravity drain: 1. In the event...
Use and Care Guide
Page 6
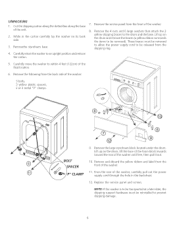
... be reinstalled to be removed). Remove the large styrofoam block located under the drum. Remove and discard the yellow ribbon and label from the front of the washer. © P" CLAMP 11. From the rear of the washer, carefully pull out the power supply cord through the hole in the carton carefully lay the washer on its back side. 3. Replace the service panel and screws. While in...
... be reinstalled to be removed). Remove the large styrofoam block located under the drum. Remove and discard the yellow ribbon and label from the front of the washer. © P" CLAMP 11. From the rear of the washer, carefully pull out the power supply cord through the hole in the carton carefully lay the washer on its back side. 3. Replace the service panel and screws. While in...
Use and Care Guide
Page 7
... on and check for water leaks and proper operation. 13. Plug the power cord into . NOTE: Check to flush the water lines and remove particles that the sewer line cannot back up the water valve screens. 6. Remove the inlet hoses and rubber washers from the hot and cold faucets to ensure the power is off at the circuit breaked fuse box before operating this washer. 12.Run the washer through the front service panel. the washer. Adjust the front leveling legs...
... on and check for water leaks and proper operation. 13. Plug the power cord into . NOTE: Check to flush the water lines and remove particles that the sewer line cannot back up the water valve screens. 6. Remove the inlet hoses and rubber washers from the hot and cold faucets to ensure the power is off at the circuit breaked fuse box before operating this washer. 12.Run the washer through the front service panel. the washer. Adjust the front leveling legs...
Use and Care Guide
Page 8
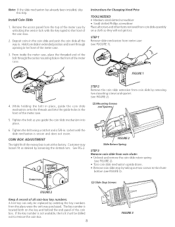
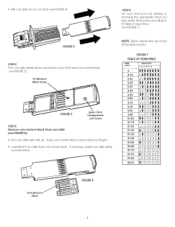
... the center mounting hole in the front of tile money box isset at tile factory. Tighten the bolt using a ratchet and a 5/8-in . The key number is secure and does not move. FIGURE 2 / Slide Return Spring STEP3 Remove coin slide from the top of the meter case, Instructions for Changing Vend Price TOOLS NEEDED Medium sized slotted screwdriver * Small slotted Phillips...
... the center mounting hole in the front of tile money box isset at tile factory. Tighten the bolt using a ratchet and a 5/8-in . The key number is secure and does not move. FIGURE 2 / Slide Return Spring STEP3 Remove coin slide from the top of the meter case, Instructions for Changing Vend Price TOOLS NEEDED Medium sized slotted screwdriver * Small slotted Phillips...
Use and Care Guide
Page 9
... STEP4 Turn coin slide upside down and remove screw that holds coin receiver block (see FIGURE B). (1) Receiver Block Screw FIGURE 5 Spare Parts Compartment and Screw STEP5 Remove coin receiver (see FIGURE 6): block from coin receiver block. Carefully lift coin slide from coin slide Turn coin slide right side up. Keep coin receiver block...or removing the appropriate block-out keys and/or dime inserts according to loosen block. If necessary, shake coin slide gently to th Table of coin chute (see FIGURE4). STEP6 Set new vend price by block-out key. • Pull coin slide ...
... STEP4 Turn coin slide upside down and remove screw that holds coin receiver block (see FIGURE B). (1) Receiver Block Screw FIGURE 5 Spare Parts Compartment and Screw STEP5 Remove coin receiver (see FIGURE 6): block from coin receiver block. Carefully lift coin slide from coin slide Turn coin slide right side up. Keep coin receiver block...or removing the appropriate block-out keys and/or dime inserts according to loosen block. If necessary, shake coin slide gently to th Table of coin chute (see FIGURE4). STEP6 Set new vend price by block-out key. • Pull coin slide ...
Use and Care Guide
Page 10
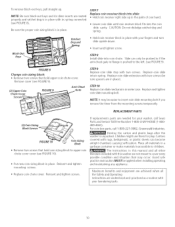
... suffocation. Replace coin slide return spring. Children might use them for your washer, call 1-800-221-0982, Greenwald Industries. For coin box parts, call Sears Parts and Service Toll Free Number 1-800-4-MY-HOME (1-800469-4663). Maximum benefits and enjoyment are needed for play. STEP7 Replace coin receiver block into slide: • Hold coin receiver right side up . REPLACEMENT PARTS Block Screws (2) Coin Sizing_ Coin Sizing Block • Remove two...
... suffocation. Replace coin slide return spring. Children might use them for your washer, call 1-800-221-0982, Greenwald Industries. For coin box parts, call Sears Parts and Service Toll Free Number 1-800-4-MY-HOME (1-800469-4663). Maximum benefits and enjoyment are needed for play. STEP7 Replace coin receiver block into slide: • Hold coin receiver right side up . REPLACEMENT PARTS Block Screws (2) Coin Sizing_ Coin Sizing Block • Remove two...
Use and Care Guide
Page 11
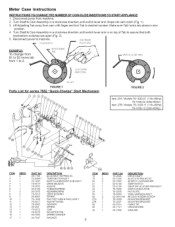
... SCREW MOUNTING BRACKET MOUNTING BRACKET CABLE TIE GROUND WIRE WASHER Disconnect powerfrom machine. 2. Make sure Tab\ locks into place in a clockwise direction until switch lever arm drops into cam notch (Fig. 1). 3. Turn Shaft & Cam Assembly in new position. 4. Meter Case Instructions INSTRUCTIONS TO CHANGE THE NUMBER OF COIN SLIDE INSERTIONS TO START APPLIANCE. 1. Reconnect power to desired number. USEFINGER CAM NOTCH TO LIFTPAD EXAMPLE: To...
... SCREW MOUNTING BRACKET MOUNTING BRACKET CABLE TIE GROUND WIRE WASHER Disconnect powerfrom machine. 2. Make sure Tab\ locks into place in a clockwise direction until switch lever arm drops into cam notch (Fig. 1). 3. Turn Shaft & Cam Assembly in new position. 4. Meter Case Instructions INSTRUCTIONS TO CHANGE THE NUMBER OF COIN SLIDE INSERTIONS TO START APPLIANCE. 1. Reconnect power to desired number. USEFINGER CAM NOTCH TO LIFTPAD EXAMPLE: To...
Use and Care Guide
Page 12
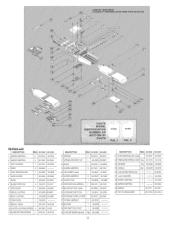
...SHIELD Opt. 20-2045 35 COIN RECEIVER BLOCK 1 ......... 20-1012 00-9256 20-2045 20-2003 37 LOCK WASHER 38 SCREW (METRIC) 3c SCREW (METRIC) 4C SCREW 41 TOP HOUSING ASMY 1 ......... 00-7934 1 ......... 00-7933 1 ......... 00-7932 00-754I 00-7541 20-1103-1 20-1104-1 V8 Parts List DESCRIPTION 20-3000 SCREW (METRIC... SHAFT 1 20-4004 20-4000 DECAL,CASTING 1 00-9905 00-9905 BODY CASTING 1 20-3020 20-3000 COIN SLIDE 1 20-3021 DECAL, SLIDE 1 00-9104 00-9104 CHUTE LOCATING SCREW 4 00-7483 61-55 SLIDE RETURN SPRING 1 00-8148 00-8148 DESCRIPTION 16 SPRING 17 SPRING PROTECTOR ...
...SHIELD Opt. 20-2045 35 COIN RECEIVER BLOCK 1 ......... 20-1012 00-9256 20-2045 20-2003 37 LOCK WASHER 38 SCREW (METRIC) 3c SCREW (METRIC) 4C SCREW 41 TOP HOUSING ASMY 1 ......... 00-7934 1 ......... 00-7933 1 ......... 00-7932 00-754I 00-7541 20-1103-1 20-1104-1 V8 Parts List DESCRIPTION 20-3000 SCREW (METRIC... SHAFT 1 20-4004 20-4000 DECAL,CASTING 1 00-9905 00-9905 BODY CASTING 1 20-3020 20-3000 COIN SLIDE 1 20-3021 DECAL, SLIDE 1 00-9104 00-9104 CHUTE LOCATING SCREW 4 00-7483 61-55 SLIDE RETURN SPRING 1 00-8148 00-8148 DESCRIPTION 16 SPRING 17 SPRING PROTECTOR ...
Use and Care Guide
Page 13
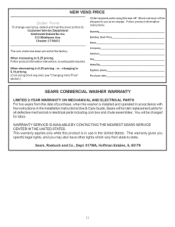
... ELECTRICAL PARTS For two years from state to you may also have other rights which vary from the date of purchase, when the washer is in use in the Installation Instructions/Use & Care Guide, Sears will furnish replacement parts for labor. WARRANTY SERVICE IS AVAILABLE BY CONTACTING THE NEAREST SEARS SERVICE CENTER IN THE UNITED STATES. Quantity. When decreasing in $.25 pricing Follow product information instructions; changing to : Customer Service...
... ELECTRICAL PARTS For two years from state to you may also have other rights which vary from the date of purchase, when the washer is in use in the Installation Instructions/Use & Care Guide, Sears will furnish replacement parts for labor. WARRANTY SERVICE IS AVAILABLE BY CONTACTING THE NEAREST SEARS SERVICE CENTER IN THE UNITED STATES. Quantity. When decreasing in $.25 pricing Follow product information instructions; changing to : Customer Service...

Use and Care Guide
Page 16
...; Registered Trademark / TM Trademark / SM Service Mark of all major brand appliances, lawn and garden equipment, or heating and cooling systems, no matter who made it, no matter who sold it -yourself. For the replacement parts, accessories and owner's manuals that you need to do-it ! in items like garage door openers and water heaters. 1-800-4-MY-HOME ®...
...; Registered Trademark / TM Trademark / SM Service Mark of all major brand appliances, lawn and garden equipment, or heating and cooling systems, no matter who made it, no matter who sold it -yourself. For the replacement parts, accessories and owner's manuals that you need to do-it ! in items like garage door openers and water heaters. 1-800-4-MY-HOME ®...


