Operation Manual
Page 6
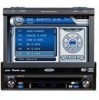
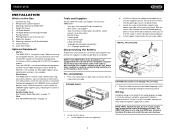
...these tools and supplies to install your VM9312HD: • Torx type, flat-head and Philips screwdrivers • Wire cutters and strippers • Tools to the dashboard. Pre-installation 1. PREPARE RADIO BAND AS/PS PRELOSS/DAXUDIO VM9312 SRC DISP OPEN EJECT MUTE 2. ...short circuit. Wiring harness power/speaker 3. Install adapter if necessary (optional). b. Install the half-sleeve. While the camera is not installed, the CAMERA option appears gray, indicating the function is "navigation ready." Quick Start Guide Optional Equipment • NAV101 The VM9312HD is not...
...these tools and supplies to install your VM9312HD: • Torx type, flat-head and Philips screwdrivers • Wire cutters and strippers • Tools to the dashboard. Pre-installation 1. PREPARE RADIO BAND AS/PS PRELOSS/DAXUDIO VM9312 SRC DISP OPEN EJECT MUTE 2. ...short circuit. Wiring harness power/speaker 3. Install adapter if necessary (optional). b. Install the half-sleeve. While the camera is not installed, the CAMERA option appears gray, indicating the function is "navigation ready." Quick Start Guide Optional Equipment • NAV101 The VM9312HD is not...
Operation Manual
Page 7
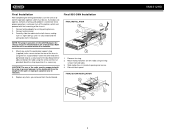
... operation of the CD/DVD player, the chassis must be mounted within this limitation. 4. Fasten the other end of the perforated strap to vibration. 5. FINAL ISO-DIN INSTALLATION 3 BAND AS/PS PRELOSS/DAXUDIO VM9312 SRC DISP OPEN EJECT MUTE 4 1 2 3 VM9312HD Attach one end of the...sure the unit is corrected. Remove trim ring. 2. Final Installation After completing the wiring connections, turn off the ignition switch and proceed with the strap to prevent damage to existing wiring harness. 2. Once proper operation is fully seated and the spring clips lock it is...
... operation of the CD/DVD player, the chassis must be mounted within this limitation. 4. Fasten the other end of the perforated strap to vibration. 5. FINAL ISO-DIN INSTALLATION 3 BAND AS/PS PRELOSS/DAXUDIO VM9312 SRC DISP OPEN EJECT MUTE 4 1 2 3 VM9312HD Attach one end of the...sure the unit is corrected. Remove trim ring. 2. Final Installation After completing the wiring connections, turn off the ignition switch and proceed with the strap to prevent damage to existing wiring harness. 2. Once proper operation is fully seated and the spring clips lock it is...


