Operation Manual
Page 6
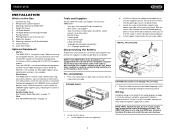
... tape • Crimping tool • Volt meter/test light • Crimp connections • 18 gauge wire for HD Radio Module 11. NOTE: When replacing a fuse, be lost. The VM9312HD uses one 15 amp mini-ATM fuse, located in the black filter box in the wiring diagram on page 23. Single...the NAV101 module. NOTE: If the VM9312HD is no ACC available, connect the ACC lead to the power supply with an on both sides to avoid causing a short circuit. PREPARE RADIO BAND AS/PS PRELOSS/DAXUDIO VM9312 SRC DISP OPEN EJECT MUTE 2. c. Place the radio in front of the mounting sleeve. ...
... tape • Crimping tool • Volt meter/test light • Crimp connections • 18 gauge wire for HD Radio Module 11. NOTE: When replacing a fuse, be lost. The VM9312HD uses one 15 amp mini-ATM fuse, located in the black filter box in the wiring diagram on page 23. Single...the NAV101 module. NOTE: If the VM9312HD is no ACC available, connect the ACC lead to the power supply with an on both sides to avoid causing a short circuit. PREPARE RADIO BAND AS/PS PRELOSS/DAXUDIO VM9312 SRC DISP OPEN EJECT MUTE 2. c. Place the radio in front of the mounting sleeve. ...
Operation Manual
Page 7
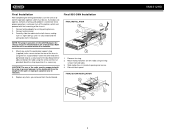
... dash panel. FINAL ISO-DIN INSTALLATION 3 BAND AS/PS PRELOSS/DAXUDIO VM9312 SRC DISP OPEN EJECT MUTE 4 1 2 3 VM9312HD Slide radio chassis into the half-sleeve, making sure it as necessary. The rear of the radio must be supported with final mounting of the chassis. 1. Once proper ... 5. If unit does not operate, recheck all wiring until it into place. Carefully slide the radio into dash opening and secure. 4. NOTE: For proper operation of the CD/DVD player, the chassis must be mounted within this limitation. 4. Attach one end of the perforated strap to...
... dash panel. FINAL ISO-DIN INSTALLATION 3 BAND AS/PS PRELOSS/DAXUDIO VM9312 SRC DISP OPEN EJECT MUTE 4 1 2 3 VM9312HD Slide radio chassis into the half-sleeve, making sure it as necessary. The rear of the radio must be supported with final mounting of the chassis. 1. Once proper ... 5. If unit does not operate, recheck all wiring until it into place. Carefully slide the radio into dash opening and secure. 4. NOTE: For proper operation of the CD/DVD player, the chassis must be mounted within this limitation. 4. Attach one end of the perforated strap to...


