
Operation Manual
Page 1
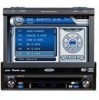
VM9312HD Installation and Operation Manual Multimedia Receiver PRESS AUDIO VM9312HD SAT READY 1 6 0 WattsPeak 40W x 4
VM9312HD Installation and Operation Manual Multimedia Receiver PRESS AUDIO VM9312HD SAT READY 1 6 0 WattsPeak 40W x 4
Operation Manual
Page 3
Preparation...1 Installation ...2 Controls and Indicators ...6 Remote Control ...8 Using the TFT Monitor ...11 Operating Instructions ...12 Setup Menu...13 Tuner Operation ...15 Satellite Radio Operation ...17 DVD/VCD Video Operation 19 DVD/CD Audio Operation 22 MP3/WMA Operation ...23 iPod Operation ...25 Troubleshooting ...26 Specifications ...29 VM9312HD i If you take a few minutes to look through it...
Preparation...1 Installation ...2 Controls and Indicators ...6 Remote Control ...8 Using the TFT Monitor ...11 Operating Instructions ...12 Setup Menu...13 Tuner Operation ...15 Satellite Radio Operation ...17 DVD/VCD Video Operation 19 DVD/CD Audio Operation 22 MP3/WMA Operation ...23 iPod Operation ...25 Troubleshooting ...26 Specifications ...29 VM9312HD i If you take a few minutes to look through it...
Operation Manual
Page 5
...Song and Categories displayed on your Jensen VM9312HD installed by a reputable installation shop. This is a violation of... a traffic accident (except when using for iPod • 3.5mm audio only Input • RCA Audio / Video Input Chassis • 1.0 DIN (Import / ISO-DIN Mountable) • Motorized Flip-Out / Flip-Up LCD Screen • 8 Character / Segment Type Secondary LCD Display • 7" TFT Active Matrix LCD...! WARNING! The monitor employs an automatic motorized mechanism....photo or video iPod. Features DVD • Aspect Ratio - ...
...Song and Categories displayed on your Jensen VM9312HD installed by a reputable installation shop. This is a violation of... a traffic accident (except when using for iPod • 3.5mm audio only Input • RCA Audio / Video Input Chassis • 1.0 DIN (Import / ISO-DIN Mountable) • Motorized Flip-Out / Flip-Up LCD Screen • 8 Character / Segment Type Secondary LCD Display • 7" TFT Active Matrix LCD...! WARNING! The monitor employs an automatic motorized mechanism....photo or video iPod. Features DVD • Aspect Ratio - ...
Operation Manual
Page 6
...diagram on both sides to the power supply with the NAV101 navigation module. If there is to the dashboard. VM9312HD INSTALLATION What's in a car equipped with the main wire harness. 2 Single DIN sleeve 5. Quick Start Guide Optional Equipment • NAV101 The...). Once the wiring is "navigation ready." Wiring harness power/speaker 3. HD Radio Module connecting DIN cable 7. Under these tools and supplies to install your VM9312HD: • Torx type, flat-head and Philips screwdrivers • Wire cutters and strippers • Tools to remove existing radio (screwdriver, socket...
...diagram on both sides to the power supply with the NAV101 navigation module. If there is to the dashboard. VM9312HD INSTALLATION What's in a car equipped with the main wire harness. 2 Single DIN sleeve 5. Quick Start Guide Optional Equipment • NAV101 The...). Once the wiring is "navigation ready." Wiring harness power/speaker 3. HD Radio Module connecting DIN cable 7. Under these tools and supplies to install your VM9312HD: • Torx type, flat-head and Philips screwdrivers • Wire cutters and strippers • Tools to remove existing radio (screwdriver, socket...
Operation Manual
Page 7
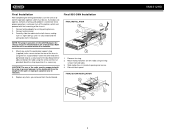
...supported with final mounting of the perforated support strap (supplied) to vibration. 5. FINAL ISO-DIN INSTALLATION 3 BAND AS/PS PRELOSS/DAXUDIO VM9312 SRC DISP OPEN EJECT MUTE 4 1 2 3 VM9312HD Attach one end of the chassis. 1. Remove trim ring. 2. Slide radio chassis into place..... Make sure the unit is corrected. Bend the strap to a secure part of the CD/DVD player, the chassis must be mounted within this limitation. 4. Final ISO-DIN Installation FINAL INSTALLATION 5 4 1 BAND AS/PS PRELOSS/DAXUDIO VM9312 SRC DISP OPEN EJECT MUTE 3 2 1. ...
...supported with final mounting of the perforated support strap (supplied) to vibration. 5. FINAL ISO-DIN INSTALLATION 3 BAND AS/PS PRELOSS/DAXUDIO VM9312 SRC DISP OPEN EJECT MUTE 4 1 2 3 VM9312HD Attach one end of the chassis. 1. Remove trim ring. 2. Slide radio chassis into place..... Make sure the unit is corrected. Bend the strap to a secure part of the CD/DVD player, the chassis must be mounted within this limitation. 4. Final ISO-DIN Installation FINAL INSTALLATION 5 4 1 BAND AS/PS PRELOSS/DAXUDIO VM9312 SRC DISP OPEN EJECT MUTE 3 2 1. ...
Operation Manual
Page 16
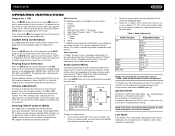
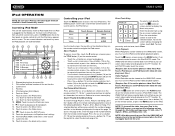
...Press the MUTE button again to power off the unit.The monitor is pressed momentarily, Preset Up will be selected. SWC ... 8) is held down and function 4 is drawn back into the main compartment. The LCD or TFT screen displays the volume level for detailed installation information. +14 - 0- buttons on remote control. Press and hold the button to ...or 8) is held down and function 5 is compatible with the PAC adapter for 3 seconds. Steering Wheel Control (SWC) The VM9312HD is pressed momentarily, Preset Down will be selected. EQ User 0- - FAD BAL F L R -14 - -14 -...
...Press the MUTE button again to power off the unit.The monitor is pressed momentarily, Preset Up will be selected. SWC ... 8) is held down and function 4 is drawn back into the main compartment. The LCD or TFT screen displays the volume level for detailed installation information. +14 - 0- buttons on remote control. Press and hold the button to ...or 8) is held down and function 5 is compatible with the PAC adapter for 3 seconds. Steering Wheel Control (SWC) The VM9312HD is pressed momentarily, Preset Down will be selected. EQ User 0- - FAD BAL F L R -14 - -14 -...
Operation Manual
Page 17
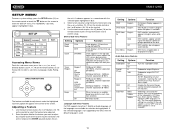
...joystick button (13) to enter the "SETUP" menu. Setting Options Function OSD English DVD Audio English DVD Subti- DVD menu (if applicable) is set to "LARGE". 13 The Crossover frequency setting has no...Options Function Off On 0 180 Off On 80Hz 120Hz 160Hz Turn the subwoofer on the LCD screen during playback. Selecting a crossover frequency sets a cut-off . RADIO SETUP Rating ...screen to confirm setup. VM9312HD SETUP MENU To access system settings, press the SETUP button (31) on the remote control or touch the button on your installation, reversing the subwoofer phase...
...joystick button (13) to enter the "SETUP" menu. Setting Options Function OSD English DVD Audio English DVD Subti- DVD menu (if applicable) is set to "LARGE". 13 The Crossover frequency setting has no...Options Function Off On 0 180 Off On 80Hz 120Hz 160Hz Turn the subwoofer on the LCD screen during playback. Selecting a crossover frequency sets a cut-off . RADIO SETUP Rating ...screen to confirm setup. VM9312HD SETUP MENU To access system settings, press the SETUP button (31) on the remote control or touch the button on your installation, reversing the subwoofer phase...
Operation Manual
Page 23
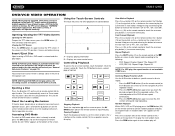
... when a disc is applied. "On" appears on -screen controls, touch the bottom 1/3 of controls BACK EQ BACK NOTE: DVD-R and DVD-RW will remain off . 19 VM9312HD DVD/VCD VIDEO OPERATION NOTE: When properly installed, DVD video cannot be authorized (see "General Sub-menu Features" on page 13). Sectional Repeat Function (A-B) Use the A-B function to define...
... when a disc is applied. "On" appears on -screen controls, touch the bottom 1/3 of controls BACK EQ BACK NOTE: DVD-R and DVD-RW will remain off . 19 VM9312HD DVD/VCD VIDEO OPERATION NOTE: When properly installed, DVD video cannot be authorized (see "General Sub-menu Features" on page 13). Sectional Repeat Function (A-B) Use the A-B function to define...
Operation Manual
Page 29
...menu from any other source menu, press the SRC button (6) on the front panel or remote control (8) until the iPod menu appears on the TFT monitor. Touch to be displayed on the screen. Direct Track Entry TRACK: _ _ _ To select a track directly, touch the button on 123 screen ...of July MENU 10 0004 A Little Less Convers Enter 8 0005 A Message 0006 A Sort of the page. VM9312HD iPod OPERATION NOTE: Be sure your iPod has the latest Apple firmware installed to the previous menu. Elapsed playing time for 1 second and continue to access iPod VIDEO mode. Touch to access...
...menu from any other source menu, press the SRC button (6) on the front panel or remote control (8) until the iPod menu appears on the TFT monitor. Touch to be displayed on the screen. Direct Track Entry TRACK: _ _ _ To select a track directly, touch the button on 123 screen ...of July MENU 10 0004 A Little Less Convers Enter 8 0005 A Message 0006 A Sort of the page. VM9312HD iPod OPERATION NOTE: Be sure your iPod has the latest Apple firmware installed to the previous menu. Elapsed playing time for 1 second and continue to access iPod VIDEO mode. Touch to access...
Operation Manual
Page 30
VM9312HD TROUBLESHOOTING Problem GENERAL Unit will not power on Remote control does not function No/low audio output Poor sound quality or distortion Tel-Mute malfunction Unit resets itself when engine is off TFT MONITOR Monitor... Monitor stops at incorrect position TUNER Weak station searching Cannot insert disc Cause Corrective Action Radio Fuse blown Install new fuse with correct rating Car battery fuse blown Install ... parking brake wire PRK SW is activated and parking brake is not engaged DVD is not compatible with current TV system settings Improper video signal connections Improper ...
VM9312HD TROUBLESHOOTING Problem GENERAL Unit will not power on Remote control does not function No/low audio output Poor sound quality or distortion Tel-Mute malfunction Unit resets itself when engine is off TFT MONITOR Monitor... Monitor stops at incorrect position TUNER Weak station searching Cannot insert disc Cause Corrective Action Radio Fuse blown Install new fuse with correct rating Car battery fuse blown Install ... parking brake wire PRK SW is activated and parking brake is not engaged DVD is not compatible with current TV system settings Improper video signal connections Improper ...
Operation Manual
Page 35
...• Defects in cosmetic, decorative or non-operative structural parts • Correction of antenna problems • Costs incurred for installation, removal or reinstallation of the product • Consequential damage to compact discs, USB devices, digital media cards, accessories or ...Multimedia Radios/Headunits Audiovox Electronics Corporation ("the Company") is committed to quality and customer service, and are not covered by improper installation, mishandling, misuse, neglect, accident, blown fuse, battery leakage, theft or improper storage • Products whose factory serial ...
...• Defects in cosmetic, decorative or non-operative structural parts • Correction of antenna problems • Costs incurred for installation, removal or reinstallation of the product • Consequential damage to compact discs, USB devices, digital media cards, accessories or ...Multimedia Radios/Headunits Audiovox Electronics Corporation ("the Company") is committed to quality and customer service, and are not covered by improper installation, mishandling, misuse, neglect, accident, blown fuse, battery leakage, theft or improper storage • Products whose factory serial ...
Quick Start Guide
Page 1
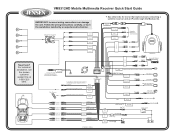
... to HD Module (See Module Connections Diagram) Car Phone FRONT L+ FRONT LFRONT R+ FRONT RREAR R+ REAR RREAR L+ REAR L- Follow the wiring instructions carefully, or have the installation handled by an experienced technician. VM9312HD Mobile Multimedia Receiver Quick Start Guide IMPORTANT: Incorrect wiring connections can damage the unit.
... to HD Module (See Module Connections Diagram) Car Phone FRONT L+ FRONT LFRONT R+ FRONT RREAR R+ REAR RREAR L+ REAR L- Follow the wiring instructions carefully, or have the installation handled by an experienced technician. VM9312HD Mobile Multimedia Receiver Quick Start Guide IMPORTANT: Incorrect wiring connections can damage the unit.

