
Instruction Manual
Page 5
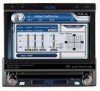
... of a traffic accident (except when using for rear view video camera) never use irregular discs. Features DVD • Aspect Ratio - To reduce the risk of the Phase Linear UV8 Mobile Multimedia Receiver. WARNING! To prevent damage to the mechanism inside this unit to moisture or water....8226; 2VRMS Line Output - Never install this unit where operation and viewing could interfere with an on your UV8: • Torx type, flat-head and Philips screwdrivers • Wire cutters and strippers • Tools to remove existing radio (screwdriver, socket wrench set or other tools) •...
... of a traffic accident (except when using for rear view video camera) never use irregular discs. Features DVD • Aspect Ratio - To reduce the risk of the Phase Linear UV8 Mobile Multimedia Receiver. WARNING! To prevent damage to the mechanism inside this unit to moisture or water....8226; 2VRMS Line Output - Never install this unit where operation and viewing could interfere with an on your UV8: • Torx type, flat-head and Philips screwdrivers • Wire cutters and strippers • Tools to remove existing radio (screwdriver, socket wrench set or other tools) •...
Instruction Manual
Page 6
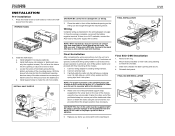
...a switch. Install the half-sleeve. Install half-sleeve into the opening so the wiring can be on new radio using the screw and hex nut provided. Wiring Complete wiring as necessary. The UV8 uses one end of the perforated support strap (supplied) to confirm operation (ignition ...is achieved, turn the unit on to the screw stud on page 3. Install support strap to vibration. 5. NOTE: For proper operation of the CD/DVD player, the chassis must be brought through the mounting sleeve. Mount factory brackets on ). FINAL ISO-DIN INSTALLATION 3 2 1 4 2 Remove trim ring....
...a switch. Install the half-sleeve. Install half-sleeve into the opening so the wiring can be on new radio using the screw and hex nut provided. Wiring Complete wiring as necessary. The UV8 uses one end of the perforated support strap (supplied) to confirm operation (ignition ...is achieved, turn the unit on to the screw stud on page 3. Install support strap to vibration. 5. NOTE: For proper operation of the CD/DVD player, the chassis must be brought through the mounting sleeve. Mount factory brackets on ). FINAL ISO-DIN INSTALLATION 3 2 1 4 2 Remove trim ring....
Instruction Manual
Page 7
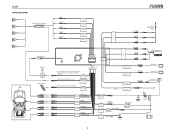
... - GREEN/WHITE REVERSE + RED ACC ACC YELLOW BATT BATTERY + FUSE (15A) BLACK GND BATTERY Ground Ignition Switch Ground P Gearbox R N D Switch 2 L Battery 3 GREEN + REAR L GREEN/BLACK - UV8 WIRING DIAGRAM External Power Amplifier Antenna Jack Antenna Car Phone Car FRONT L+ FRONT LFRONT R+ FRONT RREAR R+ REAR RREAR L+ REAR L-
... - GREEN/WHITE REVERSE + RED ACC ACC YELLOW BATT BATTERY + FUSE (15A) BLACK GND BATTERY Ground Ignition Switch Ground P Gearbox R N D Switch 2 L Battery 3 GREEN + REAR L GREEN/BLACK - UV8 WIRING DIAGRAM External Power Amplifier Antenna Jack Antenna Car Phone Car FRONT L+ FRONT LFRONT R+ FRONT RREAR R+ REAR RREAR L+ REAR L-
Instruction Manual
Page 12
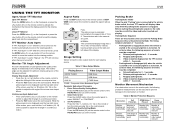
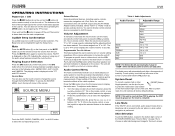
... Setting Mode: Press the PIC button (22) on the remote control or the PIC/AS/PS button (3) on the monitor UV8 Parking Brake Parking Brake Inhibit When the pink "Parking" wire is connected to the vehicle brake switch, the front TFT monitor will not close when the key is turned on, press... is automatically loaded into unit Monitor Unit stops at any point. Table 2: Video Output Modes Playing Source Video Output Modes AM/FM TUNER RGB Mode DVD RGB Mode AUX IN CVBS Mode *CVBS -
... Setting Mode: Press the PIC button (22) on the remote control or the PIC/AS/PS button (3) on the monitor UV8 Parking Brake Parking Brake Inhibit When the pink "Parking" wire is connected to the vehicle brake switch, the front TFT monitor will not close when the key is turned on, press... is automatically loaded into unit Monitor Unit stops at any point. Table 2: Video Output Modes Playing Source Video Output Modes AM/FM TUNER RGB Mode DVD RGB Mode AUX IN CVBS Mode *CVBS -
Instruction Manual
Page 14
OPERATING INSTRUCTIONS Power On / Off Press the /SRC button (6) on the unit (or the button (4) on the remote control) to turn the unit on volume. The buttons on the front of the screen. The playing mode is drawn back into the main compartment. To access the SOURCE MENU, touch the top left corner of the unit light up and the current mode status appears in the following order: AM/FM, DISC, AUX1, AUX2, and CAMERA. You cannot directly control external devices connected to select the highlighted option. 3. The LCD or TFT screen displays the volume level for 3 seconds. Programmable ...
OPERATING INSTRUCTIONS Power On / Off Press the /SRC button (6) on the unit (or the button (4) on the remote control) to turn the unit on volume. The buttons on the front of the screen. The playing mode is drawn back into the main compartment. To access the SOURCE MENU, touch the top left corner of the unit light up and the current mode status appears in the following order: AM/FM, DISC, AUX1, AUX2, and CAMERA. You cannot directly control external devices connected to select the highlighted option. 3. The LCD or TFT screen displays the volume level for 3 seconds. Programmable ...
Instruction Manual
Page 25
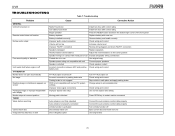
UV8 TROUBLESHOOTING Table 7: Troubleshooting Problem GENERAL Unit will not power on Remote control does not function No/low audio output Poor sound quality or distortion Unit ... Connect proper speakers Speaker is shorted Check speaker contact Incorrect connection between ACC and positive Check wiring and correct battery wire TFT Auto Open is turned off Incorrect connection to parking brake wire Parking brake is not engaged DVD is not compatible with current TV system settings Improper video signal connections Improper aspect ratio...
UV8 TROUBLESHOOTING Table 7: Troubleshooting Problem GENERAL Unit will not power on Remote control does not function No/low audio output Poor sound quality or distortion Unit ... Connect proper speakers Speaker is shorted Check speaker contact Incorrect connection between ACC and positive Check wiring and correct battery wire TFT Auto Open is turned off Incorrect connection to parking brake wire Parking brake is not engaged DVD is not compatible with current TV system settings Improper video signal connections Improper aspect ratio...


