User Manual
Page 1
DIGITAL AUDIO PLAYER USER MANUAL SMP-2GBL PLEASE READ THIS USER MANUAL COMPLETELY BEFORE OPERATING THIS UNIT AND RETAIN THIS BOOKLET FOR FUTURE REFERENCE.
DIGITAL AUDIO PLAYER USER MANUAL SMP-2GBL PLEASE READ THIS USER MANUAL COMPLETELY BEFORE OPERATING THIS UNIT AND RETAIN THIS BOOKLET FOR FUTURE REFERENCE.
User Manual
Page 2
DEAR JENSEN CUSTOMER Selecting fine audio equipment such as a permanent record of your purchase to aid in identification in the event of theft of your hearing adapts. Start your sensitive hearing. After all, we want you to get the most importantly, without distortion. To establish a safe level: - Customer's Record: The serial number of your musical enjoyment. One that lets the sound come...
DEAR JENSEN CUSTOMER Selecting fine audio equipment such as a permanent record of your purchase to aid in identification in the event of theft of your hearing adapts. Start your sensitive hearing. After all, we want you to get the most importantly, without distortion. To establish a safe level: - Customer's Record: The serial number of your musical enjoyment. One that lets the sound come...
User Manual
Page 3
... or an experienced radio/TV technician for a Class B digital device, pursuant to Part 15 of the following two conditions: (1) this device may not cause harmful interference, and (2) this device must fully concentrate in accordance with the limits for help. COMPLIANCE WITH FCC This device complies with care and attention to your health, especially your unit to download data; Connect the equipment...
... or an experienced radio/TV technician for a Class B digital device, pursuant to Part 15 of the following two conditions: (1) this device may not cause harmful interference, and (2) this device must fully concentrate in accordance with the limits for help. COMPLIANCE WITH FCC This device complies with care and attention to your health, especially your unit to download data; Connect the equipment...

User Manual
Page 4
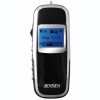
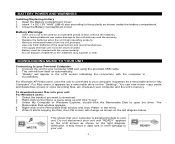
LOCATION OF CONTROLS LCD SCREEN INDICATORS 1 Battery Power 2 Repeat Mode 3 Preset EQ 4 Volume Level 5 ID3 Tag (Title/Artist/Album) 6 Play Mode 7 Current / Total Track Number 8 File Properties (Bitrate/Type) 9 Elasped / Total Time - 3 - MAIN UNIT 1 Headphone Jack 2 USB Port 3 MODE Key with Forward and Backward Control 4 A-B/REC Button 5 VOL (VOLUME)+ Button VOL (VOLUME) - Button 6 Battery Compartment Cover 7 HOLD Switch 8 LCD Screen 9 PLAY/PAUSE/STOP/ON-OFF Button 10 Hole for neckstrap 11 Microphone
LOCATION OF CONTROLS LCD SCREEN INDICATORS 1 Battery Power 2 Repeat Mode 3 Preset EQ 4 Volume Level 5 ID3 Tag (Title/Artist/Album) 6 Play Mode 7 Current / Total Track Number 8 File Properties (Bitrate/Type) 9 Elasped / Total Time - 3 - MAIN UNIT 1 Headphone Jack 2 USB Port 3 MODE Key with Forward and Backward Control 4 A-B/REC Button 5 VOL (VOLUME)+ Button VOL (VOLUME) - Button 6 Battery Compartment Cover 7 HOLD Switch 8 LCD Screen 9 PLAY/PAUSE/STOP/ON-OFF Button 10 Hole for neckstrap 11 Microphone
User Manual
Page 5
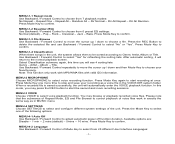
... as a removable drive on the right diagram. BATTERY POWER AND WARNINGS Installing/Replacing battery 1. Open the Battery Compartment Cover. 2. Battery Warnings - If the unit is transferring data to your computer is not to your unit until "READY" appears on the file(s), a menu pops up and click "Copy". 3. Old or leaking batteries can now move, copy, paste and delete files (music or voice recording files, etc.) between your computer, it starts copying the files, the LCD screen will change as shown...
... as a removable drive on the right diagram. BATTERY POWER AND WARNINGS Installing/Replacing battery 1. Open the Battery Compartment Cover. 2. Battery Warnings - If the unit is transferring data to your computer is not to your unit until "READY" appears on the file(s), a menu pops up and click "Copy". 3. Old or leaking batteries can now move, copy, paste and delete files (music or voice recording files, etc.) between your computer, it starts copying the files, the LCD screen will change as shown...

User Manual
Page 6
... ways: 1. In the MAIN MENU, there are the MUSIC (default), MICROPHONE, VOICE, SETTINGS, ERASE FILES, ABOUT and EXIT functions. Press Play/Pause Button to return to select music function. Click on the Desktop to your unit can now be controlled in your unit. Tap - Hold - On first power up for "MENU", "REC", "PLAY / PAUSE", V+ and V- Use Forward / Backward Control to remove your favorite songs immediately. The trash will...
... ways: 1. In the MAIN MENU, there are the MUSIC (default), MICROPHONE, VOICE, SETTINGS, ERASE FILES, ABOUT and EXIT functions. Press Play/Pause Button to return to select music function. Click on the Desktop to your unit can now be controlled in your unit. Tap - Hold - On first power up for "MENU", "REC", "PLAY / PAUSE", V+ and V- Use Forward / Backward Control to remove your favorite songs immediately. The trash will...
User Manual
Page 7
... Mode Key to choose from 7 playback modes: No Repeat - Press the REC Button to delete the selected file and use Backward / Forward Control to confirm. MENU-1-4 Classification When there songs in MUSIC menu. Use Backward / Forward Control to Genre, Artist, Album or Title. Title. When a recorded file is saved successfully, the unit will automatically enter the VOICE playback function. In this time you may browse or playback recorded voice files. MENU-3 VOICE Choose VOICE to adjust automatic power...
... Mode Key to choose from 7 playback modes: No Repeat - Press the REC Button to delete the selected file and use Backward / Forward Control to confirm. MENU-1-4 Classification When there songs in MUSIC menu. Use Backward / Forward Control to Genre, Artist, Album or Title. Title. When a recorded file is saved successfully, the unit will automatically enter the VOICE playback function. In this time you may browse or playback recorded voice files. MENU-3 VOICE Choose VOICE to adjust automatic power...
User Manual
Page 8
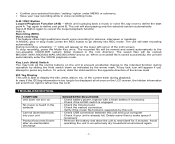
... need to press a button to turn it to wait before turning off for power saving. MENU-4-5-1 Format This option will remove all your preference settings and restore all music and voice files in the memory and restore it on the unit. MENU-5 ERASE FILES Choose ERASE FILES to invoke delete mode. Press the Play/Pause Key to erase any displayed folder (except the VOICE.DIR) or file on before proceeding to normal control operations. MENU-6 ABOUT Choose ABOUT to select the recording mode...
... need to press a button to turn it to wait before turning off for power saving. MENU-4-5-1 Format This option will remove all your preference settings and restore all music and voice files in the memory and restore it on the unit. MENU-5 ERASE FILES Choose ERASE FILES to invoke delete mode. Press the Play/Pause Key to erase any displayed folder (except the VOICE.DIR) or file on before proceeding to normal control operations. MENU-6 ABOUT Choose ABOUT to select the recording mode...
User Manual
Page 9
... (32) is reached. Tap to MAIN MENU; - 8 - Volume - Hold to previous available options within a MENU or submenu. Hold to next available options within a MENU or submenu. MUSIC PLAYBACK OPERATION Play / Pause / Stop/ On-Off Button Tap to: > Start / Resume playback, when the unit is in counterclockwise direction) Tap to: > Skip to next track during playback of a music or voice file; > Move forward/down . Mode Key Tap to: > Return to...
... (32) is reached. Tap to MAIN MENU; - 8 - Volume - Hold to previous available options within a MENU or submenu. Hold to next available options within a MENU or submenu. MUSIC PLAYBACK OPERATION Play / Pause / Stop/ On-Off Button Tap to: > Start / Resume playback, when the unit is in counterclockwise direction) Tap to: > Skip to next track during playback of a music or voice file; > Move forward/down . Mode Key Tap to: > Return to...
User Manual
Page 10
... looped playback function. Key Lock (Hold) Switch You may lock all the control buttons on the unit to prevent accidental change to be named MIC0001.WAV, MIC0002.WAV, MIC0003.WAV and so on the LCD screen, the hidden information will start recording automatically. In case if the ID3 tag information is supported by the arrow mark. Check the Volume level. - Tap A-B Button again to go directly...
... looped playback function. Key Lock (Hold) Switch You may lock all the control buttons on the unit to prevent accidental change to be named MIC0001.WAV, MIC0002.WAV, MIC0003.WAV and so on the LCD screen, the hidden information will start recording automatically. In case if the ID3 tag information is supported by the arrow mark. Check the Volume level. - Tap A-B Button again to go directly...
User Manual
Page 11
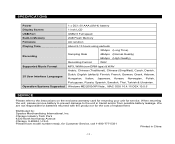
... with the product or for service. Please have model number ready, for Customer Service, call 1-800-777-5331 Printed in Memory Firmware Playing Time Recording Supported Music Format 25 User Interface Languages Operation Systems Supported 1 x DC1.5V AAA (UM-4) battery 1 inch LCD USB2.0 Full speed 2GB Flash Memory ALI solution About 8-10 hours using earbuds 32kbps (Long Time) Sampling Rate 48kbps (Normal Quality) 64kbps (High Quality) Recording Format WAV MP3, WMA (non-DRM...
... with the product or for service. Please have model number ready, for Customer Service, call 1-800-777-5331 Printed in Memory Firmware Playing Time Recording Supported Music Format 25 User Interface Languages Operation Systems Supported 1 x DC1.5V AAA (UM-4) battery 1 inch LCD USB2.0 Full speed 2GB Flash Memory ALI solution About 8-10 hours using earbuds 32kbps (Long Time) Sampling Rate 48kbps (Normal Quality) 64kbps (High Quality) Recording Format WAV MP3, WMA (non-DRM...


