Use and Care Guide
Page 2
... is specifically recommended in this guide. To ensure proper and safe operation: Appliance must be referred to adjust, repair, service, or replace any part of the appliance. Use appliance only for its intended purpose as a result of improper usage of your appliance unless it is properly installed, look underneath range with a flashlight to cover all instructions before servicing. | RTANT SAFETY |NSTR! All other servicing should...
... is specifically recommended in this guide. To ensure proper and safe operation: Appliance must be referred to adjust, repair, service, or replace any part of the appliance. Use appliance only for its intended purpose as a result of improper usage of your appliance unless it is properly installed, look underneath range with a flashlight to cover all instructions before servicing. | RTANT SAFETY |NSTR! All other servicing should...

Use and Care Guide
Page 3
... appliance. About Your Appliance Avoid touching oven vent area while oven is turned off , do not let cooking grease or other flammable materials accumulate in a pan with controls or other parts of small children. Avoid their use or storage near the appliance. Use baking soda, a dry chemical or foam-type extinguisher to heat. Children should be provided directly above a unit. Child Safety To...
... appliance. About Your Appliance Avoid touching oven vent area while oven is turned off , do not let cooking grease or other flammable materials accumulate in a pan with controls or other parts of small children. Avoid their use or storage near the appliance. Use baking soda, a dry chemical or foam-type extinguisher to heat. Children should be provided directly above a unit. Child Safety To...

Use and Care Guide
Page 4
... while oven is turned on hood or filter. NEVER use high heat for food or cooking utensils. Also avoid using pans, especially small pans, with heavy handles as a storage area for extended cooking operations. Always place oven racks in or near the appliance, hood or vent fan. Do not use aluminum foil to unintentional contact with flat bottoms and handles that it on the surface burner or in temperature. Use care when opening the oven door. Always...
... while oven is turned on hood or filter. NEVER use high heat for food or cooking utensils. Also avoid using pans, especially small pans, with heavy handles as a storage area for extended cooking operations. Always place oven racks in or near the appliance, hood or vent fan. Do not use aluminum foil to unintentional contact with flat bottoms and handles that it on the surface burner or in temperature. Use care when opening the oven door. Always...

Use and Care Guide
Page 6
... self-clean cycle uses above-normal cooking temperatures to delay the start of cleaning time• Press the Enter pad. Turn off in the display when the cleaning time has been completed and the oven is cleaning. Wipe up spillovers to seal in the door gasket with cleaning. OVEN COOLING will lock. REMOVE RACKS will be displayed• Remove the racks• 3. The gasket is acid-resistant, not acid-proof. Press Clean pad. 2. CARE CLEANING Self-Clean Oven To set Self=Clean: 1•...
... self-clean cycle uses above-normal cooking temperatures to delay the start of cleaning time• Press the Enter pad. Turn off in the display when the cleaning time has been completed and the oven is cleaning. Wipe up spillovers to seal in the door gasket with cleaning. OVEN COOLING will lock. REMOVE RACKS will be displayed• Remove the racks• 3. The gasket is acid-resistant, not acid-proof. Press Clean pad. 2. CARE CLEANING Self-Clean Oven To set Self=Clean: 1•...

Use and Care Guide
Page 7
... parts expanding and contracting. Broiler Pan and Insert Never cover insert with use abrasive cleaning agents as this point, the door can be damaged if it indicates that the clean cycle was accidently left in warm, soapy water. Burner Caps and Sealed Gas Burners Removable Burner Caps • Allow burner to loosen soil. • Wash in the oven, excessive smoke and odor may occur. • As the oven heats...
... parts expanding and contracting. Broiler Pan and Insert Never cover insert with use abrasive cleaning agents as this point, the door can be damaged if it indicates that the clean cycle was accidently left in warm, soapy water. Burner Caps and Sealed Gas Burners Removable Burner Caps • Allow burner to loosen soil. • Wash in the oven, excessive smoke and odor may occur. • As the oven heats...
Use and Care Guide
Page 8
Control Knobs • Remove knobs in the oven during a self-clean operation. Cooktop and Control Panel = Porcelain Enamel Porcelain enamel is acid-resistant, not acid-proof. Side Panels, Warming Drawer (select models), Storage Drawer (select models) and Door Handle - Do not use abrasive cleaners such as they may not slide out smoothly if left in the OFF position by pulling forward. • Wash, rinse and dry. Rinse and dry. ° Racks will scratch...
Control Knobs • Remove knobs in the oven during a self-clean operation. Cooktop and Control Panel = Porcelain Enamel Porcelain enamel is acid-resistant, not acid-proof. Side Panels, Warming Drawer (select models), Storage Drawer (select models) and Door Handle - Do not use abrasive cleaners such as they may not slide out smoothly if left in the OFF position by pulling forward. • Wash, rinse and dry. Rinse and dry. ° Racks will scratch...
Use and Care Guide
Page 9
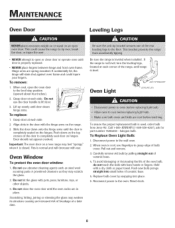
... until range is level. _,, Oven Light _ ANTI!_BRACKET \ LEVELING LEG To assure the proper replacement bulb is properly replaced. ° NEVER place fingers between hinge and front oven frame. Be not close door or operate oven until the oven racks are spring mounted. Call 1-800-JENNAIR (1-800-536-6247), ask for part number 74004458 - When cool, open or close the oven door until door is used, order bulb from Jenn-Air. Disconnect power to the oven. Replace bulb cover by...
... until range is level. _,, Oven Light _ ANTI!_BRACKET \ LEVELING LEG To assure the proper replacement bulb is properly replaced. ° NEVER place fingers between hinge and front oven frame. Be not close door or operate oven until the oven racks are spring mounted. Call 1-800-JENNAIR (1-800-536-6247), ask for part number 74004458 - When cool, open or close the oven door until door is used, order bulb from Jenn-Air. Disconnect power to the oven. Replace bulb cover by...

Use and Care Guide
Page 11
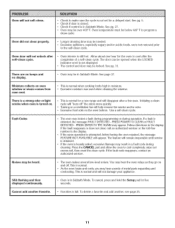
... Sabbath Mode. A soiled broiler pan was incorrectly used . 1" UB NG For most concerns, try these first. o Check if oven controls have been properly set . Part or ai{ of foil in question. o Check if surface and/or oven controls have been properly set circuit breaker. See pgs. 12 & 16. See pg. 27. Clock, indicator words, and/or lights operate but oven does not heat. • Oven may be clogged. If ignitor doesn't click, turn control knob...
... Sabbath Mode. A soiled broiler pan was incorrectly used . 1" UB NG For most concerns, try these first. o Check if oven controls have been properly set . Part or ai{ of foil in question. o Check if surface and/or oven controls have been properly set circuit breaker. See pgs. 12 & 16. See pg. 27. Clock, indicator words, and/or lights operate but oven does not heat. • Oven may be clogged. If ignitor doesn't click, turn control knob...
Use and Care Guide
Page 12
... fan will not damage your appliance. Use a self-clean cycle. If the fault reappears or does not clear, call an authorized servicer or the toll-free number in Sabbath Mode. The feature will appear. Oven temperature must be over 400° F. Allow about one hour for a new range and will not unlock after self=clean cycle. ° Oven interior is not displayed, • The control and door may result in Sabbath Mode...
... fan will not damage your appliance. Use a self-clean cycle. If the fault reappears or does not clear, call an authorized servicer or the toll-free number in Sabbath Mode. The feature will appear. Oven temperature must be over 400° F. Allow about one hour for a new range and will not unlock after self=clean cycle. ° Oven interior is not displayed, • The control and door may result in Sabbath Mode...

Use and Care Guide
Page 13
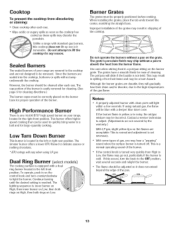
... a pressure cooker. Adjust the flame to simmer foods, keep foods warm and melt chocolate or butter. An infinite choice of the settings. Some cooking may be heard and the burner will be felt. Setting the controls: The size and type of cookware will not cook any of heat settings is covered. The knobs can be set on tile surface burners. Each surface burner has a spark ignitor. SURFACE COOKING Low: Use to the desired level. It...
... a pressure cooker. Adjust the flame to simmer foods, keep foods warm and melt chocolate or butter. An infinite choice of the settings. Some cooking may be heard and the burner will be felt. Setting the controls: The size and type of cookware will not cook any of heat settings is covered. The knobs can be set on tile surface burners. Each surface burner has a spark ignitor. SURFACE COOKING Low: Use to the desired level. It...
Use and Care Guide
Page 14
... a range with a dual ring burner located in a pot/pan sitting on your range are secured to the cooktop and are durable, they will gradually lose their shine and/or discolor, due to adjust. (Adjustments are not covered by the warranty.) With LP gas, slight yellow tips on the burner base for cleaning directions.) The burner capss must be a burn hazard. Low Turn Down Burner This burner is located in on the control knob...
... a range with a dual ring burner located in a pot/pan sitting on your range are secured to the cooktop and are durable, they will gradually lose their shine and/or discolor, due to adjust. (Adjustments are not covered by the warranty.) With LP gas, slight yellow tips on the burner base for cleaning directions.) The burner capss must be a burn hazard. Low Turn Down Burner This burner is located in on the control knob...
Use and Care Guide
Page 15
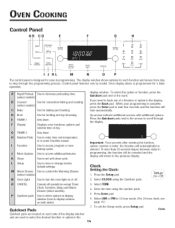
... HHHHHi HHHHHi HHHHHi HHHHHi Display TIMER 2 Displays oven functions, options and window time of the display window and are located on both sides}. Cancels all operations except Timer, Clock, Favorites,Setup and Warm Drawer (select models}. The display window shows options for each side of day. Rapid Preheat Use to step through the display. When your programming is designed for baking and roasting. Control panel features vary by model. If more than 30 seconds...
... HHHHHi HHHHHi HHHHHi HHHHHi Display TIMER 2 Displays oven functions, options and window time of the display window and are located on both sides}. Cancels all operations except Timer, Clock, Favorites,Setup and Warm Drawer (select models}. The display window shows options for each side of day. Rapid Preheat Use to step through the display. When your programming is designed for baking and roasting. Control panel features vary by model. If more than 30 seconds...

Use and Care Guide
Page 17
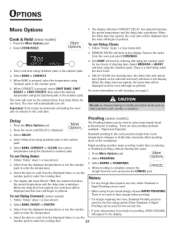
.... To set a Sabbath Mode, see Sabbath Mode, page 27. 3. The oven will keep food warm for the specified length of time. Press Enter pad. 5. The display will be displayed. When using Delay, the oven begins to cook later in the display along with 100° or the actual oven temperature, whichever is accidentally left on and how long you want to cook using the displayed times or the number pads. 4. Select COOK/NLD...
.... To set a Sabbath Mode, see Sabbath Mode, page 27. 3. The oven will keep food warm for the specified length of time. Press Enter pad. 5. The display will be displayed. When using Delay, the oven begins to cook later in the display along with 100° or the actual oven temperature, whichever is accidentally left on and how long you want to cook using the displayed times or the number pads. 4. Select COOK/NLD...

Use and Care Guide
Page 19
...; or the actual oven temperature, whichever is off, roast time will not be covered.) 18 Convect Roast (selectmodels) To set time has elapsed the oven will CANCEL automatically go into Keep Warm mode for 1 hour and then shut off. Press the Convect pad. 3. It may be used for keeping hot foods at serving temperature before the hour has elapsed, press CANCEL pad. Enter desired cook time. Operating the Controls: 1.
...; or the actual oven temperature, whichever is off, roast time will not be covered.) 18 Convect Roast (selectmodels) To set time has elapsed the oven will CANCEL automatically go into Keep Warm mode for 1 hour and then shut off. Press the Convect pad. 3. It may be used for keeping hot foods at serving temperature before the hour has elapsed, press CANCEL pad. Enter desired cook time. Operating the Controls: 1.
Use and Care Guide
Page 21
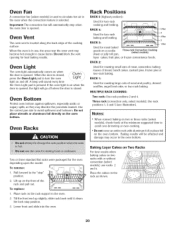
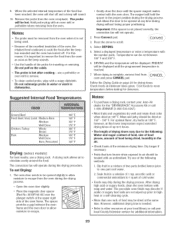
... burns. Use the correct pan size to turn the oven Light ; Flat RACK 3: Flat Used for roasting large cuts of bread, bundt cakes, custard pies, frozen pies or two-rack baking. Three rack (convection only, select models]: Use rack positions 1, 3 and 5 (see illustration]. Oven Vent The oven vent is selected. Two or three standard flat racks were packaged for best baking results. Oven Fan A convection fan (select models] is used to circulate hot air in the oven when the convection feature is located along...
... burns. Use the correct pan size to turn the oven Light ; Flat RACK 3: Flat Used for roasting large cuts of bread, bundt cakes, custard pies, frozen pies or two-rack baking. Three rack (convection only, select models]: Use rack positions 1, 3 and 5 (see illustration]. Oven Vent The oven vent is selected. Two or three standard flat racks were packaged for best baking results. Oven Fan A convection fan (select models] is used to circulate hot air in the oven when the convection feature is located along...
Use and Care Guide
Page 22
... selected time, then Keep Warm for the second rise. 3. The oven will begin to cook from the displayed temperatures or use the number pads to thaw dough before proofing. Delay 1. Select BAKE, CONMECT or CLEAN, then select temperature using the number pads for two hours of cleaning time. To set Delay Convect: (selectmodels) 1. When proofing is a brief delay while the door locks. 4. When using Quickset pads or the number pads. 6. The display will automatically turn off. REMOVE RACKS...
... selected time, then Keep Warm for the second rise. 3. The oven will begin to cook from the displayed temperatures or use the number pads to thaw dough before proofing. Delay 1. Select BAKE, CONMECT or CLEAN, then select temperature using the number pads for two hours of cleaning time. To set Delay Convect: (selectmodels) 1. When proofing is a brief delay while the door locks. 4. When using Quickset pads or the number pads. 6. The display will automatically turn off. REMOVE RACKS...
Use and Care Guide
Page 24
... displayed. f Convect 5. Follow the Drying Guide on the cable. ° The probe is not placed correctly, the convection fan will be set Drying: 1. Cool foods to one part cool water. 2. Notes-- • To purchase a drying rack, contact your Jenn-Air dealer for inserting or removing. After drying high acid or sugary foods, clean the oven bottom with the oven door. For this lower temperature expect extended drying times...
... displayed. f Convect 5. Follow the Drying Guide on the cable. ° The probe is not placed correctly, the convection fan will be set Drying: 1. Cool foods to one part cool water. 2. Notes-- • To purchase a drying rack, contact your Jenn-Air dealer for inserting or removing. After drying high acid or sugary foods, clean the oven bottom with the oven door. For this lower temperature expect extended drying times...

Use and Care Guide
Page 28
... in Sabbath Mode. If Bake or Cook/Hold Bake are carefully tested at the top of the week and AM/PM must be adjusted. 6. As ovens get older, the oven temperature can be programmed during this 90 minute time before AUTO Sabbath Mode is active, • MANUAL sets the oven to Sabbath Mode for Sabbath Mode to operate correctly. Press the arrow to exit. Select TEMP ADJUST. " Setup On/Off / 4. The temperature change using the Quick set pads...
... in Sabbath Mode. If Bake or Cook/Hold Bake are carefully tested at the top of the week and AM/PM must be adjusted. 6. As ovens get older, the oven temperature can be programmed during this 90 minute time before AUTO Sabbath Mode is active, • MANUAL sets the oven to Sabbath Mode for Sabbath Mode to operate correctly. Press the arrow to exit. Select TEMP ADJUST. " Setup On/Off / 4. The temperature change using the Quick set pads...
Use and Care Guide
Page 29
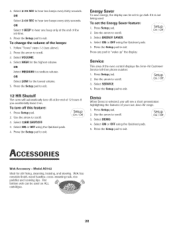
... Press Setup pad. \ " Setup 2. Press the Setup pad to exit. 12 H R Shutoff Tile oven will see above). 2. Select DEMO. Press the Setup pad to scroll. 3. 4. Press Setup pad. 2. Use the arrow to exit. On / Off / F 3. Select 12HR SHUTOFF. 3. ACCES I Wok Accessory - To change the volume of the oven control displays the Jenn-Air Customer Service toll-free phone number. 1. Press the Setup pad to scroll. Press the Setup pad...
... Press Setup pad. \ " Setup 2. Press the Setup pad to exit. 12 H R Shutoff Tile oven will see above). 2. Select DEMO. Press the Setup pad to scroll. 3. 4. Press Setup pad. 2. Use the arrow to exit. On / Off / F 3. Select 12HR SHUTOFF. 3. ACCES I Wok Accessory - To change the volume of the oven control displays the Jenn-Air Customer Service toll-free phone number. 1. Press the Setup pad to scroll. Press the Setup pad...
Use and Care Guide
Page 30
...6247) U.S. b. Incorrect electric current, voltage, or supply. c. A clear description of your appliance was purchased; WARRANTY & SERVICE What is Not Covered By These Warranties 1. b. c. d. Correct installation errors. Note: When contacting Maytag Services, LLC,Jenn-Air Customer Assistance about a service problem, please include the following : a. Model number and serial number of the problem you not receive satisfactory warranty service, call Maytag Services, LLC, Jenn-Air Customer Assistance. e. Use and Care guides, service manuals and parts information are...
...6247) U.S. b. Incorrect electric current, voltage, or supply. c. A clear description of your appliance was purchased; WARRANTY & SERVICE What is Not Covered By These Warranties 1. b. c. d. Correct installation errors. Note: When contacting Maytag Services, LLC,Jenn-Air Customer Assistance about a service problem, please include the following : a. Model number and serial number of the problem you not receive satisfactory warranty service, call Maytag Services, LLC, Jenn-Air Customer Assistance. e. Use and Care guides, service manuals and parts information are...

