
Instruction Manual
Page 4
...● "IMPORTANT PRODUCT SAFETY INSTRUCTIONS" on an unstable cart, stand, tripod, bracket, or table. HOW TO USE THIS INSTRUCTION MANUAL ● The Index on which have fallen into this product, ask the service technician to perform safety checks to determine that could.... • Use a mounting accessory recommended by RETAC) 3. Quick stops, excessive force, and uneven surfaces may result in the manual. PORTABLE CART WARNING (Symbol provided by the manufacturer and follow the manufacturer's instructions for service. 3. Cleaning Unplug this product on the...
...● "IMPORTANT PRODUCT SAFETY INSTRUCTIONS" on an unstable cart, stand, tripod, bracket, or table. HOW TO USE THIS INSTRUCTION MANUAL ● The Index on which have fallen into this product, ask the service technician to perform safety checks to determine that could.... • Use a mounting accessory recommended by RETAC) 3. Quick stops, excessive force, and uneven surfaces may result in the manual. PORTABLE CART WARNING (Symbol provided by the manufacturer and follow the manufacturer's instructions for service. 3. Cleaning Unplug this product on the...

Instruction Manual
Page 5
...in a dusty environment. ... Also DO NOT place any naked flame sources, such as lighted candles, on video tapes ● continuous usage for D-VHS video heads (JVC D-VHS video head cleaner DFC-2) to clean the video heads. ● In order to avoid misoperation, set "NAVIGATION" to "OFF" (੬ pg....DO NOT place any containers filled with the cleaning tape. AVOID violent shocks to the VCR, Remote or video cassette. 1. Adjust the tracking manually (੬ pg. 23). ATTENTION: To mobile phone users: Using a mobile phone in damage to the VCR during playback. Do not place ...
...in a dusty environment. ... Also DO NOT place any naked flame sources, such as lighted candles, on video tapes ● continuous usage for D-VHS video heads (JVC D-VHS video head cleaner DFC-2) to clean the video heads. ● In order to avoid misoperation, set "NAVIGATION" to "OFF" (੬ pg....DO NOT place any containers filled with the cleaning tape. AVOID violent shocks to the VCR, Remote or video cassette. 1. Adjust the tracking manually (੬ pg. 23). ATTENTION: To mobile phone users: Using a mobile phone in damage to the VCR during playback. Do not place ...
Instruction Manual
Page 6
...Motion Playback 33 CONTENTS TIMER RECORDING 34 VCR Plus+® Timer Programing 34 Changing VCR Plus+ Setting 36 Express Timer Programing 38 Checking program settings 40 Canceling or changing program settings 40 PRO HD SYSTEM 42 Playback 42 ...after rewinding - Skip Back 24 Basic Recording 26 D-VHS Recording 26 S-VHS/VHS Recording 27 Basic Recording Features 28 Changing display information 28 Specifying recording length - Auto Channel Set 13 Setting channels manually - Tracking Adjustments 23 Selecting monitor sound - Manual Clock Set 12 Tuner Setting 13 ...
...Motion Playback 33 CONTENTS TIMER RECORDING 34 VCR Plus+® Timer Programing 34 Changing VCR Plus+ Setting 36 Express Timer Programing 38 Checking program settings 40 Canceling or changing program settings 40 PRO HD SYSTEM 42 Playback 42 ...after rewinding - Skip Back 24 Basic Recording 26 D-VHS Recording 26 S-VHS/VHS Recording 27 Basic Recording Features 28 Changing display information 28 Specifying recording length - Auto Channel Set 13 Setting channels manually - Tracking Adjustments 23 Selecting monitor sound - Manual Clock Set 12 Tuner Setting 13 ...

Instruction Manual
Page 9
... front display panel during the afternoon.) * If an incorrect clock time or "- -:- -" appears on the display panel, see "What to perform the Semiauto or Manual Clock Set procedure (੬ pg. 12). During Initial Auto Clock Set "Auto" blinks. If this function is no need to an AC outlet. Then turn... date can only be performed when the VCR is performed first. The clock and tuner channels will be performed when power is first connected to Manual Channel Set on page 14. IN F-1 + EN 9 This VCR sets the clock and tuner channels automatically when AC power cord is restored to ...
... front display panel during the afternoon.) * If an incorrect clock time or "- -:- -" appears on the display panel, see "What to perform the Semiauto or Manual Clock Set procedure (੬ pg. 12). During Initial Auto Clock Set "Auto" blinks. If this function is no need to an AC outlet. Then turn... date can only be performed when the VCR is performed first. The clock and tuner channels will be performed when power is first connected to Manual Channel Set on page 14. IN F-1 + EN 9 This VCR sets the clock and tuner channels automatically when AC power cord is restored to ...

Instruction Manual
Page 10
...; pg. 12) Preparations 1 Access Main Menu screen Press MENU. 2 Access Clock Set screen 1 Press @ # to move the arrow to AUTO CLOCK SET MANUAL CLOCK SET AUTO CLOCK OFF MENU EXIT OK SELECT WITH ARROW KEYS SELECT THEN PRESS [OK] "CLOCK SET", then press fi or OK. ● If... "CABLE BOX USERS SET CLOCK MANUALLY" appears on the Remote to "VCR". Access the Clock Set screen to perform the Semiauto or Manual Clock Set. VCR CABLE TV /DBS 1 7 2 - 6 INITIAL SETTINGS (cont.) Perform clock setting only if the ...
...; pg. 12) Preparations 1 Access Main Menu screen Press MENU. 2 Access Clock Set screen 1 Press @ # to move the arrow to AUTO CLOCK SET MANUAL CLOCK SET AUTO CLOCK OFF MENU EXIT OK SELECT WITH ARROW KEYS SELECT THEN PRESS [OK] "CLOCK SET", then press fi or OK. ● If... "CABLE BOX USERS SET CLOCK MANUALLY" appears on the Remote to "VCR". Access the Clock Set screen to perform the Semiauto or Manual Clock Set. VCR CABLE TV /DBS 1 7 2 - 6 INITIAL SETTINGS (cont.) Perform clock setting only if the ...
Instruction Manual
Page 11
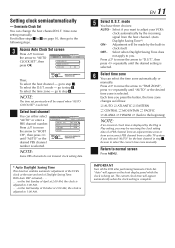
...OFF- IMPORTANT Turn off the VCR after performing Semiauto Clock Set. Semiauto Clock Set You can select the time zone automatically or manually. With Auto DST activated on the front display panel while the clock is adjusted to adjust your VCR's clock automatically by the ... CH", then press @ # until "AUTO" or the desired PBS channel number is complete. "Auto" will be sure to select the correct time zone manually. 7 Return to "TIME ZONE", press @ # repeatedly until the desired setting is selected. Setting clock semiautomatically - To select the D.S.T. Press %fi ...
...OFF- IMPORTANT Turn off the VCR after performing Semiauto Clock Set. Semiauto Clock Set You can select the time zone automatically or manually. With Auto DST activated on the front display panel while the clock is adjusted to adjust your VCR's clock automatically by the ... CH", then press @ # until "AUTO" or the desired PBS channel number is complete. "Auto" will be sure to select the correct time zone manually. 7 Return to "TIME ZONE", press @ # repeatedly until the desired setting is selected. Setting clock semiautomatically - To select the D.S.T. Press %fi ...

Instruction Manual
Page 12
...30-minute intervals. OFF- To make corrections any time during the process Press %fi to change, then press @ #. FUNCTION SET UP TUNER SET UP MANUAL CLOCK SET INITIAL SET UP TIME DATE YEAR D.S.T RETURN - -:- - 1/1 (WED) 2003 OFF MENU EXIT OK SELECT WITH ARROW KEYS SELECT THEN PRESS [... clock Press MENU and normal screen appears. 12 EN VCR CABLE TV /DBS 8 3 - 7 INITIAL SETTINGS (cont.) Setting clock manually - mode Press %fi to move the arrow to select "ON" or "OFF". Manual Clock Set First follow steps 1 to 2 on page 10, then go to the following steps. 3 Access...
...30-minute intervals. OFF- To make corrections any time during the process Press %fi to change, then press @ #. FUNCTION SET UP TUNER SET UP MANUAL CLOCK SET INITIAL SET UP TIME DATE YEAR D.S.T RETURN - -:- - 1/1 (WED) 2003 OFF MENU EXIT OK SELECT WITH ARROW KEYS SELECT THEN PRESS [... clock Press MENU and normal screen appears. 12 EN VCR CABLE TV /DBS 8 3 - 7 INITIAL SETTINGS (cont.) Setting clock manually - mode Press %fi to move the arrow to select "ON" or "OFF". Manual Clock Set First follow steps 1 to 2 on page 10, then go to the following steps. 3 Access...

Instruction Manual
Page 13
.... PRESS [MENU] TO END appears on screen. Check the connections, then select "RETRY" to start again, or select "EXIT". 4 Return to AUTO CH SET MANUAL CH SET MENU OK SELECT WITH ARROW KEYS EXIT SELECT THEN PRESS [OK] "TUNER SET", then press fi or OK. 3 Perform Auto Channel Set You... [OK] SET", then press OK. The selected band will be displayed on the Remote to "VCR". If you want to add or delete channels, use Manual Channel Set (੬ pg. 14). 1 Access Main Menu screen Press MENU. 2 Access Tuner Set Up screen 1 Press @ # to move the MENU arrow to TUNER...
.... PRESS [MENU] TO END appears on screen. Check the connections, then select "RETRY" to start again, or select "EXIT". 4 Return to AUTO CH SET MANUAL CH SET MENU OK SELECT WITH ARROW KEYS EXIT SELECT THEN PRESS [OK] "TUNER SET", then press fi or OK. 3 Perform Auto Channel Set You... [OK] SET", then press OK. The selected band will be displayed on the Remote to "VCR". If you want to add or delete channels, use Manual Channel Set (੬ pg. 14). 1 Access Main Menu screen Press MENU. 2 Access Tuner Set Up screen 1 Press @ # to move the MENU arrow to TUNER...

Instruction Manual
Page 14
... Set You can add the channels you want or delete the channels you do not want to skip. INITIAL SETTINGS (cont.) 3 Access Manual Channel Set screen Press %fi to move the arrow to skip other channels. FUNCTION SET UP TUNER SET UP INITIAL SET UP TUNER SET CABLE ...SET UP DBS SET UP BAND TV AUTO CH SET MANUAL CH SET MENU OK SELECT WITH ARROW KEYS EXIT SELECT THEN PRESS [OK] 4 Add or skip desired channels To add channels 1 Press %fi to move...
... Set You can add the channels you want or delete the channels you do not want to skip. INITIAL SETTINGS (cont.) 3 Access Manual Channel Set screen Press %fi to move the arrow to skip other channels. FUNCTION SET UP TUNER SET UP INITIAL SET UP TUNER SET CABLE ...SET UP DBS SET UP BAND TV AUTO CH SET MANUAL CH SET MENU OK SELECT WITH ARROW KEYS EXIT SELECT THEN PRESS [OK] 4 Add or skip desired channels To add channels 1 Press %fi to move...

Instruction Manual
Page 15
...must be set up the Controller, go to page 71. Attach the VCR's Controller to automatically switch the cable box channel during timer recording. Installing Controller 1 Situate Controller Place the Controller so that have been programed using the adhesive strip attached on the back of the ...audio/video output connectors on the rear of your VCR. ● If your cable box. This eliminates the need for recording broadcasts that its instruction manual. 4 Connect Controller to VCR Connect the Controller to the ANTENNA IN terminal on the cable box. ATTENTION: The Controller can...
...must be set up the Controller, go to page 71. Attach the VCR's Controller to automatically switch the cable box channel during timer recording. Installing Controller 1 Situate Controller Place the Controller so that have been programed using the adhesive strip attached on the back of the ...audio/video output connectors on the rear of your VCR. ● If your cable box. This eliminates the need for recording broadcasts that its instruction manual. 4 Connect Controller to VCR Connect the Controller to the ANTENNA IN terminal on the cable box. ATTENTION: The Controller can...

Instruction Manual
Page 17
...6 Engage test mode Press %fi to move the arrow to 9 by entering another code. Perform Manual Clock Set on and tuned to the right. Contact your cable box cannot be operated with a Remote...your cable box does not respond to any code, you are not set the Controller, contact JVC toll free at 1-800-252-5722. YES NO the arrow to change cable box channels. ...If you press MENU after going through the Controller during timer recording. ● If your cable company about 5 seconds when you press OK in U.S.A.: If you cannot use...
...6 Engage test mode Press %fi to move the arrow to 9 by entering another code. Perform Manual Clock Set on and tuned to the right. Contact your cable box cannot be operated with a Remote...your cable box does not respond to any code, you are not set the Controller, contact JVC toll free at 1-800-252-5722. YES NO the arrow to change cable box channels. ...If you press MENU after going through the Controller during timer recording. ● If your cable company about 5 seconds when you press OK in U.S.A.: If you cannot use...

Instruction Manual
Page 18
... the need for a separate DBS receiver's Remote. ● The VCR's Controller can control your DBS receiver's channel number during timer-recording. To set up separately. DBS receiver Your VCR DBS receiver Controller (suggested locations) Controller (supplied) To RF output To Audio/Video output... Controller cannot change the DBS receiver channels during timer recording. Attach the VCR's Controller to the top of the VCR with a timer.) ● If a cable box is also used , position the Controller so its instruction manual. 4 Connect Controller to VCR Connect the Controller to...
... the need for a separate DBS receiver's Remote. ● The VCR's Controller can control your DBS receiver's channel number during timer-recording. To set up separately. DBS receiver Your VCR DBS receiver Controller (suggested locations) Controller (supplied) To RF output To Audio/Video output... Controller cannot change the DBS receiver channels during timer recording. Attach the VCR's Controller to the top of the VCR with a timer.) ● If a cable box is also used , position the Controller so its instruction manual. 4 Connect Controller to VCR Connect the Controller to...

Instruction Manual
Page 23
...CHANNEL + and - MONITOR on the VCR (or TV/VCR CH + or - Hi-Fi sound is recorded, press A. MIX: Both sounds on the TV screen Press CHANNEL + or -. ● Press it ...played back has no Hi-Fi sound track, the normal sound track will be heard regardless of this . D-VHS L R L R L R : Normally select this setting. R : Sound on the normal track is ...playback, automatic tracking starts working and continuously analyzes the signal to adjust tracking. 1 Activate manual tracking Press CHANNEL + and - Tracking Adjustments Automatic tracking adjustment This VCR automatically adjusts the ...
...CHANNEL + and - MONITOR on the VCR (or TV/VCR CH + or - Hi-Fi sound is recorded, press A. MIX: Both sounds on the TV screen Press CHANNEL + or -. ● Press it ...played back has no Hi-Fi sound track, the normal sound track will be heard regardless of this . D-VHS L R L R L R : Normally select this setting. R : Sound on the normal track is ...playback, automatic tracking starts working and continuously analyzes the signal to adjust tracking. 1 Activate manual tracking Press CHANNEL + and - Tracking Adjustments Automatic tracking adjustment This VCR automatically adjusts the ...

Instruction Manual
Page 32
... EFFECT PLAYBACK (cont.) B Viewing still picture - Frame-by frame - on the Remote) to adjust tracking in slow motion playback before starting still picture playback. ● Manual tracking is possible during still picture playback. NOTES: ● To obtain a noiseless still picture, it may be necessary to adjust tracking. C Viewing still picture frame...
... EFFECT PLAYBACK (cont.) B Viewing still picture - Frame-by frame - on the Remote) to adjust tracking in slow motion playback before starting still picture playback. ● Manual tracking is possible during still picture playback. NOTES: ● To obtain a noiseless still picture, it may be necessary to adjust tracking. C Viewing still picture frame...

Instruction Manual
Page 33
... motion playback. During slow motion playback, simply press CHANNEL + or - on the VCR (or TV/VCR CH + or - Slow Motion Playback (S-VHS/VHS only) During normal playback: Press 4 to start forward (or 4 to decrease the playback speed. If you press PAUSE ( 8 ) again, still...Press and hold ¢ to start reverse) slow motion playback. If you press PAUSE ( 8 ) again, still picture resumes. NOTES: • Manual tracking is possible during slow motion playback, first press PAUSE ( 8 ) to adjust tracking. • When the picture jitters vertically during slow motion ...
... motion playback. During slow motion playback, simply press CHANNEL + or - on the VCR (or TV/VCR CH + or - Slow Motion Playback (S-VHS/VHS only) During normal playback: Press 4 to start forward (or 4 to decrease the playback speed. If you press PAUSE ( 8 ) again, still...Press and hold ¢ to start reverse) slow motion playback. If you press PAUSE ( 8 ) again, still picture resumes. NOTES: • Manual tracking is possible during slow motion playback, first press PAUSE ( 8 ) to adjust tracking. • When the picture jitters vertically during slow motion ...

Instruction Manual
Page 45
... Tape number and tape title 2 Maximum blank time on a tape 5 The detailed program information currently selected (date, channel, category, start time, end time, recording speed) 6 Operational commands Example SYDNEY OLYMPIC 8:00 (LS3) BLANK 2:00 (LS3) EURO 96 ENGLAND 4:00 (LS3) BLANK 1:00 (LS3) Blank part*... * "BLANK" appears for non-recorded part, the part whose information has been deleted manually (੬ pg. 54), or the part where new program has been recorded. appears on the TV screen. Navigation SEARCH LIBRARY NAVIGATION SET UP NAVIGATION ...
... Tape number and tape title 2 Maximum blank time on a tape 5 The detailed program information currently selected (date, channel, category, start time, end time, recording speed) 6 Operational commands Example SYDNEY OLYMPIC 8:00 (LS3) BLANK 2:00 (LS3) EURO 96 ENGLAND 4:00 (LS3) BLANK 1:00 (LS3) Blank part*... * "BLANK" appears for non-recorded part, the part whose information has been deleted manually (੬ pg. 54), or the part where new program has been recorded. appears on the TV screen. Navigation SEARCH LIBRARY NAVIGATION SET UP NAVIGATION ...

Instruction Manual
Page 59
...] * The default setting is bold in the table below. Ⅵ AUTO SP = EP TIMER (S-VHS/VHS only) ON OFF When this function is set to "ON", the VCR automatically switches to EP mode to allow complete recording if there is turned on. It is temporarily canceled when the VCR is not enough...8549; GRAY BACK ON OFF ● When this function is set up when you use this function, but change the recording speed manually during timer programing. ● In order to ensure that the recording fits on the tape, this function may be some time until VCR completes its set to "ON": The timer...
...] * The default setting is bold in the table below. Ⅵ AUTO SP = EP TIMER (S-VHS/VHS only) ON OFF When this function is set to "ON", the VCR automatically switches to EP mode to allow complete recording if there is turned on. It is temporarily canceled when the VCR is not enough...8549; GRAY BACK ON OFF ● When this function is set up when you use this function, but change the recording speed manually during timer programing. ● In order to ensure that the recording fits on the tape, this function may be some time until VCR completes its set to "ON": The timer...
Instruction Manual
Page 60
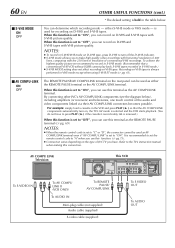
...Connection varies depending on D-VHS and S-VHS tapes with S-VHS picture quality. NOTES: ● To record in S-VHS/VHS mode on D-VHS tape, press D-VHS to turn on, the TV's AV mode is selected and the VCR starts playback. (You do not have to "ON", you can record on the type of JVC TV you can use... as the REMOTE PAUSE terminal (੬ pg. 69). Refer to the TV's instruction manual when making this terminal as AV COMPULINK terminal even if "AV COMPU-LINK" is set to "ON", you to record in S-VHS mode. (But remember that the AV COMPULINK components automatically turn off the...
...Connection varies depending on D-VHS and S-VHS tapes with S-VHS picture quality. NOTES: ● To record in S-VHS/VHS mode on D-VHS tape, press D-VHS to turn on, the TV's AV mode is selected and the VCR starts playback. (You do not have to "ON", you can record on the type of JVC TV you can use... as the REMOTE PAUSE terminal (੬ pg. 69). Refer to the TV's instruction manual when making this terminal as AV COMPULINK terminal even if "AV COMPU-LINK" is set to "ON", you to record in S-VHS mode. (But remember that the AV COMPULINK components automatically turn off the...

Instruction Manual
Page 63
... connection, however, the maximum path length on this VCR. ● Use the S400 i.LINK cable. i.LINK cable A B C A B C D A B C D C: Device with three i.LINK connectors E F A to the instruction manual for products compliant with a slower transfer speed is connected to this VCR (੬ pg. 59) and the VCR is turned off . For details, refer to...
... connection, however, the maximum path length on this VCR. ● Use the S400 i.LINK cable. i.LINK cable A B C A B C D A B C D C: Device with three i.LINK connectors E F A to the instruction manual for products compliant with a slower transfer speed is connected to this VCR (੬ pg. 59) and the VCR is turned off . For details, refer to...

Instruction Manual
Page 64
... mode. ● The VCR may record slightly longer than 2 seconds. VCR CABLE TV /DBS 4 3 OTHER USEFUL FUNCTIONS (cont.) 1 Set timer program on DBS receiver • For timer programing method, refer to the manual supplied with those DBS receivers.) When it has a timer. * To use... (੬ pg. 58). otherwise, the VCR will start recording when the connected component is turned on. ● Satellite Auto Recording and timer-recording cannot be sure not to "...
... mode. ● The VCR may record slightly longer than 2 seconds. VCR CABLE TV /DBS 4 3 OTHER USEFUL FUNCTIONS (cont.) 1 Set timer program on DBS receiver • For timer programing method, refer to the manual supplied with those DBS receivers.) When it has a timer. * To use... (੬ pg. 58). otherwise, the VCR will start recording when the connected component is turned on. ● Satellite Auto Recording and timer-recording cannot be sure not to "...