
Instruction Manual America
Page 42
...the brake lamps, blinkers, wipers, etc. If "H/W ERROR" appears again, consult your vehicle. Insulate unconnected wires with a maximum power of more than 30º. • If your vehicle wiring harness does not have any troubles, try the operation again. Metal parts such as the heat sink and enclosure ...become hot. • Do not connect the wires of the unit. Delete the unused registered Bluetooth device from ...
...the brake lamps, blinkers, wipers, etc. If "H/W ERROR" appears again, consult your vehicle. Insulate unconnected wires with a maximum power of more than 30º. • If your vehicle wiring harness does not have any troubles, try the operation again. Metal parts such as the heat sink and enclosure ...become hot. • Do not connect the wires of the unit. Delete the unused registered Bluetooth device from ...

Instruction Manual America
Page 43
... the mounting sleeve and trim plate from the unit. 2 Align the holes in -dash mounting) Do the required wiring. (Page 40) (C) Mounting sleeve (×1) (D) Wiring harness (×1) (E) Extraction key (×2) Basic procedure 1 Remove the key from the ignition switch, then disconnect the terminal... of the car battery. 2 Connect the wires properly. See "Wiring connection" on page 40. 3 Install the unit to your...
... the mounting sleeve and trim plate from the unit. 2 Align the holes in -dash mounting) Do the required wiring. (Page 40) (C) Mounting sleeve (×1) (D) Wiring harness (×1) (E) Extraction key (×2) Basic procedure 1 Remove the key from the ignition switch, then disconnect the terminal... of the car battery. 2 Connect the wires properly. See "Wiring connection" on page 40. 3 Install the unit to your...
Instruction Manual America
Page 44
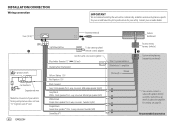
...: To power antenna Blue/white: To amplifier Brown (Not used) Vehicle dashboard Factory wiring harness (vehicle) Custom wiring harness (separately purchased) *1 You can also connect a subwoofer speaker directly using this connection if your vehicle factory wiring harness does not have "12 V ignition switch" wire. 40 ENGLISH Antenna terminal Light blue/yellow To the steering wheel remote control...
...: To power antenna Blue/white: To amplifier Brown (Not used) Vehicle dashboard Factory wiring harness (vehicle) Custom wiring harness (separately purchased) *1 You can also connect a subwoofer speaker directly using this connection if your vehicle factory wiring harness does not have "12 V ignition switch" wire. 40 ENGLISH Antenna terminal Light blue/yellow To the steering wheel remote control...
Instruction Manual America
Page 45
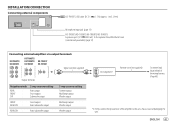
...500 mA): To the optional SiriusXM Vehicle Tuner (commercially available) (page 12) Connecting external amplifiers via output terminals KD-T905BTS/ KD-T805BTS KD-T900BTS/ KD-TD90BTS/ KD-T700BT/ KD-SR85BT KD-TD70BT Signal cord (not supplied) Output terminals Output terminals REAR : FRONT : SW : 2-way crossover setting ...Range output Woofer output Mid Range output Woofer output Woofer output JVC Amplifier*2 Remote wire (not supplied) To remote lead (blue/white) of the wiring harness. (Page 40) *2 Firmly connect the ground wire of the amplifier to the car's chassis to avoid damaging...
...500 mA): To the optional SiriusXM Vehicle Tuner (commercially available) (page 12) Connecting external amplifiers via output terminals KD-T905BTS/ KD-T805BTS KD-T900BTS/ KD-TD90BTS/ KD-T700BT/ KD-SR85BT KD-TD70BT Signal cord (not supplied) Output terminals Output terminals REAR : FRONT : SW : 2-way crossover setting ...Range output Woofer output Mid Range output Woofer output Woofer output JVC Amplifier*2 Remote wire (not supplied) To remote lead (blue/white) of the wiring harness. (Page 40) *2 Firmly connect the ground wire of the amplifier to the car's chassis to avoid damaging...

Quick Start Guide America
Page 6
...- Consult the car audio dealer. • Install this unit in the console of less than 30º. • If your vehicle wiring harness does not have the ignition terminal, connect Ignition wire (red) to the terminal on the vehicle's fuse box which provides 12 V DC power supply and is turned on page 3. 3 ... • After the unit is lower than 50 W. Metal parts such as the heat sink and enclosure become hot. • Do not connect the wires of speakers to the car's chassis again after use of your car. Installing the unit (in -dash mounting)". 4 Connect the terminal of the car ...
...- Consult the car audio dealer. • Install this unit in the console of less than 30º. • If your vehicle wiring harness does not have the ignition terminal, connect Ignition wire (red) to the terminal on the vehicle's fuse box which provides 12 V DC power supply and is turned on page 3. 3 ... • After the unit is lower than 50 W. Metal parts such as the heat sink and enclosure become hot. • Do not connect the wires of speakers to the car's chassis again after use of your car. Installing the unit (in -dash mounting)". 4 Connect the terminal of the car ...

Quick Start Guide America
Page 7
...sides) with the vehicle mounting bracket and secure the unit with screws (commercially available). Factory wiring harness (vehicle) Custom wiring harness (separately purchased) Part list (supplied) (A) Faceplate (×1) (B) Trimplate (×1) (C) Mounting sleeve (×1) (D) Wiring harness (×1) (E) Extraction key (×2) Recommended connection a Light blue/yellow: To the steering...Green ª, Green/black ·: Rear speaker (left) 3 Using wrong screws might damage the unit. Removing the unit Wiring connection Antenna terminal Vehicle dashboard Fuse (10 A) Join the same color...
...sides) with the vehicle mounting bracket and secure the unit with screws (commercially available). Factory wiring harness (vehicle) Custom wiring harness (separately purchased) Part list (supplied) (A) Faceplate (×1) (B) Trimplate (×1) (C) Mounting sleeve (×1) (D) Wiring harness (×1) (E) Extraction key (×2) Recommended connection a Light blue/yellow: To the steering...Green ª, Green/black ·: Rear speaker (left) 3 Using wrong screws might damage the unit. Removing the unit Wiring connection Antenna terminal Vehicle dashboard Fuse (10 A) Join the same color...


