
Instruction Manual America
Page 2
... and receiver. • Connect the equipment into an outlet on a circuit different from that interference will not occur in a particular installation. A reciclagem e a eliminação de lixo de maneira apropriada ajudarão a conservar os recursos naturais ao mesmo tempo...Use of controls or adjustments or performance of the following are reproductions of Conformity Trade Name: JVC Products: CD RECEIVER Model Name: KD-T905BTS/KD-T900BTS/KD-T805BTS/KD-TD90BTS/KD-T700BT/ KD-TD70BT/KD-SR85BT Responsible Party: JVCKENWOOD USA CORPORATION 2201 East Dominguez Street, Long Beach, CA 90810, ...
... and receiver. • Connect the equipment into an outlet on a circuit different from that interference will not occur in a particular installation. A reciclagem e a eliminação de lixo de maneira apropriada ajudarão a conservar os recursos naturais ao mesmo tempo...Use of controls or adjustments or performance of the following are reproductions of Conformity Trade Name: JVC Products: CD RECEIVER Model Name: KD-T905BTS/KD-T900BTS/KD-T805BTS/KD-TD90BTS/KD-T700BT/ KD-TD70BT/KD-SR85BT Responsible Party: JVCKENWOOD USA CORPORATION 2201 East Dominguez Street, Long Beach, CA 90810, ...
Instruction Manual America
Page 6
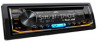
...SiriusXM® Radio 12 BLUETOOTH® 15 AUX 24 AUDIO SETTINGS 24 DISPLAY SETTINGS 30 REFERENCES 31 Maintenance More information TROUBLESHOOTING 35 INSTALLATION/ CONNECTION 38 SPECIFICATIONS 42 2 ENGLISH BEFORE USE IMPORTANT • To ensure proper use, please read this manual • Operations... are explained mainly using buttons on the faceplate of KD-T905BTS. • English indications are available on the types of the output level. The remote control supplied with the same or ...
...SiriusXM® Radio 12 BLUETOOTH® 15 AUX 24 AUDIO SETTINGS 24 DISPLAY SETTINGS 30 REFERENCES 31 Maintenance More information TROUBLESHOOTING 35 INSTALLATION/ CONNECTION 38 SPECIFICATIONS 42 2 ENGLISH BEFORE USE IMPORTANT • To ensure proper use, please read this manual • Operations... are explained mainly using buttons on the faceplate of KD-T905BTS. • English indications are available on the types of the output level. The remote control supplied with the same or ...

Instruction Manual America
Page 11
...iPod/ iPhone*1 ANDROID*2 USB cable*1 (commercially available) Selectable source: • KD-T905BTS: CD/USB FRONT/USB REAR/iPod FRONT/iPod REAR/ANDROID FRONT/ANDROID REAR • KD-T900BTS/KD-T805BTS/KD-TD90BTS/KD-T700BT/KD-TD70BT/KD-SR85BT: CD/USB/iPod USB/ANDROID To On the faceplate On the remote ...RANDOM]/[RANDOM OFF] : iPod *1 Do not leave the cable inside the car when not using the Android device itself via other media player application installed in the Android device. *3 Not applicable for ANDROID. *4 For CD: Only for iPod/ANDROID. *5 For iPod: Applicable only when [HEAD MODE...
...iPod/ iPhone*1 ANDROID*2 USB cable*1 (commercially available) Selectable source: • KD-T905BTS: CD/USB FRONT/USB REAR/iPod FRONT/iPod REAR/ANDROID FRONT/ANDROID REAR • KD-T900BTS/KD-T805BTS/KD-TD90BTS/KD-T700BT/KD-TD70BT/KD-SR85BT: CD/USB/iPod USB/ANDROID To On the faceplate On the remote ...RANDOM]/[RANDOM OFF] : iPod *1 Do not leave the cable inside the car when not using the Android device itself via other media player application installed in the Android device. *3 Not applicable for ANDROID. *4 For CD: Only for iPod/ANDROID. *5 For iPod: Applicable only when [HEAD MODE...

Instruction Manual America
Page 12
... BT source), press 5MODE repeatedly. [HEAD MODE]: Control iPod from this unit. [IPHONE MODE]: Control iPod using the iPod itself. Preparation: Install the latest version of a multiple drive device. For more information, visit . However, you can still perform play/pause, file skip, fast-... 2 Turn the volume knob to select a folder/list, then press the knob. 3 Turn the volume knob to the first character. Settings to use JVC Remote application JVC Remote application is other than A to Z, 0 to 9. • To return to browse through them quickly. Select a file from the iPhone/iPod...
... BT source), press 5MODE repeatedly. [HEAD MODE]: Control iPod from this unit. [IPHONE MODE]: Control iPod using the iPod itself. Preparation: Install the latest version of a multiple drive device. For more information, visit . However, you can still perform play/pause, file skip, fast-... 2 Turn the volume knob to select a folder/list, then press the knob. 3 Turn the volume knob to the first character. Settings to use JVC Remote application JVC Remote application is other than A to Z, 0 to 9. • To return to browse through them quickly. Select a file from the iPhone/iPod...

Instruction Manual America
Page 13
... . Broadcast starts automatically. Skip a track Press T. Press J / K. To cancel, press and hold the volume knob. Pandora® Preparation: Install the latest version of the Pandora application on your device (iPhone/ iPod touch), then create an account and log in [SOURCE SELECT]. (Page 4)...If thumbs down *2 On the remote control Press d. ENGLISH 9 Press I. USB input terminal Accessory of the iPod/iPhone*1 and/or KD-T905BTS: You can also connect to select PANDORA FRONT/PANDORA REAR/ PANDORA. or thumbs down is selected, the current track is available ...
... . Broadcast starts automatically. Skip a track Press T. Press J / K. To cancel, press and hold the volume knob. Pandora® Preparation: Install the latest version of the Pandora application on your device (iPhone/ iPod touch), then create an account and log in [SOURCE SELECT]. (Page 4)...If thumbs down *2 On the remote control Press d. ENGLISH 9 Press I. USB input terminal Accessory of the iPod/iPhone*1 and/or KD-T905BTS: You can also connect to select PANDORA FRONT/PANDORA REAR/ PANDORA. or thumbs down is selected, the current track is available ...

Instruction Manual America
Page 14
... knob to iHeartRadio. • Select [ON] for [IHEART SRC] in alphabetical order by turning the volume knob quickly. iHeartRadio® Preparation: Install the latest version of iHeartAuto application on your device. 2 Connect your device to the USB input terminal. station Select thumbs up the iHeartAuto application ... an account and log in to select the desired station, then press the knob. USB input terminal Accessory of the iPod/iPhone* and/or KD-T905BTS: You can search cities in [SOURCE SELECT]. (Page 4) Start listening 1 Start up or Press 2J / 1K. To select a stored...
... knob to iHeartRadio. • Select [ON] for [IHEART SRC] in alphabetical order by turning the volume knob quickly. iHeartRadio® Preparation: Install the latest version of iHeartAuto application on your device. 2 Connect your device to the USB input terminal. station Select thumbs up the iHeartAuto application ... an account and log in to select the desired station, then press the knob. USB input terminal Accessory of the iPod/iPhone* and/or KD-T905BTS: You can search cities in [SOURCE SELECT]. (Page 4) Start listening 1 Start up or Press 2J / 1K. To select a stored...

Instruction Manual America
Page 15
Spotify Preparation: Install the latest version of the unit. 3 Press B SRC repeatedly to select SPOTIFY FRONT/SPOTIFY REAR/ SPOTIFY. and/or KD-T905BTS: You can browse through the list quickly by turning the volume knob quickly. To unsave, repeat the same procedure. The list types displayed differ ...
Spotify Preparation: Install the latest version of the unit. 3 Press B SRC repeatedly to select SPOTIFY FRONT/SPOTIFY REAR/ SPOTIFY. and/or KD-T905BTS: You can browse through the list quickly by turning the volume knob quickly. To unsave, repeat the same procedure. The list types displayed differ ...

Instruction Manual America
Page 26
...listening to iPod BT source, the source automatically changes to select iPod BT if the device is still connected via Bluetooth. 22 ENGLISH Preparation: Install the latest version of the application will be interrupted or disconnected if: - Default: [XX] [REMOTE APP] [SELECT] Selects the device ...Android smartphone connected via Bluetooth. [ANDROID NOT CONNECTED]: No Android device is connected to activate the application. • The connectivity of JVC Remote application on this unit. If IOS is selected, select iPod BT source (or iPod USB if your device before connecting. To...
...listening to iPod BT source, the source automatically changes to select iPod BT if the device is still connected via Bluetooth. 22 ENGLISH Preparation: Install the latest version of the application will be interrupted or disconnected if: - Default: [XX] [REMOTE APP] [SELECT] Selects the device ...Android smartphone connected via Bluetooth. [ANDROID NOT CONNECTED]: No Android device is connected to activate the application. • The connectivity of JVC Remote application on this unit. If IOS is selected, select iPod BT source (or iPod USB if your device before connecting. To...

Instruction Manual America
Page 40
... is not deliverable. Please make sure both the device and unit are found. TROUBLESHOOTING Symptom Remedy • Sound cannot be selected. Make sure you have installed the latest version of the Pandora application on the Android device. Please wait. • Connected via Bluetooth or through auxiliary input jack. End the Spotify...
... is not deliverable. Please make sure both the device and unit are found. TROUBLESHOOTING Symptom Remedy • Sound cannot be selected. Make sure you have installed the latest version of the Pandora application on the Android device. Please wait. • Connected via Bluetooth or through auxiliary input jack. End the Spotify...

Instruction Manual America
Page 42
... parts of this unit in the console of less than 50 W. on the unit, then connect the device again. Remedy The unit is installed, check whether the brake lamps, blinkers, wipers, etc. Bluetooth device cannot get the contact information. The connected phones might not support phone ... 50 W, change the [AMP GAIN] setting to avoid damaging the speakers. (Page 25) • Mount the unit at an angle of your vehicle. TROUBLESHOOTING INSTALLATION/CONNECTION Bluetooth® Symptom "PLEASE WAIT" "NOT SUPPORT" "NO ENTRY"/"NO PAIR" "ERROR" "NO INFO"/"NO DATA" "H/W ERROR" "SWITCHING NG" The ...
... parts of this unit in the console of less than 50 W. on the unit, then connect the device again. Remedy The unit is installed, check whether the brake lamps, blinkers, wipers, etc. Bluetooth device cannot get the contact information. The connected phones might not support phone ... 50 W, change the [AMP GAIN] setting to avoid damaging the speakers. (Page 25) • Mount the unit at an angle of your vehicle. TROUBLESHOOTING INSTALLATION/CONNECTION Bluetooth® Symptom "PLEASE WAIT" "NOT SUPPORT" "NO ENTRY"/"NO PAIR" "ERROR" "NO INFO"/"NO DATA" "H/W ERROR" "SWITCHING NG" The ...

Instruction Manual America
Page 43
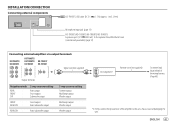
.... 5 Press BSRC to hold the sleeve firmly in the unit (on the top side Orientate the trim plate as illustrated before fitting. Installing without the mounting sleeve 1 Remove the mounting sleeve and trim plate from the ignition switch, then disconnect the terminal of your car. Removing...215;1) (E) Extraction key (×2) Basic procedure 1 Remove the key from the unit. 2 Align the holes in place. See "Wiring connection" on page 40. 3 Install the unit to your car Bend the appropriate tabs to turn on the power. 6 Detach the faceplate and reset the unit within 5 seconds. (Page 3) Hook...
.... 5 Press BSRC to hold the sleeve firmly in the unit (on the top side Orientate the trim plate as illustrated before fitting. Installing without the mounting sleeve 1 Remove the mounting sleeve and trim plate from the ignition switch, then disconnect the terminal of your car. Removing...215;1) (E) Extraction key (×2) Basic procedure 1 Remove the key from the unit. 2 Align the holes in place. See "Wiring connection" on page 40. 3 Install the unit to your car Bend the appropriate tabs to turn on the power. 6 Detach the faceplate and reset the unit within 5 seconds. (Page 3) Hook...
Instruction Manual America
Page 44
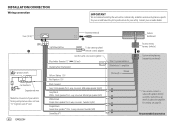
... connection IMPORTANT We recommend installing the unit with a commercially available custom wiring harness specific for your car and leave this job to professionals for your car audio dealer. Blue/white: ...
... connection IMPORTANT We recommend installing the unit with a commercially available custom wiring harness specific for your car and leave this job to professionals for your car audio dealer. Blue/white: ...
Instruction Manual America
Page 45
...INSTALLATION/CONNECTION Connecting external components KD-T905BTS: USB cable (DC 5 V 1.5 A) (approx. 1 m/3.3 feet) Microphone input jack (page 15) KD-T905BTS/KD-T900BTS/KD-T805BTS/KD-TD90BTS: Expansion port (12 V 500 mA): To the optional SiriusXM Vehicle Tuner (commercially available) (page 12) Connecting external amplifiers via output terminals KD-T905BTS/ KD-T805BTS KD-T900BTS/ KD-TD90BTS/ KD-T700BT/ KD-SR85BT KD... Tweeter output Mid Range output Woofer output Mid Range output Woofer output Woofer output JVC Amplifier*2 Remote wire (not supplied) To remote lead (blue/white) of the...
...INSTALLATION/CONNECTION Connecting external components KD-T905BTS: USB cable (DC 5 V 1.5 A) (approx. 1 m/3.3 feet) Microphone input jack (page 15) KD-T905BTS/KD-T900BTS/KD-T805BTS/KD-TD90BTS: Expansion port (12 V 500 mA): To the optional SiriusXM Vehicle Tuner (commercially available) (page 12) Connecting external amplifiers via output terminals KD-T905BTS/ KD-T805BTS KD-T900BTS/ KD-TD90BTS/ KD-T700BT/ KD-SR85BT KD... Tweeter output Mid Range output Woofer output Mid Range output Woofer output Woofer output JVC Amplifier*2 Remote wire (not supplied) To remote lead (blue/white) of the...
Instruction Manual America
Page 47
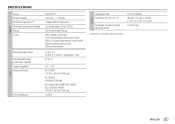
... W × 2 + 50 W × 1 (Subwoofer = 4 Ω) 22 W × 4 4 Ω - 8 Ω KD-T905BTS: CD/USB: 5 000 mV/10 kΩ load KD-T805BTS: 4 000 mV/10 kΩ load KD-T900BTS/KD-TD90BTS/KD-T700BT/ KD-TD70BT/KD-SR85BT: CD/USB: 2 500 mV/10 kΩ load ≤ 600 Ω General Operating Voltage Installation Size (W × H × D) Net Weight (includes Trimplate, Mounting Sleeve) 12...
... W × 2 + 50 W × 1 (Subwoofer = 4 Ω) 22 W × 4 4 Ω - 8 Ω KD-T905BTS: CD/USB: 5 000 mV/10 kΩ load KD-T805BTS: 4 000 mV/10 kΩ load KD-T900BTS/KD-TD90BTS/KD-T700BT/ KD-TD70BT/KD-SR85BT: CD/USB: 2 500 mV/10 kΩ load ≤ 600 Ω General Operating Voltage Installation Size (W × H × D) Net Weight (includes Trimplate, Mounting Sleeve) 12...
Quick Start Guide America
Page 2
...JVC Products: CD RECEIVER Model Name: KD-T905BTS/KD-T900BTS/KD-T805BTS/KD-TD90BTS/KD-T700BT/ KD-TD70BT/KD-SR85BT Responsible Party: JVCKENWOOD USA CORPORATION 2201 East Dominguez Street, Long Beach, CA 90810, U.S.A. FCC WARNING This equipment may cause harmful interference to radio communications, if it is not installed...is encouraged to try to correct the interference by one or more of the following are expressly approved in a residential installation. JVC KENWOOD Corporation 2967-3, ISHIKAWA-MACHI, HACHIOJI-SHI, TOKYO, JAPAN THIS PRODUCT COMPLIES WITH DHHS RULES 21CFR SUBCHAPTER J ...
...JVC Products: CD RECEIVER Model Name: KD-T905BTS/KD-T900BTS/KD-T805BTS/KD-TD90BTS/KD-T700BT/ KD-TD70BT/KD-SR85BT Responsible Party: JVCKENWOOD USA CORPORATION 2201 East Dominguez Street, Long Beach, CA 90810, U.S.A. FCC WARNING This equipment may cause harmful interference to radio communications, if it is not installed...is encouraged to try to correct the interference by one or more of the following are expressly approved in a residential installation. JVC KENWOOD Corporation 2967-3, ISHIKAWA-MACHI, HACHIOJI-SHI, TOKYO, JAPAN THIS PRODUCT COMPLIES WITH DHHS RULES 21CFR SUBCHAPTER J ...

Quick Start Guide America
Page 6
... the wires are not touching car's chassis, then replace the old fuse with one that comes into contact with metal parts to protect the wires. INSTALLATION/CONNECTION Warning • The unit can only be used with a 12 V DC power supply, negative ground. • Disconnect the battery's negative ...in -dash mounting)". 4 Connect the terminal of the car battery. 2 Connect the wires properly. Be sure to ground this unit during and shortly after installation. - Installing the unit (in place. 2 Do not touch the metal parts of the unit. Hook on and off by the ignition key. • Keep ...
... the wires are not touching car's chassis, then replace the old fuse with one that comes into contact with metal parts to protect the wires. INSTALLATION/CONNECTION Warning • The unit can only be used with a 12 V DC power supply, negative ground. • Disconnect the battery's negative ...in -dash mounting)". 4 Connect the terminal of the car battery. 2 Connect the wires properly. Be sure to ground this unit during and shortly after installation. - Installing the unit (in place. 2 Do not touch the metal parts of the unit. Hook on and off by the ignition key. • Keep ...

Quick Start Guide America
Page 7
... connection Antenna terminal Vehicle dashboard Fuse (10 A) Join the same color wires together. Use only the specified screws. Using wrong screws might damage the unit. Installing the unit (without mounting sleeve) 1 Remove the mounting sleeve and trim plate from the unit. 2 Align the holes in the unit (on both sides) with...
... connection Antenna terminal Vehicle dashboard Fuse (10 A) Join the same color wires together. Use only the specified screws. Using wrong screws might damage the unit. Installing the unit (without mounting sleeve) 1 Remove the mounting sleeve and trim plate from the unit. 2 Align the holes in the unit (on both sides) with...


