
Software License Agreement
Page 1
... subject to this Software License Agreement. LYT2427-002A-M LYT2427-002A-M SOFTWARE LICENSE AGREEMENT The software embedded in the Product (hereinafter the "Licensed Software") provided by JVC KENWOOD Corporation (hereinafter the "Licensor") is copyrighted to or sublicensable by the Licensor, and this Agreement provides for the terms and conditions which Users shall...
... subject to this Software License Agreement. LYT2427-002A-M LYT2427-002A-M SOFTWARE LICENSE AGREEMENT The software embedded in the Product (hereinafter the "Licensed Software") provided by JVC KENWOOD Corporation (hereinafter the "Licensor") is copyrighted to or sublicensable by the Licensor, and this Agreement provides for the terms and conditions which Users shall...
Software License Agreement
Page 2
... includes the software developed or created independently by "GPL/LGPL" and embedded in the construction of this Agreement is given for such software component, either JVC KENWOOD Corporation (hereinafter "JKC") or a third party subsists. The User shall understand that was executed between the Licensor and the User. 3. Matters not stipulated in...
... includes the software developed or created independently by "GPL/LGPL" and embedded in the construction of this Agreement is given for such software component, either JVC KENWOOD Corporation (hereinafter "JKC") or a third party subsists. The User shall understand that was executed between the Licensor and the User. 3. Matters not stipulated in...

Basic User Guide
Page 1
... (for AV Cable) (for Android tablet and iPhone. Detailed User Guide For more details on the battery pack mount of this JVC product. Basic User Guide HD MEMORY CAMERA GZ-EX250 A GZ-EX215 A GZ-EX210 A LYT2393-002A-M EN . o http://manual3.jvckenwood.com/ mobile/us/ VerifyiBngasthiceUAscecreGssuoidriee(sthis manual) AC Adapter AC-V11U Battery Pack BN-VG114U...
... (for AV Cable) (for Android tablet and iPhone. Detailed User Guide For more details on the battery pack mount of this JVC product. Basic User Guide HD MEMORY CAMERA GZ-EX250 A GZ-EX215 A GZ-EX210 A LYT2393-002A-M EN . o http://manual3.jvckenwood.com/ mobile/us/ VerifyiBngasthiceUAscecreGssuoidriee(sthis manual) AC Adapter AC-V11U Battery Pack BN-VG114U...
Basic User Guide
Page 2
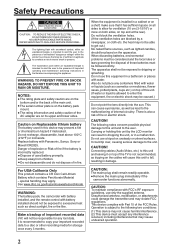
.... Do not block the ventilation holes. (If the ventilation holes are on its upper and lower sides. Also do not dispose of important recorded data JVC will cause this unit to a disc or other recording media for storage once every 3 months. CAUTION: To maintain compliance with water or liquids (such as...
.... Do not block the ventilation holes. (If the ventilation holes are on its upper and lower sides. Also do not dispose of important recorded data JVC will cause this unit to a disc or other recording media for storage once every 3 months. CAUTION: To maintain compliance with water or liquids (such as...

Basic User Guide
Page 3
... AC wall outlet or AC adapter (power/DC plug). • Be sure to 240 V. Doing so may be guaranteed. • Do not poke your nearest JVC dealer.
... AC wall outlet or AC adapter (power/DC plug). • Be sure to 240 V. Doing so may be guaranteed. • Do not poke your nearest JVC dealer.

Basic User Guide
Page 4
... filter reduces interference when this unit is connected to be charged without using this unit. * To order any of these accessories please visit www.store.jvc.com or call 1-800-252-5722 4 Release the stopper. 3 cm (1-3/16") Wind once (for AV Cable) Wind twice (for USB Cable) To be connected to...
... filter reduces interference when this unit is connected to be charged without using this unit. * To order any of these accessories please visit www.store.jvc.com or call 1-800-252-5722 4 Release the stopper. 3 cm (1-3/16") Wind once (for AV Cable) Wind twice (for USB Cable) To be connected to...
Basic User Guide
Page 5
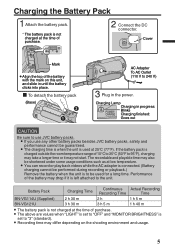
...°F). Charging Lamp Charging in the power. Charging the Battery Pack Attach the battery pack. CAUTION Be sure to use JVC battery packs. 0 If you use any other battery packs besides JVC battery packs, safety and performance cannot be guaranteed. 0 The charging time is when the unit is used at low temperature...
...°F). Charging Lamp Charging in the power. Charging the Battery Pack Attach the battery pack. CAUTION Be sure to use JVC battery packs. 0 If you use any other battery packs besides JVC battery packs, safety and performance cannot be guaranteed. 0 The charging time is when the unit is used at low temperature...
Basic User Guide
Page 6
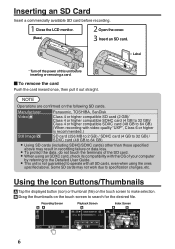
Close the LCD monitor. (Base) Open the cover. To protect the data, do not touch the terminals of this unit before recording. operate with all SD cards, even when using an SDXC card, check its compatibility with video quality "UXP", Class 6 or higher is not guaranteed to User Guide. Using the Icon Buttons/Thumbnails A Tap the displayed button (icon) or thumbnail (file) on the touch screen to 64 GB) 0 Using SD cards (including SDHC/SDXC cards) other than those specified 0 0 above . Label .. Inserting an SD Card Insert a commercially available SD card before ...
Close the LCD monitor. (Base) Open the cover. To protect the data, do not touch the terminals of this unit before recording. operate with all SD cards, even when using an SDXC card, check its compatibility with video quality "UXP", Class 6 or higher is not guaranteed to User Guide. Using the Icon Buttons/Thumbnails A Tap the displayed button (icon) or thumbnail (file) on the touch screen to 64 GB) 0 Using SD cards (including SDHC/SDXC cards) other than those specified 0 0 above . Label .. Inserting an SD Card Insert a commercially available SD card before ...

Basic User Guide
Page 7
unit turns on the menu screen. 1 Tap "MENU". 3 Tap the desired menu. is tapped, go to adjust the value. CLOCK/AREA SETTING GMT . If an item other than "MENU" is displayed. When the LCD monitor is tapped, go to step 4. CLOCK SETTING JAN DATE 1 2012 TIME 10 00 AM 0 . MENU If "MENU" is closed, the unit turns off. 2 Tap "YES" when "SET DATE/TIME!" Clock Setting 1 Open the LCD monitor. 0 The . SET DATE/TIME! Tap "" to the previous screen Tap "J" (return). VIDEO SCENE SELECT 0 . ˻PLAY REC MENU The shortcut menu appears. 2 Tap the desired...
unit turns on the menu screen. 1 Tap "MENU". 3 Tap the desired menu. is tapped, go to adjust the value. CLOCK/AREA SETTING GMT . If an item other than "MENU" is displayed. When the LCD monitor is tapped, go to step 4. CLOCK SETTING JAN DATE 1 2012 TIME 10 00 AM 0 . MENU If "MENU" is closed, the unit turns off. 2 Tap "YES" when "SET DATE/TIME!" Clock Setting 1 Open the LCD monitor. 0 The . SET DATE/TIME! Tap "" to the previous screen Tap "J" (return). VIDEO SCENE SELECT 0 . ˻PLAY REC MENU The shortcut menu appears. 2 Tap the desired...

Basic User Guide
Page 8
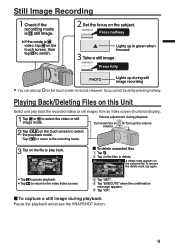
Check if the recording mode is C Intelligent Auto. If the mode is H Manual, tap H on the touch screen, then tap A to switch. Start recording. o Indications during video recording Video Quality Recording Media Battery Indicator Image Stabilizer Scene Counter ˻PLAY REC 0:00:00 [0:54] MENU Remaining Recording Time NOTE 0 The estimated recording time of specific shooting scenes such as person etc., its icon is turned on or off. 8 To stop . (Wide angle) (Telephoto) 0 The mode can also be adjusted automatically to suit the shooting conditions. 0 In case of ...
Check if the recording mode is C Intelligent Auto. If the mode is H Manual, tap H on the touch screen, then tap A to switch. Start recording. o Indications during video recording Video Quality Recording Media Battery Indicator Image Stabilizer Scene Counter ˻PLAY REC 0:00:00 [0:54] MENU Remaining Recording Time NOTE 0 The estimated recording time of specific shooting scenes such as person etc., its icon is turned on or off. 8 To stop . (Wide angle) (Telephoto) 0 The mode can also be adjusted automatically to suit the shooting conditions. 0 In case of ...
Basic User Guide
Page 9
If the mode is B still image. Set the focus on the touch screen, then tap B to switch. Tap on the touch screen to play back the recorded videos or still images from an index screen (thumbnail display). Tap "OK". Tap E to return to pause playback. To remove the delete mark, tap again. ≪REC SEL ALL REL ALL SET QUIT Tap e to the recording mode. Tap A or B to the video index screen. . Tap u to return to select the video or still image mode. Volume adjustment during playback Turn down the volume Turn up the volume Tap F on the file to select ...
If the mode is B still image. Set the focus on the touch screen, then tap B to switch. Tap on the touch screen to play back the recorded videos or still images from an index screen (thumbnail display). Tap "OK". Tap E to return to pause playback. To remove the delete mark, tap again. ≪REC SEL ALL REL ALL SET QUIT Tap e to the recording mode. Tap A or B to the video index screen. . Tap u to return to select the video or still image mode. Volume adjustment during playback Turn down the volume Turn up the volume Tap F on the file to select ...

Basic User Guide
Page 10
NOTE 0 Use a High Speed HDMI mini cable. To connect using the HDMI mini connector When connecting to a 1080p compatible TV, set "HDMI OUTPUT" to the connection. Playing Back on automatically when the AC adapter is completed A Turn on the camera and the TV. 0 This unit powers on TV Preparation: 0 Turn off both camera and TV. B Select the TV input switch. TV AV Cable (Provided) To AV Connector Yellow White Red Video Input Video Input Audio Input (L) Audio Input (R) Playback Operation After the connection with TV is connected. To connect using the AV connector Change the ...
NOTE 0 Use a High Speed HDMI mini cable. To connect using the HDMI mini connector When connecting to a 1080p compatible TV, set "HDMI OUTPUT" to the connection. Playing Back on automatically when the AC adapter is completed A Turn on the camera and the TV. 0 This unit powers on TV Preparation: 0 Turn off both camera and TV. B Select the TV input switch. TV AV Cable (Provided) To AV Connector Yellow White Red Video Input Video Input Audio Input (L) Audio Input (R) Playback Operation After the connection with TV is connected. To connect using the AV connector Change the ...

Basic User Guide
Page 11
..., refer to a computer. Upload to YouTube YouTube is a great way to share your Windows PC with a Blu-ray Player: The provided JVC software lets you create high definition AVCHD discs using standard blank DVD-R media, and your videos, in either HD or SD quality. I See... on how to create a disc using the provided software. Each of recorder. - Keep It High Definition (Windows) o Back up to a computer: The provided JVC software also makes it is necessary to install the additional software. I *2 I *3 I *4 I See Detailed User Guide and manual of these solutions is a great...
..., refer to a computer. Upload to YouTube YouTube is a great way to share your Windows PC with a Blu-ray Player: The provided JVC software lets you create high definition AVCHD discs using standard blank DVD-R media, and your videos, in either HD or SD quality. I See... on how to create a disc using the provided software. Each of recorder. - Keep It High Definition (Windows) o Back up to a computer: The provided JVC software also makes it is necessary to install the additional software. I *2 I *3 I *4 I See Detailed User Guide and manual of these solutions is a great...

Basic User Guide
Page 12
Install Everio MediaBrowser (Windows) Everio MediaBrowser is included with your videos. Everio MediaBrowser uses a calendar based interface that makes it easy to YouTube, and other popular web sites. Installation ends and icons are created on -screen instructions. 2 Click "Finish". 3 Click "Quit". 0 . Follow the on the desktop. 12 It also lets you create discs and upload video to find any video you archive and organize your camera. P00rLIenopWaadrinatdhtoieowpnsr:oVvisidtaed/ WCiDnd-RoOwsM7i,ntthoeyaouutroPpCla.y dialog box appears. 1 Click "Everio MediaBrowser 4"....
Install Everio MediaBrowser (Windows) Everio MediaBrowser is included with your videos. Everio MediaBrowser uses a calendar based interface that makes it easy to YouTube, and other popular web sites. Installation ends and icons are created on -screen instructions. 2 Click "Finish". 3 Click "Quit". 0 . Follow the on the desktop. 12 It also lets you create discs and upload video to find any video you archive and organize your camera. P00rLIenopWaadrinatdhtoieowpnsr:oVvisidtaed/ WCiDnd-RoOwsM7i,ntthoeyaouutroPpCla.y dialog box appears. 1 Click "Everio MediaBrowser 4"....

Basic User Guide
Page 13
CONNECT TO PC PLAYBACK ON PC . Tap "CONNECT TO PC" on the PC without using your recordings on the camera's touch screen. Tap an option that best suits your recordings ON PC on the PC. 0 To back up recordings on the PC. DIRECT 0 To save your recordings on the camera. 1 The "SELECT DEVICE" menu appears. sharing sites. SELECT DEVICE SELECT DEVICE TYPE TO CONNECT CONNECT TO PC . 0 Tap "CONNECT TO OTHER" if the camera is connected to a device other sections in the "Install Everio MediaBrowser (Windows)" section. 0 Reconnect the power supply to turn off the camera. 0 ...
CONNECT TO PC PLAYBACK ON PC . Tap "CONNECT TO PC" on the PC without using your recordings on the camera's touch screen. Tap an option that best suits your recordings ON PC on the PC. 0 To back up recordings on the PC. DIRECT 0 To save your recordings on the camera. 1 The "SELECT DEVICE" menu appears. sharing sites. SELECT DEVICE SELECT DEVICE TYPE TO CONNECT CONNECT TO PC . 0 Tap "CONNECT TO OTHER" if the camera is connected to a device other sections in the "Install Everio MediaBrowser (Windows)" section. 0 Reconnect the power supply to turn off the camera. 0 ...

Basic User Guide
Page 14
Reconnect the power supply to the computer, click on Device>Camcorder in the left in most popular media players. 14 o On the PC: 3 Select the volume. . View Your Video (Windows) 0 To view video that is still on your camera, click on Library>Calendar and then choose the date the video was recorded. You can also play back your videos. BACK UP Everio MediaBrowser starts on the camera's touch screen. NOTE 0 Choose Settings/Preferences to 240 V) o On the camera: 1 Tap "CONNECT TO PC" on the camera. To DC Connector USB Cable (Provided) To USB Connector AC Adapter...
Reconnect the power supply to the computer, click on Device>Camcorder in the left in most popular media players. 14 o On the PC: 3 Select the volume. . View Your Video (Windows) 0 To view video that is still on your camera, click on Library>Calendar and then choose the date the video was recorded. You can also play back your videos. BACK UP Everio MediaBrowser starts on the camera's touch screen. NOTE 0 Choose Settings/Preferences to 240 V) o On the camera: 1 Tap "CONNECT TO PC" on the camera. To DC Connector USB Cable (Provided) To USB Connector AC Adapter...

Basic User Guide
Page 15
Connect this will hold approximately 35 minutes of video in the highest quality setting. 0 AVCHD discs can use any Blu-ray player that this cable to the AV input on the "Create Disc" button. . 2 Select the video clips you wish to archive your DVD/VHS recorder instructions to 240 V) To DC Connector DVD/VHS Recorder . Recordings made in the XP, SP, or EP mode are first converted to the XP mode, and then recorded. 0 A standard 4.7 GB disc will create a standard definition recording with no loss in their original high definition quality. 0 You can be sure to go to ...
Connect this will hold approximately 35 minutes of video in the highest quality setting. 0 AVCHD discs can use any Blu-ray player that this cable to the AV input on the "Create Disc" button. . 2 Select the video clips you wish to archive your DVD/VHS recorder instructions to 240 V) To DC Connector DVD/VHS Recorder . Recordings made in the XP, SP, or EP mode are first converted to the XP mode, and then recorded. 0 A standard 4.7 GB disc will create a standard definition recording with no loss in their original high definition quality. 0 You can be sure to go to ...

Basic User Guide
Page 16
...-free) Other Countries in Europe English/German/French/Spanish +44-1489-564-764 Asia (Philippines) China English Chinese Homepage: http://www.pixela.co.jp/oem/jvc/mediabrowser/e/ Please check our website for latest information and downloading. +63-2-438-0090 10800-163-0014 (toll-free) . 16 For details on the "YouTube" button...
...-free) Other Countries in Europe English/German/French/Spanish +44-1489-564-764 Asia (Philippines) China English Chinese Homepage: http://www.pixela.co.jp/oem/jvc/mediabrowser/e/ Please check our website for latest information and downloading. +63-2-438-0090 10800-163-0014 (toll-free) . 16 For details on the "YouTube" button...

Basic User Guide
Page 17
You can import files from this unit to the computer with the USB cable. 2 Tap "CONNECT TO PC" on the camera's touch screen. 3 Tap "PLAYBACK ON PC" on the camera's touch screen. Disconnect the power supply. 1 Open the LCD monitor to connect to a computer using a USB Cable. USB cable (Provided) o iMovie and iPhoto You can determine the operating system version, processor and amount of the software. 0 There is no guarantee that enough space is left in the Mac's HDD. 0 Close the LCD monitor to the Mac Computer for backup. 17 To USB Connector To USB port NOTE 0 Files must be ...
You can import files from this unit to the computer with the USB cable. 2 Tap "CONNECT TO PC" on the camera's touch screen. 3 Tap "PLAYBACK ON PC" on the camera's touch screen. Disconnect the power supply. 1 Open the LCD monitor to connect to a computer using a USB Cable. USB cable (Provided) o iMovie and iPhoto You can determine the operating system version, processor and amount of the software. 0 There is no guarantee that enough space is left in the Mac's HDD. 0 Close the LCD monitor to the Mac Computer for backup. 17 To USB Connector To USB port NOTE 0 Files must be ...
Basic User Guide
Page 18
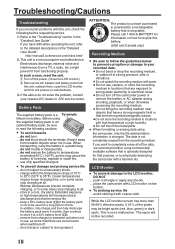
... this battery. (USA and Canada only) Recording Medium • Be sure to follow the guidelines below to prevent corruption or damage to your nearest JVC dealer or JVC service center. place the camcorder with coarse cloth. Before using commercially available software that is not completely erased from functioning properly. do not short...
... this battery. (USA and Canada only) Recording Medium • Be sure to follow the guidelines below to prevent corruption or damage to your nearest JVC dealer or JVC service center. place the camcorder with coarse cloth. Before using commercially available software that is not completely erased from functioning properly. do not short...
