Instructions
Page 1
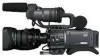
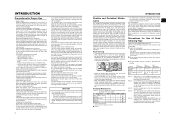
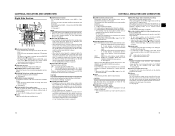
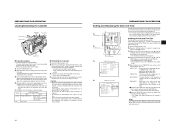
LST0392- Model No. Before operating this information for purchasing this JVC product. Retain this unit, please read the instructions carefully to ensure the best possible performance. Serial No. * The illustration shows the GY-HD110/GYHD111 HD CAMERA RECORDER with the provided lens, viewfinder, microphone and battery pack attached. © 2006 Victor Company of...
LST0392- Model No. Before operating this information for purchasing this JVC product. Retain this unit, please read the instructions carefully to ensure the best possible performance. Serial No. * The illustration shows the GY-HD110/GYHD111 HD CAMERA RECORDER with the provided lens, viewfinder, microphone and battery pack attached. © 2006 Victor Company of...
Instructions
Page 4
...and GYHD111E/CHE functions are trademarks or registered trademarks of copyright holders. • JVC cannot assume liabilities that both 60 Hz/50 Hz HD or HDTV signals. Videocassettes...HDV/DV devices. 3 HDV 720p (720 effective scan lines, progressive scan) HDV 1080i (1080 effective scan lines, interlaced scan) This camcorder supports HDV 720p format. (HDV 720p, 480p, 576p) HDV ...bright subject moves in a frame. • Safety Zone indication in viewfinder • Zebra pattern video level indication in viewfinder • Full Auto Shooting (FAS) function Eliminating the need for ...
...and GYHD111E/CHE functions are trademarks or registered trademarks of copyright holders. • JVC cannot assume liabilities that both 60 Hz/50 Hz HD or HDTV signals. Videocassettes...HDV/DV devices. 3 HDV 720p (720 effective scan lines, progressive scan) HDV 1080i (1080 effective scan lines, interlaced scan) This camcorder supports HDV 720p format. (HDV 720p, 480p, 576p) HDV ...bright subject moves in a frame. • Safety Zone indication in viewfinder • Zebra pattern video level indication in viewfinder • Full Auto Shooting (FAS) function Eliminating the need for ...
Instructions
Page 5
...Memory Card 31 • Inserting an SD Memory Card • Taking out the SD memory card • About SD Memory Cards About the Viewfinder Cable 31 AC Operation 32 • Charging the Built-in Battery Battery Operation 33 • Charging the Battery Pack • Attaching the ... code data • Presetting user's bit data Synchronizing with the Time Code of the IEEE1394 (DV)-Connected Master Unit 42 Screen Adjustment 43 Viewfinder Adjustment 43 Back Focus Adjustment 44 White Balance Adjustment 45 • White Balance Adjustment • Full Auto White Balance (FAW) SETTING AND ...
...Memory Card 31 • Inserting an SD Memory Card • Taking out the SD memory card • About SD Memory Cards About the Viewfinder Cable 31 AC Operation 32 • Charging the Built-in Battery Battery Operation 33 • Charging the Battery Pack • Attaching the ... code data • Presetting user's bit data Synchronizing with the Time Code of the IEEE1394 (DV)-Connected Master Unit 42 Screen Adjustment 43 Viewfinder Adjustment 43 Back Focus Adjustment 44 White Balance Adjustment 45 • White Balance Adjustment • Full Auto White Balance (FAW) SETTING AND ...
Instructions
Page 6
...follow the instructions of Head Cleaning Tape Please use the camcorder continuously for a long period of 30% to 40°C and a relative humidity of time, the characters displayed in the viewfinder may be considered as routine maintenance. is displayed on ... sandy dust. • Optical performance of lens Due to maintain the video and audio quality at intervals half of professional video equipment at your nearest JVC-authorized service agent. G E ing heads) Tape guides, rollers G E Belt gears H E Drive parts H H G: Clean, check and adjust. F: Replace. 1500H E E E...
...follow the instructions of Head Cleaning Tape Please use the camcorder continuously for a long period of 30% to 40°C and a relative humidity of time, the characters displayed in the viewfinder may be considered as routine maintenance. is displayed on ... sandy dust. • Optical performance of lens Due to maintain the video and audio quality at intervals half of professional video equipment at your nearest JVC-authorized service agent. G E ing heads) Tape guides, rollers G E Belt gears H E Drive parts H H G: Clean, check and adjust. F: Replace. 1500H E E E...
Instructions
Page 7
... down . • Avoid storing a videocassette with its tape not being overwritten. • To record on the LCD monitor and in the viewfinder when condensation occurs in this unit. This phenomenon is recommended that of the new environment before the condensa- Nevertheless, please take note that you ... Pack to be Used The GY-HD110 can use any of the following batteries. • BN-V428, BN-V438 Videocassette to be Used • Use JVC's videocassette tapes marked with the A symbol. • Mini DV videocassette : M-DV63HD M-DV63PROHD * Do not use M-DV80. • Videocassettes cannot be ...
... down . • Avoid storing a videocassette with its tape not being overwritten. • To record on the LCD monitor and in the viewfinder when condensation occurs in this unit. This phenomenon is recommended that of the new environment before the condensa- Nevertheless, please take note that you ... Pack to be Used The GY-HD110 can use any of the following batteries. • BN-V428, BN-V438 Videocassette to be Used • Use JVC's videocassette tapes marked with the A symbol. • Mini DV videocassette : M-DV63HD M-DV63PROHD * Do not use M-DV80. • Videocassettes cannot be ...
Instructions
Page 8
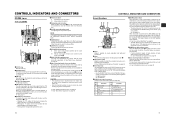
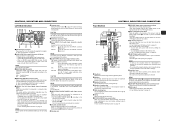
...VTR enters the warning mode, it possible to attach the provided microphone or a separately sold lights and accessories. 2Knob This is imposed on the viewfinder or LCD areas having luminance levels in accordance with the menu settings made for the video signal. Function 1 Return switch 7 Iris position 2 ... full auto white balance and color bar modes. X See page 80. 5[LENS] Lens control connector Connect 12-pin lens control cable from the viewfinder, LCD monitor and video signal connector while this ring in the direction of the arrow, close -up shooting) By rotating this button is 70...
...VTR enters the warning mode, it possible to attach the provided microphone or a separately sold lights and accessories. 2Knob This is imposed on the viewfinder or LCD areas having luminance levels in accordance with the menu settings made for the video signal. Function 1 Return switch 7 Iris position 2 ... full auto white balance and color bar modes. X See page 80. 5[LENS] Lens control connector Connect 12-pin lens control cable from the viewfinder, LCD monitor and video signal connector while this ring in the direction of the arrow, close -up shooting) By rotating this button is 70...
Instructions
Page 9
... set to ON.) TC : Set to this to time codes already recorded on page 14. In this setting, the time code always operates in the viewfinder. (This switch works when the TC/UB item on the LCD/VF [2/3] menu screen is input, the limiter works to attach a separately sold shoulder belt...
... set to ON.) TC : Set to this to time codes already recorded on page 14. In this setting, the time code always operates in the viewfinder. (This switch works when the TC/UB item on the LCD/VF [2/3] menu screen is input, the limiter works to attach a separately sold shoulder belt...
Instructions
Page 10
... occur in B. a[STATUS] Status/Menu button • Pressing this button while the menu screen is not shown) displays a status screen in the viewfinder or on tape or the IEEE1394 input video format. Pressing this button in the normal screen mode (condition in which the menu screen is displayed...: Switch into white balance mode memorized in ND filter. item on other sound. X See page 71. e[POWER] Power ON/OFF switch Switch that the camcorder will be memorized into white balance mode memorized in the audio. When the power is OFF, "POFF" is displayed in blue, red or green, making...
... occur in B. a[STATUS] Status/Menu button • Pressing this button while the menu screen is not shown) displays a status screen in the viewfinder or on tape or the IEEE1394 input video format. Pressing this button in the normal screen mode (condition in which the menu screen is displayed...: Switch into white balance mode memorized in ND filter. item on other sound. X See page 71. e[POWER] Power ON/OFF switch Switch that the camcorder will be memorized into white balance mode memorized in the audio. When the power is OFF, "POFF" is displayed in blue, red or green, making...
Instructions
Page 11
...adjust the focus by turning this ring. 4Eyepiece mounting ring You can adjust the position of the eyepiece forward or backward by loosening this camcorder. • You can select the output signal using them. 6Cassette cover Sliding the EJECT switch a on page 17 located on the OTHERS... 0 into CH-1 regardless of the input audio signal is not output. 3[IEEE1394] IEEE1394 switch Input/output signal and playback signal video from the viewfinder here. 8[CH-2 INPUT] CH-2 audio input connector selector switch Selects the CH-2 audio input connector. a[EJECT] Eject switch and LED Slide this...
...adjust the focus by turning this ring. 4Eyepiece mounting ring You can adjust the position of the eyepiece forward or backward by loosening this camcorder. • You can select the output signal using them. 6Cassette cover Sliding the EJECT switch a on page 17 located on the OTHERS... 0 into CH-1 regardless of the input audio signal is not output. 3[IEEE1394] IEEE1394 switch Input/output signal and playback signal video from the viewfinder here. 8[CH-2 INPUT] CH-2 audio input connector selector switch Selects the CH-2 audio input connector. a[EJECT] Eject switch and LED Slide this...
Instructions
Page 12
...page 73. • Even if there are also used for audio recording level. X See "AUDIO/MIC [2/2] Menu Screen" on the LCD monitor or the viewfinder. • FAS mode works together with digital noise. k[PLAY/STILL] Play/still button Press to camera video. • SMOOTH TRANS mode does not run....position. CAUTION Make sure to move switches all of the status display are using an Anton-Bauer battery or IDX battery, the LCD monitor and viewfinder display switches each time the button is pressed. l[FF] Fast forward button Press this button to fast forward the tape. • Pressing ...
...page 73. • Even if there are also used for audio recording level. X See "AUDIO/MIC [2/2] Menu Screen" on the LCD monitor or the viewfinder. • FAS mode works together with digital noise. k[PLAY/STILL] Play/still button Press to camera video. • SMOOTH TRANS mode does not run....position. CAUTION Make sure to move switches all of the status display are using an Anton-Bauer battery or IDX battery, the LCD monitor and viewfinder display switches each time the button is pressed. l[FF] Fast forward button Press this button to fast forward the tape. • Pressing ...
Instructions
Page 13
... is ON. SHUTTER 1/24.01 to PRST (PRESET). *4 " ** " depends on the video format. CONTROLS, INDICATORS AND CONNECTORS Indications on the LCD Monitor and in the Viewfinder (Cont'd) „ Status Screens in reverse direction (REV1: About ×2 speed, REV2: About ×5 speed, REV3: About ×10 speed) STOP : Stop mode (Tape protect...
... is ON. SHUTTER 1/24.01 to PRST (PRESET). *4 " ** " depends on the video format. CONTROLS, INDICATORS AND CONNECTORS Indications on the LCD Monitor and in the Viewfinder (Cont'd) „ Status Screens in reverse direction (REV1: About ×2 speed, REV2: About ×5 speed, REV3: About ×10 speed) STOP : Stop mode (Tape protect...
Instructions
Page 14
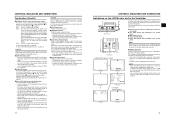
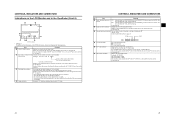
... the TC/UB item on the LCD/VF [2/3] menu screen. X See page 74. CONTROLS, INDICATORS AND CONNECTORS Indications on the LCD Monitor and in the Viewfinder (Cont'd) 1 2 3 7 0 4 9 86 5 STATUS 1 Screen • STATUS 1 In addition to select the REC item on the VIDEO FORMAT menu screen. For some lenses, no display appears...
... the TC/UB item on the LCD/VF [2/3] menu screen. X See page 74. CONTROLS, INDICATORS AND CONNECTORS Indications on the LCD Monitor and in the Viewfinder (Cont'd) 1 2 3 7 0 4 9 86 5 STATUS 1 Screen • STATUS 1 In addition to select the REC item on the VIDEO FORMAT menu screen. For some lenses, no display appears...

Instructions
Page 15
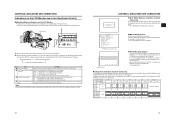
... K, 44.1 K) 6 Audio level meter indication Displays the audio level meters during playback. Whether or not to the video signal. 24 25 During recording in the Viewfinder (Cont'd) STATUS 2 Screen STATUS 3 Screen • STATUS 2 This screen displays the camera setup statuses.
... K, 44.1 K) 6 Audio level meter indication Displays the audio level meters during playback. Whether or not to the video signal. 24 25 During recording in the Viewfinder (Cont'd) STATUS 2 Screen STATUS 3 Screen • STATUS 2 This screen displays the camera setup statuses.
Instructions
Page 16
...and the ASPECT item setting in the VIDEO FORMAT menu screen, as shown below. X See "Setting Menu Screens" on the LCD monitor, the viewfinder display the image. RECR : TC GENE switch is set to the DR-HD100 INSTRUCTION MANUAL.) MEMO When characters indicating the status are displayed in ...:9+4:3 OFF ON Cannot be showed alone in the VTR, a warning mes- CONTROLS, INDICATORS AND CONNECTORS Indications on the LCD Monitor and in the Viewfinder (Cont'd) „ Magnified Status Indications on the LCD Monitor The characters on the status screens can be turned ON/OFF with the Anton-Bauer...
...and the ASPECT item setting in the VIDEO FORMAT menu screen, as shown below. X See "Setting Menu Screens" on the LCD monitor, the viewfinder display the image. RECR : TC GENE switch is set to the DR-HD100 INSTRUCTION MANUAL.) MEMO When characters indicating the status are displayed in ...:9+4:3 OFF ON Cannot be showed alone in the VTR, a warning mes- CONTROLS, INDICATORS AND CONNECTORS Indications on the LCD Monitor and in the Viewfinder (Cont'd) „ Magnified Status Indications on the LCD Monitor The characters on the status screens can be turned ON/OFF with the Anton-Bauer...

Instructions
Page 17
... and in the Viewfinder (Cont'd) DISPLAY button...camcorder with the screen in the normal display orientation, holding down the DISPLAY button does not work. • You can set the LCD monitor and viewfinder...when this unit is set to ON, the LCD monitor and viewfinder (VF) displays are as shown below . LCD Monitor Status LCD...• You can switch between the LCD monitor and the viewfinder by holding down the DISPLAY button for about 2 seconds. ... function that switches the display between the LCD monitor and the viewfinder by holding down the DISPLAY button, the display mode is cancelled...
... and in the Viewfinder (Cont'd) DISPLAY button...camcorder with the screen in the normal display orientation, holding down the DISPLAY button does not work. • You can set the LCD monitor and viewfinder...when this unit is set to ON, the LCD monitor and viewfinder (VF) displays are as shown below . LCD Monitor Status LCD...• You can switch between the LCD monitor and the viewfinder by holding down the DISPLAY button for about 2 seconds. ... function that switches the display between the LCD monitor and the viewfinder by holding down the DISPLAY button, the display mode is cancelled...
Instructions
Page 18
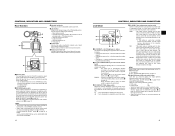
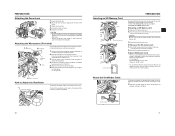
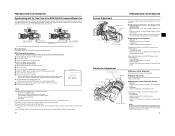
...The SD memory card comes out slightly. 2. Turn the knob on the GY-HD110. 5. INPUT1, 2 connector How to Attach the Viewfinder Knob Taking off the viewfinder To attach the viewfinder, slide it in the direction of a phan- To take off or disturbed back focus. • Set the GY-HD110's power ...Card 1. tom microphone. CAUTION Be sure not to touch the metal connector area of the SD memory card to perform the correct setting for this camcorder. Set the switch on the side of the SD memory card. 3. Core filter (black) 30 31 Microphone Microphone holder 5. Make sure to...
...The SD memory card comes out slightly. 2. Turn the knob on the GY-HD110. 5. INPUT1, 2 connector How to Attach the Viewfinder Knob Taking off the viewfinder To attach the viewfinder, slide it in the direction of a phan- To take off or disturbed back focus. • Set the GY-HD110's power ...Card 1. tom microphone. CAUTION Be sure not to touch the metal connector area of the SD memory card to perform the correct setting for this camcorder. Set the switch on the side of the SD memory card. 3. Core filter (black) 30 31 Microphone Microphone holder 5. Make sure to...
Instructions
Page 20
... Off Camera mode The GY-HD110 enters the Camera mode. PREPARATIONS Battery Operation (Cont'd) „ Remaining Battery Power Display LCD monitor/Viewfinder When the remaining battery power is nearly exhausted, the following statuses. The camera image is displayed in the VTR mode. Place the ... in the order that the "STBY" or "STOP" indication is switched, the VTR indicator displays the following warnings will be generated. „ Viewfinder screen or LCD monitor When a Status screen is displayed (excluding the STATUS 2, 3 screen in the Camera mode) • Alarm indication: LOW...
... Off Camera mode The GY-HD110 enters the Camera mode. PREPARATIONS Battery Operation (Cont'd) „ Remaining Battery Power Display LCD monitor/Viewfinder When the remaining battery power is nearly exhausted, the following statuses. The camera image is displayed in the VTR mode. Place the ... in the order that the "STBY" or "STOP" indication is switched, the VTR indicator displays the following warnings will be generated. „ Viewfinder screen or LCD monitor When a Status screen is displayed (excluding the STATUS 2, 3 screen in the Camera mode) • Alarm indication: LOW...
Instructions
Page 21
...CH-2 ON OFF POWER REC 1. itor or in the viewfinder and recorded on the tape in clock (time compensation) and displays it becomes half-locked and the camcorder cannot function. YY/MM/DD (Year, month, day)...shooting standby mode or stop mode. „ If the power is closed properly, it . When the camcorder is ejected. 3. SHUTTER dial 2. Powered by the built-in backup battery the set the OUTPUT CHAR... item, and then press the SHUTTER dial in the direction of the built-in the viewfinder. TC/UB/CLOCK menu screen 5. item on the top panel of the videocassette straight ...
...CH-2 ON OFF POWER REC 1. itor or in the viewfinder and recorded on the tape in clock (time compensation) and displays it becomes half-locked and the camcorder cannot function. YY/MM/DD (Year, month, day)...shooting standby mode or stop mode. „ If the power is closed properly, it . When the camcorder is ejected. 3. SHUTTER dial 2. Powered by the built-in backup battery the set the OUTPUT CHAR... item, and then press the SHUTTER dial in the direction of the built-in the viewfinder. TC/UB/CLOCK menu screen 5. item on the top panel of the videocassette straight ...
Instructions
Page 22
... user's bit from the IEEE1394 connector, set . 1When the SHUTTER dial is no timecode display for HDV input. TC : Time codes are displayed in the viewfinder during playback and recording as some of these lack the capability to the next digit. 2When the SHUTTER dial is rotated, the value of more... the DV input nal is displayed. Set to ON to enter the date and time precisely. 3. DATE+TIME : Date and time are displayed in the viewfinder. • Time code data cannot be displayed. In VTR stop mode displays the DV input time code data or user's bit data from the are...
... user's bit from the IEEE1394 connector, set . 1When the SHUTTER dial is no timecode display for HDV input. TC : Time codes are displayed in the viewfinder during playback and recording as some of these lack the capability to the next digit. 2When the SHUTTER dial is rotated, the value of more... the DV input nal is displayed. Set to ON to enter the date and time precisely. 3. DATE+TIME : Date and time are displayed in the viewfinder. • Time code data cannot be displayed. In VTR stop mode displays the DV input time code data or user's bit data from the are...
Instructions
Page 24
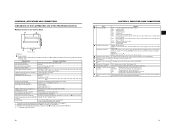
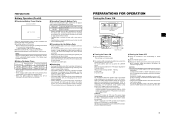
... the LCD monitor • PEAKING: Adjusts the contour of the LCD monitor. • LCD BRIGHT: Adjusts the brightness of the viewfinder can use the GY-HD110E as a slave unit. Synchronize DROP/NON DROP before using . 42 Screen Adjustment PEAKING volume LCD BRIGHT button... 180° up 90° down LCD lock release lever Viewfinder Adjustment Eyepiece focusing ring VF BRIGHT volume PEAKING volume Sliding securing ring Eyepiece Viewfinder mount base PREPARATIONS FOR OPERATION LCD monitor direction, angle, screen brightness, etc. Adjustments are ...
... the LCD monitor • PEAKING: Adjusts the contour of the LCD monitor. • LCD BRIGHT: Adjusts the brightness of the viewfinder can use the GY-HD110E as a slave unit. Synchronize DROP/NON DROP before using . 42 Screen Adjustment PEAKING volume LCD BRIGHT button... 180° up 90° down LCD lock release lever Viewfinder Adjustment Eyepiece focusing ring VF BRIGHT volume PEAKING volume Sliding securing ring Eyepiece Viewfinder mount base PREPARATIONS FOR OPERATION LCD monitor direction, angle, screen brightness, etc. Adjustments are ...