
Instructions
Page 4
...tripping on unsteady or unlevel surfaces. Refer all instructions. 5. Do not use a tripod on the cables will cause the camcorder to excessive heat such as they are particularly susceptible to the camcorder. It could tip over, causing serious damage to this type of injury. CAUTION: The mains plug...well as power-supply cord or plug is damaged, liquid has been spilled or objects have fallen into the sun. Connecting cables (Audio/Video, S-Video, etc.) to the camcorder and leaving it on top of internal circuitry. Read these instructions. 3. 4 EN Do not point the lens directly into...
...tripping on unsteady or unlevel surfaces. Refer all instructions. 5. Do not use a tripod on the cables will cause the camcorder to excessive heat such as they are particularly susceptible to the camcorder. It could tip over, causing serious damage to this type of injury. CAUTION: The mains plug...well as power-supply cord or plug is damaged, liquid has been spilled or objects have fallen into the sun. Connecting cables (Audio/Video, S-Video, etc.) to the camcorder and leaving it on top of internal circuitry. Read these instructions. 3. 4 EN Do not point the lens directly into...
Instructions
Page 6
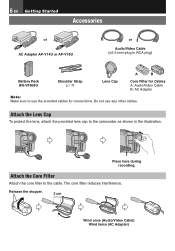
... Attach the core filter to use any other cables. Place here during recording. The core filter reduces interference. Do not use the provided cables for Cables A: Audio/Video Cable B: AC Adapter Note: Make sure to the cable. 6 EN Getting Started Accessories or AC Adapter AP-V14U...BN-VF808U Shoulder Strap (੬ 7) Lens Cap A B Core Filter for connections. Release the stopper. 3 cm Wind once (Audio/Video Cable) Wind twice (AC Adapter) Attach the Lens Cap To protect the lens, attach the provided lens cap to the camcorder as shown in the illustration.
... Attach the core filter to use any other cables. Place here during recording. The core filter reduces interference. Do not use the provided cables for Cables A: Audio/Video Cable B: AC Adapter Note: Make sure to the cable. 6 EN Getting Started Accessories or AC Adapter AP-V14U...BN-VF808U Shoulder Strap (੬ 7) Lens Cap A B Core Filter for connections. Release the stopper. 3 cm Wind once (Audio/Video Cable) Wind twice (AC Adapter) Attach the Lens Cap To protect the lens, attach the provided lens cap to the camcorder as shown in the illustration.

Instructions
Page 11
... ENGLISH In this case, the battery charge starts if the battery is finished. Using The Battery Pack Perform steps 2 - 3 in a camcorder malfunction. Failure to cover 3 times the planned shooting time. Unplug the AC adapter from the AC outlet and disconnect the AC adapter from the AC.... Attention: Before detaching the power source, make sure that you prepare enough battery packs to do not pull or bend the AC adapter plug and cable. With the "r" (arrow) on the battery pack pointing at the correct direction, insert the battery pack until it is attached to "OFF" (&#...
... ENGLISH In this case, the battery charge starts if the battery is finished. Using The Battery Pack Perform steps 2 - 3 in a camcorder malfunction. Failure to cover 3 times the planned shooting time. Unplug the AC adapter from the AC outlet and disconnect the AC adapter from the AC.... Attention: Before detaching the power source, make sure that you prepare enough battery packs to do not pull or bend the AC adapter plug and cable. With the "r" (arrow) on the battery pack pointing at the correct direction, insert the battery pack until it is attached to "OFF" (&#...
Instructions
Page 16
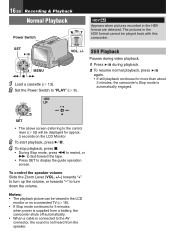
SET 6 VOL. +/- SET • The above screen (referring to the control lever (੬ 5)) will be played back with this camcorder. To control the speaker volume Slide the Zoom Lever (VOL. +/-) towards "+" to turn down the volume. Notes: • The playback picture can be ...HDV format cannot be displayed for approx. 3 seconds on a connected TV (੬ 18). • If Stop mode continues for more than about 3 minutes, the camcorder's Stop mode is not heard from a battery, the camcorder shuts off automatically. • When a cable is connected to display the guide operation screen.
SET 6 VOL. +/- SET • The above screen (referring to the control lever (੬ 5)) will be played back with this camcorder. To control the speaker volume Slide the Zoom Lever (VOL. +/-) towards "+" to turn down the volume. Notes: • The playback picture can be ...HDV format cannot be displayed for approx. 3 seconds on a connected TV (੬ 18). • If Stop mode continues for more than about 3 minutes, the camcorder's Stop mode is not heard from a battery, the camcorder shuts off automatically. • When a cable is connected to display the guide operation screen.
Instructions
Page 18
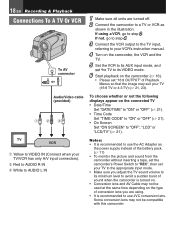
... input connectors). 2 Red to AUDIO R IN 3 White to AUDIO L IN Notes: • It is recommended to use JVC conversion lens. Audio/Video cable To choose whether or not the following (provided) displays appear on the camcorder (੬ 16). • Please set your TV (16:9 TV or 4:3 TV) (੬ 21, 23). 18 EN... the VCR to its AUX input mode, and set the TV to its minimum level to avoid a sudden burst of sound when the camcorder is turned on. • Conversion lens and AV Cable may suit your TV to the appropriate input mode. • Make sure you are turned off. 2 Connect the...
... input connectors). 2 Red to AUDIO R IN 3 White to AUDIO L IN Notes: • It is recommended to use JVC conversion lens. Audio/Video cable To choose whether or not the following (provided) displays appear on the camcorder (੬ 16). • Please set your TV (16:9 TV or 4:3 TV) (੬ 21, 23). 18 EN... the VCR to its AUX input mode, and set the TV to its minimum level to avoid a sudden burst of sound when the camcorder is turned on. • Conversion lens and AV Cable may suit your TV to the appropriate input mode. • Make sure you are turned off. 2 Connect the...
Instructions
Page 29
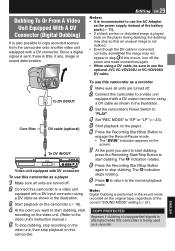
... 1 Make sure all units are turned off the power and make connections again. • When using a DV cable as shown in the illustration. 3 Start playback on the camcorder (੬ 16). 4 At the point you want to start dubbing, start dubbing. ENGLISH COPY PROTECTED Appears if ... off. 2 Connect this camcorder. If this occurs, turn off . 2 Connect this camcorder as a recorder. Note: Digital Dubbing is little, if any, image or sound deterioration. Editing EN 29 Notes: • It is recommended to use the optional JVC VC-VDV204U or VC-VDV206U DV cable. The T indication rotates....
... 1 Make sure all units are turned off the power and make connections again. • When using a DV cable as shown in the illustration. 3 Start playback on the camcorder (੬ 16). 4 At the point you want to start dubbing, start dubbing. ENGLISH COPY PROTECTED Appears if ... off. 2 Connect this camcorder. If this occurs, turn off . 2 Connect this camcorder as a recorder. Note: Digital Dubbing is little, if any, image or sound deterioration. Editing EN 29 Notes: • It is recommended to use the optional JVC VC-VDV204U or VC-VDV206U DV cable. The T indication rotates....

Instructions
Page 30
... may not work properly depending on the PC or capture board you are using. • If, after connecting a DV cable to the camcorder and it doesn't work, restart the camcorder. • Microsoft® and Windows® are using a Windows® XP, you are either registered trademarks or trademarks of ...JVC VC-VDV206U or VC-VDV204U DV cable depending on the type of DV connector (4 or 6 pins) on the PC. • The date/time information cannot be captured into the PC. • Refer to the instruction manuals of the PC and Software. • The system may cause malfunctions to the camcorder...
... may not work properly depending on the PC or capture board you are using. • If, after connecting a DV cable to the camcorder and it doesn't work, restart the camcorder. • Microsoft® and Windows® are using a Windows® XP, you are either registered trademarks or trademarks of ...JVC VC-VDV206U or VC-VDV204U DV cable depending on the type of DV connector (4 or 6 pins) on the PC. • The date/time information cannot be captured into the PC. • Refer to the instruction manuals of the PC and Software. • The system may cause malfunctions to the camcorder...


