Instruction Manual
Page 1
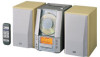
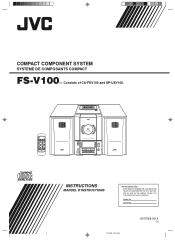
... BASS TREBLE CANCEL VOLUME REMOTE CONTROL RM-SFSV10J AUTO TAPE SELECTOR AUTO REVERSE TAPE COMPACT DIGITAL AUDIO VERTICAL DISC LOADING MECHANISM COMPACT COMPONENT SYSTEM FS-V100 STANDBY POWER AUX REC REV. Retain this information for future reference. Serial No. which are located either on the rear, bottom or side of CA-FSV100 and SP-UXV100. and Serial No. MODE PHONES TAPE DOWN FM/AM CD MULTI CONTROL UP AHB PRO TIMER VOLUME CLOCK CD OPEN/CLOSE COVER.FS-V100[J]f INSTRUCTIONS MANUEL D'INSTRUCTIONS For Customer Use: Enter below the Model...
... BASS TREBLE CANCEL VOLUME REMOTE CONTROL RM-SFSV10J AUTO TAPE SELECTOR AUTO REVERSE TAPE COMPACT DIGITAL AUDIO VERTICAL DISC LOADING MECHANISM COMPACT COMPONENT SYSTEM FS-V100 STANDBY POWER AUX REC REV. Retain this information for future reference. Serial No. which are located either on the rear, bottom or side of CA-FSV100 and SP-UXV100. and Serial No. MODE PHONES TAPE DOWN FM/AM CD MULTI CONTROL UP AHB PRO TIMER VOLUME CLOCK CD OPEN/CLOSE COVER.FS-V100[J]f INSTRUCTIONS MANUEL D'INSTRUCTIONS For Customer Use: Enter below the Model...

Instruction Manual
Page 2
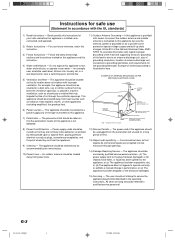
... CAUTION RISK OF ELECTRIC SHOCK DO NOT OPEN CAUTION: TO REDUCE THE RISK OF ELECTRIC SHOCK, DO NOT REMOVE COVER (OR BACK). Eviter une exposition directe au rayon. 3. The lightning flash with the instructions, may be of sufficient magnitude to radio communications. This equipment generates, uses and can be remote controlled. POWER switch! Déconnecter la fiche de secteur pour couper compl...
... CAUTION RISK OF ELECTRIC SHOCK DO NOT OPEN CAUTION: TO REDUCE THE RISK OF ELECTRIC SHOCK, DO NOT REMOVE COVER (OR BACK). Eviter une exposition directe au rayon. 3. The lightning flash with the instructions, may be of sufficient magnitude to radio communications. This equipment generates, uses and can be remote controlled. POWER switch! Déconnecter la fiche de secteur pour couper compl...
Instruction Manual
Page 4
... antenna system is grounded so as recommended by qualified service personnel when : (a) The power-supply cord or the plug has been damaged; All other appliances (including amplifiers) that its proper ventilation. or, placed in a built-in the operating instructions. If this appliance is provided with its location does not interfere with means to connect the outdoor antenna and outside antenna is connected to rain; Power supply cords...
... antenna system is grounded so as recommended by qualified service personnel when : (a) The power-supply cord or the plug has been damaged; All other appliances (including amplifiers) that its proper ventilation. or, placed in a built-in the operating instructions. If this appliance is provided with its location does not interfere with means to connect the outdoor antenna and outside antenna is connected to rain; Power supply cords...
Instruction Manual
Page 5
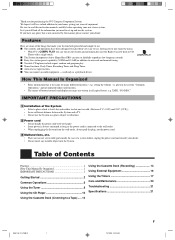
... Started 2 Common Operations 6 Using the Tuner 8 Using the CD Player 10 Using the Cassette Deck (Recording 14 Using External Equipment 16 Using the Timers 17 Care and Maintenance 20 Troubleshooting 21 Specifications 21 Using the Cassette Deck (Listening to faithfully reproduce low frequency sounds. Table of buttons/controls and display messages are some of a system failure, unplug the power cord and consult your dealer. TAPE, "NO DISC." is the same for purchasing the JVC Compact Component System. s Auto...
... Started 2 Common Operations 6 Using the Tuner 8 Using the CD Player 10 Using the Cassette Deck (Recording 14 Using External Equipment 16 Using the Timers 17 Care and Maintenance 20 Troubleshooting 21 Specifications 21 Using the Cassette Deck (Listening to faithfully reproduce low frequency sounds. Table of buttons/controls and display messages are some of a system failure, unplug the power cord and consult your dealer. TAPE, "NO DISC." is the same for purchasing the JVC Compact Component System. s Auto...

Instruction Manual
Page 6
... - Getting Started Accessories Make sure that you need to point the Remote Control at the same time with new ones. • Do not use an old battery with a new one. • Do not use many of the functions of the System from a distance of up to Put Batteries in the battery compartment. AUTO TAPE SELECTOR AUTO REVERSE TAPE 2 EN01-09.FS-V100[J]f 2 Remote sensor COMPACT DIGITAL AUDIO VERTICAL DISC LOADING MECHANISM COMPACT COMPONENT SYSTEM FS-V100 STANDBY POWER AUX REC...
... - Getting Started Accessories Make sure that you need to point the Remote Control at the same time with new ones. • Do not use an old battery with a new one. • Do not use many of the functions of the System from a distance of up to Put Batteries in the battery compartment. AUTO TAPE SELECTOR AUTO REVERSE TAPE 2 EN01-09.FS-V100[J]f 2 Remote sensor COMPACT DIGITAL AUDIO VERTICAL DISC LOADING MECHANISM COMPACT COMPONENT SYSTEM FS-V100 STANDBY POWER AUX REC...

Instruction Manual
Page 9
... EXTENDED PERIOD OF TIME. How One Touch Operation works in the section dealing with a single touch. However, this operation does not change the source to allow CD insertion. One Touch Operation turns the power on and the CD cover opens to CD. Connecting the AC Power Cord Firmly insert the supplied AC power cord into the wall outlet, and your command! Now you control the most frequently used System functions with that...
... EXTENDED PERIOD OF TIME. How One Touch Operation works in the section dealing with a single touch. However, this operation does not change the source to allow CD insertion. One Touch Operation turns the power on and the CD cover opens to CD. Connecting the AC Power Cord Firmly insert the supplied AC power cord into the wall outlet, and your command! Now you control the most frequently used System functions with that...

Instruction Manual
Page 10
... speakers. s To switch off Press the POWER button again. Common Operations POWER BASS AHB PRO VOLUME +, - POWER SLEEP DISPLAY FM MODE AUTO PRESET TAPE CD AUX FM/AM CD REPEAT UP PROGRAM SET RANDOM DOWN AHB PRO BASS TREBLE CANCEL VOLUME REMOTE CONTROL RM-SFSV10J DISPLAY UP DOWN TREBLE STANDBY lamp POWER PHONES STANDBY POWER AUX REC REV MODE PHONES TAPE DOWN FM/AM CD MULTI CONTROL UP AHB PRO TIMER VOLUME CLOCK CD OPEN/CLOSE AHB PRO VOLUME +, - CLOCK Turning the Power On and Off Turning the System on the Unit or start playing any source next time. The STANDBY...
... speakers. s To switch off Press the POWER button again. Common Operations POWER BASS AHB PRO VOLUME +, - POWER SLEEP DISPLAY FM MODE AUTO PRESET TAPE CD AUX FM/AM CD REPEAT UP PROGRAM SET RANDOM DOWN AHB PRO BASS TREBLE CANCEL VOLUME REMOTE CONTROL RM-SFSV10J DISPLAY UP DOWN TREBLE STANDBY lamp POWER PHONES STANDBY POWER AUX REC REV MODE PHONES TAPE DOWN FM/AM CD MULTI CONTROL UP AHB PRO TIMER VOLUME CLOCK CD OPEN/CLOSE AHB PRO VOLUME +, - CLOCK Turning the Power On and Off Turning the System on the Unit or start playing any source next time. The STANDBY...

Instruction Manual
Page 11
... the bass sound to maintain rich, full bass at low volume (you can adjust the treble level (high frequency range level) between -5 and +5. (0: Flat) 1 Press the BASS button on the Remote Control. 2 Press the UP or DOWN button on the Remote Control to adjust the bass level. TREBLE DOWN UP or EN01-09.FS-V100[J]f 7 7 12/12/00, 10:34 AM Showing the Clock Time In Standby mode, the digital clock appears...
... the bass sound to maintain rich, full bass at low volume (you can adjust the treble level (high frequency range level) between -5 and +5. (0: Flat) 1 Press the BASS button on the Remote Control. 2 Press the UP or DOWN button on the Remote Control to adjust the bass level. TREBLE DOWN UP or EN01-09.FS-V100[J]f 7 7 12/12/00, 10:34 AM Showing the Clock Time In Standby mode, the digital clock appears...
Instruction Manual
Page 12
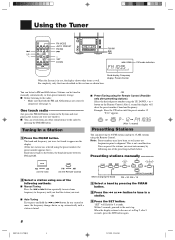
... Tuner 4 UP < POWER SLEEP DISPLAY FM MODE AUTO PRESET TAPE CD AUX FM/AM CD REPEAT UP PROGRAM SET RANDOM DOWN AHB PRO BASS TREBLE CANCEL VOLUME REMOTE CONTROL RM-SFSV10J FM MODE AUTO PRESET FM/AM ¢ > SET DOWN STANDBY POWER AUX REC REV MODE PHONES TAPE DOWN FM/AM CD MULTI CONTROL UP AHB PRO TIMER VOLUME CLOCK CD OPEN/CLOSE FM/AM ¢ 4 MONO STEREO FM mode indicators When the System is in Step 2 after presetting stations) Select the desired preset number using the preset number, the preset number appears first.) Each time...
... Tuner 4 UP < POWER SLEEP DISPLAY FM MODE AUTO PRESET TAPE CD AUX FM/AM CD REPEAT UP PROGRAM SET RANDOM DOWN AHB PRO BASS TREBLE CANCEL VOLUME REMOTE CONTROL RM-SFSV10J FM MODE AUTO PRESET FM/AM ¢ > SET DOWN STANDBY POWER AUX REC REV MODE PHONES TAPE DOWN FM/AM CD MULTI CONTROL UP AHB PRO TIMER VOLUME CLOCK CD OPEN/CLOSE FM/AM ¢ 4 MONO STEREO FM mode indicators When the System is in Step 2 after presetting stations) Select the desired preset number using the preset number, the preset number appears first.) Each time...
Instruction Manual
Page 13
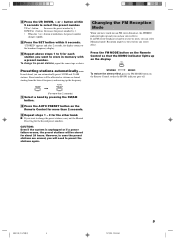
... to receive or noisy, you lose any stereo effect. Reception improves, but you can select Monaural mode. Press the FM MODE button on the Remote Control for the desired preset numbers. In each station you want to preset the stations again. However, in memory with a preset number. To change the preset stations, carry out the Manual Presetting for more than 2 seconds. 3 Repeat steps 1 - 2 for about 24 hours. EN01-09.FS-V100...
... to receive or noisy, you lose any stereo effect. Reception improves, but you can select Monaural mode. Press the FM MODE button on the Remote Control for the desired preset numbers. In each station you want to preset the stations again. However, in memory with a preset number. To change the preset stations, carry out the Manual Presetting for more than 2 seconds. 3 Repeat steps 1 - 2 for about 24 hours. EN01-09.FS-V100...
Instruction Manual
Page 14
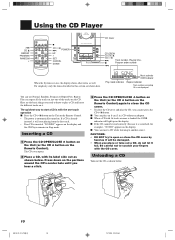
... DISC" appears on the CD. Using the CD Player DIGITAL AUDIO VERTICAL DISC LOADING MECHANISM 4 CD 0 REPEAT PROGRAM RANDOM < POWER SLEEP DISPLAY FM MODE AUTO PRESET TAPE CD AUX FM/AM CD REPEAT UP PROGRAM SET RANDOM DOWN AHB PRO BASS TREBLE CANCEL VOLUME REMOTE CONTROL RM-SFSV10J 7 CD #¥8 ¢ POWER UP > SET CANCEL DOWN COMPACT COMPONENT SYSTEM FS-V100 STANDBY POWER AUX REC REV MODE PHONES TAPE DOWN FM/AM CD MULTI CONTROL UP AHB PRO TIMER VOLUME CLOCK CD OPEN/CLOSE CD Cover CD OPEN/ CLOSE 0 CD #/8 ¢ Track number, Playing time, 7 Program...
... DISC" appears on the CD. Using the CD Player DIGITAL AUDIO VERTICAL DISC LOADING MECHANISM 4 CD 0 REPEAT PROGRAM RANDOM < POWER SLEEP DISPLAY FM MODE AUTO PRESET TAPE CD AUX FM/AM CD REPEAT UP PROGRAM SET RANDOM DOWN AHB PRO BASS TREBLE CANCEL VOLUME REMOTE CONTROL RM-SFSV10J 7 CD #¥8 ¢ POWER UP > SET CANCEL DOWN COMPACT COMPONENT SYSTEM FS-V100 STANDBY POWER AUX REC REV MODE PHONES TAPE DOWN FM/AM CD MULTI CONTROL UP AHB PRO TIMER VOLUME CLOCK CD OPEN/CLOSE CD Cover CD OPEN/ CLOSE 0 CD #/8 ¢ Track number, Playing time, 7 Program...
Instruction Manual
Page 15
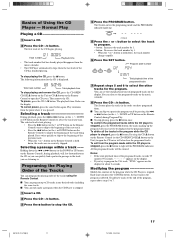
... playback time flashes on the music calendar. 8 Press the CD #/8 button. s You can only make a program when the CD Player is stopped, press the 7 button to . The System plays the tracks in the program while the CD player is stopped, press the PROGRAM button; Pressing the CD 0 button on the Remote Control (or the CD OPEN/CLOSE 0 button on the Remote Control) to stop playing and remove the CD, press the CD OPEN/ CLOSE 0 button on the Unit or CD 0 button on the Remote Control) to...
... playback time flashes on the music calendar. 8 Press the CD #/8 button. s You can only make a program when the CD Player is stopped, press the 7 button to . The System plays the tracks in the program while the CD player is stopped, press the PROGRAM button; Pressing the CD 0 button on the Remote Control (or the CD OPEN/CLOSE 0 button on the Remote Control) to stop playing and remove the CD, press the CD OPEN/ CLOSE 0 button on the Unit or CD 0 button on the Remote Control) to...
Instruction Manual
Page 17
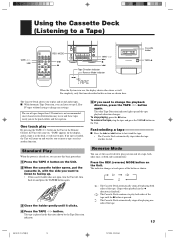
... the tape playback direction changes. The use this section are shown here. MODE ¢ 7 REMOTE CONTROL RM-SFSV10J STANDBY POWER AUX REC REV MODE PHONES TAPE DOWN FM/AM CD MULTI CONTROL UP AHB PRO TIMER VOLUME CLOCK CD OPEN/CLOSE TAPE @ # ¢ 7 4 Tape Direction indicator Reverse Mode indicator AUTO TAPE SELECTOR AUTO REVERSE TAPE Cassette holder TAPE 0 When the System is in , with the side you to play both sides continuously. Fast-winding a tape s Press the ¢ or 4 button to a Tape) TAPE @ # 4 POWER SLEEP DISPLAY FM MODE AUTO PRESET TAPE CD AUX...
... the tape playback direction changes. The use this section are shown here. MODE ¢ 7 REMOTE CONTROL RM-SFSV10J STANDBY POWER AUX REC REV MODE PHONES TAPE DOWN FM/AM CD MULTI CONTROL UP AHB PRO TIMER VOLUME CLOCK CD OPEN/CLOSE TAPE @ # ¢ 7 4 Tape Direction indicator Reverse Mode indicator AUTO TAPE SELECTOR AUTO REVERSE TAPE Cassette holder TAPE 0 When the System is in , with the side you to play both sides continuously. Fast-winding a tape s Press the ¢ or 4 button to a Tape) TAPE @ # 4 POWER SLEEP DISPLAY FM MODE AUTO PRESET TAPE CD AUX...
Instruction Manual
Page 18
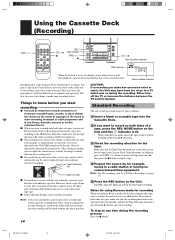
... 7 button. MODE button on the back of the hole (Type II detection slot) is it will be unlawful to make sure that the recording direction for the tape. Using the Cassette Deck (Recording) TAPE @ # POWER SLEEP DISPLAY FM MODE AUTO PRESET TAPE CD AUX FM/AM CD REPEAT UP PROGRAM SET RANDOM DOWN AHB PRO BASS TREBLE CANCEL VOLUME REMOTE CONTROL RM-SFSV10J CD #¥8 7 REC REV. s Type I and Type II tapes can adjust the sound you start...
... 7 button. MODE button on the back of the hole (Type II detection slot) is it will be unlawful to make sure that the recording direction for the tape. Using the Cassette Deck (Recording) TAPE @ # POWER SLEEP DISPLAY FM MODE AUTO PRESET TAPE CD AUX FM/AM CD REPEAT UP PROGRAM SET RANDOM DOWN AHB PRO BASS TREBLE CANCEL VOLUME REMOTE CONTROL RM-SFSV10J CD #¥8 7 REC REV. s Type I and Type II tapes can adjust the sound you start...
Instruction Manual
Page 20
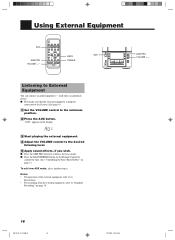
... display. 3 Start playing the external equipment. 4 Adjust the VOLUME control to the desired listening level. 5 Apply sound effects, if you wish. Notes: • For operation of the external equipment, refer to its Instructions. • For recording from AUX mode, select another source. "AUX" appears on page 14. 16 EN10-22.FS-V100[J]f 16 12/12/00, 10:33 AM Using External Equipment AUX AHB PRO VOLUME +, - POWER SLEEP DISPLAY FM MODE AUTO PRESET TAPE CD AUX...
... display. 3 Start playing the external equipment. 4 Adjust the VOLUME control to the desired listening level. 5 Apply sound effects, if you wish. Notes: • For operation of the external equipment, refer to its Instructions. • For recording from AUX mode, select another source. "AUX" appears on page 14. 16 EN10-22.FS-V100[J]f 16 12/12/00, 10:33 AM Using External Equipment AUX AHB PRO VOLUME +, - POWER SLEEP DISPLAY FM MODE AUTO PRESET TAPE CD AUX...
Instruction Manual
Page 21
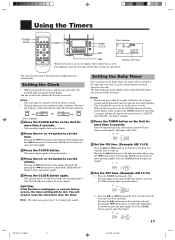
... the TIMER button to 2 minutes per month. Press the TIMER button on the display. Using the Timers POWER SLEEP POWER SLEEP DISPLAY FM MODE AUTO PRESET TAPE CD AUX FM/AM CD REPEAT DISPLAY UP MODE PROGRAM SET RANDOM DOWN AHB PRO BASS TREBLE CANCEL VOLUME REMOTE CONTROL RM-SFSV10J POWER STANDBY POWER MD/ AUX REC REV MODE PHONES TAPE DOWN FM/AM CD MULTI CONTROL UP AHB PRO TIMER VOLUME CLOCK CD OPEN/CLOSE TIMER CLOCK ¢ Timer indicator ON SLEEP OFF CLOCK 4 ON time, OFF time When the System is set and the seconds start counting...
... the TIMER button to 2 minutes per month. Press the TIMER button on the display. Using the Timers POWER SLEEP POWER SLEEP DISPLAY FM MODE AUTO PRESET TAPE CD AUX FM/AM CD REPEAT DISPLAY UP MODE PROGRAM SET RANDOM DOWN AHB PRO BASS TREBLE CANCEL VOLUME REMOTE CONTROL RM-SFSV10J POWER STANDBY POWER MD/ AUX REC REV MODE PHONES TAPE DOWN FM/AM CD MULTI CONTROL UP AHB PRO TIMER VOLUME CLOCK CD OPEN/CLOSE TIMER CLOCK ¢ Timer indicator ON SLEEP OFF CLOCK 4 ON time, OFF time When the System is set and the seconds start counting...

Instruction Manual
Page 22
... the TIMER button on the display. 2. Press the ¢ or 4 button to come on , the volume will need to work . Then, press the TIMER button repeatedly, to adjust the minute. The ON indicator lights up on the Unit for more than 2 seconds. Hold down the button to set the timer again. ON SLEEP 5 Set the OFF time. (Example: AM 12:15) 1. 4 Select the music source. 1. "TUNER" flashes on the...
... the TIMER button on the display. 2. Press the ¢ or 4 button to come on , the volume will need to work . Then, press the TIMER button repeatedly, to adjust the minute. The ON indicator lights up on the Unit for more than 2 seconds. Hold down the button to set the timer again. ON SLEEP 5 Set the OFF time. (Example: AM 12:15) 1. 4 Select the music source. 1. "TUNER" flashes on the...

Instruction Manual
Page 23
... changes the number of minutes. Then, press the TIMER button repeatedly, to reset the clock first, then the timer. The System is playing, use the Sleep Timer to "0." 9 Press the TIMER button on the display in to the selected level. EN10-22.FS-V100[J]f 19 12/12/00, 10:33 AM 19 The current volume setting flashes on the display. Setting the Sleep Timer When a source is now set to turn off the System, the last received station...
... changes the number of minutes. Then, press the TIMER button repeatedly, to reset the clock first, then the timer. The System is playing, use the Sleep Timer to "0." 9 Press the TIMER button on the display in to the selected level. EN10-22.FS-V100[J]f 19 12/12/00, 10:33 AM 19 The current volume setting flashes on the display. Setting the Sleep Timer When a source is now set to turn off the System, the last received station...
Instruction Manual
Page 25
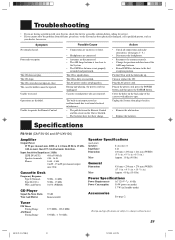
... mode) 3.7 W (in . Poor radio reception The CD does not play. The AC power cord is not properly extended and positioned. Input Sensitivity/Impedance (1 kHz) LINE IN (AUX) 400 mV/48 kΩ Speaker terminals 4 Ω - 16 Ω Phones 16 Ω - 1 kΩ 0 mW - 15 mW per channel, min. The CD cover does not open or close to the best reception position. Specifications FS-V100 (CA-FSV100 and SP-UXV100) Amplifier Output Power...
... mode) 3.7 W (in . Poor radio reception The CD does not play. The AC power cord is not properly extended and positioned. Input Sensitivity/Impedance (1 kHz) LINE IN (AUX) 400 mV/48 kΩ Speaker terminals 4 Ω - 16 Ω Phones 16 Ω - 1 kΩ 0 mW - 15 mW per channel, min. The CD cover does not open or close to the best reception position. Specifications FS-V100 (CA-FSV100 and SP-UXV100) Amplifier Output Power...
Instruction Manual
Page 27
... PURCHASER AT RETAIL to be FREE FROM DEFECTIVE MATERIAL AND WORKMANSHIP from state to state. Parts used for replacement are no charge to line power surge; 6. Products which will repair or replace defective parts at JVC authorized service centers. Operational adjustments covered in -home basis. Signal reception problems and failures due to the original owner. Accessories; 8. There are warranted only for Television sets having a screen size 25 inches and...
... PURCHASER AT RETAIL to be FREE FROM DEFECTIVE MATERIAL AND WORKMANSHIP from state to state. Parts used for replacement are no charge to line power surge; 6. Products which will repair or replace defective parts at JVC authorized service centers. Operational adjustments covered in -home basis. Signal reception problems and failures due to the original owner. Accessories; 8. There are warranted only for Television sets having a screen size 25 inches and...


