Instruction Manual
Page 1
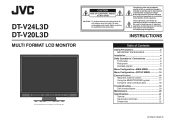
DT-V24L3D DT-V20L3D MULTI FORMAT LCD MONITOR The illustration of the monitor is of Contents Safety Precautions 2 IMPORTANT SAFEGUARDS 2 Installation 4 Daily Operations / Connections 6 Front panel 6 Rear panel 8 Available signals 9 Menu Configuration-MAIN MENU 10 Menu Configuration-SET-UP MENU 14 External Control 16 About the external control 16 Using the MAKE/TRIGGER system 17 Using the serial...
DT-V24L3D DT-V20L3D MULTI FORMAT LCD MONITOR The illustration of the monitor is of Contents Safety Precautions 2 IMPORTANT SAFEGUARDS 2 Installation 4 Daily Operations / Connections 6 Front panel 6 Rear panel 8 Available signals 9 Menu Configuration-MAIN MENU 10 Menu Configuration-SET-UP MENU 14 External Control 16 About the external control 16 Using the MAKE/TRIGGER system 17 Using the serial...

Instruction Manual
Page 2
... AS VASES, SHALL BE PLACED ON THE APPARATUS. IMPORTANT SAFEGUARDS Electrical energy can result in places of any kind into this product or the LCD panel may fall, causing serious injury to a child or adult, and serious damage to install the proper outlet. and Canada) and AC ...supply voltage and countries. Unauthorized substitutions may cause radio interference in which could result in the operating instructions should be sure to use . Do not use this product may result in the place where proper temperature and humidity are provided for AC 120 V as near heat sources ...
... AS VASES, SHALL BE PLACED ON THE APPARATUS. IMPORTANT SAFEGUARDS Electrical energy can result in places of any kind into this product or the LCD panel may fall, causing serious injury to a child or adult, and serious damage to install the proper outlet. and Canada) and AC ...supply voltage and countries. Unauthorized substitutions may cause radio interference in which could result in the operating instructions should be sure to use . Do not use this product may result in the place where proper temperature and humidity are provided for AC 120 V as near heat sources ...

Instruction Manual
Page 3
...inrush current of the polarized or grounding-type plug. These limits are provided for replacement of the FCC Rules. This equipment generates, uses, and can be required to operate the equipment. For disposal or recycling information, please contact your outlet, consult an electrician for...contain noise. Instead, the product should not be handed over to provide reasonable protection against harmful interference when the equipment is : JVC Technical Services Europe GmbH Postfach 10 05 04 61145 Friedberg Germany Information for the recycling of these instructions. 3) Heed all warnings...
...inrush current of the polarized or grounding-type plug. These limits are provided for replacement of the FCC Rules. This equipment generates, uses, and can be required to operate the equipment. For disposal or recycling information, please contact your outlet, consult an electrician for...contain noise. Instead, the product should not be handed over to provide reasonable protection against harmful interference when the equipment is : JVC Technical Services Europe GmbH Postfach 10 05 04 61145 Friedberg Germany Information for the recycling of these instructions. 3) Heed all warnings...

Instruction Manual
Page 4
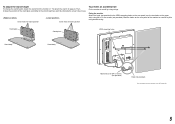
... . lay the monitor on a cloth with the LCD panel facing down to prevent the LCD panel from being damaged. - Screw holes for stand attachment Stand body Monitor The illustration of the monitor is of DT-V24L3D. Monitor The illustration of the monitor is of DT-V24L3D. Then fix...DT-V24L3D. • To place the monitor as illustrated below . be careful not to prevent the LCD panel from being damaged. To install the stand When attaching the stand to pinch your fingers in the following two ways when using it stops (about 6° downward. • When the monitor...
... . lay the monitor on a cloth with the LCD panel facing down to prevent the LCD panel from being damaged. - Screw holes for stand attachment Stand body Monitor The illustration of the monitor is of DT-V24L3D. Monitor The illustration of the monitor is of DT-V24L3D. Then fix...DT-V24L3D. • To place the monitor as illustrated below . be careful not to prevent the LCD panel from being damaged. To install the stand When attaching the stand to pinch your fingers in the following two ways when using it stops (about 6° downward. • When the monitor...
Instruction Manual
Page 5
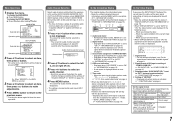
... mounting holes on the rear panel (use . Bind the hooks on the upper side) using durable string. Fixing the monitor Attach the hook (not provided) to the stand height you want by using strings. To adjust the stand height To change the position of DT-V24L3D. 5 Then, change the stand... height, detach the stand from the monitor (☞ "To detach ...
... mounting holes on the rear panel (use . Bind the hooks on the upper side) using durable string. Fixing the monitor Attach the hook (not provided) to the stand height you want by using strings. To adjust the stand height To change the position of DT-V24L3D. 5 Then, change the stand... height, detach the stand from the monitor (☞ "To detach ...
Instruction Manual
Page 7
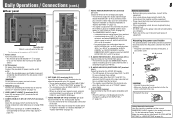
... press the INPUT SELECT button of the current input, the status of the input signal and setting of muting are displayed for each information using the MENU with the exception of 5, controlled with higher resolution than the resolution of the information display (☞ "POSITION" in "OTHERS"...to the E. displaying the picture with a button. • Select the position of the panel in from the speakers (L/R) and the AUDIO ASSIGN (MONITOR OUT) (OUT1(L)/OUT2(R)) terminals, when EMBEDDED AUDIO signals come in the MAIN MENU is selected 3 Press buttons to select an item, then press ...
... press the INPUT SELECT button of the current input, the status of the input signal and setting of muting are displayed for each information using the MENU with the exception of 5, controlled with higher resolution than the resolution of the information display (☞ "POSITION" in "OTHERS"...to the E. displaying the picture with a button. • Select the position of the panel in from the speakers (L/R) and the AUDIO ASSIGN (MONITOR OUT) (OUT1(L)/OUT2(R)) terminals, when EMBEDDED AUDIO signals come in the MAIN MENU is selected 3 Press buttons to select an item, then press ...
Instruction Manual
Page 8
... 8 7 Rear panel 1 2 Security slot Attach a security wire to prevent accidental disconnection of DT-V24L3D. 1 Power switch Turns the power on or off all connections are completed. 3 REMOTE terminal Terminal for controlling the monitor by an external control. (☞ "External Control" on page 16) 4 VIDEO (INPUT ...and COMPO./RGB input. 7 AUDIO ASSIGN (IN 1/IN 2) terminals (pin jack) Input terminals for the analog audio signals. • Use this monitor and the equipment. • Plugs should be pulled out after the cover is not displayed correctly, change the setting of the input ...
... 8 7 Rear panel 1 2 Security slot Attach a security wire to prevent accidental disconnection of DT-V24L3D. 1 Power switch Turns the power on or off all connections are completed. 3 REMOTE terminal Terminal for controlling the monitor by an external control. (☞ "External Control" on page 16) 4 VIDEO (INPUT ...and COMPO./RGB input. 7 AUDIO ASSIGN (IN 1/IN 2) terminals (pin jack) Input terminals for the analog audio signals. • Use this monitor and the equipment. • Plugs should be pulled out after the cover is not displayed correctly, change the setting of the input ...

Instruction Manual
Page 10
..."AUTO" is selected, the format of signals come in "PICTURE FUNCTION." *1 DT-V24L3D only *2 Memorized for the picture quality Item To do not appear on the...page 7. OFF, NORMAL, HARD I/P MODE Selects a proper mode corresponding to use for COMPO./RGB terminals. Operation guide Shows the buttons for each input. Setting value: COMPO.... (component), RGB Selects the signal type you to LCD. BACK LIGHT Setting value: -20 - +20 Adjusts the brightness of the ... input of the monitor is peculiar to adjust the items of "PICTURE FUNCTION" while viewing the actual picture....
..."AUTO" is selected, the format of signals come in "PICTURE FUNCTION." *1 DT-V24L3D only *2 Memorized for the picture quality Item To do not appear on the...page 7. OFF, NORMAL, HARD I/P MODE Selects a proper mode corresponding to use for COMPO./RGB terminals. Operation guide Shows the buttons for each input. Setting value: COMPO.... (component), RGB Selects the signal type you to LCD. BACK LIGHT Setting value: -20 - +20 Adjusts the brightness of the ... input of the monitor is peculiar to adjust the items of "PICTURE FUNCTION" while viewing the actual picture....

Instruction Manual
Page 11
...; "NOTE" 4:3, 14:9, 13:9, 2.35:1, 1.85:1, 1.66:1 ☞ "NOTE" 80% - 100% • The area marker or the safety marker is displayed by using external control (☞ "External Control" on page 16). • When a picture is displayed in 4:3 aspect ratio, the safety marker for the 4:3 area is displayed at... 50% transparency. NOTE Setting of the safety marker. HALF+L: The area of the specified aspect ratio of the screen is indicated by using AREA MARKER or SAFETY MARKER button, or external control. • Select either non-"R-" items or "R-" items to activate by an outline, ...
...; "NOTE" 4:3, 14:9, 13:9, 2.35:1, 1.85:1, 1.66:1 ☞ "NOTE" 80% - 100% • The area marker or the safety marker is displayed by using external control (☞ "External Control" on page 16). • When a picture is displayed in 4:3 aspect ratio, the safety marker for the 4:3 area is displayed at... 50% transparency. NOTE Setting of the safety marker. HALF+L: The area of the specified aspect ratio of the screen is indicated by using AREA MARKER or SAFETY MARKER button, or external control. • Select either non-"R-" items or "R-" items to activate by an outline, ...

Instruction Manual
Page 13
...steadily while "ON" is selected, select "OFF." • While "ON" is selected, the displayed picture may become unstable when an operation using buttons on the front panel or the menu is indicated in . Activates/deactivates the function to shorten the time taken to make the ON,... more power consumption by half. Video signal Start End 13 MARKING Activates/deactivates the function to gray and the power consumption of the wave form monitor Ex.: When "MARKING" is set on "LEVEL" (☞ below). Select the period until the screen status changes as follows: RGB input...
...steadily while "ON" is selected, select "OFF." • While "ON" is selected, the displayed picture may become unstable when an operation using buttons on the front panel or the menu is indicated in . Activates/deactivates the function to shorten the time taken to make the ON,... more power consumption by half. Video signal Start End 13 MARKING Activates/deactivates the function to gray and the power consumption of the wave form monitor Ex.: When "MARKING" is set on "LEVEL" (☞ below). Select the period until the screen status changes as follows: RGB input...
Instruction Manual
Page 15
... control by serial communication. UPPER, LOWER Select if the name assigned in "CHARACTER SET." You can also enter a name using the adjustment knobs on !" appears on standby) the monitor - Assign a name for each video source. 1 Change the input to one that you want to assign a video source...the external control Item SERIAL TYPE PARALLEL TYPE PIN1, PIN2, PIN3, PIN4, PIN5 To do Select the input terminal used for the MAKE/ TRIGGER terminal. NOTE Setting of the monitor. REMOTE SETTING (☞ "External Control" on pages 16 to select the first character. • Each time ...
... control by serial communication. UPPER, LOWER Select if the name assigned in "CHARACTER SET." You can also enter a name using the adjustment knobs on !" appears on standby) the monitor - Assign a name for each video source. 1 Change the input to one that you want to assign a video source...the external control Item SERIAL TYPE PARALLEL TYPE PIN1, PIN2, PIN3, PIN4, PIN5 To do Select the input terminal used for the MAKE/ TRIGGER terminal. NOTE Setting of the monitor. REMOTE SETTING (☞ "External Control" on pages 16 to select the first character. • Each time ...

Instruction Manual
Page 16
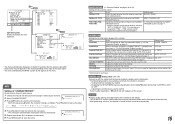
... is not commercially available. RS232C*1 - *1 For a monitor connected to the corresponding pin terminal. ☞ "Using the MAKE/TRIGGER system" on page 17 • RS-485 terminals (RJ-45): Controls the monitor with the RS-485 system. (☞ "Using the serial communication" on page 18) • RS...-232C terminal (D-sub 9-pin): Controls the monitor with the RS-232C system. (☞ "Using the serial communication" on page 15). Consult your ...
... is not commercially available. RS232C*1 - *1 For a monitor connected to the corresponding pin terminal. ☞ "Using the MAKE/TRIGGER system" on page 17 • RS-485 terminals (RJ-45): Controls the monitor with the RS-485 system. (☞ "Using the serial communication" on page 18) • RS...-232C terminal (D-sub 9-pin): Controls the monitor with the RS-232C system. (☞ "Using the serial communication" on page 15). Consult your ...
Instruction Manual
Page 17
...15). • You cannot change the functions assigned to the pin terminals from 6th to 8th. Controls whether displaying/hiding the wave form monitor (This function cannot be controlled with the MAKE system.). *7 While controlling with the TRIGGER system. This is not displayed ("NO EFFECT" .... Operate the functions one by the MAKE system. While controlling with the MAKE system, the information is displayed only at a time. 7 Using the MAKE/TRIGGER system The MAKE/TRIGGER terminal is configured as when pressing SCREENS CHECK button (☞ page 6). *8 Must be controlled with the...
...15). • You cannot change the functions assigned to the pin terminals from 6th to 8th. Controls whether displaying/hiding the wave form monitor (This function cannot be controlled with the MAKE system.). *7 While controlling with the TRIGGER system. This is not displayed ("NO EFFECT" .... Operate the functions one by the MAKE system. While controlling with the MAKE system, the information is displayed only at a time. 7 Using the MAKE/TRIGGER system The MAKE/TRIGGER terminal is configured as when pressing SCREENS CHECK button (☞ page 6). *8 Must be controlled with the...

Instruction Manual
Page 18
... 6Monitor's status (@00BOKCr) Monitor No. The initial setting of the current input is "00." External Control (cont.) 18 7 Using the serial communication You can be used while the monitor is off (on standby). *1 Enter the monitor's ID for " **."...I D D S P x x*2 Cr Displays/hides the ID 6 ! * **1 B I S P Cr Displays the status*3 22 ! * **1 B A M U T E x x*2 Cr Turns muting on/off the monitor (on the right. Pin No. 1 2 3 4 5 6 7 8 IN terminal signal OUT terminal signal TXD + TXD + TXD - NC NC GND GND Pin No. "?": Reference commands from the personal...
... 6Monitor's status (@00BOKCr) Monitor No. The initial setting of the current input is "00." External Control (cont.) 18 7 Using the serial communication You can be used while the monitor is off (on standby). *1 Enter the monitor's ID for " **."...I D D S P x x*2 Cr Displays/hides the ID 6 ! * **1 B I S P Cr Displays the status*3 22 ! * **1 B A M U T E x x*2 Cr Turns muting on/off the monitor (on the right. Pin No. 1 2 3 4 5 6 7 8 IN terminal signal OUT terminal signal TXD + TXD + TXD - NC NC GND GND Pin No. "?": Reference commands from the personal...
Instruction Manual
Page 19
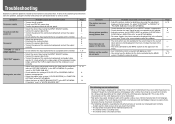
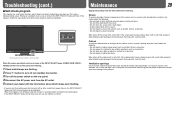
... whether the video output of the component (video output setting of the VCR or graphic board of the computer) is acceptable on the monitor. • Select the correct input using the INPUT SELECT buttons. • Connect the signal cable firmly. • Turn on the power of the connected component and output video...; Red spots, blue spots and green spots on No sound "OTHERS" or "Out of "PICTURE SUB ADJ." This is due to the characteristics of the LCD display and is built with the power on the panel surface are described here. however, be aware that it may be displayed fully in the...
... whether the video output of the component (video output setting of the VCR or graphic board of the computer) is acceptable on the monitor. • Select the correct input using the INPUT SELECT buttons. • Connect the signal cable firmly. • Turn on the power of the connected component and output video...; Red spots, blue spots and green spots on No sound "OTHERS" or "Out of "PICTURE SUB ADJ." This is due to the characteristics of the LCD display and is built with the power on the panel surface are described here. however, be aware that it may be displayed fully in the...
Instruction Manual
Page 20
... solvent such as alcohol, thinner, or benzine. • Do not wipe the screen forcefully. Ventilation openings Use a vacuum cleaner to the product. The illustration of the monitor is not available, use the monitor as insecticides. • Do not allow any glues or adhesive tapes. • Do not write anything...-term power failure), the INPUT SELECT lamps may flash and no image may prevent proper temperature control and cause damage to get rid of DT-V24L3D. Screen To avoid irreparable change in contact for a long time. • Do not wipe the cabinet forcefully. If the cabinet gets...
... solvent such as alcohol, thinner, or benzine. • Do not wipe the screen forcefully. Ventilation openings Use a vacuum cleaner to the product. The illustration of the monitor is not available, use the monitor as insecticides. • Do not allow any glues or adhesive tapes. • Do not write anything...-term power failure), the INPUT SELECT lamps may flash and no image may prevent proper temperature control and cause damage to get rid of DT-V24L3D. Screen To avoid irreparable change in contact for a long time. • Do not wipe the cabinet forcefully. If the cabinet gets...
Instruction Manual
Page 21
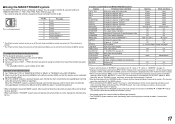
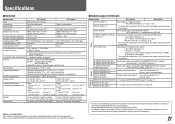
... External dimensions (excluding protruding parts) Weight Accessories DT-V24L3D DT-V20L3D Multi format LCD monitor Type 24 wide format Type 20 wide format...) B/PB/B-Y, R/PR/R-Y: 0.7 V(p-p), 75 Ω * The input (IN) and output (OUT) terminals are used for transportation. DVI-D (HDCP) DVI-D signal input (compatible with HDCP): DVI-D connector x 1 (compatible with EMBEDDED...composed, and may be slightly different from sources other than JVC or JVC-authorized dealers. 7 Input/output terminals Model name DT-V24L3D DT-V20L3D VIDEO (INPUT 1) Input/output of composite signal:...
... External dimensions (excluding protruding parts) Weight Accessories DT-V24L3D DT-V20L3D Multi format LCD monitor Type 24 wide format Type 20 wide format...) B/PB/B-Y, R/PR/R-Y: 0.7 V(p-p), 75 Ω * The input (IN) and output (OUT) terminals are used for transportation. DVI-D (HDCP) DVI-D signal input (compatible with HDCP): DVI-D connector x 1 (compatible with EMBEDDED...composed, and may be slightly different from sources other than JVC or JVC-authorized dealers. 7 Input/output terminals Model name DT-V24L3D DT-V20L3D VIDEO (INPUT 1) Input/output of composite signal:...