

User Manual
Page 3
... Riggings...30 Adjusting Footplate Height ...31 Raising/Lowering Elevating Legrest Assembly ...33 Replacing Heel Loop ...34 6 ARMS 36 Adjusting Armrest Height ...36 Removing/Installing Armrests...37 7 SEAT AND BACK 38 Replacing Back Upholstery ...38 Replacing Seat Upholstery ...38 Adjusting Seat Depth ...39 Adjusting the Seat Width ...40 8 REAR WHEELS 44 Replacing/Repairing Rear Wheel Tire ...44 Part No 1110546 3 Invacare® Tracer™ EX2 Wheelchair
... Riggings...30 Adjusting Footplate Height ...31 Raising/Lowering Elevating Legrest Assembly ...33 Replacing Heel Loop ...34 6 ARMS 36 Adjusting Armrest Height ...36 Removing/Installing Armrests...37 7 SEAT AND BACK 38 Replacing Back Upholstery ...38 Replacing Seat Upholstery ...38 Adjusting Seat Depth ...39 Adjusting the Seat Width ...40 8 REAR WHEELS 44 Replacing/Repairing Rear Wheel Tire ...44 Part No 1110546 3 Invacare® Tracer™ EX2 Wheelchair

User Manual
Page 4
... Replacing Front Casters ...50 10 ANTI-TIPPERS/WHEEL LOCKS 51 Installing/Adjusting Anti-Tippers...51 Using/Adjusting Patient Operated Wheel Locks...54 11 SEAT-TO-FLOOR 57 Changing Seat-to-Floor Height ...57 12 OPTIONS 59 Installing Amputee Bracket...59 Installing Crutch and Cane Carrier...61 Installing the Seat Positioning Strap ...62 Installing the Wheel Lock Extension Handle...63 Invacare® Tracer™ EX2 Wheelchair 4 Part...
... Replacing Front Casters ...50 10 ANTI-TIPPERS/WHEEL LOCKS 51 Installing/Adjusting Anti-Tippers...51 Using/Adjusting Patient Operated Wheel Locks...54 11 SEAT-TO-FLOOR 57 Changing Seat-to-Floor Height ...57 12 OPTIONS 59 Installing Amputee Bracket...59 Installing Crutch and Cane Carrier...61 Installing the Seat Positioning Strap ...62 Installing the Wheel Lock Extension Handle...63 Invacare® Tracer™ EX2 Wheelchair 4 Part...
User Manual
Page 6
...MAY NOT BE APPLICABLE. INVACARE SHALL NOT BE LIABLE FOR ANY CONSEQUENTIAL OR INCIDENTAL DAMAGES WHATSOEVER. Invacare® Tracer™ EX2 Wheelchair 6 Part No 1110546 Invacare warrants the upholstered materials (seat, back and armrests ...Invacare's sole obligation and your Invacare product. Invacare warrants the side frames and cross members of this product when purchased new and unused to be limited to any subsequent purchaser or owner. Provide dealer's name, address, the product model number, date of purchase, indicate nature of title to such repair and/or replacement...
...MAY NOT BE APPLICABLE. INVACARE SHALL NOT BE LIABLE FOR ANY CONSEQUENTIAL OR INCIDENTAL DAMAGES WHATSOEVER. Invacare® Tracer™ EX2 Wheelchair 6 Part No 1110546 Invacare warrants the upholstered materials (seat, back and armrests ...Invacare's sole obligation and your Invacare product. Invacare warrants the side frames and cross members of this product when purchased new and unused to be limited to any subsequent purchaser or owner. Provide dealer's name, address, the product model number, date of purchase, indicate nature of title to such repair and/or replacement...
User Manual
Page 7
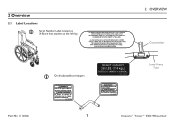
... operate without the antitip tubes installed. ! WARNING Refer to the Owner's Manual for proper anti-tipper setting. ! 2 Overview 2.1 Label Locations Serial Number Label located on X-Brace that attaches at the left hip. 2 OVERVIEW Crossmember Part No 1110546 On ...all adjustable anti-tippers ! AVERTISSEMENT Se référer au manuel de l'utilisateur pour le réglage adéquat de l'antibascule. No. 1091552 Lower Frame Tube 7 Invacare® Tracer™ EX2 Wheelchair AVERTISSEMENT NE PAS utiliser sans d'abord avoir install...
... operate without the antitip tubes installed. ! WARNING Refer to the Owner's Manual for proper anti-tipper setting. ! 2 Overview 2.1 Label Locations Serial Number Label located on X-Brace that attaches at the left hip. 2 OVERVIEW Crossmember Part No 1110546 On ...all adjustable anti-tippers ! AVERTISSEMENT Se référer au manuel de l'utilisateur pour le réglage adéquat de l'antibascule. No. 1091552 Lower Frame Tube 7 Invacare® Tracer™ EX2 Wheelchair AVERTISSEMENT NE PAS utiliser sans d'abord avoir install...

User Manual
Page 9
Weights based on how the wheelchair is equipped. Part No 1110546 9 Invacare® Tracer™ EX2 Wheelchair The seat-to -Floor * Heights (with Front Riggings) Seat Width Seat Depth: Seat-to -floor heights are based on urethane tires. Weights will vary depending on 18-inch wide wheelchair without front riggings. 2.2 Typical Product Parameters Overall Width: Overall Depth (with 24-inch Wheels) Adult: (SA...
Weights based on how the wheelchair is equipped. Part No 1110546 9 Invacare® Tracer™ EX2 Wheelchair The seat-to -Floor * Heights (with Front Riggings) Seat Width Seat Depth: Seat-to -floor heights are based on urethane tires. Weights will vary depending on 18-inch wide wheelchair without front riggings. 2.2 Typical Product Parameters Overall Width: Overall Depth (with 24-inch Wheels) Adult: (SA...
User Manual
Page 10
... instructional material such as owner's manuals, service manuals or instruction sheets supplied with Invacare accessories. A qualified technician MUST perform the initial set up of damage, DO NOT use in the manual. Invacare® Tracer™ EX2 Wheelchair 10 Part No 1110546 3 SAFETY 3 Safety The safety section contains important information for further instruction. In case of this product. 3.1 General Guidelines ƽ ƽ ! If you are specifically...
... instructional material such as owner's manuals, service manuals or instruction sheets supplied with Invacare accessories. A qualified technician MUST perform the initial set up of damage, DO NOT use in the manual. Invacare® Tracer™ EX2 Wheelchair 10 Part No 1110546 3 SAFETY 3 Safety The safety section contains important information for further instruction. In case of this product. 3.1 General Guidelines ƽ ƽ ! If you are specifically...
User Manual
Page 11
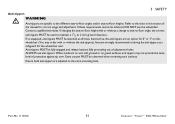
...be observed when traversing such surfaces. ALWAYS use the wheelchair. Ensure both anti-tippers are adjusted to -floor heights. 3 SAFETY Anti-tippers ƽ WARNING Anti-tippers are specific to the different seat-to-floor angles and/or seat-to the same mounting hole. Inasmuch as ...the manual for the wheelchair user. Anti-tippers MUST be achieved, DO NOT use anti-tippers. Contact a qualified technician. Part No 1110546 11 Invacare® Tracer™ EX2 Wheelchair Refer to 2 inch ground clearance. If changing the seat-to-floor height with or without a change to seat-to-...
...be observed when traversing such surfaces. ALWAYS use the wheelchair. Ensure both anti-tippers are adjusted to -floor heights. 3 SAFETY Anti-tippers ƽ WARNING Anti-tippers are specific to the different seat-to-floor angles and/or seat-to the same mounting hole. Inasmuch as ...the manual for the wheelchair user. Anti-tippers MUST be achieved, DO NOT use anti-tippers. Contact a qualified technician. Part No 1110546 11 Invacare® Tracer™ EX2 Wheelchair Refer to 2 inch ground clearance. If changing the seat-to-floor height with or without a change to seat-to-...

User Manual
Page 12
... NOT use only a clean towel lightly dampened with cool water. Invacare recommends that a non-folding device be installed to play on or operate the wheelchair. DO NOT allow children to keep the wheelchair from being folded when left unoccupied in a public place. When cleaning rear cane or hand grip areas use the...injury or damage to the frame tubing. This could cause damage to property may result. If loose and/or worn, replace IMMEDIATELY. Use of soap or ammonia based cleaning solutions will result in injury to the frame. DO NOT stand on roads, streets or highways. Hand Grips ...
... NOT use only a clean towel lightly dampened with cool water. Invacare recommends that a non-folding device be installed to play on or operate the wheelchair. DO NOT allow children to keep the wheelchair from being folded when left unoccupied in a public place. When cleaning rear cane or hand grip areas use the...injury or damage to the frame tubing. This could cause damage to property may result. If loose and/or worn, replace IMMEDIATELY. Use of soap or ammonia based cleaning solutions will result in injury to the frame. DO NOT stand on roads, streets or highways. Hand Grips ...
User Manual
Page 14
... the wheelchair user. it is the obligation of this wheelchair (you may result. Invacare® Tracer™ EX2 Wheelchair 14 Part No 1110546 After ANY adjustments, repair or service and BEFORE use, make sure all service and adjustment should be replaced IMMEDIATELY. With regards to ensure the safe operation of the DME dealer, therapists and other healthcare professionals to determine if a seat...
... the wheelchair user. it is the obligation of this wheelchair (you may result. Invacare® Tracer™ EX2 Wheelchair 14 Part No 1110546 After ANY adjustments, repair or service and BEFORE use, make sure all service and adjustment should be replaced IMMEDIATELY. With regards to ensure the safe operation of the DME dealer, therapists and other healthcare professionals to determine if a seat...

User Manual
Page 15
... the stability of the wheelchair. 3 SAFETY Stability All Models ƽ WARNING The seat depth, size/position of the front casters, size/position of the rear wheels, use of anti-tipper model, as well as the user condition directly relate to ... • • • Part No 1110546 15 Invacare® Tracer™ EX2 Wheelchair The various seat-to-floor heights require specific settings depending on rear wheel size, rear wheel position, front caster size/position and desired...
... the stability of the wheelchair. 3 SAFETY Stability All Models ƽ WARNING The seat depth, size/position of the front casters, size/position of the rear wheels, use of anti-tipper model, as well as the user condition directly relate to ... • • • Part No 1110546 15 Invacare® Tracer™ EX2 Wheelchair The various seat-to-floor heights require specific settings depending on rear wheel size, rear wheel position, front caster size/position and desired...

User Manual
Page 16
... not brakes. If the wheelchair is void. Engaging the wheel locks may not prevent the wheelchair from moving on all floor surfaces including those that users of wheelchairs should NOT be transported in vehicles of any kind while in wheelchairs. It is Invacare's position that may result. Invacare wheelchairs have not been designed or tested as a seat for transportation and use of its wheelchairs as...
... not brakes. If the wheelchair is void. Engaging the wheel locks may not prevent the wheelchair from moving on all floor surfaces including those that users of wheelchairs should NOT be transported in vehicles of any kind while in wheelchairs. It is Invacare's position that may result. Invacare wheelchairs have not been designed or tested as a seat for transportation and use of its wheelchairs as...

User Manual
Page 18
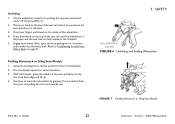
...down between your safety. Many activities require the wheelchair owner to reach objects behind you have pick them up from the floor by advancing the wheelchair and then reversing it is essential for your knees. Proper positioning is important to use of the back upholstery to reach, bend ...are reaching as this may tip over . FIGURE 1 Backwards Invacare® Tracer™ EX2 Wheelchair 18 Part No 1110546 Make sure the casters are pointing in the presence of the wheelchair. Reach back only as far as possible and engage wheel locks. DO NOT attempt to reach objects if you ,...
...down between your safety. Many activities require the wheelchair owner to reach objects behind you have pick them up from the floor by advancing the wheelchair and then reversing it is essential for your knees. Proper positioning is important to use of the back upholstery to reach, bend ...are reaching as this may tip over . FIGURE 1 Backwards Invacare® Tracer™ EX2 Wheelchair 18 Part No 1110546 Make sure the casters are pointing in the presence of the wheelchair. Reach back only as far as possible and engage wheel locks. DO NOT attempt to reach objects if you ,...
User Manual
Page 23
... you (raising the opposite wheel and caster off the ground/floor). 2. Folding Hammock or Sling Seat Models 1. Press downward on Seat Rail FIGURE 6 Unfolding and Folding Wheelchair FIGURE 7 Folding Hammock or Sling Seat Models Part No 1110546 23 Invacare® Tracer™ EX2 Wheelchair Tilt the wheelchair toward you where the seat upholstery is fully open the footrest/legrest for clearance and transfer...
... you (raising the opposite wheel and caster off the ground/floor). 2. Folding Hammock or Sling Seat Models 1. Press downward on Seat Rail FIGURE 6 Unfolding and Folding Wheelchair FIGURE 7 Folding Hammock or Sling Seat Models Part No 1110546 23 Invacare® Tracer™ EX2 Wheelchair Tilt the wheelchair toward you where the seat upholstery is fully open the footrest/legrest for clearance and transfer...

User Manual
Page 24
Replace if necessary. ❑ Inspect tires for flat spots and wear. ❑ Check pneumatic tires for just like any other vehicle. Invacare® Tracer™ EX2 Wheelchair 24 Part No 1110546 4 SAFETY INSPECTION/TROUBLESHOOTING 4 Safety Inspection/Troubleshooting Every six months or as necessary, take...the wheel locks prevent the wheelchair from moving when engaged. ❑ Inspect the seat and back for rips and sagging. ❑ Inspect the seat and back for loose or broken hardware. ❑ Inspect the back cane hand grips for a thorough inspection and servicing....
Replace if necessary. ❑ Inspect tires for flat spots and wear. ❑ Check pneumatic tires for just like any other vehicle. Invacare® Tracer™ EX2 Wheelchair 24 Part No 1110546 4 SAFETY INSPECTION/TROUBLESHOOTING 4 Safety Inspection/Troubleshooting Every six months or as necessary, take...the wheel locks prevent the wheelchair from moving when engaged. ❑ Inspect the seat and back for rips and sagging. ❑ Inspect the seat and back for loose or broken hardware. ❑ Inspect the back cane hand grips for a thorough inspection and servicing....

User Manual
Page 44
As with any adjustments, repair or service and before using the wheelchair, otherwise injury may change in the seat-to -floor height. Make sure both rear wheels are the same size and are installed into the same respective mounting hole before use, make sure all attaching ...by a qualified technician. Invacare® Tracer™ EX2 Wheelchair 44 Part No 1110546 If changing the size of the rear wheel or a change the size of the rear wheel or the seat-to -floor height is tightened securely - Replace if damaged. 8.2 Removing/Installing Rear Wheels ƽ WARNING Only ...
As with any adjustments, repair or service and before using the wheelchair, otherwise injury may change in the seat-to -floor height. Make sure both rear wheels are the same size and are installed into the same respective mounting hole before use, make sure all attaching ...by a qualified technician. Invacare® Tracer™ EX2 Wheelchair 44 Part No 1110546 If changing the size of the rear wheel or a change the size of the rear wheel or the seat-to -floor height is tightened securely - Replace if damaged. 8.2 Removing/Installing Rear Wheels ƽ WARNING Only ...

User Manual
Page 45
... If replacing the same size rear wheel, note the mounting position on page 54. 8 REAR WHEELS Rear Wheel Washer (SA Frame ONLY) Axle Mounting Axle Locknut Dust Cap (SA Frame ONLY) Hex Screw Wheelchair Frame Spacer (Wheelchairs with conventional arms. Part No 1110546 45 Invacare® Tracer™ EX2 Wheelchair To reinstall the rear wheel onto the wheelchair, reverse STEPS...
... If replacing the same size rear wheel, note the mounting position on page 54. 8 REAR WHEELS Rear Wheel Washer (SA Frame ONLY) Axle Mounting Axle Locknut Dust Cap (SA Frame ONLY) Hex Screw Wheelchair Frame Spacer (Wheelchairs with conventional arms. Part No 1110546 45 Invacare® Tracer™ EX2 Wheelchair To reinstall the rear wheel onto the wheelchair, reverse STEPS...

User Manual
Page 51
... are specific to the different seat-to-floor angles and/or seat-to 2 inch ground clearance. If these requirements cannot be observed when traversing such surfaces. 10 Anti-tippers/Wheel Locks 10 ANTI-TIPPERS/WHEEL LOCKS ƽ WARNING After any adjustments, repair or service and before use, make sure all times. otherwise injury or damage may occur. 10.1 Installing...
... are specific to the different seat-to-floor angles and/or seat-to 2 inch ground clearance. If these requirements cannot be observed when traversing such surfaces. 10 Anti-tippers/Wheel Locks 10 ANTI-TIPPERS/WHEEL LOCKS ƽ WARNING After any adjustments, repair or service and before use, make sure all times. otherwise injury or damage may occur. 10.1 Installing...
User Manual
Page 52
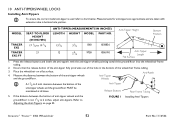
... the ground/floor MUST be maintained at all times. MODEL SEAT-TO-FLOOR HEIGHT (IN INCHES) ANTI-TIPPER (MEASUREMENTS IN INCHES) LENGTH HEIGHT MODEL PART NO. Anti-Tipper Release Buttons Rear Frame Tubing 5. 10 ANTI-TIPPERS/WHEEL LOCKS Installing Anti-Tippers To ensure the correct model anti-tipper is not 11/2 to 2 inches, adjust anti-tippers...
... the ground/floor MUST be maintained at all times. MODEL SEAT-TO-FLOOR HEIGHT (IN INCHES) ANTI-TIPPER (MEASUREMENTS IN INCHES) LENGTH HEIGHT MODEL PART NO. Anti-Tipper Release Buttons Rear Frame Tubing 5. 10 ANTI-TIPPERS/WHEEL LOCKS Installing Anti-Tippers To ensure the correct model anti-tipper is not 11/2 to 2 inches, adjust anti-tippers...

User Manual
Page 57
.... 3. Remove the rear wheels from the wheelchair. Refer to on page 50. 4. Refer to the stability of the wheelchair. Any change to one or any adjustments, repair or service and before use of an anti-tipper model, as well as the user condition directly relate to Installing/Adjusting Anti-Tippers on page 58. 1. If changing the seat-to-floor height...
.... 3. Remove the rear wheels from the wheelchair. Refer to on page 50. 4. Refer to the stability of the wheelchair. Any change to one or any adjustments, repair or service and before use of an anti-tipper model, as well as the user condition directly relate to Installing/Adjusting Anti-Tippers on page 58. 1. If changing the seat-to-floor height...

User Manual
Page 61
... screw and washer and secure the strap to the step tube of the wheelchair. 4. Base Step Tube Clamp Locknut FIGURE 2 Installing Crutch and Cane Carrier Part No 1110546 61 Invacare® Tracer™ EX2 Wheelchair Align the strap with mild soap and water. Remove the upper back upholstery... ensure that secures the base to the wheelchair. 7. Securely tighten the locknut that there is no interference with folding the wheelchair, the rear wheels, or the swing-back arms. Strap MUST be parallel to step tube to ensure proper placement. 12.2 Installing Crutch and Cane Carrier 12...
... screw and washer and secure the strap to the step tube of the wheelchair. 4. Base Step Tube Clamp Locknut FIGURE 2 Installing Crutch and Cane Carrier Part No 1110546 61 Invacare® Tracer™ EX2 Wheelchair Align the strap with mild soap and water. Remove the upper back upholstery... ensure that secures the base to the wheelchair. 7. Securely tighten the locknut that there is no interference with folding the wheelchair, the rear wheels, or the swing-back arms. Strap MUST be parallel to step tube to ensure proper placement. 12.2 Installing Crutch and Cane Carrier 12...


