

Owners Manual
Page 3
...22 Inspect/Adjust Weekly...23 Inspect/Adjust Monthly...23 Inspect/Adjust Periodically...23 Troubleshooting Guide ...24 Part No. 1106645 3 R51™and R51LXP TABLE OF CONTENTS TABLE OF CONTENTS REFERENCE DOCUMENTS 2 REGISTER YOUR PRODUCT 6 SPECIAL NOTES 7 TYPICAL ... or Service Information ...9 Accessories Information ...9 Operating Information...9 Tire Pressure ...11 Electrical Accessories ...11 Grounding Instructions ...11 Batteries...11 Charging Batteries ...12 Rain Test...12 Weight Training ...13 Weight Limitation...13 SECTION 2-EMI INFORMATION 14 SECTION 3-SAFETY/HANDLING OF ...
...22 Inspect/Adjust Weekly...23 Inspect/Adjust Monthly...23 Inspect/Adjust Periodically...23 Troubleshooting Guide ...24 Part No. 1106645 3 R51™and R51LXP TABLE OF CONTENTS TABLE OF CONTENTS REFERENCE DOCUMENTS 2 REGISTER YOUR PRODUCT 6 SPECIAL NOTES 7 TYPICAL ... or Service Information ...9 Accessories Information ...9 Operating Information...9 Tire Pressure ...11 Electrical Accessories ...11 Grounding Instructions ...11 Batteries...11 Charging Batteries ...12 Rain Test...12 Weight Training ...13 Weight Limitation...13 SECTION 2-EMI INFORMATION 14 SECTION 3-SAFETY/HANDLING OF ...
Owners Manual
Page 4
Electrical...24 SPJ+ Joysticks ...24 Information Gauge Display Diagnostics 25 Service Indicator Light Diagnostics 25 Checking Battery Charge Level...26 SECTION 5-WHEELCHAIR OPERATION 27 Operating the Wheelchair...27 Turning the Power On/Off ...27 Using the Joystick to Drive the Wheelchair 28 ... Armrest Height...39 Using Swing-Back Arms...40 Replacing Desk/Full Length Armrest Pad and/or Clothing Guards 40 Armrest Pad ...40 Clothing Guard...40 R51™and R51LXP 4 Part No. 1106645 TABLE OF CONTENTS TABLE OF CONTENTS Troubleshooting -
Electrical...24 SPJ+ Joysticks ...24 Information Gauge Display Diagnostics 25 Service Indicator Light Diagnostics 25 Checking Battery Charge Level...26 SECTION 5-WHEELCHAIR OPERATION 27 Operating the Wheelchair...27 Turning the Power On/Off ...27 Using the Joystick to Drive the Wheelchair 28 ... Armrest Height...39 Using Swing-Back Arms...40 Replacing Desk/Full Length Armrest Pad and/or Clothing Guards 40 Armrest Pad ...40 Clothing Guard...40 R51™and R51LXP 4 Part No. 1106645 TABLE OF CONTENTS TABLE OF CONTENTS Troubleshooting -
Owners Manual
Page 5
... Direct Mount Method...57 Battery Clamp Method ...60 Replacing the Battery Box Retaining Strap 63 Cleaning Battery Terminals ...64 When to Charge Batteries...65 SPJ+ Joysticks ...65 Description and Use of Battery Chargers 66 Connecting the Battery Charger...66 SECTION 13-CLUTCH/MOTOR LOCK 67 Engaging/Disengaging the Clutches...67 Part No. 1106645 5 R51™and R51LXP
... Direct Mount Method...57 Battery Clamp Method ...60 Replacing the Battery Box Retaining Strap 63 Cleaning Battery Terminals ...64 When to Charge Batteries...65 SPJ+ Joysticks ...65 Description and Use of Battery Chargers 66 Connecting the Battery Charger...66 SECTION 13-CLUTCH/MOTOR LOCK 67 Engaging/Disengaging the Clutches...67 Part No. 1106645 5 R51™and R51LXP

Owners Manual
Page 8
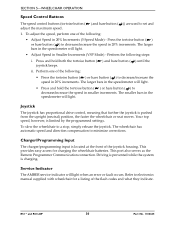
...not available on 14-inch wide wheelchairs) SPEED (M.P.H.) 0 to 4 (R51) or 0 to 6 (R51LXP) TURNING RADIUS 35 inches *RANGE (VARIABLE) 12 - 14 miles with UI batteries 18 - 22 miles with the battery discharge indicator on the joystick to determine the range of their individual results...unique conditions impact their wheelchair. Users should become accustomed to Charge Batteries on certain ideal conditions. R51™and R51LXP 8 Part No. 1106645 Users should become familiar with 22NF batteries **WEIGHT LIMITATION R51 R51LXP 250 lbs 300 lbs *NOTE: Values for range are derived...
...not available on 14-inch wide wheelchairs) SPEED (M.P.H.) 0 to 4 (R51) or 0 to 6 (R51LXP) TURNING RADIUS 35 inches *RANGE (VARIABLE) 12 - 14 miles with UI batteries 18 - 22 miles with the battery discharge indicator on the joystick to determine the range of their individual results...unique conditions impact their wheelchair. Users should become accustomed to Charge Batteries on certain ideal conditions. R51™and R51LXP 8 Part No. 1106645 Users should become familiar with 22NF batteries **WEIGHT LIMITATION R51 R51LXP 250 lbs 300 lbs *NOTE: Values for range are derived...
Owners Manual
Page 11
...these suggestions may cause the tire to explode and cause bodily harm. Batteries Ꮨ DANGER When using oxygen in the use of oxygen. Use of the tire. Part No. 1106645 11 R51™and R51LXP In addition, Invacare has placed RED/ORANGE WARNING TAGS on the deep cycle gel cell... batteries. The warranty and performance specifications contained in improper grounding and present a shock hazard to follow...
...these suggestions may cause the tire to explode and cause bodily harm. Batteries Ꮨ DANGER When using oxygen in the use of oxygen. Use of the tire. Part No. 1106645 11 R51™and R51LXP In addition, Invacare has placed RED/ORANGE WARNING TAGS on the deep cycle gel cell... batteries. The warranty and performance specifications contained in improper grounding and present a shock hazard to follow...

Owners Manual
Page 12
... cord is outside. DO NOT attempt to recharge the batteries when the wheelchair is unplugged. Rain Test Invacare has tested its power wheelchairs in accordance with extension cord attached to recharge the batteries and operate the wheelchair at all times. DO NOT leave power wheelchair in a rain ...storm of moisture. DO NOT attempt to the AC cable. Failure to the user or bystanders. may cause the chair to malfunction electrically and mechanically; R51™and ...
... cord is outside. DO NOT attempt to recharge the batteries when the wheelchair is unplugged. Rain Test Invacare has tested its power wheelchairs in accordance with extension cord attached to recharge the batteries and operate the wheelchair at all times. DO NOT leave power wheelchair in a rain ...storm of moisture. DO NOT attempt to the AC cable. Failure to the user or bystanders. may cause the chair to malfunction electrically and mechanically; R51™and ...
Owners Manual
Page 19
...battery boxes from the wheelchair. 2. Stairways SECTION 3-SAFETY/HANDLING OF WHEELCHAIRS ƽ WARNING DO NOT attempt to the wheelchair. Use an elevator to avoid injury. 1. Use proper lifting techniques (lift with your back straight. 5. Bend your knees and keep your legs) to move a wheelchair between floors. Invacare...Escalators ƽ WARNING DO NOT use only secure, non-detachable parts for hand-hold supports. Part No. 1106645 19 R51™and R51LXP Using non-removable (non-detachable) parts of the wheelchair, lift the wheelchair off of any removable (...
...battery boxes from the wheelchair. 2. Stairways SECTION 3-SAFETY/HANDLING OF WHEELCHAIRS ƽ WARNING DO NOT attempt to the wheelchair. Use an elevator to avoid injury. 1. Use proper lifting techniques (lift with your back straight. 5. Bend your knees and keep your legs) to move a wheelchair between floors. Invacare...Escalators ƽ WARNING DO NOT use only secure, non-detachable parts for hand-hold supports. Part No. 1106645 19 R51™and R51LXP Using non-removable (non-detachable) parts of the wheelchair, lift the wheelchair off of any removable (...
Owners Manual
Page 24
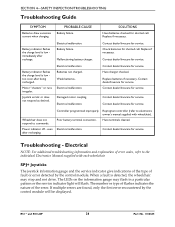
... respond as desired. Have charger checked. Contact dealer/Invacare for shorted cell. Poor battery terminal connection. Battery failure. Check batteries for service. even after recharge. Have terminals cleaned. R51™and R51LXP 24 Part No. 1106645 Malfunctioning battery charger. Damaged motor coupling. Contact dealer/Invacare for service. Contact dealer/Invacare for service. Motor "chatters" or runs irregular. Contact...
... respond as desired. Have charger checked. Contact dealer/Invacare for shorted cell. Poor battery terminal connection. Battery failure. Check batteries for service. even after recharge. Have terminals cleaned. R51™and R51LXP 24 Part No. 1106645 Malfunctioning battery charger. Damaged motor coupling. Contact dealer/Invacare for service. Contact dealer/Invacare for service. Motor "chatters" or runs irregular. Contact...
Owners Manual
Page 25
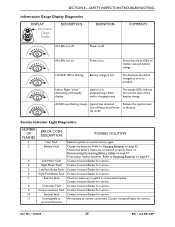
... Incompatible or incorrect Remote POSSIBLE SOLUTION Release joystick to Replacing Batteries on page 57. The batteries should be charged as soon as possible. Contact Invacare/Dealer for service. Battery charge is connected properly. Refer to make sure joystick is low. Part No. 1106645 25 R51™and R51LXP Joystick is on page 62. Refer to...
... Incompatible or incorrect Remote POSSIBLE SOLUTION Release joystick to Replacing Batteries on page 57. The batteries should be charged as soon as possible. Contact Invacare/Dealer for service. Battery charge is connected properly. Refer to make sure joystick is low. Part No. 1106645 25 R51™and R51LXP Joystick is on page 62. Refer to...
Owners Manual
Page 26
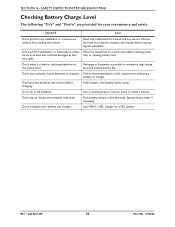
... provided for a GEL battery. DON'T DO Don't perform any service information that accompanies a battery and charger before cleaning termiteries in an area that could be damaged by bat- tery spills. Don't use randomly chosen batteries or chargers. Don't tip or tilt batteries. Push battery clamps on clamps and terminals with tools. R51™and R51LXP 26...
... provided for a GEL battery. DON'T DO Don't perform any service information that accompanies a battery and charger before cleaning termiteries in an area that could be damaged by bat- tery spills. Don't use randomly chosen batteries or chargers. Don't tip or tilt batteries. Push battery clamps on clamps and terminals with tools. R51™and R51LXP 26...
Owners Manual
Page 30
...will light. • Press and hold both the tortoise button ( joystick beeps. Refer to electronics manual supplied with wheelchair for charging the wheelchair batteries. Press and hold the tortoise button ( ) or hare button ( ) to decrease/increase the speed in 20% Increments (5 Speed Mode) -... This port also serves as the Remote Programmer Communication connection. R51™and R51LXP 30 Part No. 1106645 To adjust the speed, perform one of the following: • Adjust Speed in 20% increments. Press...
...will light. • Press and hold both the tortoise button ( joystick beeps. Refer to electronics manual supplied with wheelchair for charging the wheelchair batteries. Press and hold the tortoise button ( ) or hare button ( ) to decrease/increase the speed in 20% Increments (5 Speed Mode) -... This port also serves as the Remote Programmer Communication connection. R51™and R51LXP 30 Part No. 1106645 To adjust the speed, perform one of the following: • Adjust Speed in 20% increments. Press...
Owners Manual
Page 31
... charging: A. Refer to the user on the status of the wheelchair - 1. Power is detected by the control module. B. Recharge batteries as soon as a system diagnostic device when a fault is on. 2. SECTION 5-WHEELCHAIR OPERATION Information Gauge Display Located on the front of the joystick housing, it ... Display Diagnostics on page 25 for the diagnostic indications of the wheelchair status. C. The Information Gauge display also serves as possible. Part No. 1106645 31 R51™and R51LXP
... charging: A. Refer to the user on the status of the wheelchair - 1. Power is detected by the control module. B. Recharge batteries as soon as a system diagnostic device when a fault is on. 2. SECTION 5-WHEELCHAIR OPERATION Information Gauge Display Located on the front of the joystick housing, it ... Display Diagnostics on page 25 for the diagnostic indications of the wheelchair status. C. The Information Gauge display also serves as possible. Part No. 1106645 31 R51™and R51LXP

Owners Manual
Page 50
...locknuts according to the caster headtube hardware. Snap dust cover into the caster headtube. FIGURE 11.1 Adjusting Forks R51™and R51LXP 50 Part No. 1106645 Remove battery boxes from the caster headtube. 2. Before performing any vehicle, the wheels, casters and tires should be necessary... Dust Cover Locknut Nylon Washer Caster Headtube Fork 3. Test wheelchair for cracks and wear and should swing once to Installing/Removing the Battery Boxes on page 37. 1. SECTION 11-CASTERS SECTION 11-CASTERS ƽ WARNING After ANY adjustments, repair or service and BEFORE ...
...locknuts according to the caster headtube hardware. Snap dust cover into the caster headtube. FIGURE 11.1 Adjusting Forks R51™and R51LXP 50 Part No. 1106645 Remove battery boxes from the caster headtube. 2. Before performing any vehicle, the wheels, casters and tires should be necessary... Dust Cover Locknut Nylon Washer Caster Headtube Fork 3. Test wheelchair for cracks and wear and should swing once to Installing/Removing the Battery Boxes on page 37. 1. SECTION 11-CASTERS SECTION 11-CASTERS ƽ WARNING After ANY adjustments, repair or service and BEFORE ...
Owners Manual
Page 51
...install/reinstall a battery with batteries. Visually inspect the battery to FIGURE 12.1 on page 52. 1. Invacare strongly recommends that the terminals are above the horizontal centerline. 4. Keep the batteries in the bottom of the battery tray or on ground/flat surface. 2. Using the Proper Batteries NOTE: For this... and NEGATIVE terminals (FIGURE 12.1). Part No. 1106645 51 R51™and R51LXP It also helps to contact BOTH battery posts at the same time. ALWAYS use a battery lifting strap when lifting a battery. It is off before performing this procedure, refer to ensure...
...install/reinstall a battery with batteries. Visually inspect the battery to FIGURE 12.1 on page 52. 1. Invacare strongly recommends that the terminals are above the horizontal centerline. 4. Keep the batteries in the bottom of the battery tray or on ground/flat surface. 2. Using the Proper Batteries NOTE: For this... and NEGATIVE terminals (FIGURE 12.1). Part No. 1106645 51 R51™and R51LXP It also helps to contact BOTH battery posts at the same time. ALWAYS use a battery lifting strap when lifting a battery. It is off before performing this procedure, refer to ensure...

Owners Manual
Page 52
... may occur. Remove the battery boxes and tray from the wheelchair. R51™and R51LXP 52 Part No. 1106645 Invacare strongly recommends their use as shown below. USE THIS CONFIGURATION POSITIVE (+) Battery Terminal Crosshole NEGATIVE (-) Battery Terminal U1 Battery NEGATIVE (-) Battery Terminal DO NOT USE POSITIVE (+) Battery Terminal FIGURE 12.1 Using the Proper Batteries Recommended Battery Types ƽ WARNING The...
... may occur. Remove the battery boxes and tray from the wheelchair. R51™and R51LXP 52 Part No. 1106645 Invacare strongly recommends their use as shown below. USE THIS CONFIGURATION POSITIVE (+) Battery Terminal Crosshole NEGATIVE (-) Battery Terminal U1 Battery NEGATIVE (-) Battery Terminal DO NOT USE POSITIVE (+) Battery Terminal FIGURE 12.1 Using the Proper Batteries Recommended Battery Types ƽ WARNING The...

Owners Manual
Page 53
... R51™and R51LXP Refer to Installing/Removing the Battery Boxes on the joystick is in place before using the wheelchair. 6. Refer to Installing/Removing the Batteries Into/From the Battery Boxes on page 64. 4. Place rear battery box onto the battery tray and connect the rear battery box to the front battery box. 3. SECTION 12-BATTERIES 2. Install the battery...
... R51™and R51LXP Refer to Installing/Removing the Battery Boxes on the joystick is in place before using the wheelchair. 6. Refer to Installing/Removing the Batteries Into/From the Battery Boxes on page 64. 4. Place rear battery box onto the battery tray and connect the rear battery box to the front battery box. 3. SECTION 12-BATTERIES 2. Install the battery...

Owners Manual
Page 54
... Detail "B" 14-Inch Wide Wheelchair (To Controller) Front Battery Box Connectors Rear Battery Box Connector Battery Tray Front Battery Box Rear Battery Box Retaining Strap Clip Retaining Strap FIGURE 12.2 Installing/Removing the Battery Boxes Installing/Removing the Battery Tray NOTE: For these procedures, refer to the wheelchair frame. R51™and R51LXP 54 Part No. 1106645 NOTE...
... Detail "B" 14-Inch Wide Wheelchair (To Controller) Front Battery Box Connectors Rear Battery Box Connector Battery Tray Front Battery Box Rear Battery Box Retaining Strap Clip Retaining Strap FIGURE 12.2 Installing/Removing the Battery Boxes Installing/Removing the Battery Tray NOTE: For these procedures, refer to the wheelchair frame. R51™and R51LXP 54 Part No. 1106645 NOTE...

Owners Manual
Page 55
...; WARNING Make sure power to FIGURE 12.4 on page 53. Part No. 1106645 55 R51™and R51LXP The use a battery lifting strap when lifting a battery. Invacare strongly recommends that the battery acid will not spill. ALWAYS use of the battery. It is OFF before performing this procedure, refer to the wheelchair is the most convenient...
...; WARNING Make sure power to FIGURE 12.4 on page 53. Part No. 1106645 55 R51™and R51LXP The use a battery lifting strap when lifting a battery. Invacare strongly recommends that the battery acid will not spill. ALWAYS use of the battery. It is OFF before performing this procedure, refer to the wheelchair is the most convenient...

Owners Manual
Page 56
... from the battery box(es) or battery(ies). Batteries which interfere with the battery box cannot be used for U1 battery removal/installation. Battery Lifting Strap Molded Carrying Strap or Hold Down Flanges U1 Battery Box Bottom Battery Battery Terminal(s)/Post(s) Group 22 ONLY 22 NF Battery Box Bottom FIGURE 12.4 Installing/Removing the Batteries Into/From the Battery Boxes R51™and...
... from the battery box(es) or battery(ies). Batteries which interfere with the battery box cannot be used for U1 battery removal/installation. Battery Lifting Strap Molded Carrying Strap or Hold Down Flanges U1 Battery Box Bottom Battery Battery Terminal(s)/Post(s) Group 22 ONLY 22 NF Battery Box Bottom FIGURE 12.4 Installing/Removing the Batteries Into/From the Battery Boxes R51™and...

Owners Manual
Page 57
... FIGURE 12.5 and FIGURE 12.6. • Dual Group 22NF Batteries without Mounting Holes in the Terminal(s)/Post(s) - GREY battery terminal cap onto BLACK battery cable. FIGURE 12.5 Installing Battery Terminal Cap Part No. 1106645 57 R51™and R51LXP Use direct mount method. Install battery terminal cap(s) onto battery cable(s): A. ii. ii. B. Direct Mount Method NOTE: For...
... FIGURE 12.5 and FIGURE 12.6. • Dual Group 22NF Batteries without Mounting Holes in the Terminal(s)/Post(s) - GREY battery terminal cap onto BLACK battery cable. FIGURE 12.5 Installing Battery Terminal Cap Part No. 1106645 57 R51™and R51LXP Use direct mount method. Install battery terminal cap(s) onto battery cable(s): A. ii. ii. B. Direct Mount Method NOTE: For...


