Owners Manual
Page 2
... completely reading and understanding these instructions and any additional instructional material such as owner's manuals, service manuals or instruction sheets supplied with Invacare accessories. DO NOT use this manual are available on www.invacare.com. REFERENCE DOCUMENTS DOCUMENT M50/M51/M61 Service Manual MK5™NX™Electronics Manual (M51 Wheelchairs) MK6i™Electronics Field Reference Guide (M61 Wheelchairs) PART NUMBER 1125075 1110532 1141471 NOTE: Updated versions of this product...
... completely reading and understanding these instructions and any additional instructional material such as owner's manuals, service manuals or instruction sheets supplied with Invacare accessories. DO NOT use this manual are available on www.invacare.com. REFERENCE DOCUMENTS DOCUMENT M50/M51/M61 Service Manual MK5™NX™Electronics Manual (M51 Wheelchairs) MK6i™Electronics Field Reference Guide (M61 Wheelchairs) PART NUMBER 1125075 1110532 1141471 NOTE: Updated versions of this product...
Owners Manual
Page 3
...Settings/Repair or Service 10 Accessories ...10 Operation Information ...10 Batteries...12 Grounding Instructions ...13 Rain Test...13 Weight Training ...13 Weight Limitation...13 SECTION 2-EMI INFORMATION 14 SECTION 3-SAFETY/HANDLING OF WHEELCHAIRS ...Installing the Arms ...36 Adjusting the Arms ...36 Installing/Removing Flip Back Armrests 38 Positioning/Adjusting Flip Back Armrests 39 SECTION 7-SEAT 40 Adjusting the Back Angle ...40 Adjusting the Headrest (Semi-Recline Only 41 Removing/Installing the Seat Assembly 42 Replacing the Seat Positioning Strap ...43 Part No 1125085 3 Pronto...
...Settings/Repair or Service 10 Accessories ...10 Operation Information ...10 Batteries...12 Grounding Instructions ...13 Rain Test...13 Weight Training ...13 Weight Limitation...13 SECTION 2-EMI INFORMATION 14 SECTION 3-SAFETY/HANDLING OF WHEELCHAIRS ...Installing the Arms ...36 Adjusting the Arms ...36 Installing/Removing Flip Back Armrests 38 Positioning/Adjusting Flip Back Armrests 39 SECTION 7-SEAT 40 Adjusting the Back Angle ...40 Adjusting the Headrest (Semi-Recline Only 41 Removing/Installing the Seat Assembly 42 Replacing the Seat Positioning Strap ...43 Part No 1125085 3 Pronto...
Owners Manual
Page 5
... 5 Pronto® M51™and M61™with SureStep® WHEELCHAIR TIE-DOWN RESTRAINTS AND SEAT RESTRAINTS Wheelchair users should be transferred into appropriate seating in vehicles for transportation and use be made of any tie-down systems for use in personal injury or property damage. As of this manual and apply to the table below for use with Invacare products. The seat...
... 5 Pronto® M51™and M61™with SureStep® WHEELCHAIR TIE-DOWN RESTRAINTS AND SEAT RESTRAINTS Wheelchair users should be transferred into appropriate seating in vehicles for transportation and use be made of any tie-down systems for use in personal injury or property damage. As of this manual and apply to the table below for use with Invacare products. The seat...
Owners Manual
Page 9
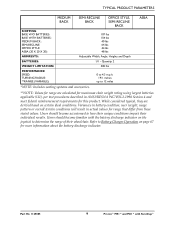
... impact their wheelchair. Part No 1125085 9 Pronto® M51™and M61™with the battery discharge indicator on certain ideal conditions. Users should become familiar with SureStep® While considered typical, they are calculated for maximum chair weight rating using largest batteries applicable (U1...: **RANGE (VARIABLE): 0 to 4.3 m.p.h. 19½ inches up to 12 miles *NOTE: Includes seating systems and accessories. **NOTE: Values for range are derived based on the joystick to Battery Charger Operation on page 67 for range that differ from these stated values.
... impact their wheelchair. Part No 1125085 9 Pronto® M51™and M61™with the battery discharge indicator on certain ideal conditions. Users should become familiar with SureStep® While considered typical, they are calculated for maximum chair weight rating using largest batteries applicable (U1...: **RANGE (VARIABLE): 0 to 4.3 m.p.h. 19½ inches up to 12 miles *NOTE: Includes seating systems and accessories. **NOTE: Values for range are derived based on the joystick to Battery Charger Operation on page 67 for range that differ from these stated values.
Owners Manual
Page 10
... reenter set ‐up specifications. Damage to the equipment could cause injury to the driver, bystanders, damage to the chair and to make sharp turns in the direction you are frequently exposed to tip over . After the wheelchair has been set ‐up of the controller may result in close proximity to product. Controller Settings/Repair or Service Set‐...
... reenter set ‐up specifications. Damage to the equipment could cause injury to the driver, bystanders, damage to the chair and to make sharp turns in the direction you are frequently exposed to tip over . After the wheelchair has been set ‐up of the controller may result in close proximity to product. Controller Settings/Repair or Service Set‐...
Owners Manual
Page 12
Invacare strongly recommends their use of the batteries. The use as the power source for each charger (supplied or purchased). Doing so will reduce the life of rubber gloves is outside. Read and carefully follow the manufacturer's instructions for this manual are not supplied, consult a qualified technician for proper procedures. If charging instructions are based on the use only a three wire...
Invacare strongly recommends their use of the batteries. The use as the power source for each charger (supplied or purchased). Doing so will reduce the life of rubber gloves is outside. Read and carefully follow the manufacturer's instructions for this manual are not supplied, consult a qualified technician for proper procedures. If charging instructions are based on the use only a three wire...
Owners Manual
Page 13
... 300 lbs. Part No 1125085 13 Pronto® M51™and M61™with or for Invacare products. This provides the end user or his/her assistant sufficient time to prematurely rust or may cause the chair to remove his/her power wheelchair from any plug used with SureStep® Invacare wheelchairs have the two‐prong receptacle replaced with a properly...
... 300 lbs. Part No 1125085 13 Pronto® M51™and M61™with or for Invacare products. This provides the end user or his/her assistant sufficient time to prematurely rust or may cause the chair to remove his/her power wheelchair from any plug used with SureStep® Invacare wheelchairs have the two‐prong receptacle replaced with a properly...
Owners Manual
Page 25
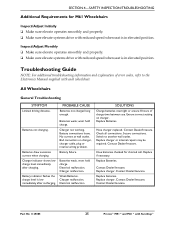
... with each wheelchair. Replace if necessary. Replace charger. Replace charger. wont hold charge. Check all connections. Battery connections loose. Batteries weak, wont hold charge. Switch to the Electronics Manual supplied with reduced speed when seat is in elevated position. Electrical malfunction SOLUTIONS Charge batteries overnight or ensure 8 hours of error codes, refer to another wall outlet. Contact Dealer/Invacare. All Wheelchairs General Troubleshooting SYMPTOM...
... with each wheelchair. Replace if necessary. Replace charger. Replace charger. wont hold charge. Check all connections. Battery connections loose. Batteries weak, wont hold charge. Switch to the Electronics Manual supplied with reduced speed when seat is in elevated position. Electrical malfunction SOLUTIONS Charge batteries overnight or ensure 8 hours of error codes, refer to another wall outlet. Contact Dealer/Invacare. All Wheelchairs General Troubleshooting SYMPTOM...
Owners Manual
Page 26
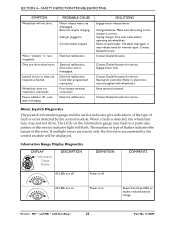
... LEDs are on . Batteries require charging. Only one drive wheel turns. Power indicator off . Contact Dealer/Invacare for service. When a fault is off. The number or type of flashes indicates the nature of fault or error detected by the control module will be displayed. Pronto® M51™and M61™with wheelchair). SECTION 4-SAFETY INSPECTION/TROUBLESHOOTING SYMPTOM Wheelchair will flash. All LEDs...
... LEDs are on . Batteries require charging. Only one drive wheel turns. Power indicator off . Contact Dealer/Invacare for service. When a fault is off. The number or type of flashes indicates the nature of fault or error detected by the control module will be displayed. Pronto® M51™and M61™with wheelchair). SECTION 4-SAFETY INSPECTION/TROUBLESHOOTING SYMPTOM Wheelchair will flash. All LEDs...
Owners Manual
Page 27
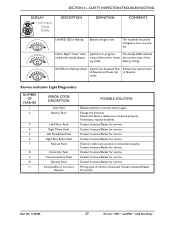
... Invacare/Dealer for service. Service Indicator Light Diagnostics NUMBER OF FLASHES 1 2 3 4 5 6 7 8 9 10 11 ERROR CODE DESCRIPTION User Fault Battery Fault Left Motor Fault Right Motor Fault Left Park Brake Fault Right Park Brake Fault Remote Fault Controller Fault Communications Fault General Fault Incompatible or incorrect Remote POSSIBLE SOLUTION Release joystick to make sure joystick is flashing. If necessary, replace batteries. Check to neutral and try again. mode. Charge the batteries. battery charge. SECTION 4-SAFETY INSPECTION/TROUBLESHOOTING...
... Invacare/Dealer for service. Service Indicator Light Diagnostics NUMBER OF FLASHES 1 2 3 4 5 6 7 8 9 10 11 ERROR CODE DESCRIPTION User Fault Battery Fault Left Motor Fault Right Motor Fault Left Park Brake Fault Right Park Brake Fault Remote Fault Controller Fault Communications Fault General Fault Incompatible or incorrect Remote POSSIBLE SOLUTION Release joystick to make sure joystick is flashing. If necessary, replace batteries. Check to neutral and try again. mode. Charge the batteries. battery charge. SECTION 4-SAFETY INSPECTION/TROUBLESHOOTING...
Owners Manual
Page 35
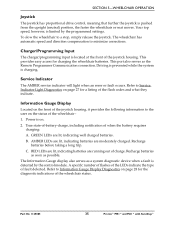
... serves as the Remote Programmer Communication connection. Service Indicator The AMBER service indicator will light when an error or fault occurs. B. Recharge batteries before taking a long trip. Part No 1125085 35 Pronto® M51™and M61™with SureStep® Power is detected by the programmed settings. C. Refer to Service Indicator Light Diagnostics on . 2. A specific number of flashes of the LEDs indicate the...
... serves as the Remote Programmer Communication connection. Service Indicator The AMBER service indicator will light when an error or fault occurs. B. Recharge batteries before taking a long trip. Part No 1125085 35 Pronto® M51™and M61™with SureStep® Power is detected by the programmed settings. C. Refer to Service Indicator Light Diagnostics on . 2. A specific number of flashes of the LEDs indicate the...
Owners Manual
Page 36
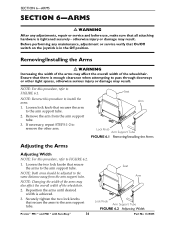
...repair or service and before use, make sure that all attaching hardware is tightened securely - Ensure that there is enough clearance when attempting to pass through doorways or other arm. NOTE: Both arms should be adjusted to FIGURE 6.1. Pronto® M51™and M61™with SureStep® 36 Seat Arm Lock Knob Arm Support...: Changing the width of the arms may affect the overall width of the wheelchair. 2. Securely tighten the two lock knobs that secure the arms to the arm support tube. Removing/Installing the Arms ƽ WARNING Increasing the width of the arms may also affect...
...repair or service and before use, make sure that all attaching hardware is tightened securely - Ensure that there is enough clearance when attempting to pass through doorways or other arm. NOTE: Both arms should be adjusted to FIGURE 6.1. Pronto® M51™and M61™with SureStep® 36 Seat Arm Lock Knob Arm Support...: Changing the width of the arms may affect the overall width of the wheelchair. 2. Securely tighten the two lock knobs that secure the arms to the arm support tube. Removing/Installing the Arms ƽ WARNING Increasing the width of the arms may also affect...
Owners Manual
Page 56
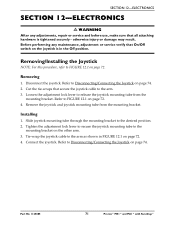
... initial use of the wheelchair. Refer to Removing/Installing the Seat Assembly on page 74. Refer to Disconnecting/Connecting the Joystick on the joystick is tightened securely - Pronto® M51™and M61™with continued use , make sure that On/Off switch on page 74. 2. Before performing any adjustments, repair or service and before use of the wheelchair, the user...
... initial use of the wheelchair. Refer to Removing/Installing the Seat Assembly on page 74. Refer to Disconnecting/Connecting the Joystick on the joystick is tightened securely - Pronto® M51™and M61™with continued use , make sure that On/Off switch on page 74. 2. Before performing any adjustments, repair or service and before use of the wheelchair, the user...
Owners Manual
Page 57
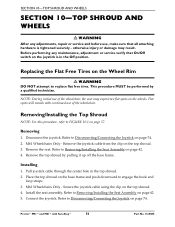
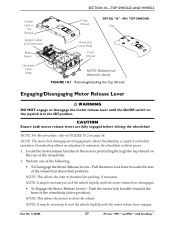
... wheelchair (drive position). Part No 1125085 57 Pronto® M51™and M61™with SureStep® NOTE: This allows the chair to drive the wheels. NOTE: It may be necessary to maneuver the wheelchair without power. 1. M61 TOP SHROUD Clip Hook and Loop Strap Front Shroud NOTE: Batteries not shown for pushing, if necessary. FIGURE 10.1 Removing/Installing...
... wheelchair (drive position). Part No 1125085 57 Pronto® M51™and M61™with SureStep® NOTE: This allows the chair to drive the wheels. NOTE: It may be necessary to maneuver the wheelchair without power. 1. M61 TOP SHROUD Clip Hook and Loop Strap Front Shroud NOTE: Batteries not shown for pushing, if necessary. FIGURE 10.1 Removing/Installing...
Owners Manual
Page 60
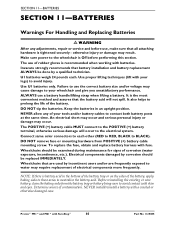
... signs of the battery. Invacare strongly recommends that are used by incontinent users and/or are frequently exposed to water may cause damage to your tools and/or battery cables to use of rubber gloves is battery acid in an upright position. NEVER allow any adjustments, repair or service and before performing this section. Wheelchairs that battery installation and battery replacement ALWAYS be done...
... signs of the battery. Invacare strongly recommends that are used by incontinent users and/or are frequently exposed to water may cause damage to your tools and/or battery cables to use of rubber gloves is battery acid in an upright position. NEVER allow any adjustments, repair or service and before performing this section. Wheelchairs that battery installation and battery replacement ALWAYS be done...
Owners Manual
Page 67
... will be charged using the wheelchair. NOTE: The batteries can be reduced. ALWAYS charge new batteries before initial use of fire and electric shock. Battery Charger Operation ƽ WARNING Read and carefully follow the manufacturer's instructions for proper procedures. Part No 1125085 67 Pronto® M51™and M61™with SureStep® SECTION 11-BATTERIES CAUTION New batteries MUST be replaced.
... will be charged using the wheelchair. NOTE: The batteries can be reduced. ALWAYS charge new batteries before initial use of fire and electric shock. Battery Charger Operation ƽ WARNING Read and carefully follow the manufacturer's instructions for proper procedures. Part No 1125085 67 Pronto® M51™and M61™with SureStep® SECTION 11-BATTERIES CAUTION New batteries MUST be replaced.
Owners Manual
Page 68
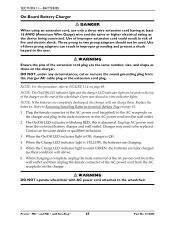
...replaced. NOTE: The On/Off LED indicator light and the charger LED indicator light are the same number, size, and shape as those on the rear of fire and electric shock. Contact an Invacare dealer or qualified technician. 3. When the Charge LED indicator light is YELLOW, the batteries are completely discharged, the charger will allow). 6. Use... of the wheelchair. NOTE: If the batteries are charging. 5. When the On/Off LED indicator light is Off, charger is abnormal. Pronto® M51™and M61™with AC power cord attached to be used. Unplug AC power cord from ...
...replaced. NOTE: The On/Off LED indicator light and the charger LED indicator light are the same number, size, and shape as those on the rear of fire and electric shock. Contact an Invacare dealer or qualified technician. 3. When the Charge LED indicator light is YELLOW, the batteries are completely discharged, the charger will allow). 6. Use... of the wheelchair. NOTE: If the batteries are charging. 5. When the On/Off LED indicator light is Off, charger is abnormal. Pronto® M51™and M61™with AC power cord attached to be used. Unplug AC power cord from ...
Owners Manual
Page 71
...on page 74. Connect the joystick. Tie‐wrap the joystick cable to the arm. 3. otherwise injury or damage may result. Part No 1125085 71 Pronto® M51™and M61™with SureStep® Slide joystick mounting tube through the mounting bracket to FIGURE 12.1 on page ...cable to the arm as shown in the Off position. Before performing any adjustments, repair or service and before use, make sure that all attaching hardware is in FIGURE 12.1 on the other arm. 3. Removing/Installing the Joystick NOTE: For this procedure, refer to release the joystick mounting tube from...
...on page 74. Connect the joystick. Tie‐wrap the joystick cable to the arm. 3. otherwise injury or damage may result. Part No 1125085 71 Pronto® M51™and M61™with SureStep® Slide joystick mounting tube through the mounting bracket to FIGURE 12.1 on page ...cable to the arm as shown in the Off position. Before performing any adjustments, repair or service and before use, make sure that all attaching hardware is in FIGURE 12.1 on the other arm. 3. Removing/Installing the Joystick NOTE: For this procedure, refer to release the joystick mounting tube from...
Owners Manual
Page 79
...serial number. For product purchased in replacement part installation or repair of the back cover. Invacare warrants all upholstered materials, padded materials, tires and wheels) to Invacare at Invacare's option. This warranty does not include any subsequent purchaser or owner. Invacare's sole obligation and your Invacare product....within any other legal rights which vary from Invacare or a dealer. THE WARRANTY SHALL NOT APPLY TO PROBLEMS ARISING FROM NORMAL WEAR AND TEAR OR FAILURE TO ADHERE TO THE PRODUCT INSTRUCTIONS. A CHANGE IN OPERATING NOISE, PARTICULARLY RELATIVE ...
...serial number. For product purchased in replacement part installation or repair of the back cover. Invacare warrants all upholstered materials, padded materials, tires and wheels) to Invacare at Invacare's option. This warranty does not include any subsequent purchaser or owner. Invacare's sole obligation and your Invacare product....within any other legal rights which vary from Invacare or a dealer. THE WARRANTY SHALL NOT APPLY TO PROBLEMS ARISING FROM NORMAL WEAR AND TEAR OR FAILURE TO ADHERE TO THE PRODUCT INSTRUCTIONS. A CHANGE IN OPERATING NOISE, PARTICULARLY RELATIVE ...
Owners Manual
Page 80
... not transferable or assignable to any subsequent purchaser or owner. Invacare warrants all electronics and electrical components (excluding batteries), motors and gearboxes to be free from defects in materials and workmanship for a period of two (2) years from the date of purchase from defects in replacement part installation or repair of the seller's invoice required for coverage under...
... not transferable or assignable to any subsequent purchaser or owner. Invacare warrants all electronics and electrical components (excluding batteries), motors and gearboxes to be free from defects in materials and workmanship for a period of two (2) years from the date of purchase from defects in replacement part installation or repair of the seller's invoice required for coverage under...


