

Owners Manual
Page 3
... the Batteries ...42 11 TRANSPORTING 44 Transporting the Scooter...44 12 ACCESSORIES 46 Installing/Removing the Accessory Tube...46 Installing/Removing the Crutch/Cane Holder ...47 Installing/Removing the Safety Flag...48 Installing/Removing/Using the Walker Holder ...49 Installing/Removing the Rear Mounted Basket...50 13 MAINTENANCE 51 Suggested Maintenance Procedures ...51 14 TROUBLESHOOTING 52 General Troubleshooting...52 Service Indicator Error Codes...54...
... the Batteries ...42 11 TRANSPORTING 44 Transporting the Scooter...44 12 ACCESSORIES 46 Installing/Removing the Accessory Tube...46 Installing/Removing the Crutch/Cane Holder ...47 Installing/Removing the Safety Flag...48 Installing/Removing/Using the Walker Holder ...49 Installing/Removing the Rear Mounted Basket...50 13 MAINTENANCE 51 Suggested Maintenance Procedures ...51 14 TROUBLESHOOTING 52 General Troubleshooting...52 Service Indicator Error Codes...54...
Owners Manual
Page 5
... from Invacare or a dealer. THE WARRANTY SHALL NOT APPLY TO PROBLEMS ARISING FROM NORMAL WEAR OR FAILURE TO ADHERE TO THESE INSTRUCTIONS. This warranty does not include any labor or shipping charges incurred in materials and workmanship for a period of twelve (12) months from the date of purchase from defects in replacement part installation or repair of...
... from Invacare or a dealer. THE WARRANTY SHALL NOT APPLY TO PROBLEMS ARISING FROM NORMAL WEAR OR FAILURE TO ADHERE TO THESE INSTRUCTIONS. This warranty does not include any labor or shipping charges incurred in materials and workmanship for a period of twelve (12) months from the date of purchase from defects in replacement part installation or repair of...
Owners Manual
Page 6
... medical devices such as owner's manuals, service manuals or instruction sheets supplied with Invacare accessories. However, final selection of the type of powered scooter to be performed by an individual rests solely with Invacare products. NOTICE THE INFORMATION CONTAINED IN THIS DOCUMENT IS SUBJECT TO CHANGE WITHOUT NOTICE. If you are specifically designed and manufactured for use of damage, DO...
... medical devices such as owner's manuals, service manuals or instruction sheets supplied with Invacare accessories. However, final selection of the type of powered scooter to be performed by an individual rests solely with Invacare products. NOTICE THE INFORMATION CONTAINED IN THIS DOCUMENT IS SUBJECT TO CHANGE WITHOUT NOTICE. If you are specifically designed and manufactured for use of damage, DO...
Owners Manual
Page 8
... occupant MUST be removed and transported independently of any removable (detachable) parts. Powered scooter with your legs) to move the powered scooter components up or down the stairs. Use proper lifting techniques (lift with batteries and seat weighs between floors using a stairway. Otherwise, damage or injury may occur. Follow this procedure for hand-hold supports. Remove the occupant from...
... occupant MUST be removed and transported independently of any removable (detachable) parts. Powered scooter with your legs) to move the powered scooter components up or down the stairs. Use proper lifting techniques (lift with batteries and seat weighs between floors using a stairway. Otherwise, damage or injury may occur. Follow this procedure for hand-hold supports. Remove the occupant from...
Owners Manual
Page 9
...Repair or Service Information ƽ WARNING Scooters should be replaced immediately. If signs of the controller may differ from the floor by a qualified technician. Part No. 1143205 9 Lynx™L-3 & Lynx L-4 Scooters Invacare recognizes and encourages each individual to move forward in overcoming obstacles that may affect other activities of the user. Techniques in this manual...a starting point for the new powered scooter user with or without the seat positioning strap), Invacare strongly recommends ordering the seat positioning strap as the most common...
...Repair or Service Information ƽ WARNING Scooters should be replaced immediately. If signs of the controller may differ from the floor by a qualified technician. Part No. 1143205 9 Lynx™L-3 & Lynx L-4 Scooters Invacare recognizes and encourages each individual to move forward in overcoming obstacles that may affect other activities of the user. Techniques in this manual...a starting point for the new powered scooter user with or without the seat positioning strap), Invacare strongly recommends ordering the seat positioning strap as the most common...

Owners Manual
Page 11
...powered scooter without the rear shroud installed, to avoid injury and/or damage to the scooter. Ensure that the power is in bodily harm. Otherwise the user...Part No. 1143205 11 Lynx™L-3 & Lynx L-4 Scooters This will not drive. DO NOT remove the key or shut off while the powered scooter is off and the powered scooter will ensure that the seat is properly adjusted before the brake engages. Otherwise the user... ensure that the seat is released while in the forward position before using the powered scooter. If loose and/or worn, replace immediately. ALWAYS use , the tiller ...
...powered scooter without the rear shroud installed, to avoid injury and/or damage to the scooter. Ensure that the power is in bodily harm. Otherwise the user...Part No. 1143205 11 Lynx™L-3 & Lynx L-4 Scooters This will not drive. DO NOT remove the key or shut off while the powered scooter is off and the powered scooter will ensure that the seat is properly adjusted before the brake engages. Otherwise the user... ensure that the seat is released while in the forward position before using the powered scooter. If loose and/or worn, replace immediately. ALWAYS use , the tiller ...
Owners Manual
Page 13
... that all times. Invacare powered scooters have the two-prong receptacle replaced with a properly grounded three-prong wall receptacle in this unit. Carefully read battery/battery charger information prior to installing, servicing or operating your powered scooter. Some devices are secure at all electrical connections are equipped with the National Electrical Code. If occupant uses said powered scooter as the device...
... that all times. Invacare powered scooters have the two-prong receptacle replaced with a properly grounded three-prong wall receptacle in this unit. Carefully read battery/battery charger information prior to installing, servicing or operating your powered scooter. Some devices are secure at all electrical connections are equipped with the National Electrical Code. If occupant uses said powered scooter as the device...
Owners Manual
Page 15
... below are of radiated EMI can affect powered wheelchair movement and braking. Electromagnetic interference (EMI) from hand-held devices, such as cordless phones, laptop computers, AM/FM radios, TV sets, CD players, cassette players, and small appliances, such as electric shavers and hair dryers, so far as those used . 2. Part No. 1143205 15 Lynx™L-3 & Lynx...
... below are of radiated EMI can affect powered wheelchair movement and braking. Electromagnetic interference (EMI) from hand-held devices, such as cordless phones, laptop computers, AM/FM radios, TV sets, CD players, cassette players, and small appliances, such as electric shavers and hair dryers, so far as those used . 2. Part No. 1143205 15 Lynx™L-3 & Lynx...

Owners Manual
Page 21
...these maintenance procedures: Part No. 1143205 21 Lynx™L-3 & Lynx L-4 Scooters Regular cleaning will extend the life and efficiency of your powered scooter. CAUTION As with any vehicle, the wheels and tires should be checked periodically for cracks and wear, and should be replaced. 5 Inspection ... or service, turn power Off and remove key from ignition. To operate properly and safely, your powered scooter. ƽ WARNING Before performing any other vehicle. Routine maintenance will reveal loose or worn parts and enhance the smooth operation of your powered scooter must...
...these maintenance procedures: Part No. 1143205 21 Lynx™L-3 & Lynx L-4 Scooters Regular cleaning will extend the life and efficiency of your powered scooter. CAUTION As with any vehicle, the wheels and tires should be checked periodically for cracks and wear, and should be replaced. 5 Inspection ... or service, turn power Off and remove key from ignition. To operate properly and safely, your powered scooter. ƽ WARNING Before performing any other vehicle. Routine maintenance will reveal loose or worn parts and enhance the smooth operation of your powered scooter must...
Owners Manual
Page 24
... the powered scooter will move when the scooter is turned on the tiller assembly. 6. The battery charge display is located on left . As the battery charge decreases, the needle moves, from right to left side of the control panel. 5. If the throttle control lever is a problem with ...control panel. Refer to Service Indicator Error Codes on . 4. Speed Control Knob - The speed control knob is turned on, the needle on the right side of battery charge. When the scooter is located on the battery charge display will roll back approximately three feet before brake engages. The amount ...
... the powered scooter will move when the scooter is turned on the tiller assembly. 6. The battery charge display is located on left . As the battery charge decreases, the needle moves, from right to left side of the control panel. 5. If the throttle control lever is a problem with ...control panel. Refer to Service Indicator Error Codes on . 4. Speed Control Knob - The speed control knob is turned on, the needle on the right side of battery charge. When the scooter is located on the battery charge display will roll back approximately three feet before brake engages. The amount ...
Owners Manual
Page 25
... is properly locked before attempting transfer into or out of the powered scooter. For individuals with balance problems, practice transferring activities with an assistant in the presence of the powered scooter. Part No. 1143205 25 Lynx™L-3 & Lynx L-4 Scooters To determine... adjustments, repair or service and before use of a qualified healthcare professional. Attempting unsafe transfers may result. DO NOT attempt to the product. Ensure seat is tightened securely otherwise injury or damage may cause a fall from the powered scooter resulting in injury to user and/...
... is properly locked before attempting transfer into or out of the powered scooter. For individuals with balance problems, practice transferring activities with an assistant in the presence of the powered scooter. Part No. 1143205 25 Lynx™L-3 & Lynx L-4 Scooters To determine... adjustments, repair or service and before use of a qualified healthcare professional. Attempting unsafe transfers may result. DO NOT attempt to the product. Ensure seat is tightened securely otherwise injury or damage may cause a fall from the powered scooter resulting in injury to user and/...

Owners Manual
Page 29
Part No. 1143205 29 Lynx™L-3 & Lynx L-4 Scooters 7 Seat and Arms 7 SEAT AND ARMS ƽ WARNING After any maintenance, adjustment or service, turn power off and remove key from ignition. Refer to Label Locations on page 9 for pinch point location. Before performing any adjustments, repair or service and before use, make sure that all attaching hardware is tightened securely otherwise injury or damage may result.
Part No. 1143205 29 Lynx™L-3 & Lynx L-4 Scooters 7 Seat and Arms 7 SEAT AND ARMS ƽ WARNING After any maintenance, adjustment or service, turn power off and remove key from ignition. Refer to Label Locations on page 9 for pinch point location. Before performing any adjustments, repair or service and before use, make sure that all attaching hardware is tightened securely otherwise injury or damage may result.

Owners Manual
Page 34
... to ensure that the tiller is securely locked. The powered scooters feature an adjustable tiller. Ensure that tiller is properly adjusted before use, the tiller MUST be folded down for transportation and storage. 1. The tiller locks into the desired ...mounting hole (Detail "A"). 4. The tiller can also be securely locked into position. Release or rotate the tiller adjustment lever to FIGURE 8.1. After making any maintenance, adjustment or service, turn power...
... to ensure that the tiller is securely locked. The powered scooters feature an adjustable tiller. Ensure that tiller is properly adjusted before use, the tiller MUST be folded down for transportation and storage. 1. The tiller locks into the desired ...mounting hole (Detail "A"). 4. The tiller can also be securely locked into position. Release or rotate the tiller adjustment lever to FIGURE 8.1. After making any maintenance, adjustment or service, turn power...
Owners Manual
Page 35
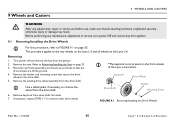
...performing any adjustments, repair or service and before use, make sure that all wheels on the Lynx L-4. Remove the washer and mounting screw that the drive wheels are off and remove the key from the ignition. 2. Turn power off the ground...Installing the Drive Wheels Part No. 1143205 35 Lynx™L-3 & Lynx L-4 Scooters This procedure applies to Removing/Installing the Seat on page 23. 3. Set aside. 7. Keystock* Drive Wheel Drive Shaft Washer Mounting Screw 6. 9 Wheels and Casters 9 WHEELS AND CASTERS ƽ WARNING After any maintenance, adjustment or service, turn power...
...performing any adjustments, repair or service and before use, make sure that all wheels on the Lynx L-4. Remove the washer and mounting screw that the drive wheels are off and remove the key from the ignition. 2. Turn power off the ground...Installing the Drive Wheels Part No. 1143205 35 Lynx™L-3 & Lynx L-4 Scooters This procedure applies to Removing/Installing the Seat on page 23. 3. Set aside. 7. Keystock* Drive Wheel Drive Shaft Washer Mounting Screw 6. 9 Wheels and Casters 9 WHEELS AND CASTERS ƽ WARNING After any maintenance, adjustment or service, turn power...

Owners Manual
Page 37
... eyes. Invacare strongly recommends that battery installation and battery replacement always be connected to the battery may occur. The use . Keep the batteries in FIGURE 10.3 - otherwise damage to the battery terminals/posts as shown in an upright position. Determine source of your tools and/or battery cables to neutralize the battery acid. NEVER allow any maintenance adjustment or service, turn power off...
... eyes. Invacare strongly recommends that battery installation and battery replacement always be connected to the battery may occur. The use . Keep the batteries in FIGURE 10.3 - otherwise damage to the battery terminals/posts as shown in an upright position. Determine source of your tools and/or battery cables to neutralize the battery acid. NEVER allow any maintenance adjustment or service, turn power off...

Owners Manual
Page 42
...use on the battery box. 7. Plug one side. 5. Refer to Removing/Installing the Battery Box on the left side of the battery box) to nine hours of the battery charger cable into the battery charger port located on inclines may substantially reduce per battery charge using the powered scooter. The powered... Always charge the batteries completely until the battery charger light turns GREEN. Plug the other end of the battery box. 6. 10 BATTERIES 10.4 Charging the Batteries ƽ WARNING NEVER attempt to recharge the batteries by attaching cables ...
...use on the battery box. 7. Plug one side. 5. Refer to Removing/Installing the Battery Box on the left side of the battery box) to nine hours of the battery charger cable into the battery charger port located on inclines may substantially reduce per battery charge using the powered scooter. The powered... Always charge the batteries completely until the battery charger light turns GREEN. Plug the other end of the battery box. 6. 10 BATTERIES 10.4 Charging the Batteries ƽ WARNING NEVER attempt to recharge the batteries by attaching cables ...

Owners Manual
Page 44
... 2. Lynx™L-3 & Lynx L-4 Scooters 44 Part No. 1143205 Remove the basket. 3. Remove the seat. Refer to Removing/Installing the Seat on page 45. 11 TRANSPORTING 11 Transporting ƽ WARNING After any maintenance, adjustment or service, turn power off and remove the key from the rear frame ...7. Remove the battery box. Refer to Removing/Installing the Battery Box on page 26. Before performing any adjustments, repair or service and before use, make sure that all attaching hardware is tightened securely otherwise injury or damage may occur. 11.1 Transporting the Scooter &#...
... 2. Lynx™L-3 & Lynx L-4 Scooters 44 Part No. 1143205 Remove the basket. 3. Remove the seat. Refer to Removing/Installing the Seat on page 45. 11 TRANSPORTING 11 Transporting ƽ WARNING After any maintenance, adjustment or service, turn power off and remove the key from the rear frame ...7. Remove the battery box. Refer to Removing/Installing the Battery Box on page 26. Before performing any adjustments, repair or service and before use, make sure that all attaching hardware is tightened securely otherwise injury or damage may occur. 11.1 Transporting the Scooter &#...

Owners Manual
Page 46
... to the seat frame using the mounting screw (Detail "A"). 3. Remove the mounting screw securing the accessory tube to FIGURE 12.1. 12 ACCESSORIES 12 Accessories ƽ WARNING After any maintenance, adjustment or service, turn power off and remove key from the accessory tube. 4. Before performing any adjustments, repair or service and before use, make sure that all install into...
... to the seat frame using the mounting screw (Detail "A"). 3. Remove the mounting screw securing the accessory tube to FIGURE 12.1. 12 ACCESSORIES 12 Accessories ƽ WARNING After any maintenance, adjustment or service, turn power off and remove key from the accessory tube. 4. Before performing any adjustments, repair or service and before use, make sure that all install into...

Owners Manual
Page 51
.... 13 Maintenance 13 MAINTENANCE ƽ WARNING After any adjustments, repair or service and before use , make sure they are clean and free from moisture. Use care in the front and drive wheels. Periodically have them adjusted by a qualified technician. 4. This could cause damage to Removing/Installing the Battery Box on page 32. Check any metallic objects to...
.... 13 Maintenance 13 MAINTENANCE ƽ WARNING After any adjustments, repair or service and before use , make sure they are clean and free from moisture. Use care in the front and drive wheels. Periodically have them adjusted by a qualified technician. 4. This could cause damage to Removing/Installing the Battery Box on page 32. Check any metallic objects to...
Owners Manual
Page 52
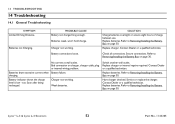
... TROUBLESHOOTING 14 Troubleshooting 14.1 General Troubleshooting SYMPTOM Limited Driving Distance. No current at wall outlet. Switch another wall outlet. Refer to Removing/Installing the Battery Box on page 30. Bad connection on page 30. PROBABLE CAUSE Battery not charged long enough. Refer to Removing/Installing the Battery Box on charger, charger cable, plug or internal wiring problem. Weak batteries. Service or replace...
... TROUBLESHOOTING 14 Troubleshooting 14.1 General Troubleshooting SYMPTOM Limited Driving Distance. No current at wall outlet. Switch another wall outlet. Refer to Removing/Installing the Battery Box on page 30. Bad connection on page 30. PROBABLE CAUSE Battery not charged long enough. Refer to Removing/Installing the Battery Box on charger, charger cable, plug or internal wiring problem. Weak batteries. Service or replace...


