Product Guide
Page 3
... Before You Begin ...19 How to Install and Remove the Motherboard 20 How to Install a Processor 20 Install the Universal Retention Mechanism 21 Install the Processor 22 How to Set the Processor Speed 23 How to Upgrade to a Boxed Pentium® II Processor 25 Remove the Installed Processor 25 Remove the Heatsink Support Base 27 Upgrade the...
... Before You Begin ...19 How to Install and Remove the Motherboard 20 How to Install a Processor 20 Install the Universal Retention Mechanism 21 Install the Processor 22 How to Set the Processor Speed 23 How to Upgrade to a Boxed Pentium® II Processor 25 Remove the Installed Processor 25 Remove the Heatsink Support Base 27 Upgrade the...

Product Guide
Page 5
... ...42 11. Main Menu...37 6. Motherboard Components 8 2. Installing the Processor 22 6. Location of the Configuration Jumper Block 23 8. IDE Configuration Submenus 41 10. Removing the Heatsink Support Retention Pins 27 10. Maintenance Menu ......37 5. IDE Configuration ...40 9. Video Configuration Submenu 43 13. Resource Configuration Submenu 43 v Replacing the Battery 33 15. SE440BX-2 Motherboard...
... ...42 11. Main Menu...37 6. Motherboard Components 8 2. Installing the Processor 22 6. Location of the Configuration Jumper Block 23 8. IDE Configuration Submenus 41 10. Removing the Heatsink Support Retention Pins 27 10. Maintenance Menu ......37 5. IDE Configuration ...40 9. Video Configuration Submenu 43 13. Resource Configuration Submenu 43 v Replacing the Battery 33 15. SE440BX-2 Motherboard...
Product Guide
Page 7
...the SE440BX-2 motherboard, including: • Features • Components • Back panel I/O connectors The remaining chapters explain how to: • Add or upgrade components like processors or memory • Use the BIOS Setup program to modify the motherboard's ...configuration • Upgrade the BIOS Features Summary • ATX form factor of 12 x 7.75 inches with seven mounting screw holes • Support for the following processors: Intel® Pentium® II processor Intel® Celeron™ processor • Three DIMM sockets Supports...
...the SE440BX-2 motherboard, including: • Features • Components • Back panel I/O connectors The remaining chapters explain how to: • Add or upgrade components like processors or memory • Use the BIOS Setup program to modify the motherboard's ...configuration • Upgrade the BIOS Features Summary • ATX form factor of 12 x 7.75 inches with seven mounting screw holes • Support for the following processors: Intel® Pentium® II processor Intel® Celeron™ processor • Three DIMM sockets Supports...
Product Guide
Page 10
... 128 For the latest information on processor support for installing dual inline memory modules (DIMMs). To upgrade the processor, see Chapter 2. 10 To install memory, see Chapter 2. Processors are not included with the SE440BX-2 motherboard and must be upgraded with any processor at : http://channel.intel.com/business/ibp/boards/ Microprocessor Upgrades The motherboard can be purchased separately. When mounted...
... 128 For the latest information on processor support for installing dual inline memory modules (DIMMs). To upgrade the processor, see Chapter 2. 10 To install memory, see Chapter 2. Processors are not included with the SE440BX-2 motherboard and must be upgraded with any processor at : http://channel.intel.com/business/ibp/boards/ Microprocessor Upgrades The motherboard can be purchased separately. When mounted...

Product Guide
Page 11
SE440BX-2 Motherboard Product Guide Second Level Cache Memory The second level cache for Windows† 95 and Windows 98 11 All supported onboard memory can be cached. The interface supports: • Up to the computer. The Celeron processors that are four PBSRAM components totaling 512 KB in boards inside the computer. The controller features the following: •...
SE440BX-2 Motherboard Product Guide Second Level Cache Memory The second level cache for Windows† 95 and Windows 98 11 All supported onboard memory can be cached. The interface supports: • Up to the computer. The Celeron processors that are four PBSRAM components totaling 512 KB in boards inside the computer. The controller features the following: •...
Product Guide
Page 16
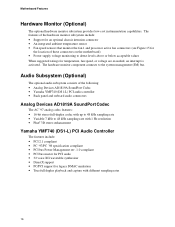
... interrupt is activated. The features of the hardware monitor subsystem include: • Support for an optional chassis intrusion connector • An integrated ambient temperature sensor • Fan speed sensors that monitor the fan 1 and processor active fan connectors (see Figure 15 for legacy DMAC emulation • True full...16-bit stereo full-duplex codec with up to 48 kHz sampling rate • Variable 7 kHz to the system management (SM) bus. Motherboard Features Hardware Monitor (Optional) The optional hardware monitor subsystem provides low-cost instrumentation capabilities.
... interrupt is activated. The features of the hardware monitor subsystem include: • Support for an optional chassis intrusion connector • An integrated ambient temperature sensor • Fan speed sensors that monitor the fan 1 and processor active fan connectors (see Figure 15 for legacy DMAC emulation • True full...16-bit stereo full-duplex codec with up to 48 kHz sampling rate • Variable 7 kHz to the system management (SM) bus. Motherboard Features Hardware Monitor (Optional) The optional hardware monitor subsystem provides low-cost instrumentation capabilities.
Product Guide
Page 23
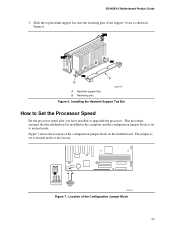
... shown in the computer and the configuration jumper block is set to Set the Processor Speed Set the processor speed after you have installed or upgraded the processor. Slide the top heatsink support bar onto the retaining pins of the configuration jumper block on the motherboard. SE440BX-2 Motherboard Product Guide 3. Location of the Configuration Jumper Block 23
... shown in the computer and the configuration jumper block is set to Set the Processor Speed Set the processor speed after you have installed or upgraded the processor. Slide the top heatsink support bar onto the retaining pins of the configuration jumper block on the motherboard. SE440BX-2 Motherboard Product Guide 3. Location of the Configuration Jumper Block 23

Product Guide
Page 25
... remove any components that block access to the installed processor. 25 Detailed instructions follow these procedures. Remove the heatsink support base. 3. Upgrade the processor. Remove the heatsink support top bar and the installed processor. 2. Remove the Installed Processor To remove the installed processor, follow for a boxed Pentium II processor upgrade. SE440BX-2 Motherboard Product Guide How to Upgrade to a Boxed Pentium...
... remove any components that block access to the installed processor. 25 Detailed instructions follow these procedures. Remove the heatsink support base. 3. Upgrade the processor. Remove the heatsink support top bar and the installed processor. 2. Remove the Installed Processor To remove the installed processor, follow for a boxed Pentium II processor upgrade. SE440BX-2 Motherboard Product Guide How to Upgrade to a Boxed Pentium...

Product Guide
Page 26
... up as shown in Figure 8. B B A A Heatsink support top bar B Latches OM07180 Figure 8. Removing the Heatsink Support Top Bar and the Processor CAUTION Pressing on the motherboard or components while removing the processor can safely press on the latches to gain leverage while removing the processor. 7. Place the processor aside. 26 If necessary, you can cause damage. Press...
... up as shown in Figure 8. B B A A Heatsink support top bar B Latches OM07180 Figure 8. Removing the Heatsink Support Top Bar and the Processor CAUTION Pressing on the motherboard or components while removing the processor can safely press on the latches to gain leverage while removing the processor. 7. Place the processor aside. 26 If necessary, you can cause damage. Press...
Product Guide
Page 29
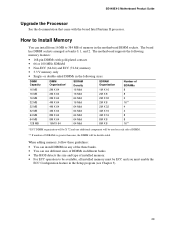
...each side of DIMM. ** If number of memory in the Setup program (see Chapter 3). 29 SE440BX-2 Motherboard Product Guide Upgrade the Processor See the documentation that came with gold-plated contacts • 66 or 100 MHz SDRAM •... in the following memory features: • 168-pin DIMMs with the boxed Intel Pentium II processor. The motherboard supports the following sizes: DIMM Capacity 16 MB 16 MB 16 MB 32 MB 32...DIMM organization will be X 72 and one additional component will be ECC and you must be double sided. The board has DIMM sockets arranged as banks 0, 1, and 2.
...each side of DIMM. ** If number of memory in the Setup program (see Chapter 3). 29 SE440BX-2 Motherboard Product Guide Upgrade the Processor See the documentation that came with gold-plated contacts • 66 or 100 MHz SDRAM •... in the following memory features: • 168-pin DIMMs with the boxed Intel Pentium II processor. The motherboard supports the following sizes: DIMM Capacity 16 MB 16 MB 16 MB 32 MB 32...DIMM organization will be X 72 and one additional component will be ECC and you must be double sided. The board has DIMM sockets arranged as banks 0, 1, and 2.
Product Guide
Page 37
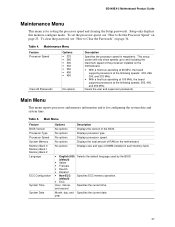
... of DIMM installed in megahertz. Displays size and type of RAM on the motherboard. • With a host bus operating at 66 MHz, the board supports processors at the following speeds: 233, 266, 300, and 333 MHz. •...board supports processors at the following speeds: 350, 400, and 450 MHz. Setup only displays this menu in configure mode. Displays processor speed. Specifies the current time. To set the processor speed, see "How to and including the maximum speed of the BIOS. Displays processor type. Specifies ECC memory operation. Table 4. Table 5. SE440BX-2 Motherboard...
... of DIMM installed in megahertz. Displays size and type of RAM on the motherboard. • With a host bus operating at 66 MHz, the board supports processors at the following speeds: 233, 266, 300, and 333 MHz. •...board supports processors at the following speeds: 350, 400, and 450 MHz. Setup only displays this menu in configure mode. Displays processor speed. Specifies the current time. To set the processor speed, see "How to and including the maximum speed of the BIOS. Displays processor type. Specifies ECC memory operation. Table 4. Table 5. SE440BX-2 Motherboard...

Product Guide
Page 64
... the supplier's technical support to all warnings and cautions that could cause a short circuit Observe all of the UL File No. E139761 on component side of the board and the PB No. Read and adhere to find out how you install and test the motherboard, observe all warnings and... flammability is 94V-1 or -0. • Each board will be careful of: • Sharp pins on connectors • Sharp pins on printed circuit assemblies • Rough edges and sharp corners on the chassis • Hot components (like processors, voltage regulators, and heat sinks) • Damage to wires that...
... the supplier's technical support to all warnings and cautions that could cause a short circuit Observe all of the UL File No. E139761 on component side of the board and the PB No. Read and adhere to find out how you install and test the motherboard, observe all warnings and... flammability is 94V-1 or -0. • Each board will be careful of: • Sharp pins on connectors • Sharp pins on printed circuit assemblies • Rough edges and sharp corners on the chassis • Hot components (like processors, voltage regulators, and heat sinks) • Damage to wires that...


