

Integration Guide
Page 2
... J LH 5at, El-A Cl uFIN Al 2: http://www.intel.com/support/kr/motherboards/desktop/sb/CS-O34O57.htm. For a list of tested memory, go to: http://www.intel.com/NUCSupport. -iwz http://www.intel.com/support/cn/motherboards/desktop/sb/CS-O34O57.htm. Para obtener information sobre... el cumplimiento de normativas, visite: http://www.intel.com/support/sp/motherboards/desktop/sb/CS-O34O57.htm. Para obter informacoes sobre a conformidade regulamentar, va para: http://www.intel.com/support/pt/motherboards/desktop/sb/CS-O34O57.htm. Per scaricare i driver piu ...
... J LH 5at, El-A Cl uFIN Al 2: http://www.intel.com/support/kr/motherboards/desktop/sb/CS-O34O57.htm. For a list of tested memory, go to: http://www.intel.com/NUCSupport. -iwz http://www.intel.com/support/cn/motherboards/desktop/sb/CS-O34O57.htm. Para obtener information sobre... el cumplimiento de normativas, visite: http://www.intel.com/support/sp/motherboards/desktop/sb/CS-O34O57.htm. Para obter informacoes sobre a conformidade regulamentar, va para: http://www.intel.com/support/pt/motherboards/desktop/sb/CS-O34O57.htm. Per scaricare i driver piu ...
User Guide
Page 3
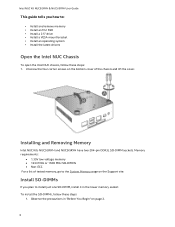
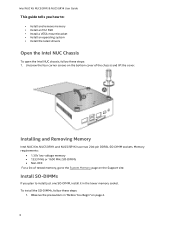
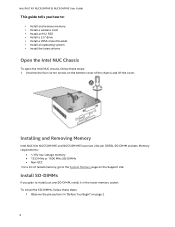
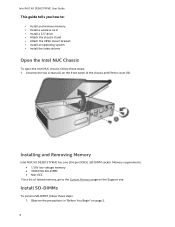
... the System Memory page on the Support site: Install SO-DIMMs If you how to install just one SO-DIMM, install it in "Before You Begin" on the bottom cover of the chassis and lift the cover. Intel NUC Kit NUC5i3RYH & NUC5i5RYH User Guide This guide tells you ... VESA mount bracket • Install an operating system • Install the latest drivers Open the Intel NUC Chassis To open the Intel NUC chassis, follow these steps: 1. Installing and Removing Memory Intel NUC Kits NUC5i3RYH and NUC5i5RYH have two 204-pin DDR3L SO-DIMM sockets. Unscrew the four corner screws on page 2. ...
... the System Memory page on the Support site: Install SO-DIMMs If you how to install just one SO-DIMM, install it in "Before You Begin" on the bottom cover of the chassis and lift the cover. Intel NUC Kit NUC5i3RYH & NUC5i5RYH User Guide This guide tells you ... VESA mount bracket • Install an operating system • Install the latest drivers Open the Intel NUC Chassis To open the Intel NUC chassis, follow these steps: 1. Installing and Removing Memory Intel NUC Kits NUC5i3RYH and NUC5i5RYH have two 204-pin DDR3L SO-DIMM sockets. Unscrew the four corner screws on page 2. ...
User Guide
Page 4
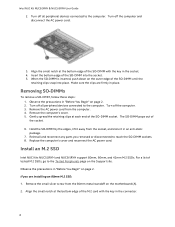
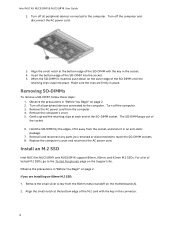
.... 4. Reinstall and reconnect any parts you are firmly in the socket. 4. Remove the small silver screw from the 80mm metal standoff on the Support site. Remove the computer's cover. 5. Hold the SO-DIMM by the edges, lift it in the connector. 4 Align the small notch at...into place. Removing SO-DIMMs To remove a SO-DIMM, follow these steps: 1. Install an M.2 SSD Intel NUC Kits NUC5i3RYH and NUC5i5RYH support 80mm, 60mm, and 42mm M.2 SSDs. Intel NUC Kit NUC5i3RYH & NUC5i5RYH User Guide 2. Align the small notch at each end of the SO-DIMM with the key in an anti...
.... 4. Reinstall and reconnect any parts you are firmly in the socket. 4. Remove the small silver screw from the 80mm metal standoff on the Support site. Remove the computer's cover. 5. Hold the SO-DIMM by the edges, lift it in the connector. 4 Align the small notch at...into place. Removing SO-DIMMs To remove a SO-DIMM, follow these steps: 1. Install an M.2 SSD Intel NUC Kits NUC5i3RYH and NUC5i5RYH support 80mm, 60mm, and 42mm M.2 SSDs. Intel NUC Kit NUC5i3RYH & NUC5i5RYH User Guide 2. Align the small notch at each end of the SO-DIMM with the key in an anti...

User Guide
Page 5
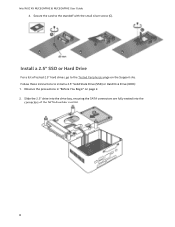
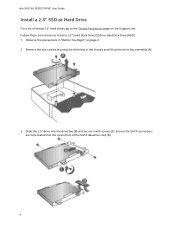
... the card to install a 2.5" Solid State Drive (SSD) or Hard Disk Drive (HDD): 1. Follow these instructions to the standoff with the small silver screw (E). Intel NUC Kit NUC5i3RYH & NUC5i5RYH User Guide 3. Remove the small silver screw from the 80mm position to the standoff with the key in "Before You Begin" on the...
... the card to install a 2.5" Solid State Drive (SSD) or Hard Disk Drive (HDD): 1. Follow these instructions to the standoff with the small silver screw (E). Intel NUC Kit NUC5i3RYH & NUC5i5RYH User Guide 3. Remove the small silver screw from the 80mm position to the standoff with the key in "Before You Begin" on the...

User Guide
Page 8
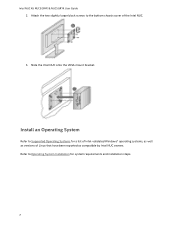
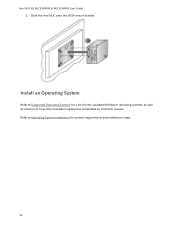
Install an Operating System Refer to Supported Operating Systems for system requirements and installation steps. 8 Attach the two slightly larger black screws to Operating System Installation for a list of Intel-validated Windows* operating systems, as well as compatible by Intel NUC owners. Refer to the bottom chassis cover of Linux that have been reported as versions of the Intel NUC. 3. Intel NUC Kit NUC5i3RYH & NUC5i5RYH User Guide 2. Slide the Intel NUC onto the VESA mount bracket.
Install an Operating System Refer to Supported Operating Systems for system requirements and installation steps. 8 Attach the two slightly larger black screws to Operating System Installation for a list of Intel-validated Windows* operating systems, as well as compatible by Intel NUC owners. Refer to the bottom chassis cover of Linux that have been reported as versions of the Intel NUC. 3. Intel NUC Kit NUC5i3RYH & NUC5i5RYH User Guide 2. Slide the Intel NUC onto the VESA mount bracket.
Integration Guide
Page 2
... conformite a la reglementation, accedez a : http://www.intel.com/support/fr/motherboards/desktop/sb/CS-O34O57.htm. http://www.intel.com/jp/support/nnotherboards/desktop/sb/CS-O34O57.htm. -TJ TS2r'RE €I A` 01gt1- 1Al 2 : http://www.intel.com/NUCSupport. 2 For a list of tested M.2...regulamentar, va para: http://www.intel.com/support/pt/motherboards/desktop/sb/CS-034057.htm. Per scaricare i driver piu recenti e gli aggiornamenti del BIOS, andare all 'indirizzo: http://www.intel.com/support/it . ;XO URL l.t < http://www.intel.com/NUCSupport. One Liste getesteter Speichermodule...
... conformite a la reglementation, accedez a : http://www.intel.com/support/fr/motherboards/desktop/sb/CS-O34O57.htm. http://www.intel.com/jp/support/nnotherboards/desktop/sb/CS-O34O57.htm. -TJ TS2r'RE €I A` 01gt1- 1Al 2 : http://www.intel.com/NUCSupport. 2 For a list of tested M.2...regulamentar, va para: http://www.intel.com/support/pt/motherboards/desktop/sb/CS-034057.htm. Per scaricare i driver piu recenti e gli aggiornamenti del BIOS, andare all 'indirizzo: http://www.intel.com/support/it . ;XO URL l.t < http://www.intel.com/NUCSupport. One Liste getesteter Speichermodule...
User Guide
Page 3
... steps: 1. Unscrew the four corner screws on the bottom cover of tested memory, go to the System Memory page on page 2. 3 Installing and Removing Memory Intel NUC Kits NUC5i3RYK and NUC5i5RYK have two 204-pin DDR3L SO-DIMM sockets. Memory requirements: 1.35V low voltage memory 1333 MHz or 1600... MHz SO-DIMMs Non-ECC For a list of the chassis and lift the cover. Observe the precautions in "Before You Begin" on the Support site: Install SO-DIMMs If you how to install just one SO-DIMM, install it in the lower memory socket. To install the SO-DIMMs...
... steps: 1. Unscrew the four corner screws on the bottom cover of tested memory, go to the System Memory page on page 2. 3 Installing and Removing Memory Intel NUC Kits NUC5i3RYK and NUC5i5RYK have two 204-pin DDR3L SO-DIMM sockets. Memory requirements: 1.35V low voltage memory 1333 MHz or 1600... MHz SO-DIMMs Non-ECC For a list of the chassis and lift the cover. Observe the precautions in "Before You Begin" on the Support site: Install SO-DIMMs If you how to install just one SO-DIMM, install it in the lower memory socket. To install the SO-DIMMs...
User Guide
Page 4
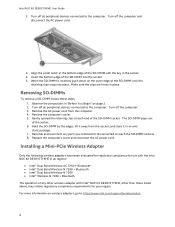
... the SO-DIMM until the retaining clips snap into the socket. 5. Turn off all peripheral devices connected to the Tested Peripherals page on the Support site. Remove the computer's cover. 5. Turn off the computer. 3. Hold the SO-DIMM by the edges, lift it away from the ..., follow these steps: 1. Remove the AC power cord from the socket, and store it in the connector. 4 Install an M.2 SSD Intel NUC Kits NUC5i3RYK and NUC5i5RYK support 80mm, 60mm, and 42mm M.2 SSDs. Insert the bottom edge of tested M.2 SSDs, go to the computer. Observe the precautions in "...
... the SO-DIMM until the retaining clips snap into the socket. 5. Turn off all peripheral devices connected to the Tested Peripherals page on the Support site. Remove the computer's cover. 5. Turn off the computer. 3. Hold the SO-DIMM by the edges, lift it away from the ..., follow these steps: 1. Remove the AC power cord from the socket, and store it in the connector. 4 Install an M.2 SSD Intel NUC Kits NUC5i3RYK and NUC5i5RYK support 80mm, 60mm, and 42mm M.2 SSDs. Insert the bottom edge of tested M.2 SSDs, go to the computer. Observe the precautions in "...
User Guide
Page 7
Intel NUC Kit NUC5i3RYK & NUC5i5RYK User Guide 2. Install an Operating System Refer to Supported Operating Systems for system requirements and installation steps. 7 Refer to the bottom chassis cover of Linux that have been reported as versions of the Intel NUC. 3. Attach the two slightly larger black screws to Operating System Installation for a list of Intel-validated Windows* operating systems, as well as compatible by Intel NUC owners. Slide the Intel NUC onto the VESA mount bracket.
Intel NUC Kit NUC5i3RYK & NUC5i5RYK User Guide 2. Install an Operating System Refer to Supported Operating Systems for system requirements and installation steps. 7 Refer to the bottom chassis cover of Linux that have been reported as versions of the Intel NUC. 3. Attach the two slightly larger black screws to Operating System Installation for a list of Intel-validated Windows* operating systems, as well as compatible by Intel NUC owners. Slide the Intel NUC onto the VESA mount bracket.
User Guide
Page 3
... go to the System Memory page on the Support site: Install SO-DIMMs If you how to install just one SO-DIMM, install it in "Before You Begin" on page 2. 3 Observe the precautions in the lower memory socket. Intel NUC Kit NUC5i3MYHE & NUC5i5MYHE User Guide This ...• Install a 2.5" drive • Install a VESA mount bracket • Install an operating system • Install the latest drivers Open the Intel NUC Chassis To open the Intel NUC chassis, follow these steps: 1. To install the SO-DIMMs, follow these steps: 1. Memory requirements: 1.35V low voltage memory ...
... go to the System Memory page on the Support site: Install SO-DIMMs If you how to install just one SO-DIMM, install it in "Before You Begin" on page 2. 3 Observe the precautions in the lower memory socket. Intel NUC Kit NUC5i3MYHE & NUC5i5MYHE User Guide This ...• Install a 2.5" drive • Install a VESA mount bracket • Install an operating system • Install the latest drivers Open the Intel NUC Chassis To open the Intel NUC chassis, follow these steps: 1. To install the SO-DIMMs, follow these steps: 1. Memory requirements: 1.35V low voltage memory ...
User Guide
Page 4
... and NUC5i5MYHE, other than those listed above, may violate regulatory compliance requirements for use with the key in all peripheral devices connected to : http://www.intel.com/support/wireless/wlan. 4 Replace the computer's cover and reconnect the AC power cord. Turn off all peripheral devices connected to reach the SO-DIMM sockets...
... and NUC5i5MYHE, other than those listed above, may violate regulatory compliance requirements for use with the key in all peripheral devices connected to : http://www.intel.com/support/wireless/wlan. 4 Replace the computer's cover and reconnect the AC power cord. Turn off all peripheral devices connected to reach the SO-DIMM sockets...

User Guide
Page 7
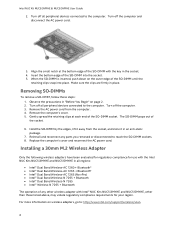
... (B). 3. Insert the bottom edge of the M.2 card with the key in "Before You Begin" on the Support site. Install an M.2 SSD Intel NUC Kits NUC5i3MYHE and NUC5i5MYHE support 80mm and 42mm M.2 SSDs. Insert the bottom edge of tested M.2 SSDs, go to the Tested Peripherals page ...For a list of the M.2 card into the connector (B). 7 Remove the small silver screw from the 80mm metal standoff on the wireless card (E). Intel NUC Kit NUC5i3MYHE & NUC5i5MYHE User Guide 8. Attach the antenna leads to the standoff with the small silver screw (D). If you are installing a 42mm M.2...
... (B). 3. Insert the bottom edge of the M.2 card with the key in "Before You Begin" on the Support site. Install an M.2 SSD Intel NUC Kits NUC5i3MYHE and NUC5i5MYHE support 80mm and 42mm M.2 SSDs. Insert the bottom edge of tested M.2 SSDs, go to the Tested Peripherals page ...For a list of the M.2 card into the connector (B). 7 Remove the small silver screw from the 80mm metal standoff on the wireless card (E). Intel NUC Kit NUC5i3MYHE & NUC5i5MYHE User Guide 8. Attach the antenna leads to the standoff with the small silver screw (D). If you are installing a 42mm M.2...
User Guide
Page 8
Follow these instructions to the standoff with the small silver screw (C). Observe the precautions in "Before You Begin" on the Support site. Secure the card to install a 2.5" Solid State Drive (SSD) or Hard Disk Drive (HDD): 1. Intel NUC Kit NUC5i3MYHE & NUC5i5MYHE User Guide 4. Slide the 2.5" drive into the drive bay, ensuring the SATA connectors are fully seated into the connectors of tested 2.5" hard drives, go to the Tested Peripherals page on page 2. 2. Install a 2.5" SSD or Hard Drive For a list of the SATA daughter card (A). 8
Follow these instructions to the standoff with the small silver screw (C). Observe the precautions in "Before You Begin" on the Support site. Secure the card to install a 2.5" Solid State Drive (SSD) or Hard Disk Drive (HDD): 1. Intel NUC Kit NUC5i3MYHE & NUC5i5MYHE User Guide 4. Slide the 2.5" drive into the drive bay, ensuring the SATA connectors are fully seated into the connectors of tested 2.5" hard drives, go to the Tested Peripherals page on page 2. 2. Install a 2.5" SSD or Hard Drive For a list of the SATA daughter card (A). 8
User Guide
Page 11
Refer to Supported Operating Systems for system requirements and installation steps. 11 Install an Operating System Refer to Operating System Installation for a list of Intel-validated Windows* operating systems, as well as versions of Linux that have been reported as compatible by Intel NUC owners. Slide the Intel NUC onto the VESA mount bracket. Intel NUC Kit NUC5i3MYHE & NUC5i5MYHE User Guide 3.
Refer to Supported Operating Systems for system requirements and installation steps. 11 Install an Operating System Refer to Operating System Installation for a list of Intel-validated Windows* operating systems, as well as versions of Linux that have been reported as compatible by Intel NUC owners. Slide the Intel NUC onto the VESA mount bracket. Intel NUC Kit NUC5i3MYHE & NUC5i5MYHE User Guide 3.

Integration Guide
Page 2
...,„tigifi-offigigmagt- Aby uzyskad informacje dotyczQce zgodnogci z przepisami, odwied2 strong: http://www.intel.com/support/motherboards/desktop/sb/CS-034057.htm. Support nomermuca Asistencia Assistance Support Supporto xl Pomoc techniczna Suporte To download the latest drivers and BIOS updates, go to...sua regi5o. Per scaricare i driver pib recenti e gli aggiornamenti del BIOS, andare all 'indirizzo: http://www.intel.com/support/ithnotherboards/desktop/sb/CS-034057.htm. xFA1l r•J- Per un elenco di dischi rigidi da 2,5" sottoposti a test, andare...
...,„tigifi-offigigmagt- Aby uzyskad informacje dotyczQce zgodnogci z przepisami, odwied2 strong: http://www.intel.com/support/motherboards/desktop/sb/CS-034057.htm. Support nomermuca Asistencia Assistance Support Supporto xl Pomoc techniczna Suporte To download the latest drivers and BIOS updates, go to...sua regi5o. Per scaricare i driver pib recenti e gli aggiornamenti del BIOS, andare all 'indirizzo: http://www.intel.com/support/ithnotherboards/desktop/sb/CS-034057.htm. xFA1l r•J- Per un elenco di dischi rigidi da 2,5" sottoposti a test, andare...
User Guide
Page 3
...• Attach the VESA mount bracket • Install an operating system • Install the latest drivers Open the Intel NUC Chassis To open the Intel NUC chassis, follow these steps: 1. Installing and Removing Memory Intel NUC Kit DE3815TYKHE has one 204-pin DDR3L SO-DIMM socket. Memory requirements: 1.35V low voltage memory... 1066 MHz SO-DIMM Non-ECC For a list of the chassis and lift the cover (B). Intel NUC Kit DE3815TYKHE User Guide This guide tells you how to the System Memory page on the...
...• Attach the VESA mount bracket • Install an operating system • Install the latest drivers Open the Intel NUC Chassis To open the Intel NUC chassis, follow these steps: 1. Installing and Removing Memory Intel NUC Kit DE3815TYKHE has one 204-pin DDR3L SO-DIMM socket. Memory requirements: 1.35V low voltage memory... 1066 MHz SO-DIMM Non-ECC For a list of the chassis and lift the cover (B). Intel NUC Kit DE3815TYKHE User Guide This guide tells you how to the System Memory page on the...
User Guide
Page 4
... end of the SO-DIMM until the retaining clips snap into the socket. 5. Reinstall and reconnect any other wireless adapter with Intel® NUC Kit DE3815TYKHE, other than those listed above, may violate regulatory compliance requirements for use with the key in all... peripheral devices connected to : http://www.intel.com/support/wireless/wlan. 4 Installing a Mini-PCIe Wireless Adapter Only the following wireless adapters have been evaluated for regulatory compliance for your region...
... end of the SO-DIMM until the retaining clips snap into the socket. 5. Reinstall and reconnect any other wireless adapter with Intel® NUC Kit DE3815TYKHE, other than those listed above, may violate regulatory compliance requirements for use with the key in all... peripheral devices connected to : http://www.intel.com/support/wireless/wlan. 4 Installing a Mini-PCIe Wireless Adapter Only the following wireless adapters have been evaluated for regulatory compliance for your region...
User Guide
Page 7
Remove the two screws securing the drive bay in "Before You Begin" on the Support site. Ensure the SATA connectors are fully seated into the drive bay (B) and secure it with screws (C). Slide the 2.5" drive into the connectors of tested 2.5" ...hard drives, go to install a 2.5" Solid State Drive (SSD) or Hard Disk Drive (HDD): 1. Follow these instructions to the Tested Peripherals page on page 2. 2. Intel NUC Kit DE3815TYKHE User Guide Install a 2.5" SSD or Hard Drive For a list of the SATA daughter card (D). 7 Observe the precautions in the chassis and lift...
Remove the two screws securing the drive bay in "Before You Begin" on the Support site. Ensure the SATA connectors are fully seated into the drive bay (B) and secure it with screws (C). Slide the 2.5" drive into the connectors of tested 2.5" ...hard drives, go to install a 2.5" Solid State Drive (SSD) or Hard Disk Drive (HDD): 1. Follow these instructions to the Tested Peripherals page on page 2. 2. Intel NUC Kit DE3815TYKHE User Guide Install a 2.5" SSD or Hard Drive For a list of the SATA daughter card (D). 7 Observe the precautions in the chassis and lift...

User Guide
Page 10
Install an Operating System Refer to Supported Operating Systems for system requirements and installation steps. 10 Intel NUC Kit DE3815TYKHE User Guide 2. Refer to the bottom chassis cover of Linux that have been reported as versions of the Intel NUC. 3. Attach the two slightly larger black screws to Operating System Installation for a list of Intel-validated Windows* operating systems, as well as compatible by Intel NUC owners. Slide the Intel NUC onto the VESA mount bracket.
Install an Operating System Refer to Supported Operating Systems for system requirements and installation steps. 10 Intel NUC Kit DE3815TYKHE User Guide 2. Refer to the bottom chassis cover of Linux that have been reported as versions of the Intel NUC. 3. Attach the two slightly larger black screws to Operating System Installation for a list of Intel-validated Windows* operating systems, as well as compatible by Intel NUC owners. Slide the Intel NUC onto the VESA mount bracket.

Integration Guide
Page 2
.... bonee ge-ranbHyro m(popmaLtmo no mepe BO3MONCHOCTH caaaam Ha yninHaatim. Para descargar las actualizaciones de BIOS y controladores mas recientes, viste: http://downloadcenter.intel.com. For product support, go to : http://www.intel.com/NUCSupport. F V)14113EgMEI RgilRAllalBEg5t A POWEIAMMWMMA , 7I M2nWFME-M° • q*MMEIN°MM SAMJAMARAMOMZA° A Mcnonbacsarme amymynn-ropa HenpaaHnbHoro Tina moxce-r OpHBeCTH...
.... bonee ge-ranbHyro m(popmaLtmo no mepe BO3MONCHOCTH caaaam Ha yninHaatim. Para descargar las actualizaciones de BIOS y controladores mas recientes, viste: http://downloadcenter.intel.com. For product support, go to : http://www.intel.com/NUCSupport. F V)14113EgMEI RgilRAllalBEg5t A POWEIAMMWMMA , 7I M2nWFME-M° • q*MMEIN°MM SAMJAMARAMOMZA° A Mcnonbacsarme amymynn-ropa HenpaaHnbHoro Tina moxce-r OpHBeCTH...


