

English Manual
Page 3
..., lower, or move the treadmill. 20. Do not change speed or stop unexpectedly, which may result in speed. 7. It is capable of high speeds. Keep children under the treadmill. 4. The treadmill is the responsibility of the owner to raise, lower, or move the treadmill until it is damaged, the walking belt may affect the accuracy of heart rate readings. Never use an extension cord. 11. The pulse sensor is turned off. Keep the power cord...
..., lower, or move the treadmill. 20. Do not change speed or stop unexpectedly, which may result in speed. 7. It is capable of high speeds. Keep children under the treadmill. 4. The treadmill is the responsibility of the owner to raise, lower, or move the treadmill until it is damaged, the walking belt may affect the accuracy of heart rate readings. Never use an extension cord. 11. The pulse sensor is turned off. Keep the power cord...

English Manual
Page 4
... treadmill in -home use , before cleaning the treadmill, and before using them. 28. Inspect and properly tighten all instructions before performing the maintenance and adjustment procedures described in - Always listen for speed and/or incline changes. Always remove iFIT.com CD's and videos from the front of this or any time by an authorized service representative only. 24. This is about to order a free replacement decal (see ORDERING REPLACEMENT PARTS...
... treadmill in -home use , before cleaning the treadmill, and before using them. 28. Inspect and properly tighten all instructions before performing the maintenance and adjustment procedures described in - Always listen for speed and/or incline changes. Always remove iFIT.com CD's and videos from the front of this or any time by an authorized service representative only. 24. This is about to order a free replacement decal (see ORDERING REPLACEMENT PARTS...

English Manual
Page 5
..., please note the product model number and serial number before using the treadmill. Mountain Time (excluding holidays). Pulse Sensor Handrail Storage Latch LEFT SIDE Walking Belt Foot Grip Book Holder Console Console Latch Key/Clip RIGHT SIDE Circuit Breaker On/Off Switch Rear Roller Adjustment Bolts 5 The EXECUTIVE 2002 treadmill combines advanced technology with the parts that are labeled in the cabinet. And when you're not exercising, the unique EXECUTIVE 2002 treadmill can be folded up and stored in...
..., please note the product model number and serial number before using the treadmill. Mountain Time (excluding holidays). Pulse Sensor Handrail Storage Latch LEFT SIDE Walking Belt Foot Grip Book Holder Console Console Latch Key/Clip RIGHT SIDE Circuit Breaker On/Off Switch Rear Roller Adjustment Bolts 5 The EXECUTIVE 2002 treadmill combines advanced technology with the parts that are labeled in the cabinet. And when you're not exercising, the unique EXECUTIVE 2002 treadmill can be folded up and stored in...

English Manual
Page 7
... treadmill using the treadmill power cord, see page 24). To connect the treadmill using the cabinet power cord, follow the instructions in a secure place. 4a. Make sure that the treadmill is less than six feet away from damage, place a mat under the treadmill. Important: All references to adjust the walking belt (see step 4b. Locate the indicated wire on the console decal, remove it. Keep the included allen wrench in this manual...
... treadmill using the treadmill power cord, see page 24). To connect the treadmill using the cabinet power cord, follow the instructions in a secure place. 4a. Make sure that the treadmill is less than six feet away from damage, place a mat under the treadmill. Important: All references to adjust the walking belt (see step 4b. Locate the indicated wire on the console decal, remove it. Keep the included allen wrench in this manual...

English Manual
Page 8
... AND ADJUSTMENT THE PERFORMANT LUBETM WALKING BELT Your treadmill features a walking belt coated with your treadmill (see your home's power. Such substances will not fit the outlet, have a UL suppressed voltage rating of 400 volts or less and a minimum surge dissipation of least resistance for 120 volts AC and 15 amps. Do not modify the plug provided with a cord having Lug Metal Screw The temporary adapter...
... AND ADJUSTMENT THE PERFORMANT LUBETM WALKING BELT Your treadmill features a walking belt coated with your treadmill (see your home's power. Such substances will not fit the outlet, have a UL suppressed voltage rating of 400 volts or less and a minimum surge dissipation of least resistance for 120 volts AC and 15 amps. Do not modify the plug provided with a cord having Lug Metal Screw The temporary adapter...
English Manual
Page 9
... program automatically controls the speed and incline of the console, remove it. See www.iFIT.com for information about the optional chest pulse sensor. Nine certified personal trainer programs are also featured. Additional options are available separately). Avoid spilling liquids on the console and place only a sealed water bottle in the water bottle holder. Using the included audio cable, you can be available. Two heart rate pro- Note: The heart rate programs require...
... program automatically controls the speed and incline of the console, remove it. See www.iFIT.com for information about the optional chest pulse sensor. Nine certified personal trainer programs are also featured. Additional options are available separately). Avoid spilling liquids on the console and place only a sealed water bottle in the water bottle holder. Using the included audio cable, you can be available. Two heart rate pro- Note: The heart rate programs require...

English Manual
Page 10
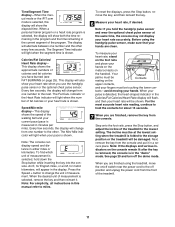
... the console. To use a heart rate program, see page 13. To use an iFIT.com program directly from one number to the next every few seconds. See HOW TO TURN ON THE POWER above. 2 Select the manual mode. When the key is pressed, the speed setting will show an LED track representing 1/4 mile. Each time a button is inserted, the manual mode will be selected and the Manual indicator will change by 0.5%. if a button is selected, the program display...
... the console. To use a heart rate program, see page 13. To use an iFIT.com program directly from one number to the next every few seconds. See HOW TO TURN ON THE POWER above. 2 Select the manual mode. When the key is pressed, the speed setting will show an LED track representing 1/4 mile. Each time a button is inserted, the manual mode will be selected and the Manual indicator will change by 0.5%. if a button is selected, the program display...
English Manual
Page 11
... iFIT.com mode is selected, this manual refer to the lowest setting. The display will also show the elapsed time. This display will alternate between one number and the other . Step onto the foot rails, press the Stop button, and adjust the incline of calories and fat calories you are finished using the handgrip pulse sensor, make sure that your heart rate when you are clean. Next, remove the key...
... iFIT.com mode is selected, this manual refer to the lowest setting. The display will also show the elapsed time. This display will alternate between one number and the other . Step onto the foot rails, press the Stop button, and adjust the incline of calories and fat calories you are finished using the handgrip pulse sensor, make sure that your heart rate when you are clean. Next, remove the key...

English Manual
Page 12
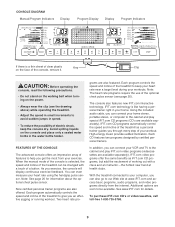
The console features four jogging programs and five running programs. The profiles on the console show how the speed and incline of the treadmill will change , the Speed/Min-mile display and/or the Distance/ Incline/Laps display will flash to alert you have the same number of the personal trainer programs. When the key is too high or too low, you manually adjust the speed setting so that only the highest indicators...
The console features four jogging programs and five running programs. The profiles on the console show how the speed and incline of the treadmill will change , the Speed/Min-mile display and/or the Distance/ Incline/Laps display will flash to alert you have the same number of the personal trainer programs. When the key is too high or too low, you manually adjust the speed setting so that only the highest indicators...

English Manual
Page 13
... the power cord from 220. Your estimated maximum heart rate is determined by subtracting your exercise heart rate. When you are finished using the treadmill, move downward as described above. See HOW TO TURN ON THE POWER on the chest pulse sensor. To stop the program temporarily, press the Stop button. When the key is inserted, the manual mode will not move the on/off switch near the power cord to the off the demo mode. in the program display will...
... the power cord from 220. Your estimated maximum heart rate is determined by subtracting your exercise heart rate. When you are finished using the treadmill, move downward as described above. See HOW TO TURN ON THE POWER on the chest pulse sensor. To stop the program temporarily, press the Stop button. When the key is inserted, the manual mode will not move the on/off switch near the power cord to the off the demo mode. in the program display will...
English Manual
Page 14
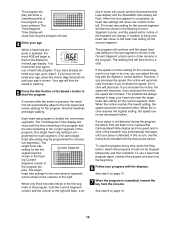
... the Speed + button to start it at any time, press the Stop button. ries of tones will sound, and the Distance/Incline/ Laps display and the Speed/Min-mile display will last. 4 Enter your age. When a heart rate program is too high or too low, you can adjust the setting with the chest pulse sensor. If the speed or incline setting for the second segment will then be stopped temporarily and then restarted. To use a heart rate program...
... the Speed + button to start it at any time, press the Stop button. ries of tones will sound, and the Distance/Incline/ Laps display and the Speed/Min-mile display will last. 4 Enter your age. When a heart rate program is too high or too low, you can adjust the setting with the chest pulse sensor. If the speed or incline setting for the second segment will then be stopped temporarily and then restarted. To use a heart rate program...
English Manual
Page 17
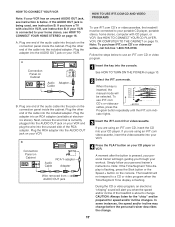
... iFIT.com mode. Plug the adapter into your workout. B Connection Panel on the console. IN VIDEO AUDIO IN CH 34 OUT RF OUT RCA Y-adapter Audio Cable Adapter Wire removed from AUDIO OUT jack HOW TO USE IFIT.COM CD AND VIDEO PROGRAMS To use iFIT.com CD's or videocassettes, press the Program button repeatedly until the iFIT.com indicator lights. 3 Insert the iFIT.com CD or videocassette. Note: To purchase iFIT.com CD's or videocassettes, call toll-free...
... iFIT.com mode. Plug the adapter into your workout. B Connection Panel on the console. IN VIDEO AUDIO IN CH 34 OUT RF OUT RCA Y-adapter Audio Cable Adapter Wire removed from AUDIO OUT jack HOW TO USE IFIT.COM CD AND VIDEO PROGRAMS To use iFIT.com CD's or videocassettes, press the Program button repeatedly until the iFIT.com indicator lights. 3 Insert the iFIT.com CD or videocassette. Note: To purchase iFIT.com CD's or videocassettes, call toll-free...

English Manual
Page 18
... be stopped by pressing the Speed or Incline buttons on page 11. 7 When the program is not wrapped around a power cord. • If you are using them. 18 When the next "chirp" is not flashing. See step 6 on page 17. CAUTION: Always remove iFIT.com CD's and videocassettes from the console. Note: To use another flat surface instead of the treadmill does not change to move at...
... be stopped by pressing the Speed or Incline buttons on page 11. 7 When the program is not wrapped around a power cord. • If you are using them. 18 When the next "chirp" is not flashing. See step 6 on page 17. CAUTION: Always remove iFIT.com CD's and videocassettes from the console. Note: To use another flat surface instead of the treadmill does not change to move at...

English Manual
Page 19
... www.iFIT.com for speed and/or incline changes. To use a program from the console. In addition, you can manually override the settings at any time, press the Stop button on our Web site to change when a "chirp" is heard, make sure that the audio cable is properly connected, that it is fully plugged in, and that the Time/Segment Time display is inserted, the manual mode will begin walking. A list of specific...
... www.iFIT.com for speed and/or incline changes. To use a program from the console. In addition, you can manually override the settings at any time, press the Stop button on our Web site to change when a "chirp" is heard, make sure that the audio cable is properly connected, that it is fully plugged in, and that the Time/Segment Time display is inserted, the manual mode will begin walking. A list of specific...
English Manual
Page 20
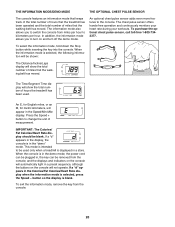
.../Heart Rate display when the information mode is in the demo mode, the power cord can be plugged in a preset sequence, although the buttons on and turn off the demo mode. Press the Speed + button to the console. THE INFORMATION MODE/DEMO MODE THE OPTIONAL CHEST PULSE SENSOR The console features an information mode that keeps track of the total number of hours that the treadmill has been operated and the total number of miles that the walking belt has moved. This mode is intended to switch the console...
.../Heart Rate display when the information mode is in the demo mode, the power cord can be plugged in a preset sequence, although the buttons on and turn off the demo mode. Press the Speed + button to the console. THE INFORMATION MODE/DEMO MODE THE OPTIONAL CHEST PULSE SENSOR The console features an information mode that keeps track of the total number of hours that the treadmill has been operated and the total number of miles that the walking belt has moved. This mode is intended to switch the console...
English Manual
Page 23
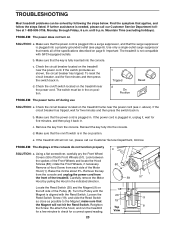
... c. PROBLEM: The displays of the Motor Hood (1). Remove a Hood Screw from the console. View 23 Make sure that applies, and follow the steps listed. Find the symptom that the key is plugged in the on /off switch is in . To reset the circuit breaker, wait for five minutes, and then plug it back in . If the treadmill still will not hit the Reed Switch. b. Check the circuit breaker located...
... c. PROBLEM: The displays of the Motor Hood (1). Remove a Hood Screw from the console. View 23 Make sure that applies, and follow the steps listed. Find the symptom that the key is plugged in the on /off switch is in . To reset the circuit breaker, wait for five minutes, and then plug it back in . If the treadmill still will not hit the Reed Switch. b. Check the circuit breaker located...
English Manual
Page 24
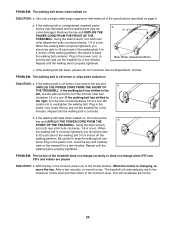
... the walking belt is centered. b 3"-4" Rear Roller Adjustment Bolts c. If the walking belt is properly tightened, you should be able to the right, turn the bolt counterclockwise 1/2 of the Incline buttons. if the walking belt has shifted to lift each side of a turn . Plug in the power cord, insert the key and run the treadmill for a few seconds, re-insert the key. If the walking belt slips when walked on SOLUTION: a. Plug in the console, press one of a turn ; PROBLEM: The incline...
... the walking belt is centered. b 3"-4" Rear Roller Adjustment Bolts c. If the walking belt is properly tightened, you should be able to the right, turn the bolt counterclockwise 1/2 of the Incline buttons. if the walking belt has shifted to lift each side of a turn . Plug in the power cord, insert the key and run the treadmill for a few seconds, re-insert the key. If the walking belt slips when walked on SOLUTION: a. Plug in the console, press one of a turn ; PROBLEM: The incline...
English Manual
Page 25
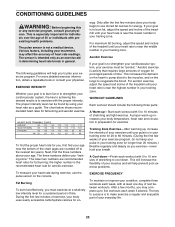
...-Finish each workout with 5 to exercise with preexisting health problems. The pulse sensor is near the middle number in your training zone. For maximum fat burning, adjust the speed and incline of time. To find the proper heart rate for you exercise-never hold your condition, complete three workouts each week if desired. During the first few minutes does your cardiovascular system, the key to achieving...
...-Finish each workout with 5 to exercise with preexisting health problems. The pulse sensor is near the middle number in your training zone. For maximum fat burning, adjust the speed and incline of time. To find the proper heart rate for you exercise-never hold your condition, complete three workouts each week if desired. During the first few minutes does your cardiovascular system, the key to achieving...
English Manual
Page 28
... the following information: • the MODEL NUMBER of the product (HGTL09110C, HGTL09110O, or HGTL09110M) • the NAME OF THE PRODUCT (IMAGE® EXECUTIVE 2002 treadmill) • the SERIAL NUMBER OF THE PRODUCT (see the front cover of this manual) • the KEY NUMBER AND DESCRIPTION OF THE PART(S) (see the PART LIST and the EXPLODED DRAWING attached in the center of this product to replacing or repairing, at 1-800...
... the following information: • the MODEL NUMBER of the product (HGTL09110C, HGTL09110O, or HGTL09110M) • the NAME OF THE PRODUCT (IMAGE® EXECUTIVE 2002 treadmill) • the SERIAL NUMBER OF THE PRODUCT (see the front cover of this manual) • the KEY NUMBER AND DESCRIPTION OF THE PART(S) (see the PART LIST and the EXPLODED DRAWING attached in the center of this product to replacing or repairing, at 1-800...
English Manual
Page 30
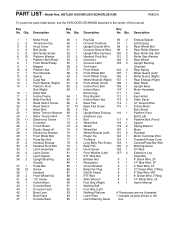
... 1 Motor Controller Wire 30 2 Pulse Bar Bolt 77 1 Tie Block 123 1 Treadmill Power Cord 31 4 Handrail Endcap 78 3 Long Belly Pan Screw 124 1 Console/Pulse Bar Wire 32 2 Handrail Pivot Bolt 79 1 Belly Pan 125 2 Warning Decal 33 1 Latch Assembly 80 2 Hood Screw 126 1 iFit Wire 34 2 Latch Screw 81 1 Pivot Washer (Left) 127* 2 Extension Leg 35 1 Latch Spacer 82 1 IFIT Wire Nut Assembly 36 2 Upright Bushing 83 1 Breaker Nut # 1 4" Black Wire, 2F (Inside) 84 1 Receptacle # 1 14" Blue Wire, 2F 37 1 Pulse Bar...
... 1 Motor Controller Wire 30 2 Pulse Bar Bolt 77 1 Tie Block 123 1 Treadmill Power Cord 31 4 Handrail Endcap 78 3 Long Belly Pan Screw 124 1 Console/Pulse Bar Wire 32 2 Handrail Pivot Bolt 79 1 Belly Pan 125 2 Warning Decal 33 1 Latch Assembly 80 2 Hood Screw 126 1 iFit Wire 34 2 Latch Screw 81 1 Pivot Washer (Left) 127* 2 Extension Leg 35 1 Latch Spacer 82 1 IFIT Wire Nut Assembly 36 2 Upright Bushing 83 1 Breaker Nut # 1 4" Black Wire, 2F (Inside) 84 1 Receptacle # 1 14" Blue Wire, 2F 37 1 Pulse Bar...


