

English Manual
Page 1
... CAUTION Read all precautions and instructions in this manual before using this manual for future reference. ¨ Patent Pending USER'S MANUAL Visit our website at www.imagefitness.com New products, prizes, fitness tips, and much more! The trained technicians on our customer hot line will guarantee complete satisfaction through direct assistance from our factory. Serial Number Decal QUESTIONS? Keep this equipment...
... CAUTION Read all precautions and instructions in this manual before using this manual for future reference. ¨ Patent Pending USER'S MANUAL Visit our website at www.imagefitness.com New products, prizes, fitness tips, and much more! The trained technicians on our customer hot line will guarantee complete satisfaction through direct assistance from our factory. Serial Number Decal QUESTIONS? Keep this equipment...

English Manual
Page 2
.... Do not arch your back. 9. Use the 2.0c indoors on the 2.0c. Read all precautions. Wear appropriate clothing when exercising; TABLE OF CONTENTS IMPORTANT PRECAUTIONS 2 BEFORE YOU BEGIN 3 ASSEMBLY 4 HOW TO USE THE IMAGE¨ 2.0c 8 HOW TO USE THE PULSE SENSOR 10 MAINTENANCE AND STORAGE 11 CONDITIONING GUIDELINES 12 PART LIST 14 EXPLODED DRAWING 15 ORDERING REPLACEMENT PARTS Back Cover LIMITED WARRANTY Back Cover IMPORTANT PRECAUTIONS WARNING: To reduce the...
.... Do not arch your back. 9. Use the 2.0c indoors on the 2.0c. Read all precautions. Wear appropriate clothing when exercising; TABLE OF CONTENTS IMPORTANT PRECAUTIONS 2 BEFORE YOU BEGIN 3 ASSEMBLY 4 HOW TO USE THE IMAGE¨ 2.0c 8 HOW TO USE THE PULSE SENSOR 10 MAINTENANCE AND STORAGE 11 CONDITIONING GUIDELINES 12 PART LIST 14 EXPLODED DRAWING 15 ORDERING REPLACEMENT PARTS Back Cover LIMITED WARRANTY Back Cover IMPORTANT PRECAUTIONS WARNING: To reduce the...
English Manual
Page 3
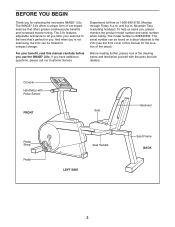
... yourself with Pulse Sensor FRONT Seat Backrest Pedal Strap Pedal Seat Handle PFEX9757 LEFT SIDE Seat Frame BACK 3 The 2.0c features adjustable resistance to let you tailor your benefit, read this manual for the location of the decal). For your exercise to the 2.0c (see the front cover of low-impact exercise that Õs perfect for you , please mention the product model number and serial number when calling. until 6 p.m. The serial number can...
... yourself with Pulse Sensor FRONT Seat Backrest Pedal Strap Pedal Seat Handle PFEX9757 LEFT SIDE Seat Frame BACK 3 The 2.0c features adjustable resistance to let you tailor your benefit, read this manual for the location of the decal). For your exercise to the 2.0c (see the front cover of low-impact exercise that Õs perfect for you , please mention the product model number and serial number when calling. until 6 p.m. The serial number can...
English Manual
Page 4
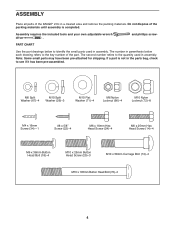
...;4 4 Assembly requires the included tools and your own adjustable wrench driver . PART CHART Use the part drawings below each drawing refers to the quantity used in the parts bag, check to see if it has been pre-assembled. Do not dispose of the packing materials until assembly is not in assembly. and phillips screw- The second number refers to the key number of the IMAGE¨ 2.0c in assembly.
...;4 4 Assembly requires the included tools and your own adjustable wrench driver . PART CHART Use the part drawings below each drawing refers to the quantity used in the parts bag, check to see if it has been pre-assembled. Do not dispose of the packing materials until assembly is not in assembly. and phillips screw- The second number refers to the key number of the IMAGE¨ 2.0c in assembly.

English Manual
Page 5
... the right side of the 1 Frame (1). Tighten the Lock Knob. 1 Identify the Rear Stabilizer (76), which has wheels. 2 Attach the Front Stabilizer (75) to the Frame (1) with two M10 x 58mm Carriage Bolts (74) and two M10 Nylon Locknuts (72). 2. Route both Adapters (73) up through the Upright (2) as shown. 1. Attach the Handlebar (4) to pinch the Reed Switch Wire (13) or the Resistance Cable (10). 4.
... the right side of the 1 Frame (1). Tighten the Lock Knob. 1 Identify the Rear Stabilizer (76), which has wheels. 2 Attach the Front Stabilizer (75) to the Frame (1) with two M10 x 58mm Carriage Bolts (74) and two M10 Nylon Locknuts (72). 2. Route both Adapters (73) up through the Upright (2) as shown. 1. Attach the Handlebar (4) to pinch the Reed Switch Wire (13) or the Resistance Cable (10). 4.

English Manual
Page 6
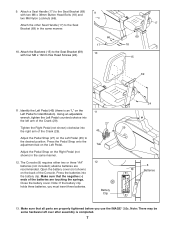
Attach the Seat Bracket (69) to the corresponding wires on the Knob is correctly aligned. 6. Press the Resistance Knob (9) onto the Resistance Control (10). Tighten all four Hex Head Screws. 5 8 9 Console Wires 73 13 22 Ground Wire 34 10 2 22 6 14 67 67 14 4 2 7. Connect the Reed Switch Wire (13) and the two Adapters (73) to the Seat Frame (3) 7 70 with four M10 x 105mm Button Head Bolts (70), four M10 Flat Washers (71...
Attach the Seat Bracket (69) to the corresponding wires on the Knob is correctly aligned. 6. Press the Resistance Knob (9) onto the Resistance Control (10). Tighten all four Hex Head Screws. 5 8 9 Console Wires 73 13 22 Ground Wire 34 10 2 22 6 14 67 67 14 4 2 7. Connect the Reed Switch Wire (13) and the two Adapters (73) to the Seat Frame (3) 7 70 with four M10 x 105mm Button Head Bolts (70), four M10 Flat Washers (71...
English Manual
Page 7
.... Press the Pedal Strap onto the adjustment tab on the back of the Crank (29). 27 Tighten the Right Pedal (not shown) clockwise into the battery clip. The Console (8) requires either two or three ÒAAÓ batteries (not included); Identify the Left Pedal (45) (there is completed. 7 Open the battery cover (not shown) on the Left Pedal. Note: There may be some hardware left arm...
.... Press the Pedal Strap onto the adjustment tab on the back of the Crank (29). 27 Tighten the Right Pedal (not shown) clockwise into the battery clip. The Console (8) requires either two or three ÒAAÓ batteries (not included); Identify the Left Pedal (45) (there is completed. 7 Open the battery cover (not shown) on the Left Pedal. Note: There may be some hardware left arm...
English Manual
Page 8
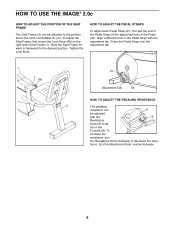
... the Console (8). Align a different hole in the Pedal Strap with the 9 Resistance Knob (9) locat- to the desired position. Tighten the Lock Knob. HOW TO ADJUST THE PEDAL STRAPS To adjust each Pedal Strap (27), first pull the end of the Frame (1). Slide the Seat Frame forward or backward to decrease the resis- To increase the resistance, turn the Resistance Knob counterclockwise. 8 tance, turn the Resistance Knob clockwise; ed on the Pedal (45). Press the Pedal Strap...
... the Console (8). Align a different hole in the Pedal Strap with the 9 Resistance Knob (9) locat- to the desired position. Tighten the Lock Knob. HOW TO ADJUST THE PEDAL STRAPS To adjust each Pedal Strap (27), first pull the end of the Frame (1). Slide the Seat Frame forward or backward to decrease the resis- To increase the resistance, turn the Resistance Knob counterclockwise. 8 tance, turn the Resistance Knob clockwise; ed on the Pedal (45). Press the Pedal Strap...
English Manual
Page 9
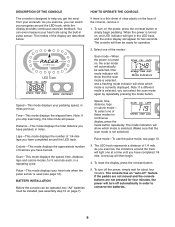
.... LED Track SpeedÑThis mode displays your heart rate using the built-in miles. LapsÑThis mode displays the number of the display are not pressed for four minutes, the power will turn off Ó feature. BATTERY INSTALLATION Before the console can watch your progress around the track will show that the scan mode is not selected.) Pulse modeÑTo use the pulse mode, see page 10). To reset the display, press the on /reset button or...
.... LED Track SpeedÑThis mode displays your heart rate using the built-in miles. LapsÑThis mode displays the number of the display are not pressed for four minutes, the power will turn off Ó feature. BATTERY INSTALLATION Before the console can watch your progress around the track will show that the scan mode is not selected.) Pulse modeÑTo use the pulse mode, see page 10). To reset the display, press the on /reset button or...
English Manual
Page 10
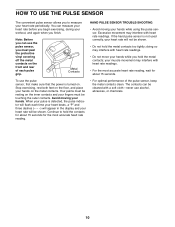
... TO USE THE PULSE SENSOR The convenient pulse sensor allows you finish. Note: Before you can use alcohol, abrasives, or chemicals. 10 If the hand pulse sensor is turned on the metal contacts. doing so may interfere with heart rate readings. ¥ Do not move your fingers must peel the protective vinyl covering off the metal contacts on the front and rear of the pulse sensor...
... TO USE THE PULSE SENSOR The convenient pulse sensor allows you finish. Note: Before you can use alcohol, abrasives, or chemicals. 10 If the hand pulse sensor is turned on the metal contacts. doing so may interfere with heart rate readings. ¥ Do not move your fingers must peel the protective vinyl covering off the metal contacts on the front and rear of the pulse sensor...
English Manual
Page 11
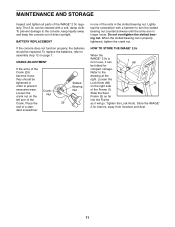
BATTERY REPLACEMENT If the console does not function properly, the batteries should be replaced. CRANK ADJUSTMENT If the arms of the Crank. Lightly tap the screwdriver with a soft, damp cloth. Refer to turn the slotted bearing nut counterclockwise until the arms are no longer loose. Slide the Seat Frame (3) as far into the Frame as it can be folded for compact storage. Store the IMAGE¨...
BATTERY REPLACEMENT If the console does not function properly, the batteries should be replaced. CRANK ADJUSTMENT If the arms of the Crank. Lightly tap the screwdriver with a soft, damp cloth. Refer to turn the slotted bearing nut counterclockwise until the arms are no longer loose. Slide the Seat Frame (3) as far into the Frame as it can be folded for compact storage. Store the IMAGE¨...
English Manual
Page 12
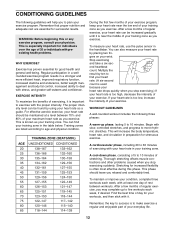
... your heart rate, use the pulse sensor in the handlebar. A cardiovascular phase, including 20 to 30 minutes of exercising with your heart rate in a stronger and more efficient heart, improved respiratory function, increased stamina and endurance, better weight management and body fat control, increased ability to more rhythmic stretches. After a few months of your exercise program, keep your heart rate near the middle of your training zone...
... your heart rate, use the pulse sensor in the handlebar. A cardiovascular phase, including 20 to 30 minutes of exercising with your heart rate in a stronger and more efficient heart, improved respiratory function, increased stamina and endurance, better weight management and body fat control, increased ability to more rhythmic stretches. After a few months of your exercise program, keep your heart rate near the middle of your training zone...

English Manual
Page 13
...: Be sure to your health. SUGGESTED STRETCHES The correct form for balance, reach back and grasp one day of rest between workouts. Hold for 15 counts, then relax. EXERCISE FREQUENCY To maintain or improve your condition, plan three workouts each week, if desired. To cause further stretching of your extended leg. Quadriceps Stretch With one hand...
...: Be sure to your health. SUGGESTED STRETCHES The correct form for balance, reach back and grasp one day of rest between workouts. Hold for 15 counts, then relax. EXERCISE FREQUENCY To maintain or improve your condition, plan three workouts each week, if desired. To cause further stretching of your extended leg. Quadriceps Stretch With one hand...
English Manual
Page 14
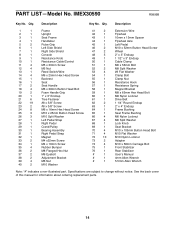
... 2 37 2 38 2 39 4 40 2 Frame 41 2 Upright 42 1 Seat Frame 43 1 Handlebar 44 1 Pulse Grip 45 1 Left Side Shield 46 2 Right Side Shield 47 2 Console 48 5 Resistance Knob 49 1 Resistance Cable/Control 50 1 M5 x 30mm Screw 51 1 M5 Nut 52 2 Reed Switch/Wire 53 4 M6 x 25mm Hex Head Screw 54 1 Backrest 55 1 Seat 56 1 Seat Handle 57 1 M6 x 38mm Button Head Bolt 58 1 Foam Handle Grip 59 1 1Ó...
... 2 37 2 38 2 39 4 40 2 Frame 41 2 Upright 42 1 Seat Frame 43 1 Handlebar 44 1 Pulse Grip 45 1 Left Side Shield 46 2 Right Side Shield 47 2 Console 48 5 Resistance Knob 49 1 Resistance Cable/Control 50 1 M5 x 30mm Screw 51 1 M5 Nut 52 2 Reed Switch/Wire 53 4 M6 x 25mm Hex Head Screw 54 1 Backrest 55 1 Seat 56 1 Seat Handle 57 1 M6 x 38mm Button Head Bolt 58 1 Foam Handle Grip 59 1 1Ó...
English Manual
Page 16
... limitation of ICON Health & Fitness, Inc. Accordingly, the above limitation may not apply to give the following information: ¥ The MODEL NUMBER of the product (IMEX30590) ¥ The NAME of the product (IMAGE¨ 2.0c) ¥ The SERIAL NUMBER of the product (see the front cover of this manual) ¥ The KEY NUMBER and DESCRIPTION of the part(s) (see the PART LIST on how long an implied warranty lasts. This warranty...
... limitation of ICON Health & Fitness, Inc. Accordingly, the above limitation may not apply to give the following information: ¥ The MODEL NUMBER of the product (IMEX30590) ¥ The NAME of the product (IMAGE¨ 2.0c) ¥ The SERIAL NUMBER of the product (see the front cover of this manual) ¥ The KEY NUMBER and DESCRIPTION of the part(s) (see the PART LIST on how long an implied warranty lasts. This warranty...


