

User Guide
Page 5
... 1-1 Chapter 2. D-1 Warranty period D-1 Service and support D-1 Warranty information on the tape cartridge . . . 3-5 Resetting the drive 3-6 Packaging the drive for shipping 3-6 Appendix A. Warranty information . . Notices E-1 Trademarks E-2 Electronic emission notices E-2 Federal Communications Commission (FCC) statement E-2 © Copyright IBM Corp. 2003 iii Using the tape drive . . . . 3-1 Front panel LEDs 3-2 Loading data cartridges 3-4 Unloading data cartridges 3-4 Using cleaning cartridges 3-4 Setting write...
... 1-1 Chapter 2. D-1 Warranty period D-1 Service and support D-1 Warranty information on the tape cartridge . . . 3-5 Resetting the drive 3-6 Packaging the drive for shipping 3-6 Appendix A. Warranty information . . Notices E-1 Trademarks E-2 Electronic emission notices E-2 Federal Communications Commission (FCC) statement E-2 © Copyright IBM Corp. 2003 iii Using the tape drive . . . . 3-1 Front panel LEDs 3-2 Loading data cartridges 3-4 Unloading data cartridges 3-4 Using cleaning cartridges 3-4 Setting write...

User Guide
Page 16
...the on self-test, the LEDs scroll sequentially right to left, then left to provide information about your system changes after startup or if you are using software not included in the ″device driver″ folder. 2-4 VXA-2 Internal Tape Drive: User's Guide Ensure that come... with the SCSI adapter. v If you are properly routed. v If you are usually provided with your computer. During the tape drive's power-on -screen installation and operating instructions. Updating ...
...the on self-test, the LEDs scroll sequentially right to left, then left to provide information about your system changes after startup or if you are using software not included in the ″device driver″ folder. 2-4 VXA-2 Internal Tape Drive: User's Guide Ensure that come... with the SCSI adapter. v If you are properly routed. v If you are usually provided with your computer. During the tape drive's power-on -screen installation and operating instructions. Updating ...

User Guide
Page 17
Chapter 3. Using the tape drive This section provides information on using the tape drive. Front view of the tape drive and identifies the components. 1 Ready LED 2 Activity LED 3 Cleaning LED Figure 3-1. Figure 3-1 shows the front panel of the tape drive 4 Fault LED 5 Eject button © Copyright IBM Corp. 2003 3-1
Chapter 3. Using the tape drive This section provides information on using the tape drive. Front view of the tape drive and identifies the components. 1 Ready LED 2 Activity LED 3 Cleaning LED Figure 3-1. Figure 3-1 shows the front panel of the tape drive 4 Fault LED 5 Eject button © Copyright IBM Corp. 2003 3-1

User Guide
Page 18
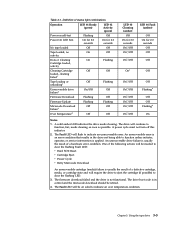
Front panel LEDs The tape drive contains four LEDs to indicate its operational status, as shown in Table 3-1 on page 3-3. 3-2 VXA-2 Internal Tape Drive: User's Guide
Front panel LEDs The tape drive contains four LEDs to indicate its operational status, as shown in Table 3-1 on page 3-3. 3-2 VXA-2 Internal Tape Drive: User's Guide
User Guide
Page 19
...Flashing Cleaning Cartridge Off Off loaded, cleaning failed1 Tape loading or unloading1 Off Flashing Unrecoverable drive On/Off Off failure2 Firmware Download Flashing Off Firmware Update Flashing Flashing Microcode Download Off Off failure3 Over Temperature4 Off Off LED #3 Cleaning (amber) Off On for 2.0 ...seconds On1/Off On1/Off On1/Off LED #4 Fault (amber) Off On for 2.0 seconds Off Off Off On1 Off On1/Off On1/Off On1/Off On1/Off On1/Off On1/Off Off Flashing2 Off Off Flashing2 On Notes: 1. Table 3-1. Using the tape drive...
...Flashing Cleaning Cartridge Off Off loaded, cleaning failed1 Tape loading or unloading1 Off Flashing Unrecoverable drive On/Off Off failure2 Firmware Download Flashing Off Firmware Update Flashing Flashing Microcode Download Off Off failure3 Over Temperature4 Off Off LED #3 Cleaning (amber) Off On for 2.0 ...seconds On1/Off On1/Off On1/Off LED #4 Fault (amber) Off On for 2.0 seconds Off Off Off On1 Off On1/Off On1/Off On1/Off On1/Off On1/Off On1/Off Off Flashing2 Off Off Flashing2 On Notes: 1. Table 3-1. Using the tape drive...

User Guide
Page 20
... A-2 for the capacities of the VXA tape cartridges. When the Activity LED is steady green, the tape drive is in approximately 1 to its maximum number of the cartridge through the tape drive door into the drive. If a tape cartridge is ready to log the use . Grasp the cleaning cartridge by the outer edges, with IBM recommended VXA data cartridges. Do not...
... A-2 for the capacities of the VXA tape cartridges. When the Activity LED is steady green, the tape drive is in approximately 1 to its maximum number of the cartridge through the tape drive door into the drive. If a tape cartridge is ready to log the use . Grasp the cleaning cartridge by the outer edges, with IBM recommended VXA data cartridges. Do not...

User Guide
Page 21
... authorized service representative. if the Cleaning LED was off the Cleaning LED (if the Cleaning LED was on prior to the cleaning process. Using the tape drive 3-5 Loads the cleaning cartridge into the drive and the drive door closes. Chapter 3. 4. Otherwise, the Cleaning LED remains solid to use a depleted cleaning cartridge, the tape drive automatically detects the error and ejects...
... authorized service representative. if the Cleaning LED was off the Cleaning LED (if the Cleaning LED was on prior to the cleaning process. Using the tape drive 3-5 Loads the cleaning cartridge into the drive and the drive door closes. Chapter 3. 4. Otherwise, the Cleaning LED remains solid to use a depleted cleaning cartridge, the tape drive automatically detects the error and ejects...

User Guide
Page 33
..., observe the drive's LED code sequence. If power to the drive was interrupted when you are attempting to load a cartridge, the drive detects the tape when its power is not a VXA Tape cartridge, the tape drive automatically ejects it. 3. Appendix C. Problem solving This appendix provides information on sequence normally, but still does not accept the cartridge, contact IBM technical support...
..., observe the drive's LED code sequence. If power to the drive was interrupted when you are attempting to load a cartridge, the drive detects the tape when its power is not a VXA Tape cartridge, the tape drive automatically ejects it. 3. Appendix C. Problem solving This appendix provides information on sequence normally, but still does not accept the cartridge, contact IBM technical support...

User Guide
Page 34
... service. If it for an option in an environment that are emitting excessive heat. C-2 VXA-2 Internal Tape Drive: User's Guide If Fault LED is still amber after power-up, the tape drive may be in the software that may be preventing media removal and reset that the cartridge be...working properly and you may need to cool. Problem Solution FAULT LED IS STEADY AMBER (This means the tape drive is over -temperature condition yourself, contact IBM technical support. When the drive cools down, LED 4 turns off power to unload the tape and move it on . Wait a few minutes, then turn...
... service. If it for an option in an environment that are emitting excessive heat. C-2 VXA-2 Internal Tape Drive: User's Guide If Fault LED is still amber after power-up, the tape drive may be in the software that may be preventing media removal and reset that the cartridge be...working properly and you may need to cool. Problem Solution FAULT LED IS STEADY AMBER (This means the tape drive is over -temperature condition yourself, contact IBM technical support. When the drive cools down, LED 4 turns off power to unload the tape and move it on . Wait a few minutes, then turn...

User Guide
Page 35
... or defective connector? Use only an IBM-approved VXA tape cleaning cartridge. 2. If the drive was attempting to be firmly connected. Power cycle the drive. Clean the drive. Appendix C. LED 2 flashes yellow when the drive needs to perform a read or write operation. Problem solving C-3 Make sure the tape drive is installed properly on again. LEDS BLINK IN AN UNKNOWN SEQUENCE 1. Make...
... or defective connector? Use only an IBM-approved VXA tape cleaning cartridge. 2. If the drive was attempting to be firmly connected. Power cycle the drive. Clean the drive. Appendix C. LED 2 flashes yellow when the drive needs to perform a read or write operation. Problem solving C-3 Make sure the tape drive is installed properly on again. LEDS BLINK IN AN UNKNOWN SEQUENCE 1. Make...