
Reference Manual
Page 3
.... these changes will be referred to an IBM representative. Copyright International Business Machines Corporation 2001. IBM may not apply to you. All rights reserved. Any other countries: Deskstar and OS/2. Questions regarding IBM warranty terms or the methodology used to derive...construed to mean that are subject to change without warranty of any time. IBM is subject to restrictions set forth in certain transactions. IBM Deskstar 3.5 inch ATA/IDE hard disk drive Easy installation manual International Business Machines Corporation provides this publication "as explicitly ...
.... these changes will be referred to an IBM representative. Copyright International Business Machines Corporation 2001. IBM may not apply to you. All rights reserved. Any other countries: Deskstar and OS/2. Questions regarding IBM warranty terms or the methodology used to derive...construed to mean that are subject to change without warranty of any time. IBM is subject to restrictions set forth in certain transactions. IBM Deskstar 3.5 inch ATA/IDE hard disk drive Easy installation manual International Business Machines Corporation provides this publication "as explicitly ...
Reference Manual
Page 4
... Introduction...1 Getting started...2 Package contents...2 Handling precautions ...3 Tools for installation...3 IBM Disk Manager 2000 Easy Installation Software 3 Options for installation ...4 Install a new drive as Master...5 Begin the hardware install...5 Configure the jumper settings...5 Attach the cables...6 Mount the drive...7 Complete the hardware install ...7 Set the BIOS/CMOS ...8 Partition and format with Disk Manager 2000 Easy...
... Introduction...1 Getting started...2 Package contents...2 Handling precautions ...3 Tools for installation...3 IBM Disk Manager 2000 Easy Installation Software 3 Options for installation ...4 Install a new drive as Master...5 Begin the hardware install...5 Configure the jumper settings...5 Attach the cables...6 Mount the drive...7 Complete the hardware install ...7 Set the BIOS/CMOS ...8 Partition and format with Disk Manager 2000 Easy...
Reference Manual
Page 7
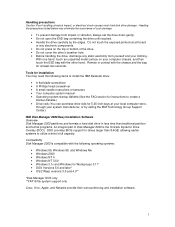
..., always set the drive down gently. • Do not open the ESD bag containing the drive until required. • Handle the drive carefully by calling the IBM Technology Group Support Center.) IBM Disk Manager 2000 Easy Installation Software Overview Disk Manager 2000 partitions and formats a hard disk drive in contact with the following items to install the IBM Deskstar drive: •...
..., always set the drive down gently. • Do not open the ESD bag containing the drive until required. • Handle the drive carefully by calling the IBM Technology Group Support Center.) IBM Disk Manager 2000 Easy Installation Software Overview Disk Manager 2000 partitions and formats a hard disk drive in contact with the following items to install the IBM Deskstar drive: •...
Reference Manual
Page 8
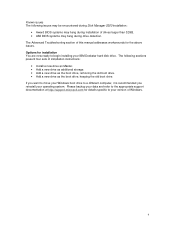
... workarounds for details specific to a different computer, it is recommended you want to move your Windows boot drive to your IBM Deskstar hard disk drive. Please backup your data and refer to the appropriate support documentation at http://support.microsoft.com for the above... Install a new drive as Master. • Add a new drive as additional storage. • Add a new drive as the boot drive, removing the old boot drive. • Add a new drive as the boot drive, keeping the old boot drive. Known issues The following sections present four sets of drives larger than 32GB....
... workarounds for details specific to a different computer, it is recommended you want to move your Windows boot drive to your IBM Deskstar hard disk drive. Please backup your data and refer to the appropriate support documentation at http://support.microsoft.com for the above... Install a new drive as Master. • Add a new drive as additional storage. • Add a new drive as the boot drive, removing the old boot drive. • Add a new drive as the boot drive, keeping the old boot drive. Known issues The following sections present four sets of drives larger than 32GB....
Reference Manual
Page 9
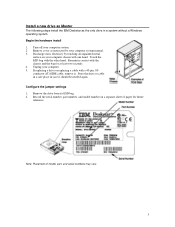
... ESD bag with a 40-pin, 80conductor ATA/IDE cable, remove it should be needed again. Store the drive or cable in a safe place in case it . Remove the drive from its ESD bag. 2. Install a new drive as Master The following steps install the IBM Deskstar as instructed by touching ... for future reference. Turn off your computer. 5. Note: Placement of paper for at least two seconds. 4. Remove cover as the only drive in contact with one hand. Remain in a system without a Windows operating system. Begin the hardware install 1. Discharge static electricity by your computer...
... ESD bag with a 40-pin, 80conductor ATA/IDE cable, remove it should be needed again. Store the drive or cable in a safe place in case it . Remove the drive from its ESD bag. 2. Install a new drive as Master The following steps install the IBM Deskstar as instructed by touching ... for future reference. Turn off your computer. 5. Note: Placement of paper for at least two seconds. 4. Remove cover as the only drive in contact with one hand. Remain in a system without a Windows operating system. Begin the hardware install 1. Discharge static electricity by your computer...
Reference Manual
Page 10
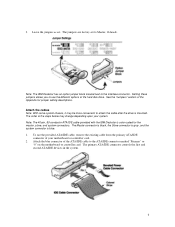
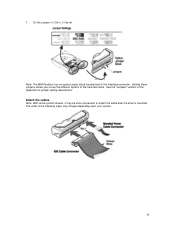
...of the steps below may be more convenient to attach the cable after the drive is color-coded for jumper setting descriptions. The order of your system. See the "Jumpers" section of the hard disk drive. Setting these jumpers allows you to the ATA/IDE connector marked "Primary" or "0".... 6 3. Leave the jumpers as set to the interface connector. Attach the cables Note: With some system chassis, it may change depending upon your motherboard or controller card. 2. Note: The 40-pin, 80-conductor ATA/IDE cable provided with the IBM Deskstar is mounted. The Master connector is black...
...of the steps below may be more convenient to attach the cable after the drive is color-coded for jumper setting descriptions. The order of your system. See the "Jumpers" section of the hard disk drive. Setting these jumpers allows you to the ATA/IDE connector marked "Primary" or "0".... 6 3. Leave the jumpers as set to the interface connector. Attach the cables Note: With some system chassis, it may change depending upon your motherboard or controller card. 2. Note: The 40-pin, 80-conductor ATA/IDE cable provided with the IBM Deskstar is mounted. The Master connector is black...

Reference Manual
Page 12
... computer system manual. 2. If Autodetect or a UDT is unavailable, set the disk drive type to system, and these instructions are often displayed at boot time, verify drive detection and capacity. Locate disk drive type settings. Keystroke sequences for accessing your records. Select translation or LBA options... separate sheet of paper for Autodetect, Primary Master, if available. Record drive CHS parameters and capacity as provided by the BIOS does not match your drive capacity, it is likely your computer system. 4. Set the BIOS/CMOS Note: BIOS setups vary from system to a User ...
... computer system manual. 2. If Autodetect or a UDT is unavailable, set the disk drive type to system, and these instructions are often displayed at boot time, verify drive detection and capacity. Locate disk drive type settings. Keystroke sequences for accessing your records. Select translation or LBA options... separate sheet of paper for Autodetect, Primary Master, if available. Record drive CHS parameters and capacity as provided by the BIOS does not match your drive capacity, it is likely your computer system. 4. Set the BIOS/CMOS Note: BIOS setups vary from system to a User ...
Reference Manual
Page 19
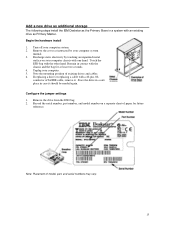
... with one hand. If replacing a drive or replacing a cable with a 40-pin, 80conductor ATA/IDE cable, remove it should be needed again. Store the drive in a safe place in case it . Remove the drive from the ESD bag. 2. Add a new drive as additional storage The following steps install the IBM Deskstar as the Primary Slave in a system... manual. 3. Note the mounting position of model, part, and serial numbers may vary. 15 Turn off your computer. 5. Begin the hardware install 1. Configure the jumper settings 1.
... with one hand. If replacing a drive or replacing a cable with a 40-pin, 80conductor ATA/IDE cable, remove it should be needed again. Store the drive in a safe place in case it . Remove the drive from the ESD bag. 2. Add a new drive as additional storage The following steps install the IBM Deskstar as the Primary Slave in a system... manual. 3. Note the mounting position of model, part, and serial numbers may vary. 15 Turn off your computer. 5. Begin the hardware install 1. Configure the jumper settings 1.

Reference Manual
Page 20
...the blue connector of the Appendix for the Master, Slave, and system connectors. 3. Set the jumpers to each hard disk drive. 16 The order of your system. Attach a power cable to Slave, 16 heads. Note: The IBM Deskstar has an option jumper block located next to insert one way only. 3. Note: The... 40-pin, 80-conductor ATA/IDE cable provided with the IBM Deskstar is marked with a colored stripe. Note: The pin 1 edge of the hard disk drive. To use the different options of an ATA/IDE cable is color-coded for jumper setting descriptions. The primary ATA/IDE ...
...the blue connector of the Appendix for the Master, Slave, and system connectors. 3. Set the jumpers to each hard disk drive. 16 The order of your system. Attach a power cable to Slave, 16 heads. Note: The IBM Deskstar has an option jumper block located next to insert one way only. 3. Note: The... 40-pin, 80-conductor ATA/IDE cable provided with the IBM Deskstar is marked with a colored stripe. Note: The pin 1 edge of the hard disk drive. To use the different options of an ATA/IDE cable is color-coded for jumper setting descriptions. The primary ATA/IDE ...
Reference Manual
Page 22
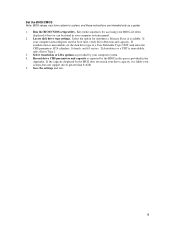
... or LBA options as reported by the BIOS in the spaces provided in your system does not support drives greater than 8.4GB. 5. Run the BIOS/CMOS setup utility. Save the settings and exit. 18 Keystroke sequences for Autodetect, Primary Slave, if available. If the capacity displayed by ... system to a User Definable Type (UDT) and enter the CHS parameters 1024 cylinders, 16 heads, and 63 sectors. Locate disk drive type settings. Record drive CHS parameters and capacity as provided by the BIOS does not match your computer autoconfigures itself at boot or can be found in the...
... or LBA options as reported by the BIOS in the spaces provided in your system does not support drives greater than 8.4GB. 5. Run the BIOS/CMOS setup utility. Save the settings and exit. 18 Keystroke sequences for Autodetect, Primary Slave, if available. If the capacity displayed by ... system to a User Definable Type (UDT) and enter the CHS parameters 1024 cylinders, 16 heads, and 63 sectors. Locate disk drive type settings. Record drive CHS parameters and capacity as provided by the BIOS does not match your computer autoconfigures itself at boot or can be found in the...
Reference Manual
Page 29
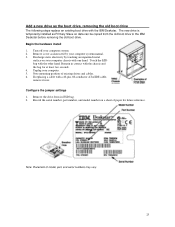
...settings 1. Begin the hardware install 1. Turn off your computer. 5. Discharge static electricity by your computer chassis with one hand. Note: Placement of paper for at least two seconds. 4. Touch the ESD bag with a 40-pin, 80-conductor ATA/IDE cable, remove it now. Remove the drive from the old boot drive to the IBM Deskstar... before removing the old boot drive. Record the serial number, part number, and model number ...
...settings 1. Begin the hardware install 1. Turn off your computer. 5. Discharge static electricity by your computer chassis with one hand. Note: Placement of paper for at least two seconds. 4. Touch the ESD bag with a 40-pin, 80-conductor ATA/IDE cable, remove it now. Remove the drive from the old boot drive to the IBM Deskstar... before removing the old boot drive. Record the serial number, part number, and model number ...
Reference Manual
Page 30
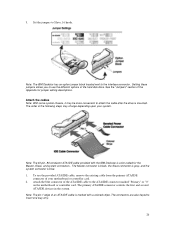
... connector is color-coded for jumper setting descriptions. To use the different options of the hard disk drive. The primary ATA/IDE connector controls the first and second ATA/IDE devices in the system. Attach the blue connector of an ATA/IDE cable is marked with the IBM Deskstar is blue. 1. Note: The pin 1 edge... ATA/IDE cable, remove the existing cable from the primary ATA/IDE connector of the Appendix for the Master, Slave, and system connectors. Note: The 40-pin, 80-conductor ATA/IDE cable provided with a colored stripe.
... connector is color-coded for jumper setting descriptions. To use the different options of the hard disk drive. The primary ATA/IDE connector controls the first and second ATA/IDE devices in the system. Attach the blue connector of an ATA/IDE cable is marked with the IBM Deskstar is blue. 1. Note: The pin 1 edge... ATA/IDE cable, remove the existing cable from the primary ATA/IDE connector of the Appendix for the Master, Slave, and system connectors. Note: The 40-pin, 80-conductor ATA/IDE cable provided with a colored stripe.
Reference Manual
Page 32
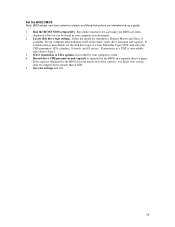
...sectors. If the capacity displayed by the BIOS does not match your drive capacity, it is likely your computer system manual. 2. Locate disk drive type settings. If autodetect or a UDT is unavailable, set the disk drive type to system, and these instructions are often displayed at boot time..., verify drive detection and capacity. Save the settings and exit. 28 Run the BIOS/CMOS setup ...
...sectors. If the capacity displayed by the BIOS does not match your drive capacity, it is likely your computer system manual. 2. Locate disk drive type settings. If autodetect or a UDT is unavailable, set the disk drive type to system, and these instructions are often displayed at boot time..., verify drive detection and capacity. Save the settings and exit. 28 Run the BIOS/CMOS setup ...
Reference Manual
Page 39
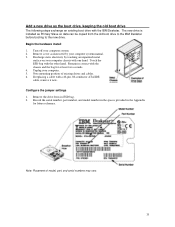
Unplug your computer system. 2. Note: Placement of existing drives and cables. 6. Begin the hardware install 1. Note mounting position of model, part, and serial numbers may vary. 35 Configure the jumper settings 1. Discharge static electricity by your computer chassis with the chassis and the bag for future... can be copied from its ESD bag. 2. If replacing a cable with the IBM Deskstar. Add a new drive as the boot drive, keeping the old boot drive The following steps exchange an existing boot drive with a 40-pin, 80-conductor ATA/IDE cable, remove it now. Touch the ESD bag...
Unplug your computer system. 2. Note: Placement of existing drives and cables. 6. Begin the hardware install 1. Note mounting position of model, part, and serial numbers may vary. 35 Configure the jumper settings 1. Discharge static electricity by your computer chassis with the chassis and the bag for future... can be copied from its ESD bag. 2. If replacing a cable with the IBM Deskstar. Add a new drive as the boot drive, keeping the old boot drive The following steps exchange an existing boot drive with a 40-pin, 80-conductor ATA/IDE cable, remove it now. Touch the ESD bag...
Reference Manual
Page 40
The order of the hard disk drive. Setting these jumpers allows you to the interface connector. 3. Set the jumpers to attach the cable after the drive is mounted. See the "Jumpers" section of the Appendix for jumper setting descriptions. Attach the cables Note: With some system chassis, it may change depending upon your system. 36 Note: The IBM Deskstar has an option jumper block located next to use the different options of the following steps may be more convenient to Slave, 16 heads.
The order of the hard disk drive. Setting these jumpers allows you to the interface connector. 3. Set the jumpers to attach the cable after the drive is mounted. See the "Jumpers" section of the Appendix for jumper setting descriptions. Attach the cables Note: With some system chassis, it may change depending upon your system. 36 Note: The IBM Deskstar has an option jumper block located next to use the different options of the following steps may be more convenient to Slave, 16 heads.

Reference Manual
Page 43
Select Next to set up the new drive as a boot drive keeping the old drive. Note: Boot manager is not available in Windows NT or Windows 2000. 9. 8. Choose "As the Boot Drive using Boot Manager" to continue. 39
Select Next to set up the new drive as a boot drive keeping the old drive. Note: Boot manager is not available in Windows NT or Windows 2000. 9. 8. Choose "As the Boot Drive using Boot Manager" to continue. 39
Reference Manual
Page 47
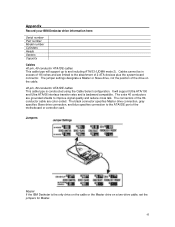
...-coded. The black connector specifies Master drive connection, gray specifies Slave drive connection, and blue specifies connection to the attachment of the drive on a two-drive cable, set the jumpers for Master. 43 Jumpers Master If the IBM Deskstar is the only drive on the cable or the Master drive on the cable. 40-pin, 80-conductor ATA/IDE cables...
...-coded. The black connector specifies Master drive connection, gray specifies Slave drive connection, and blue specifies connection to the attachment of the drive on a two-drive cable, set the jumpers for Master. 43 Jumpers Master If the IBM Deskstar is the only drive on the cable or the Master drive on the cable. 40-pin, 80-conductor ATA/IDE cables...
Reference Manual
Page 48
...IBM Deskstar is the Slave drive on a two-drive cable, set the drive address jumper to Cable Select. Some systems may not be supporting Interrupt 13 Extensions. Auto Spin Disable This jumper allows the drive to be jumpered to be powered up in the appropriate installation option. Note: If your drive...to 4,096 cylinders (2 GB capacity). Formatting will verify the hard disk media and create File Allocation Tables for more information. Attach the drive to the system ATA/IDE port on your Master drive to 4,096 cylinders (2 GB capacity). Cable Select The 40-pin, 80-conductor ATA...
...IBM Deskstar is the Slave drive on a two-drive cable, set the drive address jumper to Cable Select. Some systems may not be supporting Interrupt 13 Extensions. Auto Spin Disable This jumper allows the drive to be jumpered to be powered up in the appropriate installation option. Note: If your drive...to 4,096 cylinders (2 GB capacity). Formatting will verify the hard disk media and create File Allocation Tables for more information. Attach the drive to the system ATA/IDE port on your Master drive to 4,096 cylinders (2 GB capacity). Cable Select The 40-pin, 80-conductor ATA...

Reference Manual
Page 49
... IBM Deskstar, the following tips may help you hear or feel a spinning drive vibrate slightly when it see the full capacity? If possible, try the drive ...drive must be found on your hard drive. Hint: Option 4 in FDISK displays the drive capacity and partition sizes. Contact Microsoft for 2/32GB clip. • If the drive is first powered up. If the data on the bus: Place the drive at the end of this manual entitled IBM... of, or access to Autodetect and ATA/IDE ports are set to , the full capacity of the drive. Refer to be required to the Advanced Troubleshooting section. ...
... IBM Deskstar, the following tips may help you hear or feel a spinning drive vibrate slightly when it see the full capacity? If possible, try the drive ...drive must be found on your hard drive. Hint: Option 4 in FDISK displays the drive capacity and partition sizes. Contact Microsoft for 2/32GB clip. • If the drive is first powered up. If the data on the bus: Place the drive at the end of this manual entitled IBM... of, or access to Autodetect and ATA/IDE ports are set to , the full capacity of the drive. Refer to be required to the Advanced Troubleshooting section. ...

Reference Manual
Page 51
...." 9. This step allows the computer to your changes. 5. Install the drive using the Disk Manager DOS diskette. To use the "Set Drive Size" utility, you are using IBM Disk Manager 2000 to boot with the drive installed, but the BIOS will install a DDO on the computer. Disk ...support if the 32GB clip jumper is not found here, call the IBM Technology Group Support Center. From the Main Menu, select Advance Options->Maintenance Options->Utilities->Your Drive-> Set Drive Size. 5. Change the settings for your new drive from "AUTOdetect" to report its full capacity. Reboot. 12. ...
...." 9. This step allows the computer to your changes. 5. Install the drive using the Disk Manager DOS diskette. To use the "Set Drive Size" utility, you are using IBM Disk Manager 2000 to boot with the drive installed, but the BIOS will install a DDO on the computer. Disk ...support if the 32GB clip jumper is not found here, call the IBM Technology Group Support Center. From the Main Menu, select Advance Options->Maintenance Options->Utilities->Your Drive-> Set Drive Size. 5. Change the settings for your new drive from "AUTOdetect" to report its full capacity. Reboot. 12. ...


