
User Guide
Page 10
...45 Viewing CO cable information and setting a CO language 46 Viewing and configuring cascade devices 47 Viewing software and firmware versions for the appliance 48 Viewing CO cable version information and administering firmware 48 Using the Tools ...51 Rebooting the appliance using the Tools 51 Upgrading the appliance... firmware using the Tools 52 Upgrading firmware on multiple CO cables using the Tools 53 Managing appliance configuration files 54 Managing user databases ...56 Chapter 4: Using the ...
...45 Viewing CO cable information and setting a CO language 46 Viewing and configuring cascade devices 47 Viewing software and firmware versions for the appliance 48 Viewing CO cable version information and administering firmware 48 Using the Tools ...51 Rebooting the appliance using the Tools 51 Upgrading the appliance... firmware using the Tools 52 Upgrading firmware on multiple CO cables using the Tools 53 Managing appliance configuration files 54 Managing user databases ...56 Chapter 4: Using the ...

User Guide
Page 11
......73 Managing target device tasks using the OSCAR interface 74 Displaying version information 74 Upgrading the CO cable firmware 75 Upgrading the appliance firmware 76 Viewing the switching system configuration 76 Viewing and disconnecting user connections 76 Resetting the keyboard and mouse 78... ...81 Chapter 5: Using the Console Menu 83 Console Main Menu...83 Network Configuration Menu ...84 Security Configuration option ...85 Firmware Management option ...86 Enable Debug Messages option 86 Set/Change Password option...86 Restore Factory Defaults option 87 Reset Appliance option ...
......73 Managing target device tasks using the OSCAR interface 74 Displaying version information 74 Upgrading the CO cable firmware 75 Upgrading the appliance firmware 76 Viewing the switching system configuration 76 Viewing and disconnecting user connections 76 Resetting the keyboard and mouse 78... ...81 Chapter 5: Using the Console Menu 83 Console Main Menu...83 Network Configuration Menu ...84 Security Configuration option ...85 Firmware Management option ...86 Enable Debug Messages option 86 Set/Change Password option...86 Restore Factory Defaults option 87 Reset Appliance option ...

User Guide
Page 13
... Window 49 Figure 3.18: CO Version window...50 Figure 3.19: Tools tab ...51 Figure 3.20: Upgrade Appliance Firmware window- TFTP server 52 Figure 3.21: Upgrade Appliance Firmware window - xi LIST OF FIGURES List of Figures Figure 1.1: GCM2 or GCM4 appliance 1 Figure 1.2: Examples of CO cables 3 Figure 1.3: Cat5 cable and a terminator connected to... Traps Window 44 Figure 3.12: Servers window...45 Figure 3.13: Modify Server Name window 45 Figure 3.14: Servers - file system 53 Figure 3.22: Upgrade CO Firmware window 54
... Window 49 Figure 3.18: CO Version window...50 Figure 3.19: Tools tab ...51 Figure 3.20: Upgrade Appliance Firmware window- TFTP server 52 Figure 3.21: Upgrade Appliance Firmware window - xi LIST OF FIGURES List of Figures Figure 1.1: GCM2 or GCM4 appliance 1 Figure 1.2: Examples of CO cables 3 Figure 1.3: Cat5 cable and a terminator connected to... Traps Window 44 Figure 3.12: Servers window...45 Figure 3.13: Modify Server Name window 45 Figure 3.14: Servers - file system 53 Figure 3.22: Upgrade CO Firmware window 54

User Guide
Page 18
... always used, whether it is not supported for virtual media support. Using the virtual media capability, users can be connected to the configuration port for firmware upgrades and other types of both authentication and authorizations checking. • LDAP can access connected target devices remotely through the1000BASE-T Ethernet port and directly through...
... always used, whether it is not supported for virtual media support. Using the virtual media capability, users can be connected to the configuration port for firmware upgrades and other types of both authentication and authorizations checking. • LDAP can access connected target devices remotely through the1000BASE-T Ethernet port and directly through...

User Guide
Page 19
... of CO cables Using Cat5 cables dramatically reduces cable clutter while providing optimal digital display resolution and video settings. PS/2 and VGA connectors • IBM 1.5 M KVM Conversion Option (KCO) cable - Each CO cable receives power directly from the target device. USB2 and VGA connectors NOTE: For virtual...has one of a target device and to an ARI port on or if the connection between the CO cable and the switch is interrupted. Firmware on the CO cable of the following ways. • A Cat5 cable must be directly connected to each CO cable simplifies configuration by ...
... of CO cables Using Cat5 cables dramatically reduces cable clutter while providing optimal digital display resolution and video settings. PS/2 and VGA connectors • IBM 1.5 M KVM Conversion Option (KCO) cable - Each CO cable receives power directly from the target device. USB2 and VGA connectors NOTE: For virtual...has one of a target device and to an ARI port on or if the connection between the CO cable and the switch is interrupted. Firmware on the CO cable of the following ways. • A Cat5 cable must be directly connected to each CO cable simplifies configuration by ...

User Guide
Page 21
The network port supports up to 1000BASE-T Ethernet. 10BASE-T and switched 100BASE-T Ethernet can be upgraded to upgrade the firmware. Resolutions of the selected target device displaying in a Video Viewer window. See Appendix A for more information about how to a more-...Console menu. Accessing the appliance through network connection The appliance uses TCP/IP for analog VGA, SVGA, and XGA video. Flash upgradability The appliance firmware can be installed on the computer. Accessing target devices When a user accesses OSCAR, the Web interface, or the VCS, a list appears with...
The network port supports up to 1000BASE-T Ethernet. 10BASE-T and switched 100BASE-T Ethernet can be upgraded to upgrade the firmware. Resolutions of the selected target device displaying in a Video Viewer window. See Appendix A for more information about how to a more-...Console menu. Accessing the appliance through network connection The appliance uses TCP/IP for analog VGA, SVGA, and XGA video. Flash upgradability The appliance firmware can be installed on the computer. Accessing target devices When a user accesses OSCAR, the Web interface, or the VCS, a list appears with...

User Guide
Page 32
... turn on the back panel of the Ethernet connection is the Link indicator. If you plan to use the Console menu interface for configuration or firmware upgrades, connect a terminal or a computer running terminal emulation software to the configuration port on the appliance, complete the following steps: 1. Ensure terminal settings are daisy...
... turn on the back panel of the Ethernet connection is the Link indicator. If you plan to use the Console menu interface for configuration or firmware upgrades, connect a terminal or a computer running terminal emulation software to the configuration port on the appliance, complete the following steps: 1. Ensure terminal settings are daisy...

User Guide
Page 41
... to a version that supports the Web interface, using the VCS, see the VCS Installation and User's Guide. For more details about using the firmware upgrade tool in the VCS Appliance Management Panel (AMP). • Use the VCS Migration Wizard and the Resync Wizard to the appliance. NOTE: ... Netscape version 7.0 or later Upgrading GCM2 and GCM4 appliances to use the Web interface You need to use the Web interface to the firmware version that has network access to migrate and resync upgraded appli- Perform the following browsers are described in a supported browser and logs into ...
... to a version that supports the Web interface, using the VCS, see the VCS Installation and User's Guide. For more details about using the firmware upgrade tool in the VCS Appliance Management Panel (AMP). • Use the VCS Migration Wizard and the Resync Wizard to the appliance. NOTE: ... Netscape version 7.0 or later Upgrading GCM2 and GCM4 appliances to use the Web interface You need to use the Web interface to the firmware version that has network access to migrate and resync upgraded appli- Perform the following browsers are described in a supported browser and logs into ...

User Guide
Page 42
... installed in the default locations.) • In Microsoft Windows operating systems, select Start > Programs > IBM Virtual Console Software. • In the Linux operating system, go to be set in . 5. Download and install the latest version of the firmware that includes support for the Web interface from the list. Click Next. Select the...
... installed in the default locations.) • In Microsoft Windows operating systems, select Start > Programs > IBM Virtual Console Software. • In the Linux operating system, go to be set in . 5. Download and install the latest version of the firmware that includes support for the Web interface from the list. Click Next. Select the...

User Guide
Page 43
...Information check box. 6. A page with a warning and two check box options appears. 4. Click Finish to migrate list. 5. See "Viewing software and firmware versions for the Web interface on page 48. 3. In the VCS Explorer window, select Units > New Appliance. Follow the steps in the pop-up menu... button appears. 2. In the Web interface, select the appliance. 2. In the VCS Explorer window, click Units, right click the name of the firmware that does not support the Web interface. The Completing the Migration Wizard window appears. 7. In the VCS Explorer, right click the name of the appliance...
...Information check box. 6. A page with a warning and two check box options appears. 4. Click Finish to migrate list. 5. See "Viewing software and firmware versions for the Web interface on page 48. 3. In the VCS Explorer window, select Units > New Appliance. Follow the steps in the pop-up menu... button appears. 2. In the Web interface, select the appliance. 2. In the VCS Explorer window, click Units, right click the name of the firmware that does not support the Web interface. The Completing the Migration Wizard window appears. 7. In the VCS Explorer, right click the name of the appliance...

User Guide
Page 45
... CO cables, save and restore appliance configuration files, save and restore appliance and user databases. View session status and disconnect sessions. Reboot the appliance, upgrade firmware on page 31. • Status - A GCM2 or GCM4 appliance or a legacy switch that require a reboot, the Reboot Required button displays at the lower right of...
... CO cables, save and restore appliance configuration files, save and restore appliance and user databases. View session status and disconnect sessions. Reboot the appliance, upgrade firmware on page 31. • Status - A GCM2 or GCM4 appliance or a legacy switch that require a reboot, the Reboot Required button displays at the lower right of...

User Guide
Page 46
... exit the Web interface, perform the following steps: 1. User access rights Three access rights are accessing the switching system. No No Yes Reboot and upgrade firmware. No Yes Yes Monitor target device status. Enter the appliance IP address in a browser. Type the username and password and click OK. Configure network and...
... exit the Web interface, perform the following steps: 1. User access rights Three access rights are accessing the switching system. No No Yes Reboot and upgrade firmware. No Yes Yes Monitor target device status. Enter the appliance IP address in a browser. Type the username and password and click OK. Configure network and...

User Guide
Page 64
... Name, eID, Path, and Type. Type the new name for the device. 6. Figure 3.16: Versions window Viewing CO cable version information and administering firmware When the Configure tab is selected, any user can click the Versions option in the left menu. 3. Log into the Web interface as a user with...rights. 2. Any user can also click on an eID for a CO cable to view Application, Boot, and Hardware version information and whether updated firmware is available for the appliance When the Configure tab is selected, any user can click Versions > CO in the left menu to view information about...
... Name, eID, Path, and Type. Type the new name for the device. 6. Figure 3.16: Versions window Viewing CO cable version information and administering firmware When the Configure tab is selected, any user can click the Versions option in the left menu. 3. Log into the Web interface as a user with...rights. 2. Any user can also click on an eID for a CO cable to view Application, Boot, and Hardware version information and whether updated firmware is available for the appliance When the Configure tab is selected, any user can click Versions > CO in the left menu to view information about...

User Guide
Page 65
... and then click Versions > CO Versions in the Tools tab. See "Using the Tools" on the appliance. Figure 3.17: COs Firmware Version Window To view version information for all COs check box causes automatic upgrades of all CO cables of the CO cable. Click the... upgrade all subsequently connected CO cables to a tiered switch, which can configure firmware upgrades for individual CO cables and enable automatic firmware upgrades for CO cables. This guarantees that CO cable firmware is connected to the firmware level available on page 51. Chapter 3: Using the Web Interface 49 Admin...
... and then click Versions > CO Versions in the Tools tab. See "Using the Tools" on the appliance. Figure 3.17: COs Firmware Version Window To view version information for all COs check box causes automatic upgrades of all CO cables of the CO cable. Click the... upgrade all subsequently connected CO cables to a tiered switch, which can configure firmware upgrades for individual CO cables and enable automatic firmware upgrades for CO cables. This guarantees that CO cable firmware is connected to the firmware level available on page 51. Chapter 3: Using the Web Interface 49 Admin...

User Guide
Page 66
...connected CO cables, complete the following steps. b. During the upgrade, a progress message is displayed below the Firmware Available box and the Load Firmware button dims. When the upgrade is finished, a message appears indicating that the upgrade was successful. e. To... Repeat steps a-d for all COs button. To configure automatic or individual CO cable firmware upgrades, complete the following steps: a. The firmware upgrade begins. Compare the Application version to the Firmware Available Application version show. (You can downgrade the CO cable to an older, ...
...connected CO cables, complete the following steps. b. During the upgrade, a progress message is displayed below the Firmware Available box and the Load Firmware button dims. When the upgrade is finished, a message appears indicating that the upgrade was successful. e. To... Repeat steps a-d for all COs button. To configure automatic or individual CO cable firmware upgrades, complete the following steps: a. The firmware upgrade begins. Compare the Application version to the Firmware Available Application version show. (You can downgrade the CO cable to an older, ...

User Guide
Page 68
...- The Tools window appears. 3. Click OK. Log into the Web interface as an upgrade is in the Firmware File field. To upgrade firmware from http://www.ibm.com/support/ either into the file system of the computer that has been downloaded either to a TFTP server or to the current computer. ...2. NOTE: If you are updating an appliance to a firmware version that provides support for the Web interface, you ...
...- The Tools window appears. 3. Click OK. Log into the Web interface as an upgrade is in the Firmware File field. To upgrade firmware from http://www.ibm.com/support/ either into the file system of the computer that has been downloaded either to a TFTP server or to the current computer. ...2. NOTE: If you are updating an appliance to a firmware version that provides support for the Web interface, you ...

User Guide
Page 69
... that no CO cable of that type are upgraded. 12. Click Open. Figure 3.21: Upgrade Appliance Firmware window - Click the Upgrade button. Click the Upgrade CO Firmware button. Select the check box in this procedure until all CO cables of each CO cable type (PS2,USB...ready" appears, click Close to the location on multiple CO cables, complete the following steps: 1. When the notice "Firmware Upgrade has completed. The Upgrade CO Firmware window appears. 4. To upgrade firmware from the current computer, select the File System radio button and browse to exit the Upgrade Appliance...
... that no CO cable of that type are upgraded. 12. Click Open. Figure 3.21: Upgrade Appliance Firmware window - Click the Upgrade button. Click the Upgrade CO Firmware button. Select the check box in this procedure until all CO cables of each CO cable type (PS2,USB...ready" appears, click Close to the location on multiple CO cables, complete the following steps: 1. When the notice "Firmware Upgrade has completed. The Upgrade CO Firmware window appears. 4. To upgrade firmware from the current computer, select the File System radio button and browse to exit the Upgrade Appliance...

User Guide
Page 70
...To save appliance configuration into a file and click the Restore Appliance Configuration button to the Tools window. A firmware upgrade currently in the user configuration file. The Upgrade Firmware window appears with the Upgrade button is stored in progress message displays until all appliance settings, including SNMP ...settings, LDAP settings, and NTP settings. 54 GCM2 and GCM4 Installation and User's Guide Figure 3.22: Upgrade CO Firmware window 5. Click Close to exit the Upgrade Firmware window and return to restore the file. Click the Tools tab. Click Upgrade. Click OK.
...To save appliance configuration into a file and click the Restore Appliance Configuration button to the Tools window. A firmware upgrade currently in the user configuration file. The Upgrade Firmware window appears with the Upgrade button is stored in progress message displays until all appliance settings, including SNMP ...settings, LDAP settings, and NTP settings. 54 GCM2 and GCM4 Installation and User's Guide Figure 3.22: Upgrade CO Firmware window 5. Click Close to exit the Upgrade Firmware window and return to restore the file. Click the Tools tab. Click Upgrade. Click OK.

User Guide
Page 87
... in the same location as the Y key on or rebooted. Only local users can use the US keyboard country code with a keyboard of the appliance firmware will cause incorrect keyboard mapping. You can view or change . Start the OSCAR interface. 2. The Keyboard window opens. 3. Click OK to save the changes, or...
... in the same location as the Y key on or rebooted. Only local users can use the US keyboard country code with a keyboard of the appliance firmware will cause incorrect keyboard mapping. You can view or change . Start the OSCAR interface. 2. The Keyboard window opens. 3. Click OK to save the changes, or...
User Guide
Page 90
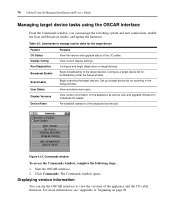
... the OSCAR interface From the Commands window, you can use the OSCAR interface to view the versions of the appliance and the CO cable firmware. Table 4.5: Commands to the target devices. Configure a target device list for scanning in the Setup window. View version information for the... appliance as well as view and upgrade firmware for the target device Feature CO Status Display Config Run Diagnostics Broadcast Enable Scan Enable User Status Display Versions Device Reset Purpose View the...
... the OSCAR interface From the Commands window, you can use the OSCAR interface to view the versions of the appliance and the CO cable firmware. Table 4.5: Commands to the target devices. Configure a target device list for scanning in the Setup window. View version information for the... appliance as well as view and upgrade firmware for the target device Feature CO Status Display Config Run Diagnostics Broadcast Enable Scan Enable User Status Display Versions Device Reset Purpose View the...