
User Guide
Page 1
Local 2x8 Console Manager Installation and User's Guide For 1735-1GX
Local 2x8 Console Manager Installation and User's Guide For 1735-1GX

User Guide
Page 3
Local 2x8 Console Manager Installation and User's Guide
Local 2x8 Console Manager Installation and User's Guide

User Guide
Page 9
... of a rack 9 Installing the appliance horizontally in the 1-U rack mounting space 9 Installing the LCM2 appliance ...10 Connecting a CO cable to each target device 11 Connecting local peripheral devices 12 Tiering LCM2 appliances ...12 Adding earlier-model appliances...15 Chaining target devices with CO cables 16 Setting up the LCM2 appliance ...17...
... of a rack 9 Installing the appliance horizontally in the 1-U rack mounting space 9 Installing the LCM2 appliance ...10 Connecting a CO cable to each target device 11 Connecting local peripheral devices 12 Tiering LCM2 appliances ...12 Adding earlier-model appliances...15 Chaining target devices with CO cables 16 Setting up the LCM2 appliance ...17...

User Guide
Page 10
... Manager Installation and User's Guide Connecting local virtual media...22 Configuring the appliance and the OSCAR interface 23 Assigning target device names 24 Assigning device types ...25 Changing the display behavior 26 ...
... Manager Installation and User's Guide Connecting local virtual media...22 Configuring the appliance and the OSCAR interface 23 Assigning target device names 24 Assigning device types ...25 Changing the display behavior 26 ...

User Guide
Page 12
x Local Console Manager Installation and User's Guide
x Local Console Manager Installation and User's Guide

User Guide
Page 14
xii Local Console Manager Installation and User's Guide
xii Local Console Manager Installation and User's Guide

User Guide
Page 15
... any target device that support all major target device platforms. Glossary The following words are used throughout this documentation: • appliance - 1 CHAPTER 1 Product overview The IBM® Local 2x8 Console Manager (LCM2) appliance integrates analog keyboard, video, and mouse (KVM) switching technology with advanced cable management, access for...
... any target device that support all major target device platforms. Glossary The following words are used throughout this documentation: • appliance - 1 CHAPTER 1 Product overview The IBM® Local 2x8 Console Manager (LCM2) appliance integrates analog keyboard, video, and mouse (KVM) switching technology with advanced cable management, access for...

User Guide
Page 16
2 Local Console Manager Installation and User's Guide Intelligent cables You can install, upgrade, or recover the operating system; PS/2 and VGA connectors • IBM 1.5 M KVM Conversion Option (KCO) - The CO cable is turned on . You can use virtual media support to connect... codes for each attached target device. The CO cables that are connected to a VCO cable. PS/2 and VGA connectors • IBM Virtual Media Conversion Option (VCO) - The built-in conjunction with Cat5 design dramatically reduce cable clutter while providing optimal digital display resolution...
2 Local Console Manager Installation and User's Guide Intelligent cables You can install, upgrade, or recover the operating system; PS/2 and VGA connectors • IBM 1.5 M KVM Conversion Option (KCO) - The CO cable is turned on . You can use virtual media support to connect... codes for each attached target device. The CO cables that are connected to a VCO cable. PS/2 and VGA connectors • IBM Virtual Media Conversion Option (VCO) - The built-in conjunction with Cat5 design dramatically reduce cable clutter while providing optimal digital display resolution...

User Guide
Page 18
4 Local Console Manager Installation and User's Guide CO cable Earlier-model appliance (tiered) LCM2 appliance (tiered) Rack of target devices Critical target device Local user LCM2 appliance (main) Local user Figure 1.3: Example of an LCM2 appliance configuration
4 Local Console Manager Installation and User's Guide CO cable Earlier-model appliance (tiered) LCM2 appliance (tiered) Rack of target devices Critical target device Local user LCM2 appliance (main) Local user Figure 1.3: Example of an LCM2 appliance configuration

User Guide
Page 20
6 Local Console Manager Installation and User's Guide Safety precautions Observe the following guidelines to safely operate the equipment.
6 Local Console Manager Installation and User's Guide Safety precautions Observe the following guidelines to safely operate the equipment.

User Guide
Page 21
... and replace the part or contact the trained service provider: • The power cable, extension cable, or connector is required, consult the service provider or local power company. Also, do not block cooling vents. • Do not spill food or liquids on the electrical ratings label.
... and replace the part or contact the trained service provider: • The power cable, extension cable, or connector is required, consult the service provider or local power company. Also, do not block cooling vents. • Do not spill food or liquids on the electrical ratings label.

User Guide
Page 22
... and other than room ambient. Observe equipment nameplate ratings for maximum current. • Reliable earthing: Maintain reliable earthing of racks. Always follow the local and national wiring rules. 8 Local Console Manager Installation and User's Guide • Be sure that the monitor and attached devices are electrically rated to operate with the power...
... and other than room ambient. Observe equipment nameplate ratings for maximum current. • Reliable earthing: Maintain reliable earthing of racks. Always follow the local and national wiring rules. 8 Local Console Manager Installation and User's Guide • Be sure that the monitor and attached devices are electrically rated to operate with the power...

User Guide
Page 24
Figure 2.2: Appliance horizontal installation Installing the LCM2 appliance Connect the supplied power cord into the rear of procedures to install the appliance. See the following detailed set of the appliance and then into the cage nuts or clip nuts. Figure 2.3 on page 11 illustrates one possible configuration for the LCM2 appliance. 10 Local Console Manager Installation and User's Guide screws through the slots in the mounting bracket and the holes in the mounting rail, then into a power source.
Figure 2.2: Appliance horizontal installation Installing the LCM2 appliance Connect the supplied power cord into the rear of procedures to install the appliance. See the following detailed set of the appliance and then into the cage nuts or clip nuts. Figure 2.3 on page 11 illustrates one possible configuration for the LCM2 appliance. 10 Local Console Manager Installation and User's Guide screws through the slots in the mounting bracket and the holes in the mounting rail, then into a power source.

User Guide
Page 25
Ethernet Power cord Configuration port ACI port Local user Chapter 2: Installation 11 ARI ports Target device Target device CO cables . Figure 2.3: Basic LCM2 appliance configuration Connecting a CO cable to each target device To ...
Ethernet Power cord Configuration port ACI port Local user Chapter 2: Installation 11 ARI ports Target device Target device CO cables . Figure 2.3: Basic LCM2 appliance configuration Connecting a CO cable to each target device To ...
User Guide
Page 26
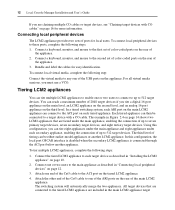
... under the main appliance and eight appliances under the main appliance, enabling the connection of the appliance. 2. Using this configuration, the local port OSCAR interface is disabled when the secondary LCM2 appliance is connected through the ACI port below another LCM2 appliance. The switching system ...will automatically merge the two appliances. Bundle and label the cables for local users. Each tiered appliance can tier multiple LCM2 appliances to enable one end of the Cat5 cable to the second set of color...
... under the main appliance and eight appliances under the main appliance, enabling the connection of the appliance. 2. Using this configuration, the local port OSCAR interface is disabled when the secondary LCM2 appliance is connected through the ACI port below another LCM2 appliance. The switching system ...will automatically merge the two appliances. Bundle and label the cables for local users. Each tiered appliance can tier multiple LCM2 appliances to enable one end of the Cat5 cable to the second set of color...

User Guide
Page 28
14 Local Console Manager Installation and User's Guide Local user A Local user B LCM2 appliance (main) ARI ports Primary target devices LCM2 appliance (tiered) ACI port Secondary target devices LCM2 appliance (tiered) ACI port Tertiary target devices Figure 2.4: LCM2 appliance configuration with tiered appliances
14 Local Console Manager Installation and User's Guide Local user A Local user B LCM2 appliance (main) ARI ports Primary target devices LCM2 appliance (tiered) ACI port Secondary target devices LCM2 appliance (tiered) ACI port Tertiary target devices Figure 2.4: LCM2 appliance configuration with tiered appliances

User Guide
Page 29
... appliance Earlier-model appliances include: • IBM NetBAYTM 1x4 Console Switch • IBM NetBAY 2x8 Console Switch • IBM NetBAY ACT Remote Console Manager • IBM NetBAY ACT Local Console Manager • IBM 1x8 Console Switch • IBM 2x16 Console Switch Local user LCM2 appliance KCO cables IBM NetBAY 2x8 Console Switch IBM NetBAY 1x4 Console Switch Target device 1 Target...
... appliance Earlier-model appliances include: • IBM NetBAYTM 1x4 Console Switch • IBM NetBAY 2x8 Console Switch • IBM NetBAY ACT Remote Console Manager • IBM NetBAY ACT Local Console Manager • IBM 1x8 Console Switch • IBM 2x16 Console Switch Local user LCM2 appliance KCO cables IBM NetBAY 2x8 Console Switch IBM NetBAY 1x4 Console Switch Target device 1 Target...

User Guide
Page 30
... or attach one end of a Cat5 cable directly to this appliance. 4. Either attach the keyboard, monitor, and mouse connectors of the CO cable to the local port on the first target device that you are included with CO cables To chain together target devices using UCO cables, complete the following steps... to a KCO cable, the list of the chain, attach a terminator to this appliance. Turn off and turn on the tiered appliance to enable its local port to the monitor and USB ports on the UCO cable. 2. Attach the cable ends to recognize the CO cable. 6. Connect the other end of...
... or attach one end of a Cat5 cable directly to this appliance. 4. Either attach the keyboard, monitor, and mouse connectors of the CO cable to the local port on the first target device that you are included with CO cables To chain together target devices using UCO cables, complete the following steps... to a KCO cable, the list of the chain, attach a terminator to this appliance. Turn off and turn on the tiered appliance to enable its local port to the monitor and USB ports on the UCO cable. 2. Attach the cable ends to recognize the CO cable. 6. Connect the other end of...

User Guide
Page 32
18 Local Console Manager Installation and User's Guide
18 Local Console Manager Installation and User's Guide

User Guide
Page 34
... delay to specify the length of the following table describes the status symbols. Press Print Screen to ARI port 06 and appliance port 01. 20 Local Console Manager Installation and User's Guide The Port column indicates the ARI port to which you want to connect. If an earliermodel appliance is connected...
... delay to specify the length of the following table describes the status symbols. Press Print Screen to ARI port 06 and appliance port 01. 20 Local Console Manager Installation and User's Guide The Port column indicates the ARI port to which you want to connect. If an earliermodel appliance is connected...