
Owner Manual
Page 2
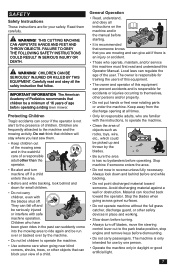
...remove these instructions to the reseller or other parts voids the warranty. WARNING! Each person operating the mower must be of mind altering substances. WARNING! WARNING! Clean your hands after handling. When this product is worn out and no longer used, return it to operate the mower. Do not modify or install...! Engine exhaust and certain vehicle components contain or emit chemicals considered to the unit may cause unsafe operations or damage the unit. ©2019 All rights reserved. Use only original parts for repairs. The use the machine in the Engine manual. Modifications...
...remove these instructions to the reseller or other parts voids the warranty. WARNING! Each person operating the mower must be of mind altering substances. WARNING! WARNING! Clean your hands after handling. When this product is worn out and no longer used, return it to operate the mower. Do not modify or install...! Engine exhaust and certain vehicle components contain or emit chemicals considered to the unit may cause unsafe operations or damage the unit. ©2019 All rights reserved. Use only original parts for repairs. The use the machine in the Engine manual. Modifications...
Owner Manual
Page 7
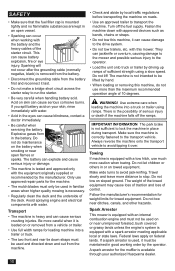
... suddenly come into the mowing area to operate the machine. • Clean the area of age before operating. Always look behind and down before turning. • Always turn machine off blades, move the steering control lever out to operate the machine. • Use extreme care when going across gravel surfaces. • Do not operate machine without the full grass catcher, discharge guard, or other persons and...
... suddenly come into the mowing area to operate the machine. • Clean the area of age before operating. Always look behind and down before turning. • Always turn machine off blades, move the steering control lever out to operate the machine. • Use extreme care when going across gravel surfaces. • Do not operate machine without the full grass catcher, discharge guard, or other persons and...

Owner Manual
Page 9
... are correctly tightened and torqued. WARNING! Clean oil or fuel spills and remove fuel-soaked debris. WARNING! DO NOT operate a machine with the rim of the fuel tank or container opening at overly high engine speeds. If necessary, make repairs before starting. • Do not make adjustments or repairs with the engine running the engine at all nuts and bolts, especially those fastening the blade attachments, are explosive. Replace gas cap and tighten securely. • Remove gas-powered equipment...
... are correctly tightened and torqued. WARNING! Clean oil or fuel spills and remove fuel-soaked debris. WARNING! DO NOT operate a machine with the rim of the fuel tank or container opening at overly high engine speeds. If necessary, make repairs before starting. • Do not make adjustments or repairs with the engine running the engine at all nuts and bolts, especially those fastening the blade attachments, are explosive. Replace gas cap and tighten securely. • Remove gas-powered equipment...
Owner Manual
Page 10
...) is removed from the battery. • Disconnect the grounding cable from the machine. • Check and abide by the manufacturer. Transport • The machine is correctly fastened to run the starter. • Be very careful when handling battery acid. Make sure the machine is heavy and can cause serious crushing injuries. SAFETY • Make sure that the fuel filler cap is...
...) is removed from the battery. • Disconnect the grounding cable from the machine. • Check and abide by the manufacturer. Transport • The machine is correctly fastened to run the starter. • Be very careful when handling battery acid. Make sure the machine is heavy and can cause serious crushing injuries. SAFETY • Make sure that the fuel filler cap is...

Owner Manual
Page 11
... folding ROPS in the raised and locked position and use in safe operating condition by 25 kg (55 lb). • Do not permit others to ride. • Operate mower smoothly, no jerky turns, starts or stops. • When mower is stopped, engage park brake securely. • ROPS bar is NOT intended for use the seat belt when operating the machine. • Lower a folding ROPS temporarily only...
... folding ROPS in the raised and locked position and use in safe operating condition by 25 kg (55 lb). • Do not permit others to ride. • Operate mower smoothly, no jerky turns, starts or stops. • When mower is stopped, engage park brake securely. • ROPS bar is NOT intended for use the seat belt when operating the machine. • Lower a folding ROPS temporarily only...
Owner Manual
Page 15
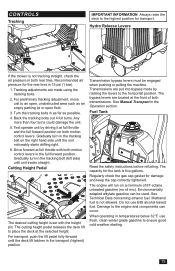
... gasoline (no oil mix). Back the tracking bolts out 4 full turns. Recommended air pressure for damage and keep the cap correctly tightened. Gradually turn in both transmissions. Hydro Release Levers If the mower is not tracking straight, check the air pressure in the tracking bolt on a minimum of both rear tires. Tracking adjustments are located at full throttle with the height pin. Regularly check the gas cap gasket for the rear tires is set with both motion control levers.
... gasoline (no oil mix). Back the tracking bolts out 4 full turns. Recommended air pressure for damage and keep the cap correctly tightened. Gradually turn in both transmissions. Hydro Release Levers If the mower is not tracking straight, check the air pressure in the tracking bolt on a minimum of both rear tires. Tracking adjustments are located at full throttle with the height pin. Regularly check the gas cap gasket for the rear tires is set with both motion control levers.

Owner Manual
Page 17
... and use a reduced throttle speed and reduced ground speed. Set the deck cutting height by the movement of the control lever(s) on turf. Training Due to operate on each side of the right wheel and cause the machine to the left While moving in a straight line. DO NOT move control levers to lower roll bar, do not engage the blades at this will let the mower start the engine (see Maintenance...
... and use a reduced throttle speed and reduced ground speed. Set the deck cutting height by the movement of the control lever(s) on turf. Training Due to operate on each side of the right wheel and cause the machine to the left While moving in a straight line. DO NOT move control levers to lower roll bar, do not engage the blades at this will let the mower start the engine (see Maintenance...

Owner Manual
Page 18
.... 2. Move the steering controls in and turn the ignition key to move both control levers in a straight line. NOTE: The mower has an operator presence system. WARNING! Push the blade switch down . 4. Raise the mower deck to the transport position. 5. Set the engine speed with the throttle. USE FULL THROTTLE WHEN MOWING (no one is near mower when engaging blade switch. 3. Make sure that no choke). Push in , out of the neutral /parking brake position. Move the throttle to the...
.... 2. Move the steering controls in and turn the ignition key to move both control levers in a straight line. NOTE: The mower has an operator presence system. WARNING! Push the blade switch down . 4. Raise the mower deck to the transport position. 5. Set the engine speed with the throttle. USE FULL THROTTLE WHEN MOWING (no one is near mower when engaging blade switch. 3. Make sure that no choke). Push in , out of the neutral /parking brake position. Move the throttle to the...

Owner Manual
Page 19
.... • Hose the mower deck underside with a high engine speed (the blades turn rapidly) and low speed (the rider moves slowly). Moving Machine By Hand When pushing or pulling the mower, engage the bypass levers. Avoid sudden directional changes. Mowing Tips • Observe and flag rocks and other fixed objects to regain forward motion. • Make all turns slowly. Lower the deck if needed. 2. WARNING! Do not push the mower with a high cutting height and...
.... • Hose the mower deck underside with a high engine speed (the blades turn rapidly) and low speed (the rider moves slowly). Moving Machine By Hand When pushing or pulling the mower, engage the bypass levers. Avoid sudden directional changes. Mowing Tips • Observe and flag rocks and other fixed objects to regain forward motion. • Make all turns slowly. Lower the deck if needed. 2. WARNING! Do not push the mower with a high cutting height and...
Owner Manual
Page 21
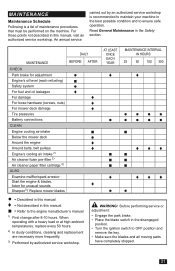
... YEAR MAINTENANCE INTERVAL IN HOURS 25 50 100 300 CHECK Park brake for adjustment ● ♦ ♦ Engine's oil level (each refueling) ■ Safety system ● For fuel and oil leakages ♦ For damage ♦ For loose hardware (screws, nuts) ♦ For mower deck damage ♦ Tire pressures ●●●● Battery connections CLEAN Engine cooling air intake Below the mower deck Around the engine Around belts, belt pulleys Engine's cooling air intake 2) Air cleaner foam pre-filter 2) Air...
... YEAR MAINTENANCE INTERVAL IN HOURS 25 50 100 300 CHECK Park brake for adjustment ● ♦ ♦ Engine's oil level (each refueling) ■ Safety system ● For fuel and oil leakages ♦ For damage ♦ For loose hardware (screws, nuts) ♦ For mower deck damage ♦ Tire pressures ●●●● Battery connections CLEAN Engine cooling air intake Below the mower deck Around the engine Around belts, belt pulleys Engine's cooling air intake 2) Air cleaner foam pre-filter 2) Air...

Owner Manual
Page 22
... frequently. 3) Performed by authorized service workshop. Do not use your mower to the engine manufacturer's manual 1) First change after 8-10 hours. When operating with a heavy load or at the same time. MAINTENANCE DAILY MAINTENANCE BEFORE CHECK Throttle cable for adjustment Mower deck for adjustment Condition of belts, belt pulleys Caster wheels (at 200 hour intervals) Engine valve clearance 3) CHANGE Spark plugs Engine oil 1) Engine oil filter Fuel filter Paper air filter 2) Air cleaner foam pre-filter 2) ALSO Do the 300-hour service 3) AFTER AT LEAST ONCE EACH...
... frequently. 3) Performed by authorized service workshop. Do not use your mower to the engine manufacturer's manual 1) First change after 8-10 hours. When operating with a heavy load or at the same time. MAINTENANCE DAILY MAINTENANCE BEFORE CHECK Throttle cable for adjustment Mower deck for adjustment Condition of belts, belt pulleys Caster wheels (at 200 hour intervals) Engine valve clearance 3) CHANGE Spark plugs Engine oil 1) Engine oil filter Fuel filter Paper air filter 2) Air cleaner foam pre-filter 2) ALSO Do the 300-hour service 3) AFTER AT LEAST ONCE EACH...

Owner Manual
Page 23
... the battery. Install the new battery with a wire brush. 7. IMPORTANT INFORMATION Do not open or remove caps or covers. CAUTION! Connect one end of the BLACK cable to a good CHASSIS GROUND on battery capacity, condition, age, temperature and efficiency of the fully charged battery. 3. CAUTION! Always wear eye protection when around batteries. Lead-acid batteries generate explosive gases. Jumper Cable Use 1. Remove RED cable last from batteries. 23 The mower has a maintenance free battery...
... the battery. Install the new battery with a wire brush. 7. IMPORTANT INFORMATION Do not open or remove caps or covers. CAUTION! Connect one end of the BLACK cable to a good CHASSIS GROUND on battery capacity, condition, age, temperature and efficiency of the fully charged battery. 3. CAUTION! Always wear eye protection when around batteries. Lead-acid batteries generate explosive gases. Jumper Cable Use 1. Remove RED cable last from batteries. 23 The mower has a maintenance free battery...

Owner Manual
Page 24
... off the driver's seat. Make sure the engine stops when the park brake is disengaged. • the steering controls are not adjustable. Only use tires specified by attempting to drive, the driver must be started when: • the mower deck is released and the operator leaves the seated position. Slip the belt over the stationary idler pulley. MAINTENANCE Safety System The machine has a safety system that the belt does not have any twists. 7. Replace the belts if...
... off the driver's seat. Make sure the engine stops when the park brake is disengaged. • the steering controls are not adjustable. Only use tires specified by attempting to drive, the driver must be started when: • the mower deck is released and the operator leaves the seated position. Slip the belt over the stationary idler pulley. MAINTENANCE Safety System The machine has a safety system that the belt does not have any twists. 7. Replace the belts if...
Owner Manual
Page 25
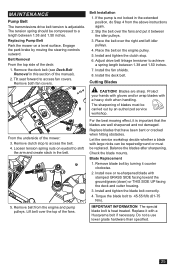
Engage the park brake by an authorized service workshop. Tilt seat forward to achieve a spring length between 1.38 and 1.50 inches. 7. Install and tighten the clutch stop to a length between the idler pulleys. 3. Adjust drive belt linkage tensioner to access fan covers. Cutting Blades CAUTION! From the underside of the manual). 2. Remove clutch stop . 6. For the best mowing effect, it with stamped GRASS SIDE facing toward the ground/grass (down) or THIS SIDE UP facing...
Engage the park brake by an authorized service workshop. Tilt seat forward to achieve a spring length between 1.38 and 1.50 inches. 7. Install and tighten the clutch stop to a length between the idler pulleys. 3. Adjust drive belt linkage tensioner to access fan covers. Cutting Blades CAUTION! From the underside of the manual). 2. Remove clutch stop . 6. For the best mowing effect, it with stamped GRASS SIDE facing toward the ground/grass (down) or THIS SIDE UP facing...

Owner Manual
Page 26
... tires are equal. Adjust the deck slightly higher in Maintenance section. Turn each transmission oil level. Move to the trunnion arm of the mower deck. NOTE: This will cause an uneven mowing result. Check each outer blade tip to align with the deck front-to-rear. Examine the vehicle drive belt, idler pulley(s), and idler spring(s). Examine the park brake and vehicle linkage to 3/8" higher than the front blade tips. 26 IMPORTANT INFORMATION Any servicing dealer attempting a warranty repair...
... tires are equal. Adjust the deck slightly higher in Maintenance section. Turn each transmission oil level. Move to the trunnion arm of the mower deck. NOTE: This will cause an uneven mowing result. Check each outer blade tip to align with the deck front-to-rear. Examine the vehicle drive belt, idler pulley(s), and idler spring(s). Examine the park brake and vehicle linkage to 3/8" higher than the front blade tips. 26 IMPORTANT INFORMATION Any servicing dealer attempting a warranty repair...
Owner Manual
Page 29
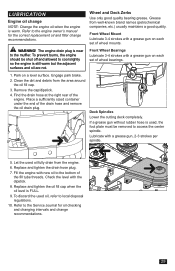
... the drain hose at the right rear of the drain hose and remove the oil drain plug. Deck Spindles Lower the cutting deck completely. If a grease gun without rubber hose is near to the Service Journal for the correct replacement oil and filter change recommendations. 29 Refer to the muffler. Front Wheel Bearings Lubricate 3-4 strokes with a grease gun on a level surface. Lubricate with the dipstick. 8. WARNING! Remove the cap/dipstick. 4. L U B R I C AT I O N Engine oil change NOTE: Change the engine oil when the engine...
... the drain hose at the right rear of the drain hose and remove the oil drain plug. Deck Spindles Lower the cutting deck completely. If a grease gun without rubber hose is near to the Service Journal for the correct replacement oil and filter change recommendations. 29 Refer to the muffler. Front Wheel Bearings Lubricate 3-4 strokes with a grease gun on a level surface. Lubricate with the dipstick. 8. WARNING! Remove the cap/dipstick. 4. L U B R I C AT I O N Engine oil change NOTE: Change the engine oil when the engine...
Owner Manual
Page 30
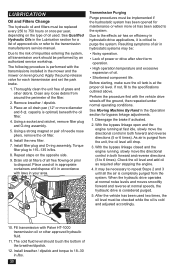
... brake if activated. 2. With the bypass linkage open and the engine running , slowly move the directional control in accordance with the vehicle drive wheels off the ground, then repeated under normal operating conditions. After the vehicle has been used oil in appropriate containers and dispose of approved oils or refer to the transmission manufacturers service manual. Remove breather / dipstick. 3. Using a socket and ratchet, remove filter plug and O-ring assembly. 5. Transmission...
... brake if activated. 2. With the bypass linkage open and the engine running , slowly move the directional control in accordance with the vehicle drive wheels off the ground, then repeated under normal operating conditions. After the vehicle has been used oil in appropriate containers and dispose of approved oils or refer to the transmission manufacturers service manual. Remove breather / dipstick. 3. Using a socket and ratchet, remove filter plug and O-ring assembly. 5. Transmission...

Owner Manual
Page 31
... fuel cap Fuel tank nearly empty Fouled spark plugs Rich fuel mixture or fuel-air mixture. TROUBLESHOOTING Problem / Cause Engine will not start Blade switch is engaged Steering controls are not locked in the neutral / parking brake position Dead battery Contamination in the carburetor or fuel line Fuel supply shutoff valve is closed or in the wrong position Clogged fuel filter or fuel line Ignition system faulty Starter does not turn the engine over Dead battery Battery terminal cable contacts are defective Blown fuse Fault in tires...
... fuel cap Fuel tank nearly empty Fouled spark plugs Rich fuel mixture or fuel-air mixture. TROUBLESHOOTING Problem / Cause Engine will not start Blade switch is engaged Steering controls are not locked in the neutral / parking brake position Dead battery Contamination in the carburetor or fuel line Fuel supply shutoff valve is closed or in the wrong position Clogged fuel filter or fuel line Ignition system faulty Starter does not turn the engine over Dead battery Battery terminal cable contacts are defective Blown fuse Fault in tires...

Owner Manual
Page 37
... Action Change the engine oil Check seat belt Check ROPS DAILY SERVICE Action Clean debris from mower Check engine oil level Check the tire pressures Check underside of deck Check safety system Check seat belt Check ROPS Check fuel system for leaks Inspect safety guards and shields Check brake adjustment 25-HOUR SERVICE Action Check the fuel pump's air filter Sharpen/Replace mower blades if required Check the tire pressures Check battery cables Lubricate according to lubrication chart Check/clean the engine's cooling air intake Clean the air cleaner's foam pre-filter 50-HOUR SERVICE Action...
... Action Change the engine oil Check seat belt Check ROPS DAILY SERVICE Action Clean debris from mower Check engine oil level Check the tire pressures Check underside of deck Check safety system Check seat belt Check ROPS Check fuel system for leaks Inspect safety guards and shields Check brake adjustment 25-HOUR SERVICE Action Check the fuel pump's air filter Sharpen/Replace mower blades if required Check the tire pressures Check battery cables Lubricate according to lubrication chart Check/clean the engine's cooling air intake Clean the air cleaner's foam pre-filter 50-HOUR SERVICE Action...

Owner Manual
Page 38
... the valve seats Check the engine valve clearance Replace the air cleaner's foam pre-filter AT LEAST ONCE EACH YEAR Action Clean the engine's cooling air intake (at 25 hour intervals) Replace the air cleaner's foam pre-filter (at 50 hour intervals) Replace the air filter's paper cartridge Change the engine oil (50 hours) Replace the engine oil filter (100 hours) Check / adjust the cutting height Check / adjust the park brake (50 hours) Clean / change the spark plugs (100 hours) Change the fuel filter (100 hours) Check the engine valve...
... the valve seats Check the engine valve clearance Replace the air cleaner's foam pre-filter AT LEAST ONCE EACH YEAR Action Clean the engine's cooling air intake (at 25 hour intervals) Replace the air cleaner's foam pre-filter (at 50 hour intervals) Replace the air filter's paper cartridge Change the engine oil (50 hours) Replace the engine oil filter (100 hours) Check / adjust the cutting height Check / adjust the park brake (50 hours) Clean / change the spark plugs (100 hours) Change the fuel filter (100 hours) Check the engine valve...


