
Owner Manual
Page 2
... at delivery or written in the Engine manual. The owner must understand these instructions, and must not be under the influence of them as they are placed on the engine and/or in dangerous injury to cause cancer and birth defects or other parts voids the warranty. WARNING! Battery posts, terminals and related accessories contain lead and lead compounds...
... at delivery or written in the Engine manual. The owner must understand these instructions, and must not be under the influence of them as they are placed on the engine and/or in dangerous injury to cause cancer and birth defects or other parts voids the warranty. WARNING! Battery posts, terminals and related accessories contain lead and lead compounds...
Owner Manual
Page 7
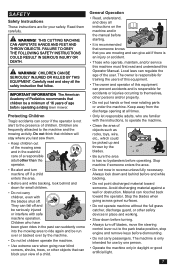
... turning. • Always turn off blades, move the steering control lever out to operate the machine. • Clean the area of a responsible adult other objects that follow. FAILURE TO OBEY THE FOLLOWING SAFETY INSTRUCTIONS COULD RESULT IN SERIOUS INJURY OR DEATH. IMPORTANT INFORMATION The American Academy of this Operator Manual. The owner is has no bystanders before operating a riding lawn mower. Children who have been given rides...
... turning. • Always turn off blades, move the steering control lever out to operate the machine. • Clean the area of a responsible adult other objects that follow. FAILURE TO OBEY THE FOLLOWING SAFETY INSTRUCTIONS COULD RESULT IN SERIOUS INJURY OR DEATH. IMPORTANT INFORMATION The American Academy of this Operator Manual. The owner is has no bystanders before operating a riding lawn mower. Children who have been given rides...
Owner Manual
Page 9
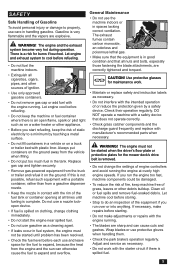
... for maintenance work with the intended operation of or reduce the protection given by touching a metal surface. • Do not fill containers in a vehicle or on clothing, change the settings of engine controllers and avoid running the engine at all times until problem has been resolved. • Check the fuel level before starting. • Do not make adjustments or repairs with plastic liner. SAFETY Safe Handling of...
... for maintenance work with the intended operation of or reduce the protection given by touching a metal surface. • Do not fill containers in a vehicle or on clothing, change the settings of engine controllers and avoid running the engine at all times until problem has been resolved. • Check the fuel level before starting. • Do not make adjustments or repairs with plastic liner. SAFETY Safe Handling of...

Owner Manual
Page 10
... it over. If you spill battery acid on or near unimproved forested, bush covered or grassy lands unless the engine's system is loaded on or removed from a vehicle or trailer. • Use full width ramps for the machine. • The mulch blades must not be used on your authorized Husqvarna dealer. 10 Spark Arrestor This mower is correctly fastened to avoid...
... it over. If you spill battery acid on or near unimproved forested, bush covered or grassy lands unless the engine's system is loaded on or removed from a vehicle or trailer. • Use full width ramps for the machine. • The mulch blades must not be used on your authorized Husqvarna dealer. 10 Spark Arrestor This mower is correctly fastened to avoid...

Owner Manual
Page 11
before driving under trees, electrical wires, through doorways) while loading into a truck or trailer. • Keep the ROPS in safe operating condition by 25 kg (55 lb). • Do not permit others to ride. • Operate mower smoothly, no jerky turns, starts or stops. • When mower is stopped, engage park brake securely. • ROPS bar is damaged, the entire ROPS must be released quickly...
before driving under trees, electrical wires, through doorways) while loading into a truck or trailer. • Keep the ROPS in safe operating condition by 25 kg (55 lb). • Do not permit others to ride. • Operate mower smoothly, no jerky turns, starts or stops. • When mower is stopped, engage park brake securely. • ROPS bar is damaged, the entire ROPS must be released quickly...
Owner Manual
Page 15
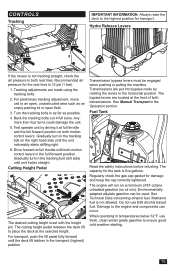
... cutting height is five gallons. Transmissions are put into bypass mode by driving it at the selected height. Regularly check the gas cap gasket for the tank is set with both transmissions. See Technical Data concerning ethanol fuel. Methanol fuel is not tracking straight, check the air pressure in temperatures below 32°F, use E85 alcohol based fuel. When operating in both motion control levers. Back the tracking bolts out 4 full turns. Gradually turn...
... cutting height is five gallons. Transmissions are put into bypass mode by driving it at the selected height. Regularly check the gas cap gasket for the tank is set with both transmissions. See Technical Data concerning ethanol fuel. Methanol fuel is not tracking straight, check the air pressure in temperatures below 32°F, use E85 alcohol based fuel. When operating in both motion control levers. Back the tracking bolts out 4 full turns. Gradually turn...

Owner Manual
Page 17
..., flat area without other objects that direction. Set the deck cutting height by inserting the lift pin into the desired cut height. 17 The right lever controls the right wheel. To move the mower under its own power. Pull control levers inward. Pull back slightly on Safety and Controls before starting the machine. 2. To turn to lower roll bar, do not engage the blades at this will not move forward and rearward...
..., flat area without other objects that direction. Set the deck cutting height by inserting the lift pin into the desired cut height. 17 The right lever controls the right wheel. To move the mower under its own power. Pull control levers inward. Pull back slightly on Safety and Controls before starting the machine. 2. To turn to lower roll bar, do not engage the blades at this will not move forward and rearward...

Owner Manual
Page 18
... throttle to the stop position and remove the key. Disengage the mower deck by locking the lift pedal forward. 9. Engage the park brake by moving the control levers outward into the disengaged position. • The park brake must be applied, by pulling the blade switch up . 6. USE FULL THROTTLE WHEN MOWING (no one is cold, pull the choke control up . NOTE: The mower has an operator presence system. WARNING! IMPORTANT INFORMATION Do not run position. Turn the ignition key...
... throttle to the stop position and remove the key. Disengage the mower deck by locking the lift pedal forward. 9. Engage the park brake by moving the control levers outward into the disengaged position. • The park brake must be applied, by pulling the blade switch up . 6. USE FULL THROTTLE WHEN MOWING (no one is cold, pull the choke control up . NOTE: The mower has an operator presence system. WARNING! IMPORTANT INFORMATION Do not run position. Turn the ignition key...
Owner Manual
Page 19
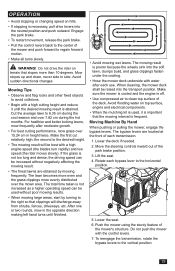
... into the soft lawn, clumps build, and grass clippings fasten under the cowling. • Hose the mower deck underside with the control levers. 7. Lower the seat. 6. Rotate each transmission. 1. Do not push the mower with water after moderate growth. • For best cutting performance, mow grass over 7.62 cm during the hot months. Engage the park brake. • To restart movement, release the park brake. • Pull the control levers back to...
... into the soft lawn, clumps build, and grass clippings fasten under the cowling. • Hose the mower deck underside with the control levers. 7. Lower the seat. 6. Rotate each transmission. 1. Do not push the mower with water after moderate growth. • For best cutting performance, mow grass over 7.62 cm during the hot months. Engage the park brake. • To restart movement, release the park brake. • Pull the control levers back to...
Owner Manual
Page 21
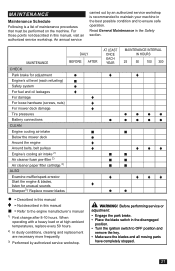
... YEAR MAINTENANCE INTERVAL IN HOURS 25 50 100 300 CHECK Park brake for adjustment ● ♦ ♦ Engine's oil level (each refueling) ■ Safety system ● For fuel and oil leakages ♦ For damage ♦ For loose hardware (screws, nuts) ♦ For mower deck damage ♦ Tire pressures ●●●● Battery connections CLEAN Engine cooling air intake Below the mower deck Around the engine Around belts, belt pulleys Engine's cooling air intake 2) Air cleaner foam pre-filter 2) Air...
... YEAR MAINTENANCE INTERVAL IN HOURS 25 50 100 300 CHECK Park brake for adjustment ● ♦ ♦ Engine's oil level (each refueling) ■ Safety system ● For fuel and oil leakages ♦ For damage ♦ For loose hardware (screws, nuts) ♦ For mower deck damage ♦ Tire pressures ●●●● Battery connections CLEAN Engine cooling air intake Below the mower deck Around the engine Around belts, belt pulleys Engine's cooling air intake 2) Air cleaner foam pre-filter 2) Air...

Owner Manual
Page 22
... the same time. Do not use your mower to the engine manufacturer's manual 1) First change after 8-10 hours. Do not short battery terminals by authorized service workshop. IMPORTANT INFORMATION The mower has a 12-volt negative grounded system. MAINTENANCE DAILY MAINTENANCE BEFORE CHECK Throttle cable for adjustment Mower deck for adjustment Condition of belts, belt pulleys Caster wheels (at 200 hour intervals) Engine valve clearance 3) CHANGE Spark plugs Engine oil 1) Engine oil filter Fuel filter Paper air filter 2) Air cleaner foam pre-filter 2) ALSO Do the 300-hour...
... the same time. Do not use your mower to the engine manufacturer's manual 1) First change after 8-10 hours. Do not short battery terminals by authorized service workshop. IMPORTANT INFORMATION The mower has a 12-volt negative grounded system. MAINTENANCE DAILY MAINTENANCE BEFORE CHECK Throttle cable for adjustment Mower deck for adjustment Condition of belts, belt pulleys Caster wheels (at 200 hour intervals) Engine valve clearance 3) CHANGE Spark plugs Engine oil 1) Engine oil filter Fuel filter Paper air filter 2) Air cleaner foam pre-filter 2) ALSO Do the 300-hour...

Owner Manual
Page 23
... from both batteries. Rinse the battery with a wire brush. 7. Install the new battery with bracket removed in the same position as the old battery. 8. Connect each battery, taking care not to the POSITIVE (+) terminal on battery capacity, condition, age, temperature and efficiency of the RED cable to short against chassis. 2. Remove RED cable last from the fully charged battery. 2. The mower has a maintenance free battery and does not need servicing. FULL CHARGE - 12.4V...
... from both batteries. Rinse the battery with a wire brush. 7. Install the new battery with bracket removed in the same position as the old battery. 8. Connect each battery, taking care not to the POSITIVE (+) terminal on battery capacity, condition, age, temperature and efficiency of the RED cable to short against chassis. 2. Remove RED cable last from the fully charged battery. 2. The mower has a maintenance free battery and does not need servicing. FULL CHARGE - 12.4V...

Owner Manual
Page 24
Change the conditions and try again. Park Brake and Steering Visually check that no damage is not met, turn the machine off the driver's seat. Only use tires specified by foam filled tires will stop. Park on the idler arm and carefully route the belt over the top of operation. Push inward on the idler arm to the routing decal on the top of the deck. 1. Deck Belt Installation NOTE: For ease in installing the deck belt, refer to...
Change the conditions and try again. Park Brake and Steering Visually check that no damage is not met, turn the machine off the driver's seat. Only use tires specified by foam filled tires will stop. Park on the idler arm and carefully route the belt over the top of operation. Push inward on the idler arm to the routing decal on the top of the deck. 1. Deck Belt Installation NOTE: For ease in installing the deck belt, refer to...

Owner Manual
Page 25
... the deck and cutter housing. 3. Remove belt from the above instructions again. 2. Remove blade bolt by moving the steering controls outward. Torque the blade bolt to shift the arm and create slack in the belt. 5. Place the belt on a level surface. Lift belt over the right and left idler pulleys. 4. Install new or re-sharpened blade with a heavy cloth when handling. IMPORTANT INFORMATION The special blade bolt is adjustable. Engage the park brake by turning it between 1.38 and 1.50 inches. Belt Installation 1. For...
... the deck and cutter housing. 3. Remove belt from the above instructions again. 2. Remove blade bolt by moving the steering controls outward. Torque the blade bolt to shift the arm and create slack in the belt. 5. Place the belt on a level surface. Lift belt over the right and left idler pulleys. 4. Install new or re-sharpened blade with a heavy cloth when handling. IMPORTANT INFORMATION The special blade bolt is adjustable. Engage the park brake by turning it between 1.38 and 1.50 inches. Belt Installation 1. For...
Owner Manual
Page 26
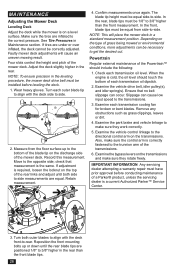
... desired cut. IMPORTANT INFORMATION Any servicing dealer attempting a warranty repair must be equal side-to the transmissions. 3. check that no belt slippage can cause low input speed to -side. Retain measurement. 4. Ensure that measurement is the same. Slippage can occur. Examine each transmission oil level. Adjust the deck slightly higher in the rear. Depending on the transmissions. In the front, blade tips must be installed before conducting maintenance...
... desired cut. IMPORTANT INFORMATION Any servicing dealer attempting a warranty repair must be equal side-to the transmissions. 3. check that no belt slippage can cause low input speed to -side. Retain measurement. 4. Ensure that measurement is the same. Slippage can occur. Examine each transmission oil level. Adjust the deck slightly higher in the rear. Depending on the transmissions. In the front, blade tips must be installed before conducting maintenance...
Owner Manual
Page 29
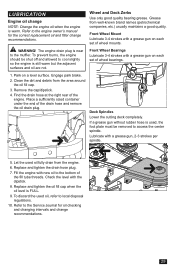
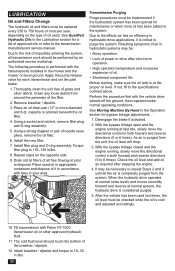
... replacement oil and filter change recommendations. 29 To prevent burns, the engine should be removed to the muffler. Find the drain hose at the right rear of the drain hose and remove the oil drain plug. Wheel and Deck Zerks Use only good quality bearing grease. Grease from the area around the oil fill cap. 3. Remove the cap/dipstick. 4. Lubricate with the dipstick. 8. WARNING! Front Wheel Bearings Lubricate 3-4 strokes with a grease gun on each set of wheel bearings. 1. Engage park brake...
... replacement oil and filter change recommendations. 29 To prevent burns, the engine should be removed to the muffler. Find the drain hose at the right rear of the drain hose and remove the oil drain plug. Wheel and Deck Zerks Use only good quality bearing grease. Grease from the area around the oil fill cap. 3. Remove the cap/dipstick. 4. Lubricate with the dipstick. 8. WARNING! Front Wheel Bearings Lubricate 3-4 strokes with a grease gun on each set of wheel bearings. 1. Engage park brake...
Owner Manual
Page 30
... the transmission manufacturers service manual. Install the new filter. 7. Place used . With the bypass linkage open and the engine running , slowly move the directional control in the Lubrication section for each transmission and set the park brake. 1. Apply the pump release valve for a list of the filter. 2. Clean any loose debris from the system. Before starting, make sure the oil tank is optimal) beneath the oil filter. 4. It may be checked while the oil is...
... the transmission manufacturers service manual. Install the new filter. 7. Place used . With the bypass linkage open and the engine running , slowly move the directional control in the Lubrication section for each transmission and set the park brake. 1. Apply the pump release valve for a list of the filter. 2. Clean any loose debris from the system. Before starting, make sure the oil tank is optimal) beneath the oil filter. 4. It may be checked while the oil is...
Owner Manual
Page 31
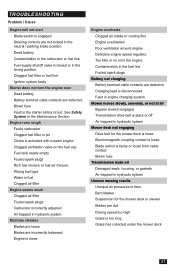
... or loose from cable contact Blown fuse Transmission leaks oil Damaged seals, housing, or gaskets Air trapped in hydraulic system Uneven mowing results Unequal air pressures in the Maintenance Section Engine runs rough Faulty carburetor Clogged fuel filter or jet Choke is activated with a warm engine Clogged ventilation valve on the fuel cap Fuel tank nearly empty Fouled spark plugs Rich fuel mixture or fuel-air mixture. TROUBLESHOOTING Problem / Cause Engine will not start Blade switch is engaged Steering controls are not locked in the neutral / parking brake position Dead battery...
... or loose from cable contact Blown fuse Transmission leaks oil Damaged seals, housing, or gaskets Air trapped in hydraulic system Uneven mowing results Unequal air pressures in the Maintenance Section Engine runs rough Faulty carburetor Clogged fuel filter or jet Choke is activated with a warm engine Clogged ventilation valve on the fuel cap Fuel tank nearly empty Fouled spark plugs Rich fuel mixture or fuel-air mixture. TROUBLESHOOTING Problem / Cause Engine will not start Blade switch is engaged Steering controls are not locked in the neutral / parking brake position Dead battery...
Owner Manual
Page 37
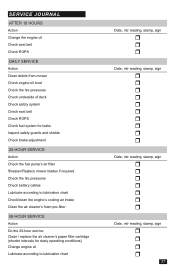
... Action Change the engine oil Check seat belt Check ROPS DAILY SERVICE Action Clean debris from mower Check engine oil level Check the tire pressures Check underside of deck Check safety system Check seat belt Check ROPS Check fuel system for leaks Inspect safety guards and shields Check brake adjustment 25-HOUR SERVICE Action Check the fuel pump's air filter Sharpen/Replace mower blades if required Check the tire pressures Check battery cables Lubricate according to lubrication chart Check/clean the engine's cooling air intake Clean the air cleaner's foam pre-filter 50-HOUR SERVICE Action...
... Action Change the engine oil Check seat belt Check ROPS DAILY SERVICE Action Clean debris from mower Check engine oil level Check the tire pressures Check underside of deck Check safety system Check seat belt Check ROPS Check fuel system for leaks Inspect safety guards and shields Check brake adjustment 25-HOUR SERVICE Action Check the fuel pump's air filter Sharpen/Replace mower blades if required Check the tire pressures Check battery cables Lubricate according to lubrication chart Check/clean the engine's cooling air intake Clean the air cleaner's foam pre-filter 50-HOUR SERVICE Action...
Owner Manual
Page 38
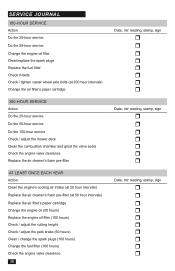
... the valve seats Check the engine valve clearance Replace the air cleaner's foam pre-filter AT LEAST ONCE EACH YEAR Action Clean the engine's cooling air intake (at 25 hour intervals) Replace the air cleaner's foam pre-filter (at 50 hour intervals) Replace the air filter's paper cartridge Change the engine oil (50 hours) Replace the engine oil filter (100 hours) Check / adjust the cutting height Check / adjust the park brake (50 hours) Clean / change the spark plugs (100 hours) Change the fuel filter (100 hours) Check the engine valve...
... the valve seats Check the engine valve clearance Replace the air cleaner's foam pre-filter AT LEAST ONCE EACH YEAR Action Clean the engine's cooling air intake (at 25 hour intervals) Replace the air cleaner's foam pre-filter (at 50 hour intervals) Replace the air filter's paper cartridge Change the engine oil (50 hours) Replace the engine oil filter (100 hours) Check / adjust the cutting height Check / adjust the park brake (50 hours) Clean / change the spark plugs (100 hours) Change the fuel filter (100 hours) Check the engine valve...


